1
Service Manual For
CHERY QQ6
(Body Accessories and Dimensions)
After Sales Service Department of Chery
Automobile Sales Co., Ltd

2
TABLE OF CONTENTS
Chapter 1 Engine Hood and Luggage Compartment........................................................................8
I. Removal of Engine Hood......................................................................................................8
1. Preparation....................................................................................................................8
2. Precautions....................................................................................................................8
3. Disassembly/Reassembly of engine hood accessories..................................................8
3.1. Removal Step.....................................................................................................8
3.2. Installation Step..................................................................................................8
Disassembly and adjustment of the engine hood assy.......................................................9
Disassembly and assembly of air intake grille assy..........................................................9
5.1. Removal Step.....................................................................................................9
5.2. Installation Step..................................................................................................9
Adjustment and assembly of the engine hood lock.........................................................10
6.1. Removal Step...................................................................................................10
6.2. Installation of engine hood lock.......................................................................10
7. Removal of hood lock control cable...........................................................................10
7.1. Removal Step...................................................................................................10
7.2. Installation Step................................................................................................12
II. Disassembly/Reassembly of rear boot lid..........................................................................12
1. Preparation..................................................................................................................12
2. Removal of Trunk Lid Ornament Plate.......................................................................12
2.1. Removal Step...................................................................................................12
2.2. Installation Step................................................................................................12
3. Installation of luggage boot lock.................................................................................12
3.1. Removal Step...................................................................................................12
3.2. Installation Step................................................................................................13
4. Removal of license plate lamp....................................................................................13
4.1. Removal Step...................................................................................................13
4.2. Installation Step................................................................................................14
Chapter 2 Disassembly/Reassembly of Interior Decorations.......................................................15
I. Disassembly/Reassembly of Seat Belt.................................................................................15
1. Preparation..................................................................................................................15
2. Precautions..................................................................................................................15
3. Removal Step (Driver’s seat belt is taken as an example)..........................................15
4. Installation Step...........................................................................................................17
II. Disassembly/Reassembly of Seat.......................................................................................18
1. Front passenger seat removal step..............................................................................18
2. Rear passenger seat removal step................................................................................18
3. Installation Step...........................................................................................................20
III. Disassembly/Reassembly of Console...............................................................................20
1. Removal Step..............................................................................................................20
2. Installation Step...........................................................................................................21

3
IV. Disassembly/Reassembly of Carpet..................................................................................22
1. Removal Step..............................................................................................................22
2. Installation Step...........................................................................................................22
V. Removal of Cushion Pad....................................................................................................23
1. Removal Step..............................................................................................................23
2. Installation Step...........................................................................................................24
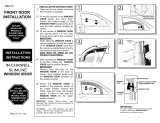
Chapter 3 Removal and Maintenance of Door.............................................................................25
I. Disassembly/Reassembly and Maitenance of Front Door...................................................25
1. System Composition Diagram....................................................................................25
2. Preparation..................................................................................................................26
3. Precautions..................................................................................................................26
4. Disassembly/Reassembly Step....................................................................................26
5. Installation and Adjustment Step................................................................................33
II. Disassembly/Reassembly and Maintenance of Rear Door.................................................34
1. Preparation..................................................................................................................34
2. Precautions..................................................................................................................34
3. Removal Step..............................................................................................................34
4. Installation and Adjustment Step................................................................................40
Chapter 4 Disassembly/Reassembly and Maintenance of Front/Rear Bumper............................41
Disassembly/Reassembly and Maintenance of Front Bumper................................................41
1. System Composition Diagram....................................................................................41
2. Preparation..................................................................................................................41
3. Precautions..................................................................................................................41
4. Removal Step..............................................................................................................42
5. Installation and Maintenance......................................................................................44
Disassembly/Reassembly and Maintenance of Rear Bumper.................................................45
1. System Composition Diagram....................................................................................45
2. Preparation..................................................................................................................45
3. Precautions..................................................................................................................45
4. Removal Step..............................................................................................................46
5. Installation Step...........................................................................................................47
Chapter 5 Disassembly/Reassembly and Maintenance of Headlamp and Fog Lamp..................48
1. System Composition Diagram....................................................................................48
2. Preparation..................................................................................................................49
3. Precautions..................................................................................................................49
4. Removal Step of Headlamp........................................................................................49
5. Removal of Fog Lamp................................................................................................52
6. Installation and Adjustment of Headlamp...................................................................53
6.1. headlamp Installation Step...............................................................................53
6.2. Introduction to headlamp function...................................................................53
6.2.1. Front view.............................................................................................53
6.2.2. Back view..............................................................................................53
6.3. Adjustment of headlamp light..........................................................................53
7. Tail Lamp Removal Step.............................................................................................55

4
Chapter 6 Disassembly/Reassembly of Ceiling...........................................................................56
1. Preparation..........................................................................................................................56
2. Precautions..........................................................................................................................56
3. Disassembly/Reassembly of Sun Visor...............................................................................56
3.1. Removal Step...........................................................................................................56
3.2. Installation Step........................................................................................................56
4. Disassembly/Reassembly of Roof Hand-Hold....................................................................57
4.1. Removal Step...........................................................................................................57
4.2. Installation Step........................................................................................................57
5. Disassembly/Reassembly of Front Ceiling Lamp...............................................................57
5.1. Removal Step...........................................................................................................57
5.2. Installation Step........................................................................................................58
6. Disassembly/Reassembly of A Pillar Trim..........................................................................58
6.1. Removal Step...........................................................................................................58
6.2. Installation Step........................................................................................................58
7. Disassembly/Reassembly of B Pillar Trim.........................................................................58
7.1. Removal Step...........................................................................................................58
7.2. Installation Step........................................................................................................59
8. Disassembly/Reassembly of C Pillar Trim.........................................................................59
8.1. Removal Step...........................................................................................................59
8.2. Installation Step........................................................................................................59
9. Disassembly/Reassembly of Ceiling...................................................................................59
9.1. Removal Step...........................................................................................................59
9.2. Installation Step........................................................................................................60
Chapter 7 Disassembly/Reassembly of Instrument Panel............................................................61
I. Removal of Instrument Panel Accessories..........................................................................61
1. Preparation..................................................................................................................61
2. Disassembly/Reassembly of Central Console Panel, Audio Unit, Emergency Switch,
A/C Control Switch, Ashtray..........................................................................................61
2.1. Removal Step...................................................................................................61
2.2. Installation Step................................................................................................62
3. Disassembly/Reassembly of Front Ashtray................................................................62
3.1. Removal Step...................................................................................................62
3.2. Installation Step................................................................................................63
4. Disassembly/Reassembly of Glove Case....................................................................63
4.1. Removal Step...................................................................................................63
4.2. Installation Step................................................................................................63
5. combination instrument Disassembly/Reassembly of..............................................63
5.1. Removal Step...................................................................................................63
5.2. Installation Step................................................................................................64
6. Disassembly/Reassembly of Combination Switch, Wiper Switch, Ignition Switch,
Heliax Cable...................................................................................................................64
II. Removal of Instrument Panel..........................................................................................65
1. Disassembly/Reassembly of Instrument Panel........................................................65

5
1.1. Removal Step...................................................................................................65
1.2. Installation Step................................................................................................67
2. Removal of Instrument Panel cross beam.............................................................68
2.1. Removal Step...................................................................................................68
2.2. Installation Step................................................................................................70
Chapter 8 Air Conditioning (A/C) System..................................................................................71
I. System Composition............................................................................................................71
II. Removal of Evaporator Assy..............................................................................................71
1. Preparation..................................................................................................................71
2. Disassembly/Reassembly Step....................................................................................71
3. Installation of Evaporator Assy...................................................................................73
4. Disassembly/Reassembly of Evaporator Interior........................................................73
4.1. Removal Step...................................................................................................73
4.2. Installation Step................................................................................................78
III. Troubleshooting................................................................................................................78
Chapter 9 Body Dimension..........................................................................................................80
I. Chassis Control Point..........................................................................................................80
II. Body Assembly Dimension................................................................................................83
1. Front View..................................................................................................................83
2. Rear View....................................................................................................................86
3. Left View....................................................................................................................90
4. Top View...................................................................................................................104
III. Dimension of Engine Compartment...............................................................................110
Windscreen Dimension.........................................................................................................111
V. Dimension of Opening of Each Part.................................................................................112
Chapter 10 Wire Harness...........................................................................................................113
Section 1 Battery Negative Electrode Harness..................................................................113
I. Schematic Diagram of Harness.................................................................................113
II. Main Connectors Description...................................................................................113
III. Disassembly/Reassembly of Battery Harness.........................................................113
(I). Preparation......................................................................................................113
(II). Precautions.....................................................................................................113
(III). Removal Procedure......................................................................................113
Section 2 Engine Compartment Harness.........................................................................115
I. Schematic Diagram of Harness.................................................................................115
II. Main Connectors Description...................................................................................116
III. Disassembly/Reassembly of Engine Compartment Harness................................117
(I). Preparation......................................................................................................117
(II). Precautions:...................................................................................................117
(III). Removal Procedure......................................................................................117
Section 3 Electronic Injector Harness................................................................................125
I. Schematic Diagram of Harness.................................................................................125
II. Main Connectors Description...................................................................................126
III. Disassembly/Reassembly of Engine Harness.........................................................127

6
(I). Preparation......................................................................................................127
(II). Precautions.....................................................................................................127
(III). Removal Procedure......................................................................................127
Section 4 Interior Harness................................................................................................133
I. Schematic Diagram of Harness.................................................................................133
II. Main Connectors Description...................................................................................134
III. Disassembly/Reassembly of Interior Floor Harness...............................................135
(I). Preparation......................................................................................................135
(II). Precautions.....................................................................................................135
(III). Removal Procedure......................................................................................135
Section 5 Instrument Harness Assy..................................................................................142
I. Schematic Diagram of Harness.................................................................................142
II. Definition of Main Connectors.................................................................................143
III. Disassembly/Reassembly of Instrument Harness................................................150
(I). Preparation......................................................................................................150
(II). Precautions.....................................................................................................150
(III). Removal Procedure......................................................................................150
Section 6 Evaporator Harness............................................................................................152
I. Schematic Diagram of Harness.................................................................................152
II. Definition of Main Connectors.................................................................................152
III. Disassembly/Reassembly of Evaporator Harness...................................................153
(I). Preparation......................................................................................................153
(II). Precautions.....................................................................................................153
(III). Removal Procedure......................................................................................153
Section 7 Front Left Door Harness....................................................................................155
I. Schematic Diagram of Harness.................................................................................155
II. Main Connectors Description...................................................................................156
III. Disassembly/Reassembly of Front Left Door Inner Harness..................................157
(I). Preparation......................................................................................................157
(二) , Precautions..................................................................................................157
(III). Removal Procedure......................................................................................157
Section 8 Front Right Door Harness..................................................................................159
I. Schematic Diagram of Harness.................................................................................159
II. Main Connectors Description...................................................................................160
III. Disassembly/Reassembly of Front Right Door Inner Harness................................160
1. Removal Step....................................................................................................160
2. Installation Step.................................................................................................160
Section 9 Rear Door Harness.............................................................................................161
I. Schematic Diagram of Harness.................................................................................161
II. Main Connectors Description...................................................................................162
III. Disassembly/Reassembly of Rear Left Door Inner Harness...................................163
(I). Preparation......................................................................................................163
(II). Precautions.....................................................................................................163
(III). Removal Procedure......................................................................................163

7
IV. Disassembly/Reassembly of Rear Right Door Inner Harness.................................164
Section 10 Back Door Harness..........................................................................................165
I. Schematic Diagram of Harness.................................................................................165
II. Main Connectors Description...................................................................................166
III. Disassembly/Reassembly of Back Door Inner Harness..........................................167
(I). Preparation......................................................................................................167
(II). Precautions.....................................................................................................167
(III). Removal Procedure......................................................................................167
Section 11 Defroster Harness.............................................................................................170
I. Schematic Diagram of Defroster Positive Harness....................................................170
II. Schematic Diagram of Defroster Negative Harness.................................................170
III. Main Connectors Description.................................................................................170
IV. Disassembly/Reassembly of Rear Defroster Harness.............................................171
(I). Preparation......................................................................................................171
(II). Precautions.....................................................................................................171
(III). Removal Procedure......................................................................................171

8
Chapter 1 Engine Hood and Luggage Compartment
I. Removal of Engine Hood
1. Preparation
Tool: flat head screwdriver, pliers, wrench
2. Precautions
2.1. During the removal, pay more attention to
the application of appropriate strength.
No rude operation.
2.2. During the removal/reassembly of trim,
especially pay more attention to the protection
of surface ornaments so that any ornament may
not be damaged.
3. Disassembly/Reassembly of engine
hood accessories
3.1. Removal Step
3.1.1. Remove the clip from the heat insulation
washers (19 pcs in total) with a flat head
screwdriver, and detach the heat shield from the
engine compartment.
3.1.2. Pull off the washing liquid hose.
3.1.3. Detach two water spray nozzle clips from
the bottom of engine hood, push the nozzle
from the bottom of engine hood, and take out
the nozzle from the outside.
3.2. Installation Step
The installing steps are reverse to those for
removal.

9
4. Disassembly and adjustment of the
engine hood assy.
Preparation of tool(s): 13# wrench
4.1. Take off four adjusting bolts from engine
hood. And remove the engine hood.
At the same time, unscrew four adjusting bolts
to adjust the front/rear position and right/left
position of the engine hood.
4.2. Installation of engine hood assy.:
The installing steps are reverse to those for
removal.
Installation torque is 30±1Nm
5. Disassembly and assembly of air
intake grille assy.
Preparation of tool(s): cross screwdriver, socket
wrench
5.1. Removal Step
5.1.1. Open the engine hood by hand.
5.1.2. Use a cross screwdriver to remove the fix
screw from the intake grille.
5.1.3. Utilize a socket wrench to remove the
fixing bolts from the intake grille.
5.1.4. Detach the intake grille.
5.2. Installation Step
The installing steps are reverse to those for
removal.
Installation torque is 5±1Nm

10
6. Adjustment and assembly of the
engine hood lock
Preparation of tool(s): 10# wrench
6.1. Removal Step
6.1.1. Unscrew three centering bolts from the
engine hood, and then remove the engine hood
lock.
Also unscrew these three bolts to adjust the
position of engine hood lock.
Torque: 9±1 Nm
6.1.2. Remove the lock cable of front engine
hood from engine hood lock assy.
6.2. Installation of engine hood lock
The installing steps are reverse to those for
removal.
Installation torque is 9±1Nm
7. Removal of hood lock control cable
Preparation of tool(s): 8# wrench, 10# wrench,
flat head screwdriver
7.1. Removal Step
7.1.1. Open the engine hood inside the driver’s
cab, and remove two fixing bolts from the
handle.
Installation torque is 9±1Nm
7.1.2. Remove the front hood cable from the
hood.

11
7.1.3. Remove the hood lock and detach the
engine hood lock control cable from the hood
lock assy..
7.1.4. Remove three clips used to fix the control
cable by hand or with a flat head screwdriver.
7.1.5. Draw out the control cable from the
engine compartment.

12
7.2. Installation Step
The installing steps are reverse to those for
removal.
CAUTION: In case of installation, the groove
on control cable shall be inserted into the pull
groove; the control cable penerates into driver’s
cab through the engine compartment, and shall
passes through a small hole and then enters into
the cab, as shown in the figure.
II. Disassembly/Reassembly of
rear boot lid
1. Preparation
Tools: Flat head and cross screwdriver, socket
wrench, open-end wrench
Materials: clip
2. Removal of Trunk Lid Ornament
Plate
2.1. Removal Step
2.1.1. Remove the screws from the fixed
luggage boot internal guard plate with a cross
screwdriver.
2.1.2. Remove the disposable clips from the
fixed luggage boot internal guard plate with a
flat head screwdriver, and then remove the
luggage boot internal guard plate.
2.2. Installation Step
The installing steps are reverse to those for
removal.
3. Installation of luggage boot lock
3.1. Removal Step
Preparation of tool(s): 10# wrench
3.1.1. Detach the connectors of the luggage
boot lock body motor.
Small hole

13
3.1.2. Detach two locating bolts from the
luggage boot lock (the installation torque is 9±1
Nm)
3.1.3. Remove the luggage boot lock core.
3.1.4. Remove two fixing bolts from the trunk
(i.e. luggage boot) lock body with a socket
wrench.
3.1.5. Take off the trunk lock body.
3.2. Installation Step
The installing steps are reverse to those for
removal.
Precautions on installation of luggage boot
lock: check whether the lock column is
deformed, whether the riveted connections are
in its proper positions, and whether the lock
tongue can open or close flexibly, smoothly.
4. Removal of license plate lamp
Preparation of tool(s): cross screwdriver,
open-end wrench.
4.1. Removal Step
4.1.1. Remove the trunk internal ornament plate
(see Removal of trunk lid ornament plate)
4.1.2. Remove two fixing bolts from the license
plate lamp with an open-end wrench.

14
4.1.3. Disconnet the connecting plugs from the
right and left license plate lamps and then take
off the license plate lamp assy.
4.1.4. Remove two fix screws from the license
plate lamp with a cross screwdriver.
4.1.5. Take off the license plate lamp
4.1.6. Take off the bulb from the license plate
lamp.
4.2. Installation Step
The installing steps are reverse to those for
removal.

15
Chapter 2 Disassembly/Reassembly of Interior Decorations
I. Disassembly/Reassembly of
Seat Belt
1. Preparation
Tools: flat head screwdriver, wrench, sleeve.
Parts: disposable clips.
2. Precautions
Keep the seat belt clean, avoid the oil stain, and
check whether the seat belt is damaged.
3. Removal Step (Driver’s seat belt is
taken as an example)
Prize the front threshold pressing plate
carefully with a flat head screwdriver.
3.2. Remove the weatherproof rubber strip of
the front door opening.
3.3. Remove the rear scuff plate.

16
3.4. Remove the weatherproof rubber strip of
the rear door opening.
3.5. Remove the seat belt lower ornament
cover.
3.6. Unscrew the fixing nuts with a 17# sleeve,
and detach the B pillar lower trim.
Installation torque is 50±5Nm
3.7. Unclench the ornament cover on the seat
belt regulator with a flat head screwdriver.
CAUTION: Pay attention to the breakage of
clip inside the regulator.
3.8. Loosen the fixing nuts with a 17# sleeve,
and then take off the seat belt.
Installation torque is 50±5Nm

17
3.9. Unclench the B pillar trim with a
right-angled screwdriver.
3.10. Take off the B pillar trim.
3.11. Remove the fix screws from the seat belt
with a cross screwdriver.
3.12. Loosen the fixing nuts with a 17# sleeve,
and then take off the seat belt.
4. Installation Step
The installing steps are reverse to those for
removal.
Note:
4.1. Keep the seat belt clean, avoid the oil stain,
and check whether the seat belt is damaged.
4.2. The pillar trim shall securely fit with the
body, without any loose symptoms; and the
trim shall fit well with the ceiling and rubber
strip.
4.3. The seat belt adjusting slide baffle on the B
pillar upper trim shall move freely, without any
influence on the adjustment of seat belt, and the
fit clearance of lower trim shall be even and
below 1mm;
4.4. The fit clearance between B pillar low trim
and front/rear scuff plate shall be even and less
than 1mm;

18
II. Disassembly/Reassembly of
Seat
Tool: 16# sleeve
1. Front passenger seat removal step
1.1. Pull the moveable handle under the left
seat to move the left seat backwards and reveal
the fixing bolts under the seat.
1.2. Remove two fixing bolts before the seat.
by sleeve
1.3. Turn the moveable handle and pull
forwards the seat, and expose two fixing bolts
on the rear of seat.
1.4 Disassemble two fixing bolts at the back
of seat with sleeve.
1.5 Pull off the inserter under seat and take
away the seat.
2. Rear passenger seat removal step
2.1 Lift up the rear passenger seat cushion by
hand, and then take out the cushion from the
clips of chassis and body.
2.2. Directly take out the seat cushion by both
hands.

19
2.3. Loosen the front fixing bolts at the right
side of rear right seat with an open-end wrench.
2.4. Loosen the front fixing bolts at the left
side of rear right seat with an open-end wrench.
2.5. Pull up the ring-pull of rear right seat,
and lay down the seat forwards.
2.6. Loosen the rear fixing bolts at the right side
of rear right seat with an open-end wrench.
2.7. Loosen the rear fixing bolts at the left side
of rear right seat with an open-end wrench, and
then remove the rear right seat.

20
2.8. Loosen the front fixing bolts of rear right
seat with a open-end wrench.
2.9. Pull up the ring-pull of rear left seat, and
lay down the seat forwards.
3.0. Loosen the rear fixing bolt of rear left seat
with a sleeve, and then remove the rear left
seat.
3. Installation Step
The installing steps are reverse to those for
removal.
Installation torque is 25±3Nm
III. Disassembly/Reassembly of
Console
Tool: cross head screwdriver
1. Removal Step
1.1. Remove each two bolts at left and right
sides with a cross screwdriver, these bolts of
which are used to joint the console and front
lower guard plate.
(The tightening torque is 2±0.5N.m)
Page is loading ...
Page is loading ...
Page is loading ...
Page is loading ...
Page is loading ...
Page is loading ...
Page is loading ...
Page is loading ...
Page is loading ...
Page is loading ...
Page is loading ...
Page is loading ...
Page is loading ...
Page is loading ...
Page is loading ...
Page is loading ...
Page is loading ...
Page is loading ...
Page is loading ...
Page is loading ...
Page is loading ...
Page is loading ...
Page is loading ...
Page is loading ...
Page is loading ...
Page is loading ...
Page is loading ...
Page is loading ...
Page is loading ...
Page is loading ...
Page is loading ...
Page is loading ...
Page is loading ...
Page is loading ...
Page is loading ...
Page is loading ...
Page is loading ...
Page is loading ...
Page is loading ...
Page is loading ...
Page is loading ...
Page is loading ...
Page is loading ...
Page is loading ...
Page is loading ...
Page is loading ...
Page is loading ...
Page is loading ...
Page is loading ...
Page is loading ...
Page is loading ...
Page is loading ...
Page is loading ...
Page is loading ...
Page is loading ...
Page is loading ...
Page is loading ...
Page is loading ...
Page is loading ...
Page is loading ...
Page is loading ...
Page is loading ...
Page is loading ...
Page is loading ...
Page is loading ...
Page is loading ...
Page is loading ...
Page is loading ...
Page is loading ...
Page is loading ...
Page is loading ...
Page is loading ...
Page is loading ...
Page is loading ...
Page is loading ...
Page is loading ...
Page is loading ...
Page is loading ...
Page is loading ...
Page is loading ...
Page is loading ...
Page is loading ...
Page is loading ...
Page is loading ...
Page is loading ...
Page is loading ...
Page is loading ...
Page is loading ...
Page is loading ...
Page is loading ...
Page is loading ...
Page is loading ...
Page is loading ...
Page is loading ...
Page is loading ...
Page is loading ...
Page is loading ...
Page is loading ...
Page is loading ...
Page is loading ...
Page is loading ...
Page is loading ...
Page is loading ...
Page is loading ...
Page is loading ...
Page is loading ...
Page is loading ...
Page is loading ...
Page is loading ...
Page is loading ...
Page is loading ...
Page is loading ...
Page is loading ...
Page is loading ...
Page is loading ...
Page is loading ...
Page is loading ...
Page is loading ...
Page is loading ...
Page is loading ...
Page is loading ...
Page is loading ...
Page is loading ...
Page is loading ...
Page is loading ...
Page is loading ...
Page is loading ...
Page is loading ...
Page is loading ...
Page is loading ...
Page is loading ...
Page is loading ...
Page is loading ...
Page is loading ...
Page is loading ...
Page is loading ...
Page is loading ...
Page is loading ...
Page is loading ...
Page is loading ...
Page is loading ...
Page is loading ...
Page is loading ...
Page is loading ...
Page is loading ...
Page is loading ...
Page is loading ...
Page is loading ...
Page is loading ...
Page is loading ...
Page is loading ...
/