Page is loading ...

CRD-39
Please read this manual before use
ROBERTS
Sound for Generations
FM RDS/DAB digital radio
with

Controls ........................................................................... 2-4
Mains operation ...................................................................5
Operating your radio - DAB .................................................6
Selecting a station - DAB ....................................................7
Secondary services - DAB ..................................................8
Display modes - DAB ..........................................................8
Finding new stations - DAB .................................................9
Autoselect - DAB .................................................................9
Manual tuning - DAB .........................................................10
Signal strength display - DAB ............................................10
Using your radio's Pauseplus feature ...........................11-12
Operating your radio - FM .................................................13
Manual tuning - FM ...........................................................14
Display modes - FM...........................................................15
FM stereo/mono ................................................................15
Presetting stations - DAB and FM .....................................16
Recalling a preset station - DAB and FM ..........................16
System reset .....................................................................17
Classic FM button ..............................................................18
Software version ................................................................18
Sleep function ....................................................................19
Alarm display .....................................................................20
Contents
Alarm/timers ................................................................ 21-24
Snooze function .................................................................25
Cancelling alarms ..............................................................25
Auto Dimmer......................................................................25
Connecting to an external amplifi er or recorder ................26
Recording from your radio .................................................26
Clock display .....................................................................27
Display backlight ...............................................................27
Headphone socket ............................................................27
Line in socket ....................................................................28
Optical output socket .........................................................28
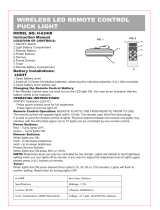
Remote control ..................................................................29
Remote handset battery replacement ...............................30
Using the remote control ...................................................31
General ..............................................................................32
Specifi cations ....................................................................32
Circuit features ..................................................................32
Mains Supply .....................................................................33
Guarantee .........................................................................34
1

If you need any further advice, please call our Technical Helpline on :-
020 8758 0338 (Mon-Fri)
2
Controls
1. Headphone socket
2. Loudspeakers
3. LCD display
4. On/Off button
5. FM/DAB band button
(Front)
23
4
2
56 7 89
6. Select/Real time button
7. Infra red sensor
8. Classic FM button
9.
button
1

3
Controls
10. Treble control
11. Volume control
12. Sleep button
13. Station preset buttons
14. Snooze button
15. Select/Real time button
16. Auto dimmer
17. Tuning control
18. Bass control
19. Info button
20. Auto tune button
21. Alarm button
(Top)
11
13 15
18
10
1412 16 17
192021

If you need any further advice, please call our Technical Helpline on :-
020 8758 0338 (Mon-Fri)
4
Controls
(Rear)
22. Wire DAB/FM aerial
23. Mains input socket
24. Optical output socket (toslink)
25. Line in socket
25
24
22 23

Mains operation
1. Place your radio on a fl at surface.
2. Plug the mains lead into the Socket located on the rear of your radio
ensuring that the plug is pushed fully into the socket.
3. Plug the other end of the mains lead into a wall socket and switch on
the wall socket.
• The unit remains connected to the mains even when it is switched
off. The unit is only isolated from the mains if the mains plug is
removed from the wall socket.
5

If you need any further advice, please call our Technical Helpline on :-
020 8758 0338 (Mon-Fri)
Operating your radio - DAB
1. The Wire aerial located on the rear of your radio is for DAB/FM recep-
tion. The wire should be fully extended and positioned for optimum
reception.
2. Press the On/Off button to switch on your radio. The display will
show "Roberts DAB digital radio" for a few seconds.
3. If this is the fi rst time the radio is used a quick scan of UK Band III
DAB channels will be carried out. The display will show "Autotune
Quick scan". If the radio has been used before the last used station
will be selected.
4. During Autotune as each group of stations is detected the bottom line
of the display will show its name and the station count will be updated.
The top line of the display shows a bargraph indicating progress of
the Autotune.
5. When the Auto tune is complete the fi rst station (in numeric-alpha
order 0...9...A....Z) will be selected.
6. If the station list is still empty after the Autotune your radio will display
"No Signal".
7. If no signals are found it may be necessary to relocate your radio to
a position giving better reception.
2
6

7
Selecting a station - DAB
1. The top line of the display shows the name of the station currently
selected.
2. Rotate the Tuning control to scroll through the list of available sta-
tions. Stop rotating the Tuning control when you fi nd the station that
you wish to hear.
3. Press the Select/Real time button to select the station. The display
may show "Tuning" while your radio fi nds the new station.
4. Adjust the Volume, bass and treble controls to the required
settings.
Note: If after selecting a station the display continues to show "Not
Available" it may be necessary to relocate your radio to a position
giving better reception.
2
3
4
4
4

If you need any further advice, please call our Technical Helpline on :-
020 8758 0338 (Mon-Fri)
8
Display modes - DAB
Your radio has six display modes:-
1. Press the Info button to cycle through the various modes.
a. Scrolling text Displays scrolling text messages such
as artist/track name, phone in number,
etc.
b. Programme type Displays type of station being listened to
e.g. Pop, Classic, News, etc.
c. Multiplex Name Displays name of multiplex to which
current station belongs.
d. Signal strength Displays signal strength for station being
listened to.
e. Time and date Displays current time and date.
f. Maximum delay Displays maximum time that the
current station can be delayed when
using pauseplus
Secondary services - DAB
1. Certain radio stations have one or more secondary services associated
with them. If a station has a secondary service associated with it the
display will show ">" next to the station name on the station list. The
secondary service will then appear immediately after the primary
service as you rotate the tuning control clockwise.
a
b
c
d
e
1
f

9
Finding new stations - DAB
As time passes new stations may become available. To fi nd new stations
proceed as follows:-
1. Press and release the AutoTune button, the display will show "Au-
totune Quick Scan". Your radio will perform a scan of the UK DAB
frequencies. As new stations are found the station counter on the
right-hand side of the display will increase and stations will be added
to the list.
2. To carry out a full scan of the entire DAB Band III frequencies press
and hold down the AutoTune button for more than 2 seconds and then
release. The display will show "Autotune Full scan". As new stations
are found the station counter on the right-hand side of the display will
increase and stations will be added to the list.
Autoselect - DAB
As an alternative to rotating the tuning control to select a station your radio
can be set so as to automatically select a station.
1. Rotate the Tuning control to scroll through the list of available sta-
tions.
2. Immediately press and hold in the Select/Real time button for 2
seconds until the display shows "Autoselect ON".
3. Rotate the Tuning control until the station you require is visible on
the display, after a few seconds your radio will automatically select
the station shown on the display.
4. To switch off Autoselect rotate the Tuning control to scroll through
the list and immediately press and hold in the Select/Real time button
until the display shows "Autoselect OFF".
1
2
1,3
2,4

If you need any further advice, please call our Technical Helpline on :-
020 8758 0338 (Mon-Fri)
10
Manual Tuning - DAB
Manual tuning allows you to tune directly to the various DAB Band III
channels. UK DAB stations located in the range 11B to 12D.
1. Press and hold in the Select/Real time button until the display shows
"Manual tune".
2. Rotate the Tuning control to select the required DAB channel.
3. Press and release the Select/Real time button to select the chan-
nel.
4. Rotate the Tuning control to select the stations contained within the
Multiplex for the selected DAB channel.
5. Press and release the Select/Real time button to return to normal
tuning mode.
Signal strength display - DAB
1. Repeatedly press and release the Info button until the lower line of
the display shows signal strength.
2. Position your radio and the wire aerial for best reception using the signal
strength display as a guide. Move your radio around and position so
as to give maximum number of black rectangles on signal strength
display.
3. The clear unfi lled rectangle indicates minimum signal level required
for satisfactory reception.
1
2,4
1,3,5

11
Using your radio's Pauseplus feature
How many times has your favourite radio station been interrupted by
that phone call from a double glazing fi rm or someone selling that must
have item? Sound familiar? Now with a single press of the
button you can put your favourite station on hold while you answer that
important call. After the call or other important task is fi nished simply
press the button to return to your favourite station exactly
where you left off so that you never miss a single word.
Radio stations can effectively be put on hold for typically 15 minutes
but can be up to 35 minutes depending on the station you are listening
to.
Note the
feature only operates on the DAB
waveband.
1. To place your radio in mode simply press the
button, the sound from the loudspeaker will be muted. The display
will alternate between PAUSE and the time which the radio station
has been on Pause.
2. To return to the radio station that you were listening to simply press
the
button and your radio will continue playing from where
you left off. The display will alternate between DELAY and the amount
by which you are behind real time.
3. When using your radio's
feature the lower line of display
automatically switches to show the Maximum delay time for the station
you are listening to.
4. To return to real time press in and release the Select/Real time but-
ton, the display will return to show DAB in right hand corner.
1
2
4

If you need any further advice, please call our Technical Helpline on :-
020 8758 0338 (Mon-Fri)
12
1
1
Pauseplus continued
1. Your radio’s feature is continuiously working silently in
the background even when your radio is in Standby mode so, say for
example, you want to hear a news item again switch on your radio
using the On/off button and press button twice, use the
Tuning control to scroll back to the item you wish to listen. The display
will show the amount of time you have scrolled back.
Note when your radio is in standby the
memory will
continuiously store up to 35 minutes of the last station listened
to.
2. When using your radio's
feature the lower line of display
automatically switches to show the Maximum delay time for the station
you are listening to.

Operating your radio - FM
1. The Wire aerial located on the rear of your radio is for DAB/FM recep-
tion. The wire should be fully extended and positioned for optimum
reception.
2. Press the On/Off button to switch on your radio. The display will show
"Roberts DAB digital radio" for a few seconds.
3. Press the FM/DAB Band button to select the FM band.
4. Press and immediately release the Auto Tune button, your radio will
scan in an upwards direction (low frequency to high frequency) and
stop automatically when it fi nds a station of suffi cient strength.
5. After a few seconds the display will update and show station name.
6. To fi nd other stations press and release the AutoTune button as
before.
7. To scan the FM band in a downwards direction (high frequency to low
frequency) press and hold down the AutoTune button for 0.5 seconds
and then release.
8. When the waveband end is reached your radio will recommence tuning
from the opposite waveband end.
9. Adjust the Volume, treble and bass controls to the required
settings.
10. To switch off your radio press the On/Off button.
13
2 3
4
9
10
9
9

If you need any further advice, please call our Technical Helpline on :-
020 8758 0338 (Mon-Fri)
14
Manual tuning - FM
1. Press the On/Off button to switch on your radio.
2. Press the FM/DAB Band button to select the FM band. Fully extend
the Wire DAB/FM aerial and position for optimum reception.
3. Rotate the Tuning control to tune to a station. The frequency will
change in steps of 50kHz.
4. When the waveband end is reached the radio will recommence tuning
from the opposite waveband end.
5. Set the Volume, treble and bass controls to the desired settings.
6. To switch off your radio press the On/Off button.
1
2
5
6
5
3
5

Display modes - FM
On FM the bottom line of the display can be set to any of the following
modes:-
1. Press the Info button to cycle through the various modes.
a. Scrolling text Displays scrolling text messages such
as artist/track name, phone in number
etc.
b. Programme Type Displays type of station being listened to
e.g. Pop, Classic, News, etc.
c. Signal strength Displays signal strength for station being
listened to.
d. Time and date Displays current time and date.
e. Frequency Displays frequency of the station being
listened to.
f. Audio mode Display shows Auto (stereo) or mono.
FM Stereo/Mono
1. If a station being received is weak some hiss may be audible. To re-
duce the hiss repeatedly press the Select/Real time button until the
display shows "Audio mode : mono" your radio will switch to mono
mode.
2. To return to stereo mode repeatedly press the Select/Real time button
until the display shows "Audio mode :Auto", your radio will switch to
stereo mode.
a
b
c
d
e
f
15
1
1,2

If you need any further advice, please call our Technical Helpline on :-
020 8758 0338 (Mon-Fri)
16
Presetting stations - DAB and FM
There are 5 memory presets for each of the 2 wavebands.
1. Press the On/Off button to switch on your radio.
2. Tune to the required station as previously described.
3. Press and hold down the required Preset button until the display shows
e.g. "Preset 1 stored". The station will be stored under the chosen
preset button. Repeat this procedure for the remaining presets.
4. Stations stored in preset memories may be overwritten by following
the above procedure.
Recalling a preset station - DAB and FM
1. Press the On/Off button to switch on your radio.
2. Select the required waveband by pressing the FM/DAB Band but-
ton.
3. Momentarily press the required Preset button, your radio will tune to
the station stored in preset memory.
Note: If you have not previously stored a preset station and the preset
button is pressed "preset N empty" will be displayed.
1
1
2
3
3

3
System reset
If your radio fails to operate correctly, or some digits on the display are
missing or incomplete carry out the following procedure.
1. Press and hold in the Info button until the display shows CRD39
v1.03.
2. Press the Info button twice the display will show "Select to Reset".
3. Press in and release the Select/Real time button to select System
reset.
4. If DAB was used last then a "Quick scan" of the DAB band will be
performed, otherwise a "Quick scan" will be carried out the next time
the DAB band is selected.
If a problem persists our technical staff would be pleased to help offer
any assistance on operating the radio. Our technical helpline number
is 020 8758 0338.
17
1
2

If you need any further advice, please call our Technical Helpline on :-
020 8758 0338 (Mon-Fri)
18
Classic FM button
Your radio is fi tted with a button which when pressed will automatically
tune your radio to Classic FM on the DAB waveband.
1. Press the Classic FM button.
2. Your radio will automatically tune to Classic FM.
Note: If Classic FM is not available in your area the display will
show "Not Available". As an alternative it may be possible to listen to
classic FM on the FM waveband.
1
Software version
The software display cannot be altered and is for your reference only.
1. To view the software version your radio has, press and hold in the
Info button. The software version will appear on the display.
1

Sleep function
Your clock radio can be set to turn off after a preset time has elapsed.
1. Press the Sleep button the display will show "Sleep after 30 min-
utes".
2. Rotate the Tuning control to increase the time by 1 minute incre-
ments, up to a maximum of 99 minutes.
3. Rotating the Tuning control in the opposite direction will decrease
the time by 1 minute increments.
4. Your radio will switch off after the preset sleep time has elapsed.
5. To cancel the sleep function before the preset time has elapsed, press
the On/Off button.
5
2
19
1
/