Page is loading ...

VISTA-40
N7001–INSTV2 6/97,
Part of N7001V2
Installation Instructions • Installation Instructions • Installation Instructions
2-Partitioned Security System
This Control Supports the Ademco
2-Way Voice Interface Module (VIM)
For Audio Alarm Verification (AAV)
Features Q.E.D. programming for
quick enrollment of devices.
downloaded from: http://www.guardianalarms.net

Ð2Ð
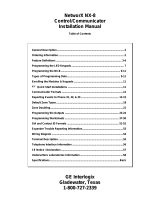
RECOMMENDATIONS FOR PROPER PROTECTION
The Following Recommendations For The Location Of Fire And Burglary Detection Devices Help
Provide Proper Coverage For The Protected Premises.
Recommendations For Smoke And Heat Detectors
With regard to the number and placement of smoke/heat detectors, we subscribe to the
recommendations contained in the National Fire Protection Association's (NFPA) Standard #72 noted
below.
Early warning fire detection is best achieved by the installation of fire detection equipment in all rooms and
areas of the household as follows: For minimum protection a smoke detector should be installed outside
of each separate sleeping area, and on each additional floor of a multi-floor family living unit, including
basements. The installation of smoke detectors in kitchens, attics (finished or unfinished), or in garages is
not normally recommended.
For additional protection the NFPA recommends that you install heat or smoke detectors in the living
room, dining room, bedroom(s), kitchen, hallway(s), attic, furnace room, utility and storage rooms,
basements and attached garages.
In addition, we recommend the following:
¥ Install a smoke detector inside every bedroom where a smoker sleeps.
¥ Install a smoke detector inside every bedroom where someone sleeps with the door partly or
completely closed. Smoke could be blocked by the closed door. Also, an alarm in the hallway
outside may not wake up the sleeper if the door is closed.
¥ Install a smoke detector inside bedrooms where electrical appliances (such as portable heaters, air
conditioners or humidifiers) are used.
¥ Install a smoke detector at both ends of a hallway if the hallway is more than 40 feet (12 meters)
long.
¥ Install smoke detectors in any room where an alarm control is located, or in any room where alarm
control connections to an AC source or phone lines are made. If detectors are not so located, a fire
within the room could prevent the control from reporting a fire or an intrusion.
DINING
KITCHEN
BEDROOM
BEDROOM
BEDROOM
BEDROOM
LIVING ROOM
J
J
J
J
J
s
s
BEDROOM
BDRM
BDRM
DINING
LIVING ROOM
TV ROOM
KITCHEN
n
n
n
J
J
J
JJ
J
s
J
J
J
BEDROOM
BEDROOM
TO
BR
n
n
n
n
n
LVNG RM
BASEMENT
KTCHN
s
s
.
CLOSED
DOOR
GARAGE
s
Smoke Detectors for Minimum Protection
Smoke Detectors for Additional Protection
Heat-Activated Detectors
U
L
This control complies with
National Fire Protection Association
(NFPA) requirements for temporal pulse
sounding of fire notification appliances.
Recommendations For Proper Intrusion Protection
For proper intrusion coverage, sensors should be located at every possible point of entry to a home or
commercial premises. This would include any skylights that may be present, and the upper windows in a
multi-level building.
In addition, we recommend that radio backup be used in a security system so that alarm signals can still be
sent to the alarm monitoring station in the event that the telephone lines are out of order (alarm signals are
normally sent over the phone lines, if connected to an alarm monitoring station).

Ð 3 Ð
TABLE OF CONTENTS
PART 1. INSTALLATION INSTRUCTIONS
............................................................................. 6
Use Part 1 when installing the hardware components of the installation.
Section 1. GENERAL INFORMATION................................................................................. 7
SUMMARY OF SYSTEM FEATURES........................................................................ 7
INTRODUCTION TO THE PARTITIONED SYSTEM .................................................... 9
Section 2. INSTALLING THE CONTROL.......................................................................... 10
MOUNTING THE CABINET ..................................................................................... 10
PHONE LINE CONNECTIONS................................................................................ 11
VOICE INTERFACE MODULE (VIM)........................................................................ 11
Section 3. POWERING THE SYSTEM............................................................................... 12
Primary Power ....................................................................................................... 12
Back-Up Power...................................................................................................... 12
Earth Ground Connections..................................................................................... 12
Power-Up Procedure............................................................................................. 13
Polling Loop Current Draw Worksheet..................................................................... 13
Auxiliary Device Current Draw Worksheet ................................................................ 13
Section 4. INSTALLING REMOTE KEYPADS.................................................................. 14
General................................................................................................................. 14
Programming The Keypads.................................................................................... 14
Mounting The Keypads.......................................................................................... 14
Wiring Keypads ..................................................................................................... 14
Setting the Keypad Address .................................................................................. 15
Powering Additional Keypads................................................................................. 15
6139AV 2-Way Voice Keypads............................................................................... 16
Voice Interface Module (VIM) Connection................................................................ 16
Section 5. ZONE CONFIGURATIONS............................................................................... 17
BASIC 9 HARD-WIRED ZONES.............................................................................. 17
General Information................................................................................................ 17
Zone 1.................................................................................................................. 17
Compatible Smoke Detectors................................................................................. 18
Zones 2Ð8 ............................................................................................................ 18
Compatible Glass Break Detectors .......................................................................... 19
Zone 9.................................................................................................................. 19
2-WIRE POLLING LOOP EXPANSION (Zones 10 through 64).................................. 20
General Information................................................................................................ 20
Intercom Interference............................................................................................. 20
Compatible Polling Loop Devices ........................................................................... 21
WIRELESS EXPANSION (Zones 1Ð63) .................................................................. 22
General Information................................................................................................ 22
4281 Series Receiver ............................................................................................ 23
5881 Series Receiver ............................................................................................ 23
Transmitters .......................................................................................................... 24
Arming/Disarming with RF Keys (5801, etc.) ............................................................ 25
If Using 5827BD/5800TM Wireless Keypad/Transmitter Module ............................... 25
Wireless Zone Types ............................................................................................. 25
Fault Annunciation................................................................................................. 26
Important Battery Notice......................................................................................... 26
Compatible 5700 Series Wireless Devices............................................................... 26
Compatible 5800 Series Wireless Devices............................................................... 27
VOLTAGE TRIGGERS (Connector J7) .................................................................... 27
General Information................................................................................................ 27
Ground Start Module.............................................................................................. 28
Remote Keyswitch................................................................................................. 29
Remote Keypad Sounder Operation and Wiring ...................................................... 30
Using a Trigger To Activate Another ManufacturerÕs AAV Unit (if necessary)............... 30

Ð4Ð
Section 6. RELAY OUTPUTS & POWERLINE CARRIER DEVICES............................. 31
General Information................................................................................................ 31
4204 Relay Module................................................................................................ 31
4300 Transformer & X-10 Devices........................................................................... 31
Section 7. THE 4285 PHONE MODULE........................................................................... 32
General Information................................................................................................ 32
Mounting The Phone Module................................................................................. 32
Wiring Connections ............................................................................................... 33
Programming The Control For Phone Access.......................................................... 33
Installation When The Telephone System Includes an Answering Machine................ 34
Section 8. 2-WAY VOICE KEYPADS & AUDIO ALARM VERIFICATION (AAV).......... 35
General Information................................................................................................ 35
Using the VIM Module and 6139AV Keypad............................................................ 35
Setting the DIP Switches on the VIM Module........................................................... 35
VIM Module Connections to the Control.................................................................. 35
6139AV Audio Connections to the VIM Module....................................................... 36
Programming Information for the VIM Module..................................................... 36
Programming Information For the 6139AV Keypad ............................................ 37
6139AV Keypad Audio Level Adjustment......................................................... 37
Using a Non-Ademco Audio Alarm Verification (AAV) Unit................................... 38
Section 9. EXTERNAL SOUNDERS.................................................................................. 39
Compatible Sounders............................................................................................ 39
PART 2. PROGRAMMING PROCEDURES
..................................................... 40
Use Part 2 when programming. It provides detailed programming procedures and
descriptions of all data fields. It also provides procedures for using #93 Menu Mode.
Section 1. GENERAL PROGRAMMING PROCEDURES................................................. 41
GENERAL INFORMATION ..................................................................................... 41
User-Friendly Zone, Device & Alpha Programming (#93 Menu Mode)........................ 41
Communication Default Programming ..................................................................... 41
Entering The Various Program Modes..................................................................... 41
Programming Steps............................................................................................... 42
Section 2. ZONE TYPES .................................................................................................... 43
Section 3. DATA FIELD PROGRAMMING......................................................................... 45
PROGRAMMING SYSTEM-WIDE (GLOBAL) DATA FIELDS...................................... 45
INDEX TO PROGRAMMING FIELDS........................................................................ 46
DATA FIELD DESCRIPTIONS ................................................................................ 47
Control Options..................................................................................................... 47
Downloader Options.............................................................................................. 49
Dialer Options........................................................................................................ 49
Wireless Options ................................................................................................... 51
Partitioning Options............................................................................................... 52
Relay Output Options ............................................................................................ 52
Real Time Clock Options ........................................................................................ 52
Event Logging Options.......................................................................................... 52
PROGRAMMING PARTITION-SPECIFIC DATA FIELDS............................................ 53
General Procedure ................................................................................................ 53
Partition-Specific Field Descriptions........................................................................ 53
Section 4. PROGRAMMING WITH #93 MENU MODE ..................................................... 55
General Information................................................................................................ 55
Zone Programming................................................................................................ 56
Serial Number Enrolling/Deleting............................................................................ 58
Alpha Programming ............................................................................................... 58
Entering Zone Descriptors ..................................................................................... 59
Adding Custom Words........................................................................................... 60
Creating Partition Descriptors ................................................................................. 61
Creating A Custom Message Display (Installer Message)........................................... 61
Alpha Vocabulary................................................................................................... 62
Device Programming.............................................................................................. 63

Ð 5 Ð
VIM Voice Interface Module Prompts....................................................................... 64
Relay Programming................................................................................................ 65
Zone List Programming.......................................................................................... 68
Programming Relays for Silencing of External Sounders When Using the VIM ........... 68
Programming the VIM for Relay Triggering on Supervision Fault................................ 69
Relay Voice Descriptors ......................................................................................... 69
Relay Voice Descriptors and Custom Word Substitute Vocabulary ............................ 70
Custom Word Voice Substitutes............................................................................. 70
Section 5. SYSTEM COMMUNICATION............................................................................ 71
COMMUNICATION FORMATS................................................................................ 71
Table of Contact ID Event Codes ............................................................................ 73
COMMUNICATION PROGRAMMING ....................................................................... 74
Loading Communication Defaults ........................................................................... 74
Making Changes To Communication Fields ............................................................. 74
Swinger Suppression ............................................................................................ 74
Enabling Of Dialer Reporting By Partition................................................................. 74
Summary Of Default Consequences....................................................................... 75
Communication Defaults For Low Speed Format (Q94 then Q80).............................. 76
Communication Defaults For Ademco Express Format (Q94 then Q81)...................... 77
Communication Defaults For Ademco High Speed Format (Q94 then Q82)................ 78
Communication Defaults For Ademco's Contact ID Format (Q94 then Q83) ................ 79
Section 6. DOWNLOADING................................................................................................ 80
REMOTE DOWNLOADING .................................................................................... 80
DIRECT WIRE DOWNLOADING .............................................................................. 82
Section 7. SETTING THE REAL-TIME CLOCK................................................................ 83
PART 3. SYSTEM OPERATION AND TESTING
................................................ 84
Section 1. SYSTEM OPERATION ..................................................................................... 85
SECURITY ACCESS CODES................................................................................. 85
KEYPAD FUNCTIONS ........................................................................................... 90
General Information................................................................................................ 90
Phone Module ...................................................................................................... 90
Arming Functions .................................................................................................. 90
Access Control...................................................................................................... 91
Partition ÒGOTOÓ Commands.................................................................................. 91
View Capabilities of a User...................................................................................... 91
Viewing Downloaded Messages............................................................................. 91
Using the Built-in UserÕs Manual.............................................................................. 91
Displaying Descriptors............................................................................................ 91
Panic Keys............................................................................................................ 92
End-User Relay Command Mode (#70 Mode).......................................................... 92
Trouble Conditions................................................................................................ 92
Power Failure ........................................................................................................ 93
VIM VOICE INTERFACE MODULE OPERATOR FUNCTIONS .................................. 93
EVENT LOGGING.................................................................................................. 94
Section 2. TESTING THE SYSTEM................................................................................... 96
Using The Test Mode............................................................................................. 96
Armed System Test ............................................................................................... 96
2-Way Voice Test Mode ......................................................................................... 97
Turning The System Over To The User................................................................... 98
Section 3. SUMMARY OF SYSTEM COMMANDS ........................................................... 99
Section 4. REGULATORY AGENCY STATEMENTS..................................................... 101
DIP SWITCH TABLES ................................................................................................... 103
Section 5. SPECIFICATIONS........................................................................................... 106
CONTACTING TECHNICAL SUPPORT .............................................................................. 107
SUMMARY OF CONNECTIONS DIAGRAM......................................................................... 109
NOTE: UNLESS OTHERWISE STATED, MODEL NUMBERS FOR DEVICES ARE ADEMCO MODEL NUMBERS.

Ð6Ð
PART 1
INSTALLATION INSTRUCTIONS

Ð 7 Ð
Section 1. GENERAL INFORMATION
SUMMARY OF SYSTEM FEATURES
The VISTA-40 Control is a microprocessor based, programmable, partitioned system, and features EEROM
memory technology (power loss does not result in the loss of programmed data).
Before installing this partitioned system, become completely familiar with the partitioning concepts,
including zone distribution (each zone can be assigned to only one partition), output relay features, user code
usage and authority levels, and the user-friendly menu mode of programming.
NOTE: Throughout this manual, the term "alpha keypad" refers equally to the 6139 alpha keypad or 6139AV
voice/alpha keypad.
The following lists the major features of the VISTA-40 system.
System Features
Zones Supported
¥ Supports up to 9 traditional wired zones of protec-
tion.
¥ Expandable to 64 zones using combinations of
2-wire polling loop devices, and/or 5700 or 5800
series wireless transmitters. Supports 4281 or 5881
(5882 in Canada) series wireless receivers.
¥ Zones can be distributed among 2 logical partitions of
operation.
¥ Supports up to sixteen 2-wire smoke detectors
(zone 1).
¥ Other zones can be fire zones using 4-wire smoke
and heat detectors and/or polling loop detectors.
¥ Supports up to 50 latching type 2-wire glass break
detectors on zone 8.
Audio Alarm Verification (AAV)
¥ This option allows the central station to "listen-in" at
the premises during an alarm, when used with the
optional Ademco 2-Way Voice Interface Module (VIM)
and at least one 6139AV 2-way Voice keypad (up to
six can be used). After an alarm report is successfully
sent to the central station, the local alarm sounder is
automatically silenced and a trigger can be activated
by the central station operator allowing the operator
to hear what is happening at the premises and speak
directly to persons on the premises via the
microphone and speaker built into the 6139AV
keypad.
Phone Access And Voice Response
¥ The VISTA-40 supports the optional 4285 Phone
Module. The 4285 is not permissible in UL
installations. This add-on accessory permits phone
access to the security system for arming/disarming
and for performing most function commands using
the telephone keypad, with voice annunciation being
provided over the phone as confirmation after any
function command entered.
Note: The phone module can be installed in either
partition, and can be used to control the other
partition using the GOTO command.
Output Control
¥ Supports up to 8 output devices (optional 4204
relays or X-10 devices) that can be activated by
system events.
The X-10 devices are not UL Listed
for fire and burglary applications.
Addressable Devices
¥ Supports up to sixteen addressable devices (any
combination of remote keypads, RF receivers and
relay output modules ).
Keypads
¥ Supports the following remote keypads: Ademco
6128, 6137, 6139, 6139AV
.
For use with the Ademco VIM module.
Keyswitch
¥ Supports the 4146 keyswitch.
User Codes
¥ Supports up to 70 user allocations, maximum of 69 in
a given partition, each with various levels of authority.
Keypad Panic Keys
¥ Provides 3 keypad panic functions.
Global Arming
¥ Allows users to easily arm both partitions via keypad
prompts.
Quick Bypass (Forced Bypass)
¥ Quick (forced) bypass feature bypasses all faulted
zones with single key entry sequence.
Memory-Of-Alarm
¥ Memory-of-alarm feature, which, upon disarming the
system, automatically displays all zones that were in
an alarm condition while the system was armed.
Circuit Breakers
¥ Self-resetting circuit breaker protection eliminates
the need to replace blown cartridge fuses.
Built-in Users Manual
¥ Built-in Users Manual (6139, 6139AV only). By
depressing and holding any of the function keys on
the keypad for 5 seconds, a brief explanation of that
function will scroll across the alpha-numeric display.

Ð 8 Ð
Descriptors
¥ All programmed descriptors can be displayed (one at
a time) by pressing and holding the READY key for 5
seconds, then releasing the key. This serves as a
check for installers to be sure all descriptors are
entered properly.
Event Logging
¥ Event Logging feature keeps record of up to 100
events.
Access Control
¥ Provides user-activated access control command
which pulses a relay output for controlled opening of
access doors (e.g. lobby door).
#70 End User Relay Commands
¥ Allows end users to manually turn on/off relay/X-10
module outputs to control lights or other devices via
keypad or phone module.
Cabinet
¥ Large cabinet with removable door for easier
installations.
Programming Features
¥ Programming can be performed at the office prior to
installation, or on the job site directly from the
keypad.
¥ Can be downloaded from a remote location or at the
job site (using a PC/laptop with 4100SM Serial
Module) by using the AdemcoÕs V-Link
¨
downloading software (Rev. 4 or higher) or AdemcoÕs
Compass
Windows downloading software.
¥ The Control is pre-programmed with a set of standard
values that is designed to meet the needs of many
installations. These values, however, can be
changed to suit the needs of any particular
installation.
¥ The Control can also be pre-programmed by the
installer with one of four standard communication
default programming values, thus further saving time
and effort.
Installer Code
¥ Installer code override feature. Installer code will
disarm system only if it was used to arm the system.
Prohibit Program Mode Entry
¥ If desired, entry to program mode via [*] + [#] within
30 seconds of power up can be disabled.
Alpha Descriptors
¥ All zones and partitions can be assigned
descriptions.
¥ The letter "s" or " 's " can be added to descriptors.
Relay Voice Descriptors
¥ Separate vocabulary for annunciating relay output
descriptors when using a phone module to activate
relays.
Custom Words
¥ Up to 20 custom words can be added to the built-in
vocabulary.
Voice Substitute Custom Words
¥ Provides a means of annunciating substitute words
for the phone module whenever a custom word is
used for alpha keypad displays.
Downloading
¥ Direct wire downloading can be done without a
modem, by using a PC or Laptop computer and
4100SM Module.
#93 Menu Mode
¥ Easy programming of zones using the user friendly
#93 Menu Mode.
Communication Features
Communication
¥ Ademco low speed, SESCOA/RADIONICS, Ademco
Express, Ademco High Speed, Ademco Contact ID.
Comm. Fields
¥ Easy programming for communication fields. Simply
enter the report code for each zone.
Comm. Defaults
¥ Communication defaults can be loaded anytime, and
does not affect non-communication program fields.
Zone Reports
¥ All 64 zones can report to a central station using any
standard reporting format.
Callback
¥ Callback defeat option for downloading.
Real-Time Clock
¥ Real-Time clock for time related functions.
NOTE: 6139 or 6139AV alpha keypad must be used
to set clock, or it can be set using Downloader
software.
AC Loss Reporting
¥ Random AC Loss and AC Restore reporting option
sends report randomly from 10-40 minutes after AC
loss, to help prevent central stations from receiving
an overload of reports due to area blackouts.
Test Reporting
¥ Intelligent test reporting option means test reports
will not be sent if any other report was sent within the
programmed test report interval.
Split/Dual Reporting
¥ Split/Dual reporting communicator options available.
Cancel Report
¥ Option to allow a cancel report to be sent, even after
Bell Time-out has ended.
Voltage Triggers
¥ Used to interface with LORRA or other devices.
¥ PC Downloader can command output voltage
triggers to pulse on for 2 seconds.
Phone Numbers
¥ Primary and secondary phone number capability.
¥ Can program different formats for each phone
number.

Ð 9 Ð
INTRODUCTION TO THE PARTITIONED SYSTEM
Basic Partitioning Features
The following lists the partitioning features of the VISTA-40 system.
Simple, Secure, Reliable
¥ Easy to use and program as the simplest alarm
system.
¥ Integrity of security is not compromised for any users
of the system.
¥ Inherent reliability of the partitioned system is equal
to a stand-alone alarm system if purchased
separately.
Keypads
¥ Flexible number of keypads per partition (up to a total
of 16 in a system (exclusive of other ECP devices
and auxiliary power requirements), any way you want
to assign them.
¥ Appropriate sounds and messages to assigned
keypads only (each system appears to be
independent to users).
¥ Ability to inhibit other keypads from accessing your
partition (total security in a strip mall environment).
User Codes
¥ 70 User Codes assigned virtually anyway you want
them (69 max. in any one partition, otherwise no
.
restrictions). Enough to handle the largest
commercial jobs
¥ Multiple levels of authority per partition (allows key
people in a partition to have complete control and
limit system tampering by others).
Partitions
¥ Any zone can be assigned to any particular partition
(easy to install, allows logical assignment by the
dealer).
¥ "GOTO" function provides access to the other
partition (ideal for executive access to factory for
example).
¥ Intelligent partition/zone menu programming help
(simplifies the programming and reduces errors)
¥ Programmable 4-character partition name displayed
on alpha keypads when needed (no need to
memorize numbers Ð name and number are shown
for you).
Global Partitioning Features and Resources
In any system, certain physical system components and features are shared by all partitions or assigned to a
specific partition. The following elements are shared or assignable to a specific partition:
Shared By All Partitions Assignable To One Partition
Dialer 4
Alarm Relay/Sounder 4 4 (using relay outputs)
Power Supply 4
Wireless Keypad 4
Keyswitch Station 4
In addition to the physical devices which are shared, the system shares some software
features on a global basis as well. These include:
Panic Code Reports ....................... Common code for any partition
Low Battery Reporting .................... Reports as Partition 1
AC Power Reporting Options .......... Reports as Partition 1
Test Reporting Interval ................... Global for the Panel
Download Phone Number .............. Global for the Panel
Communication Format ................... Global for the Panel
Rotary/Touch Tone ........................ Global for the Panel
Download Callback defeat ............... Global for the Panel
Installer Code ................................. Global for all Partitions
Partition Specific Features
Many devices and functions are reserved on a partition basis to provide proper operation
and flexibility for installations. The items assignable on a per partition basis include:
¥ Keypads ¥ Enable/Disable Chime Mode
¥ Entry and Exit Delays ¥ "Go To" Partition function
¥ Keypad Sound during Exit Delay ¥ Swinger Suppression
¥ Primary Subscriber Number ¥ Burglary Alarm Comm. Delay
¥ Secondary Subscriber Number ¥ Open/close for Installer Code
¥ Enable/Disable of Panic Keys ¥ Confirmation of Arming Ding
¥ Enable/Disable of Duress ¥ Alarm Sounder Duration
¥ Multiple Alarm Reporting ¥ User Codes
¥ Quick Arm enable/disable ¥ Inhibit Bypass of one Zone

Ð 10 Ð
Section 2. INSTALLING THE CONTROL
MOUNTING THE CABINET
General The VISTA-40 is supplied with a 12.5"W x 14.5"H x 3"D cabinet suitable for use
in residential and non-certified commercial burglary installations.
Mount the Control cabinet to a sturdy wall using fasteners or anchors (not
supplied) in a clean, dry area which is not readily accessible to the general public.
The back of the Control cabinet has 4 holes for this purpose.
Follow the instructions below for mounting the VISTA-40 PC board into the
cabinet and for mounting the Control's lock to its cabinet door.
Mounting The
PC Board
Before mounting the circuit board, be certain that the appropriate metal
knockouts have been removed. Do not attempt to remove the
knockouts after the circuit board has been installed.
1. Hang the three mounting clips on the raised cabinet tabs. Observe proper
clip orientation to avoid damage to the clip when mounting screws are
tightened and to avoid problems with insertion and removal of the PC board.
2. Insert the top of the circuit board into the slots at the top of the cabinet. Make
certain that the board rests in the slots as indicated in step 2 detail.
3. Swing the base of the board into the mounting clips and secure the board to
the cabinet with the accompanying screws (as illustrated in step 3 detail).
Advisory Make certain that the mounting screws are reasonably tight to ensure that there is
a good ground connection between the PC board and the cabinet. Also, dress
field wiring away from the microprocessor (center) section of the PC board. The
cabinet provides 2 loops on its left and right sidewalls for anchoring field wiring
using tie wraps. These steps are important to minimizing the risk of panel RF
interference with television reception.
A
B
3RD CLIP
REQUIRED
DETAIL SIDE VIEW OF CLIP INSTALLATION
A-CABINET TAB WITHOUT CLIP
B-CABINET TAB WITH HANGING CLIP
DETAIL SIDE VIEW OF CLIP AND
BOARD INSTALLED
DETAIL SIDE
VIEW OF BOARD
INSERTED INTO
SLOTS
MOUNTING THE PC BOARD
Installing the Lock
1. Remove the lock knockout on the
control cabinet cover. Insert the key
into the lock. Position the lock in the
hole making certain that the latch will
make contact with the latch bracket
when the door is closed.
2. While holding the lock steady, insert
the retainer clip into the retainer
slots.
3. Hold the lock steady, and insert the
retainer clip into the retainer slots.
Position the clip as illustrated in
order to permit easy removal.
CABINET DOOR BOTTOM
RETAINER
CLIP
RETAINER CLIP
(NOTE POSITION)
RETAINER
SLOTS
LOCKED
UNLOCKED

Ð 11 Ð
PHONE LINE CONNECTIONS
Standard Phone Line
Connections
IMPORTANT!: If using a 4285 Phone Module, phone connections must be
made exactly as shown in the
PHONE MODULE
section, even if the system is
not programmed to communicate with a monitoring station. The 4285 Phone
Module will not function unless the system is wired exactly as
described.
Incoming phone line and handset wiring is connected to the main terminal block
as follows (refer to Diagram below):
TB1-26: Local Handset (TIP)
TB1-27: Local Handset (RING)
TB1-28: Incoming Phone Line (TIP)
TB1-29: Incoming Phone Line (RING)
Warning:
To prevent the risk of shock, disconnect phone lines at telco jack before servicing
the panel.
If you want to connect the control panel to phone lines that require ground start
capability, you must use a 675 Ground Start Module must be used. This module
is triggered by one of the outputs on the connector labeled J7 (see
VOLTAGE
TRIGGERS
section).
Voice Interface Module
(VIM)
Be sure to connect the VIM unit to the control's handset terminals 26 and 27.
Refer to the
2-WAY VOICE KEYPADS AND AUDIO ALARM VERIFICATION
section later in this manual for wiring diagram.
PABX If the communicator is connected to a telephone line inside a PABX, be sure the
PABX has a back-up power supply that can support the PABX for 24 hours. Many
PABXs are not power backed up and connection to such a PABX will result in a
communication failure if power is lost.
TERMINALS
ON CONTROL
EARTH GROUND
INCOMING TELCO LINE
Æ
Handset
Incoming
Telco Line
TIP
RING
RJ31X
JACK
PLUG
DIRECT
CONNECT
CORD
TIP
RING
GROUND
s
ss
PREMISES
PHONES
s
{
{
BROWN (TIP)
GRAY (RING)
GREEN (TIP)
RED (RING)
26 27 28 29 30
26 27
28 29
30
STANDARD PHONE LINE CONNECTIONS

Ð 12 Ð
Section 3. POWERING THE SYSTEM
Primary Power Power to the Control panel is supplied by model No. 1361* Plug-in Transformer
which is rated at 16.5VAC, 40VA. Caution must be taken when wiring this
transformer to the panel to guard against blowing the fuse inside the transformer
(non-replaceable).
* NOTE: Use 1361CN Transformer in Canadian installations.
Back-Up Power In the event of an AC power loss, the Control panel is supported by a back-up,
rechargeable gel cell battery. Ademco 467 (12V, 4AH), YUASA NP4-12 (12V,
4AH) and NP7-12 (12V, 7AH) batteries are recommended. Do not use Gates
batteries.
The standby battery is automatically tested every 24 hours, beginning 24 hours
after exiting programming mode. In addition, entry into the test mode will cause a
battery test to be initiated.
Battery Standby Table
AUX. STANDBY CURRENT DRAW
AMP-HRS. 200mA 400mA 600mA 750mA
4.0 6 hrs. 4 hrs. 3 hrs. 2.5 hrs.
6.0-7.0 11 hrs. 7 hrs. 5.5 hrs. 4 hrs.
NOTE: These figures are
approximate, and may vary
depending upon the age, quality,
and capacity of the battery at
the time of the AC loss.
Earth Ground
Connections
In order for the lightning transient protective devices in this product to be
effective, the designated earth ground terminal must be terminated in a good
earth ground. The following are examples of good earth grounds available at most
installations:
Metal Cold Water Pipe: Use a non-corrosive metal strap (copper is
recommended) firmly secured to the pipe to which the ground lead is electrically
connected and secured.
AC Power Outlet Ground: Available from 3-prong, 120VAC, power outlets
only. To test the integrity of the ground terminal, use a three-wire circuit tester
with neon lamp indicators, such as the UL-Listed Ideal Model 61-035, or
equivalent, available at most electrical supply stores.
NO CONNECTION
TRANSFORMER
16.5VAC, 40VA
ADEMCO No.1361
(IN CANADA
USE No. 1361CN)
or 4300 IF
X-10 DEVICES
WILL BE USED
Connect to
24hr. 120VAC,
60 Hz Outlet
123
RED (+)BLK (–)
Connect to
12VDC, 4AH
or 12VDC, 7AH
GEL CELL
BATTERY
CHARGING
VOLTAGE
13.7 VDC
Replace
every
3 years
NOTE:
WHEN POWERING UP
THE PANEL, PLUG THE
TRANSFORMER IN BEFORE
CONNECTING THE BATTERY.
BATTERY
TABS
PRIMARY POWER
Supplied by 1361*
Plug-in
Transformer which
is rated at
16.5VAC, 40VA.
Caution must be
taken when wiring
this transformer to
the panel to guard
against blowing the
fuse inside the
transformer (non-
replaceable).
AC POWER AND BATTERY CONNECTIONS

Ð 13 Ð
Power-Up Procedure 1. Fill out the Polling Loop Current Draw and Auxiliary Device Current Draw
Worksheets shown below. Make sure that the currents drawn from these
outputs do not exceed their respective ratings.
CAUTION: Failure to observe the polling loop current rating will cause a
polling loop malfunction. Failure to observe the auxiliary output current rating
will result in a battery which does not charge properly, or possibly a tripped
circuit breaker.
2. Wire the 1361 transformer (1361CN in Canada) to terminals 1 & 2 on the
control panel (before connecting the battery), as shown in the SUMMARY OF
CONNECTIONS diagram. Do not plug in at this time.
3. Connect all polling loop and auxiliary devices, such as keypads, PIRs, etc.
4. Plug the transformer into a 24-hour, uninterrupted AC outlet. After a few
seconds, the green READY LED on the keypad(s) should light and the
keypad(s) should display DISARMED READY TO ARM (Alpha keypads), or
READY (Fixed-word keypads).
5. Connect the battery to the battery tabs on the control board using the battery
cables supplied (use Red for + to +, Black for Ð to Ð). See the SUMMARY OF
CONNECTIONS diagram.
POLLING LOOP CURRENT DRAW WORKSHEET
RPM DEVICE CURRENT # UNITS TOTAL CURRENT
998MX PIR 1mA
4191SN Contact 1mA
4194 Contact 1 mA
4192SD Photo Smoke 0.4 mA
4192SDT Smoke w/Heat 0.4 mA
4192CP Ionization Detector 0.4 mA
4275 Dual Element PIR 1 mA
4278 Quad Element PIR 1 mA
4190WH 2-Zone RPM 1 mA (LOW)
2 mA (HIGH)
4208 8-Zone RPM 16 mA
4278EX-SN PIR 1mA
4939SN Contact 1mA
4959SN Contact 1mA
TOTAL CURRENT *
* If the total current draw exceeds 64 mA, a 4197 Loop Extender module must be used.
AUXILIARY DEVICE CURRENT DRAW WORKSHEET
DEVICE CURRENT # UNITS TOTAL CURRENT
6128 Keypad 30mA
6137 Keypad 85mA
6139 Keypad 100mA
6139AV Keypad 200mA
675 Ground Start Module 50 mA
Built-in Polling Loop (total poll loop worksht)
4281 RF Receiver 35mA
5881 RF Receiver 60mA
4197 Poll Loop Extender 80 mA
4204 Relay Module 15mA standby
40mA per active relay
VIM Voice Interface Module. 80mA
*
*
TOTAL CURRENT (750mA max)
*
If using hard-wire devices such as PIRs, refer to the specifications for that particular unit's current draw.
Only applies if powered from Control's auxiliary power.

Ð 14 Ð
Section 4. INSTALLING REMOTE KEYPADS
General The Control supplies up to 750 mA of auxiliary power for remote keypads, polling loop
devices and/or other auxiliary devices such as motion detectors or 4-wire smoke
detectors*.
The Control supports, independent of auxiliary power considerations, up to 16
addressable remote keypads (6128, 6137, 6139, 6139AV
). Note that since the
maximum number of addressable devices connected to the keypad lines is 16, usage of
non-keypad devices (ex. 4204, 4281, 5881) reduces the number of keypads that can be
supported.
Keypads can be powered from the auxiliary power output provided that the total current
drawn from this output does not exceed 750 mA. Keep this in mind when adding remote
keypads so you don't overdraw current from the panel. This would result in a battery which
does not charge properly or possibly a tripped auxiliary solid state circuit breaker.
If the auxiliary load is determined to be greater than 750 mA, then additional keypads can
be powered from a separate power supply. Refer to the ÒPowering Additional KeypadsÓ
paragraph for a diagram that shows how to make connections to the separate power
supply.
* 4-wire smoke detectors cannot be used in UL Listed applications.
The control supports the VIM Voice Interface Module (connected to the control's keypad
terminals), which supports up to six 6139AV 2-way voice keypads per system. Refer to the
6139AV KEYPAD paragraph later in this section.
Programming The
Keypads
The keypads can be set for a device address of 00Ð15
IMPORTANT! You must select a device address of 00, 01, 02, or 03 if standard
defaults are to be programmed, since these are the only keypad addresses enabled by
the standard default. Instructions for setting a keypad address are provided with each
keypad, and in the ÒSetting the Keypad AddressÓ paragraph on the next page.
Keypads must also be programmed for type, partition number and keypad sounder
suppression options. In addition, 6139AV 2-way voice keypads require the programming
of a VIM keypad number, which refers to the keypad's ID number when controlled by a
central station operator during a 2-way voice session.
For instructions, refer to Section 4: #93 MENU MODEÐDEVICE PROGRAMMING in
PART 2. PROGRAMMING PROCEDURES
.
Mounting The
Keypads
Note that field wiring to the keypads must be completed before the keypads can be
mounted.
The keypads can be either surface mounted directly to a drywall, or to a single or double
gang electrical box, or flush mounted (using Trim Ring Kit 5137TRK or 6139TRK). Refer
to the mounting instructions and template included with the keypad and/or trim ring kit for
specific information.
Be sure to take the height of the users into account when mounting keypads.
Wiring Keypads Connect keypads to the control's keypad terminals 6Ð9 as shown below and in the
Summary Of Connections diagram at the end of this manual.
KEYPADS
RED
BLACK
GREEN
YELLOW
6
7
8
9
CONTROL
TERMINALS
KEYPAD CONNECTOR CABLE
¯
6128, 6137, 6139
KEYPAD CONNECTIONS
Keypads may be wired to a single wire run or individual keypads may be connected to
separate wire runs. The maximum wire run length from the panel to a keypad which is
homerun back to the panel must not exceed the following:

Ð 15 Ð
Wire Gauge Maximum Length
#22 gauge 450 feet
#20 gauge 700 feet
#18 gauge 1100 feet
#16 gauge 1750 feet
NOTE: The length of all wire runs combined
must not exceed 2000 feet when
unshielded quad conductor cable is used
(1000 feet if shielded cable is used.)
If more than one keypad is wired to a run,
then the above maximum lengths must be
divided by the number of keypads on the
run (i.e. the maximum length would be 225
feet if two keypads are wired on a #22
gauge run).
Setting the
Keypad Address
To set the keypad's address, do the following:
1. Enter the address mode: Power-up (plug-in) the keypad. Within 60 seconds of
system power-up, press and hold down the [1] and [3] keys at the same time for 3
seconds. (If unable to enter address mode, power-up and try again.)
The current keypad address will be displayed, and the cursor will be under the "tens"
digit. If 10 seconds have passed with no key entry, the keypad automatically exits
address mode. You must then power down, power-up and start address mode again.
Note: The keypad will not enter address mode if the panel to which it is connected
is in programming mode.
2. Set the current address to "00": Press [0] to clear the current "tens" digit. The
cursor will move to the "ones" digit position. Press [0] to clear the current "ones" digit.
The cursor will move back to the "tens" digit position.
3. Enter the keypad's address: Enter the proper "tens" digit of the keypad's
address. The cursor will move to the "ones" digit position. Enter the proper "ones"
digit of the keypad's address.
Note that address "31" sets the keypad to the non-addressable mode.
4. Exit the address mode:
Press [*] to save the displayed address and exit address mode.
Note: If 10 seconds passes with no key entry, the keypad automatically exits
address mode.
Viewing the Keypad Address
Press and hold down the [1] and [3] keys at the same time for about 3 seconds. The
current address will be displayed. No key entry is allowed in this mode. Press any key to
exit or wait 10 seconds to exit the viewing mode.
Powering Additional
Keypads
Up to five (5) 6139 keypads can be powered from the auxiliary power output provided
that the 750mA rating is not exceeded. The backup battery will supply power to these
keypads in the event that AC power is lost.
Additional keypads, up to the system maximum of 16, can be connected to the
system by using a regulated, 12VDC power supply (e.g., 488-12 supplies 12V,
500mA). Use a UL Listed, battery-backed supply for UL installations.
Connect additional keypads as shown below, using the keypad wire colors shown.
Make sure to observe the current ratings for the power supply used.
IMPORTANT
Common (Ð) of auxiliary
power supply must be
connected to (Ð) terminal
7 of the control panel.
SUPPLEMENTARY
POWER SUPPLY
+
–
CONTROL
TERMINAL STRIP
AUX AUX
.
DATA DATA
+–
IN OUT
6789
IMPORTANT:
MAKE CONNECTIONS
DIRECTLY TO SCREW
TERMINALS AS SHOWN.
MAKE NO CONNECTION
TO THE KEYPAD BLUE
WIRE (IF PRESENT).
TO KEYPAD RED WIRE
TO KEYPAD BLK WIRE
TO KEYPAD YEL WIRE
TO KEYPAD GRN WIRE
TO KEYPAD RED WIRE
TO KEYPAD BLK WIRE
TO KEYPAD GRN WIRE
TO KEYPAD YEL WIRE
POWERING ADDITIONAL KEYPADS

Ð 16 Ð
6139AV 2-Way Voice
Keypads
The control supports the VIM Voice Interface Module, which can support up to six
6139AV 2-way voice keypads. These keypads feature a built-in microphone and
speaker that allows a central station operator to "listen-in" and/or speak to persons at
the protected premises after an alarm has occurred. Note that during this Òlisten-inÓ
and/or ÒspeakÓ period, all alarms will be temporarily silenced. Refer to the
2-WAY
VOICE KEYPADS AND AUDIO ALARM VERIFICATION
section later in this manual for
details on wiring and using the VIM module and 6139AV keypads.
6139AV Audio Connection
In addition to the 4-wire connection to the control's keypad terminals, the 6139AV
requires a shielded 2-wire connection to a VIM Voice Interface Module. This
information is provided in the
2-WAY VOICE KEYPADS AND AUDIO ALARM
VERIFICATION
section.
Voice Interface Module
(VIM) Connection
The VIM connects to the control's keypad terminals in the same manner as any other
keypad. The VIM requires a device address to be set using its DIP switches, and
requires programming using the #93 Menu Mode Ð Device Programming. Refer to
the
2-WAY VOICE KEYPADS AND AUDIO ALARM VERIFICATION
section for
connection and programming information.

Ð 17 Ð
Section 5. ZONE CONFIGURATIONS
BASIC 9 HARD-WIRED ZONES
General Information
Zones 1-9 are reserved for traditional hard-wired devices. The following table summarizes
zone usage.
Zone 1 EOLR supervised or closed circuit unsupervised devices. Also
supports up to sixteen (16) 2-wire smoke detectors.
Zones 2, 3, 4, 6 EOLR supervised or closed circuit unsupervised devices. Also
supports 4-wire smoke detectors.
Zone 5 EOLR supervised or closed circuit unsupervised devices. Also
supports 4-wire smoke detectors.
Zone 7 EOLR supervised or closed circuit unsupervised devices. Also
supports 4-wire smoke detectors. Alternatively, can be used to
support remote keyswitch. If used for keyswitch, it cannot be used
as protection zone.
Zone 8 EOLR supervised or closed circuit unsupervised devices. Also
supports 4-wire smoke detectors. Zone 8 also supports latching
glass break detectors.
Zone 9 Unsupervised devices only. Programmable for fast response
(10mS). Can monitor fast acting glass break detectors or vibration
sensors if set for fast response.
Programmable Response Time For Zone 9:
Zone response time for zone 9 can be set to either 350mS (normal) or 10mS (fast) via
program field *14.
Hard-wired Zone 1
UL NOTE: EOLRs are required for UL installations.
Applications Can be used for EOLR supervised or closed circuit
unsupervised devices. It is the only zone that supports up to
sixteen (16) 2-wire smoke detectors.
Zone Response Type Any, except type 23 (no alarm)
Max. Zone Resistance 100 ohms, excluding EOLR
Unsupervised Usage ¥ Cut red PCB jumper.
¥ Only closed circuit devices can be used.
EOLR Supervised ¥ Leave red PCB jumper intact.
¥ Supports both open circuit and closed circuit devices.
¥ Connect open circuit device in parallel across the loop. The
2,000 ohm EOLR must be connected across the loop wires
at the last device.
¥ Connect closed circuit device in series with the loop.
EOLR Fire Zone: ¥ Leave red PCB jumper intact.
¥ Assign zone type 09 (fire)
¥ Supports up to sixteen (16) 2-wire smoke detectors.
¥ Second CODE + OFF sequence momentarily interrupts
power to reset the smoke detectors.
¥ See table that follows for compatible detectors.

Ð 18 Ð
Compatible Device Model #
Smoke Detectors (System Sensor)
Photoelectric 2100
Photoelectric w/ 135° heat 2100T
Photoelectric w/heat sensor, direct wire 2300T
Photoelectric, direct wire 2400
Photoelectric w/heat sensor, direct wire 2400TH
Photoelectric w/B401B base 2451
Photoelectric w/heat sensor & B401B base 2451TH
Ionization 1100
Ionization, direct wire 1400
Ionization w/B401B base 1451
Photoelectric duct detector w/DH400 base 2451
Ionization duct detect. w/DH400 base 1451DH
Zone 1 Advisories
If the EOLR is not at the end of the loop, the zone is not properly supervised. The system
may not respond to an open circuit within the zone.
The alarm current provided by this zone is sufficient to support operation of only one
detector in the alarmed state.
Hard-wired Zones 2Ð8
Applications Can be used for EOLR supervised or closed circuit unsuper-
vised devices. EOLRs are required for UL installations. Can also
support 4-wire smoke detectors. Zone 8 can support latching
glass break detectors.
Zone Response Type Any, except types 20Ð22 (these are used only for 5800 series
wireless transmitters).
Max. Zone Resistance ¥ Zones 2Ð7: 300 ohms, excluding EOLR
¥ Zone 1, 8: 100 ohms, excluding EOLR
Unsupervised Usage ¥ EOLR disabled in field *41 (enter 1).
¥ Only closed circuit devices can be used.
EOLR Supervised ¥ EOLR enabled in field *41 (enter 0).
¥ Supports both open circuit and closed circuit devices.
¥ Connect open circuit devices in parallel across the loop. The
2,000 ohm EOLR must be connected across the loop wires
at the last device.
¥ Connect closed circuit devices in series with the loop.
Glass Break Devices ¥ Supports up to 50 2-wire latching type glass break detectors.
on Zone 8 ¥ Configure as EOLR zone.
¥ Second CODE + OFF sequence momentarily interrupts
power to reset the glass break detectors.
¥ See table that follows for compatible detectors.
Smoke Detectors ¥ Supports as many 4-wire smoke detectors as can be powered
on Zones 2Ð8 (see UL note on next page).
¥ Assign zone response type 09 (fire).
¥ The zones must be configured for EOLR supervision.
¥ A normally-closed, momentary switch must be installed in
series with the power to the detectors in order to allow reset of
the smoke detectors after an alarm.
¥ The detectors must be wired in parallel, with the EOLR at the
last detector for full supervision.
¥ To supervise power, a System Sensor No. A77-716 EOL
Relay Module is recommended.

Ð 19 Ð
Compatible Glass Break Detectors
Use detectors which are compatible with the following ratings:
Standby Voltage:.......... 5VDC-Ð13.8VDC
Standby Resistance: Greater than 20k ohms (equivalent resistance of all detectors
in parallel)
Alarm Resistance:......... Less than 1.1k ohms (see note below)
Alarm Current: .............. 2 mA -Ð10 mA
Reset Time:.................. Less than 6 seconds
The IEI 735L series detectors have been tested and found to be compatible with these
ratings. Up to 50 IEI 735L detectors, connected in parallel, may be used (the alarm
current provided by this zone is sufficient to support operation of only one detector in
alarmed state). Follow the manufacturer's recommendations on proper installation.
Detectors which exceed 1.1k ohms in alarm, but maintain a voltage drop in alarm of less
than 3.8 volts can also be used.
Zones 2-8 Advisories
If latching type devices are installed on both zones 1 & 8, and these zones are assigned
to different partitions, there is a possibility that, if both devices go into alarm at the same
time, the resetting of one device could cause the loss of alarm memory in the other
device.
Use of N.O. or N.C. contacts on the same zone may prevent proper glass break detector
operation.
UL NOTE: 4-wire smoke detectors cannot be used in UL installations.
Hard-wired Zone 9
Applications This zone is unsupervised and is suitable for monitoring fast-
acting glass break sensors or vibration sensors when pro-
grammed for fast response.
Response Type Any type except fire (09), and types 20Ð22 (these are used
only for 5800 series wireless transmitters).
Response Time Fast (10 msec) or slow (350 msec) response selected in field
*14.
Max. Zone Resistance 300 ohms
Unsupervised Usage ¥ Only closed circuit devices can be used.
¥ Connect these devices in series with one another between
terminals 22 & 23.
Zone 9 Advisories
Avoid using mechanical magnetic or relay type contacts in this zone when programmed
for fast response.
UL NOTE: The interconnecting wires from zone 9 shall be no longer than 3 feet, with no
intervening walls or barriers for UL installations.

Ð 20 Ð
2-WIRE POLLING LOOP EXPANSION (Zones 10 through 64)
General Information
The following table summarizes polling loop expansion characteristics.
Applications ¥ Built-in 2- wire polling loop interface allows the number of
zones to be expanded from the basic 9 zones to up to 64
zones using various Remote Point Modules (RPMs). See
ADVISORIES below.
¥ The polling loop provides power to sensors and serves as
communication path between the panel and sensors.
¥ Refer to the list of compatible devices at the end of this
section.
RPM Address (ID) ¥ Each sensor must be assigned a unique address ID number
(from 10-64) before being connected to the polling loop. Care
must be taken to assign unique ID numbers to each sensor in
order to allow the panel to supervise and provide keypad
status indications for individual sensors.
¥ Most RPMs have DIP switches to set their addresses. The
4139SN, 4191SN, 4939SN, 4959SN and 998MX have
preprogrammed serial numbers which must be "enrolled" by
the control via the #93 menu programming mode.
Connections ¥ Connect RPM sensors to terminals 24 & 25.
¥ Sensors can be connected to a single run, or groups of
sensors may be connected to separate wire runs, star
configuration, without affecting the panel's ability to supervise
individual sensors.
¥ Follow the wiring instructions provided with individual
sensors. Be sure to observe sensor polarity when wiring.
¥ The maximum allowable wire run length between the panel
and the last sensor on a given wire run is shown in the table
below.
Maximum Polling Loop Wire Runs
Wire Gauge Max. Length
#22 gauge 650 feet
#20 gauge 950 feet
#18 gauge 1500 feet
#16 gauge 2400 feet
Note: Twisted pair recommended
for all normal wire runs.
Important: When in a star configuration, no individual run can be longer than the table
indicates, and the total length of all the sensor star runs, combined, cannot exceed 4000'.
If using shielded wire, the maximum is 2000'. If longer wire runs are needed, a 4197/4297
Loop Extender Module must be used (see instructions included with the 4197/4297).
Intercom Interference
If an intercom system is being used, the polling loop wires must be as far from the
intercom wiring as possible (minimum 6"). If this spacing cannot be achieved, shielded
wire must be used. If this is not done, interference on the intercom system might occur.
Also note that the maximum total wire length supported is cut in half when shielded wire is
used.
NOTE: Shield must be terminated at control terminal 30.
Advisories
The maximum allowable current draw from the polling loop is 64mA. Refer to the POLLING
LOOP CURRENT DRAW WORKSHEET (found in the POWERING THE SYSTEM section
of this manual) for current draws of various polling loop devices.
Make certain to include the total current drawn on the polling loop in the AUXILIARY
CURRENT DRAW WORKSHEET (see POWERING THE SYSTEM section) when figuring
the total auxiliary load on the panel's power supply.
/