Page is loading ...

PAGE 1 OF 5 0614 IH-974
π
Zebra ZM400 Printer
1-800-295-5510
uline.com
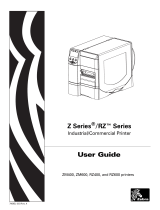
EXTERNAL VIEW
Control Panel Media Door
Power Switch
(O = off, I = on) AC Power Connector
Wireless Print Server
Card Slot (Ethernet)
Wireless Card
Ejector Button
Serial Port
Internal Wired Print
Server Port (Ethernet)
USB Port
Parallel Port
FRONT OF PRINTER
REAR OF PRINTER

PAGE 2 OF 5 0614 IH-974
PRINTER MEDIA COMPARTMENT
NOTE: For optimal printing quality and proper printer performance, it is recommended to use genuine
Zebra™ supplies. Specifically, the ZM400 is designed to work only with genuine Zebra™ printheads, thus
maximizing safety and print quality.
CONTROL PANEL
The control panel contains the lights that indicate basic operation and the buttons that you may need to press
during basic operation.
1Power Light On when the printer is on.
2Pause Light On when the printer is paused.
3Error Light Blinks or remains on when the printer needs attention.
4 Data Light Blinks quickly when the printer is receiving data.
5LCD Shows the printer's operating status.
6Pause Button Starts or stops printer operation when pressed.
Printhead Assembly
Control Panel
Media Door
Media Supply Guide
Media Supply Hanger
Ribbon Take-Up Spindle
Ribbon Supply Spindle
Dancer Assembly
Printhead Release Latch
1
23
4
5
6

PAGE 3 OF 5 0614 IH-974
LOADING MEDIA
CAUTION: When loading media, remove all
jewelry that could come into contact with the
printhead or other printer parts.
LOADING ROLL MEDIA IN TEAR-OFF MODE
1. Press printhead release latch to open printhead
assembly. Lift printhead until it latches open.
(See Figure 1)
2. Slide out media guide. (See Figure 2)
3. Remove and discard any tags or labels that are
dirty or are held by adhesives or tape.
(See Figure 3)
4. Flip down media supply guide. (See Figure 4)
5. Place roll of media on media supply hanger. Push the
roll as far back as possible. (See Figure 5)
6. Flip up media supply guide. (See Figure 6)
7. Slide in media supply guide until it touches the edge
of the roll. (See Figure 7)
8. Feed media under dancer assembly, upper media
sensor, and ribbon sensor. (See Figure 8)
Dancer
Assembly
Upper Media
Sensor
Ribbon Sensor
Media Path Diagram
Figure 1
Figure 2
Figure 3
Figure 4
Figure 5
Figure 6
Figure 7
Figure 8
Media Guide

PAGE 4 OF 5 0614 IH-974
9. Slide in media guide until it touches the edge of the
media. (See Figure 9)
10. Close printhead assembly. (See Figure 10)
11. If the printer is paused (the Pause light is on), press
PAUSE to enable printing.
LOADING MEDIA CONTINUED
LOADING RIBBON
Always use ribbon that is wider than the media to
protect the printhead from wear. For direct thermal
printing, do not load ribbon in the printer.
CAUTION: When loading ribbon, remove all
jewelry that could come into contact with the
printhead or other printer parts.
1. Press printhead release latch to open printhead
assembly. Lift printhead until it latches open.
(See Figure 1)
2. Insert ribbon into the printer. In this step, follow the
instructions for the Thermal Transfer option installed
in the printer.
a. Hold ribbon with loose end unrolling clockwise.
(See Figure 11)
b. Place roll of ribbon on the ribbon supply spindle
and push it all the way back. (See Figure 12)
c. Pull the end of the ribbon under printhead
assembly and out of the front of the printer.
Extend ribbon approximately 24" out of the
printer. (See Figure 13)
Printhead Assembly
Ribbon
Ribbon Supply Spindle
Figure 9
Figure 10
Fig u re 11
Figure 12
Figure 13
Media Guide

PAGE 5 OF 5 0614 IH-974
PRINT A CONFIGURATION LABEL
A configuration label lists the printer settings that are
stored in configuration memory. After the media is
loaded, print a configuration label as a record of the
printer's current settings.
1. On the control panel, press SETUP/EXIT.
2. Scroll through the parameters until you reach LIST
SETU P.
3. Press SELECT to select the parameter.
4. Press PLUS (+) to confirm printing.
5. A configuration label will print. (See Figure 16)
d. Close printhead assembly. (See Figure 14) e. Wind ribbon clockwise onto ribbon take-up
spindle. (See Figure 15)
LOADING RIBBON CONTINUED
π CHICAGO • ATLANTA • DALLAS • LOS ANGELES • MINNEAPOLIS • NYC/PHILA • SEATTLE • MEXICO • CANADA
1-800-295-5510
uline.com
Figure 14 Figure 15
Figure 16
Ribbon Take-Up
Spindle
/