Quick Start Guide
Xonar U5 SI
5.1-Channel Audio Card
Q10073 / First Edition / December 2014
Package Contents
1. Read and keep these instructions for future reference.
2. Follow all instructions and take note of all warnings.
3. Do not use this apparatus near water or expose the device to moisture.
4. Clean machine surface with a cloth. Avoid using detergent or cleaning uid.
5. Do not block any ventilation openings. Install in accordance with the manufacturer’s instructions.
6. Do not install near any heat sources such as radiators, heat registers, stoves, or other apparatus (including
ampliers) that produce heat.
7. The polarized or grounding-type plug is for user safety. A polarized plug has two blades with one wider than the
other. A grounding type plug has two blades and a third grounding prong. The wide blade or the third prong is
provided for your safety. If the provided plug does not t into your outlet, consult an electrician for replacement
of the outlet.
8. Protect the power cord from being stepped on or compressed particularly at the point where it exits from the
apparatus.
9. Only use attachments/accessories approved by the manufacturer.
10. Use only with the cart, stand, tripod, bracket, or table specied by the manufacturer, or sold with the apparatus.
When using a cart, take care to avoid tipping over the load when moving the device.
11. Unplug this apparatus during lightning storms or when not in use for a long period of time.
12. Refer all repairs to qualied service personnel. Servicing is required when the apparatus has
been damaged in any way, such as when the power-supply cord or plug is damaged, liquid has
been spilled or objects have fallen into the apparatus, the apparatus has been exposed to rain or
moisture, does not operate normally, or has been dropped.
Safety Information
This package should contain the following:
• ASUSXonar™U5SI5.1-ChannelAudioCardx1
• USBCablex1
System Requirements
Driver Installation
ToensureasuccessfulinstallationofthetheXonarU5SIaudiocard,yourcomputermustmeetthefollowing
requirements:
• 32/64bitMicrosoft®Windows®7/Windows®8/Windows®8.1
• Intel®Pentium®41.4GHz,AMDAthlon1400CPU,orfasterCPU
• 256MBsystemmemory
• 60MBavailablestoragespacefordriverinstallation
• CD-ROMdrive(orDVD-ROMdrive)forsoftwareinstallation
• High-qualityheadphones,poweredanalogspeakers,oraDolbyDigitaldecoder
AfterconnectingtheXonarU5SIaudiocardtoyourcomputer,youneedtoinstallthedevicedriverthatenablesthe
XonarU5SIaudiocardtoworkwithWindowsoperatingsystem.
NOTE: Driver version and the contents of the support CD are subject to change without notice.
To install the device driver:
1. InserttheASUSXonarU5SIsupportCDintoyouropticaldriveordownloadthedriverfromtheASUSsupportsite.
IfAutorunisenabled,theASUSXonarCardDriverscreenappearsautomatically.Gotostep4.IfAutorunisnot
enabled in your computer, perform step 2.
2. Click Computer on your desktop and double-click the optical drive icon.
3. Double-click setup.exe located on the optical drive.
4. Click Driver to start the installation.
5. Follow the on-screen instructions to complete the installation. Read, understand, and accept the END USER
LICENSE AGREEMENT before continuing the installation.
6. When the installation nishes, you may be prompted to restart your computer. You can choose to restart the
computer at a later time.
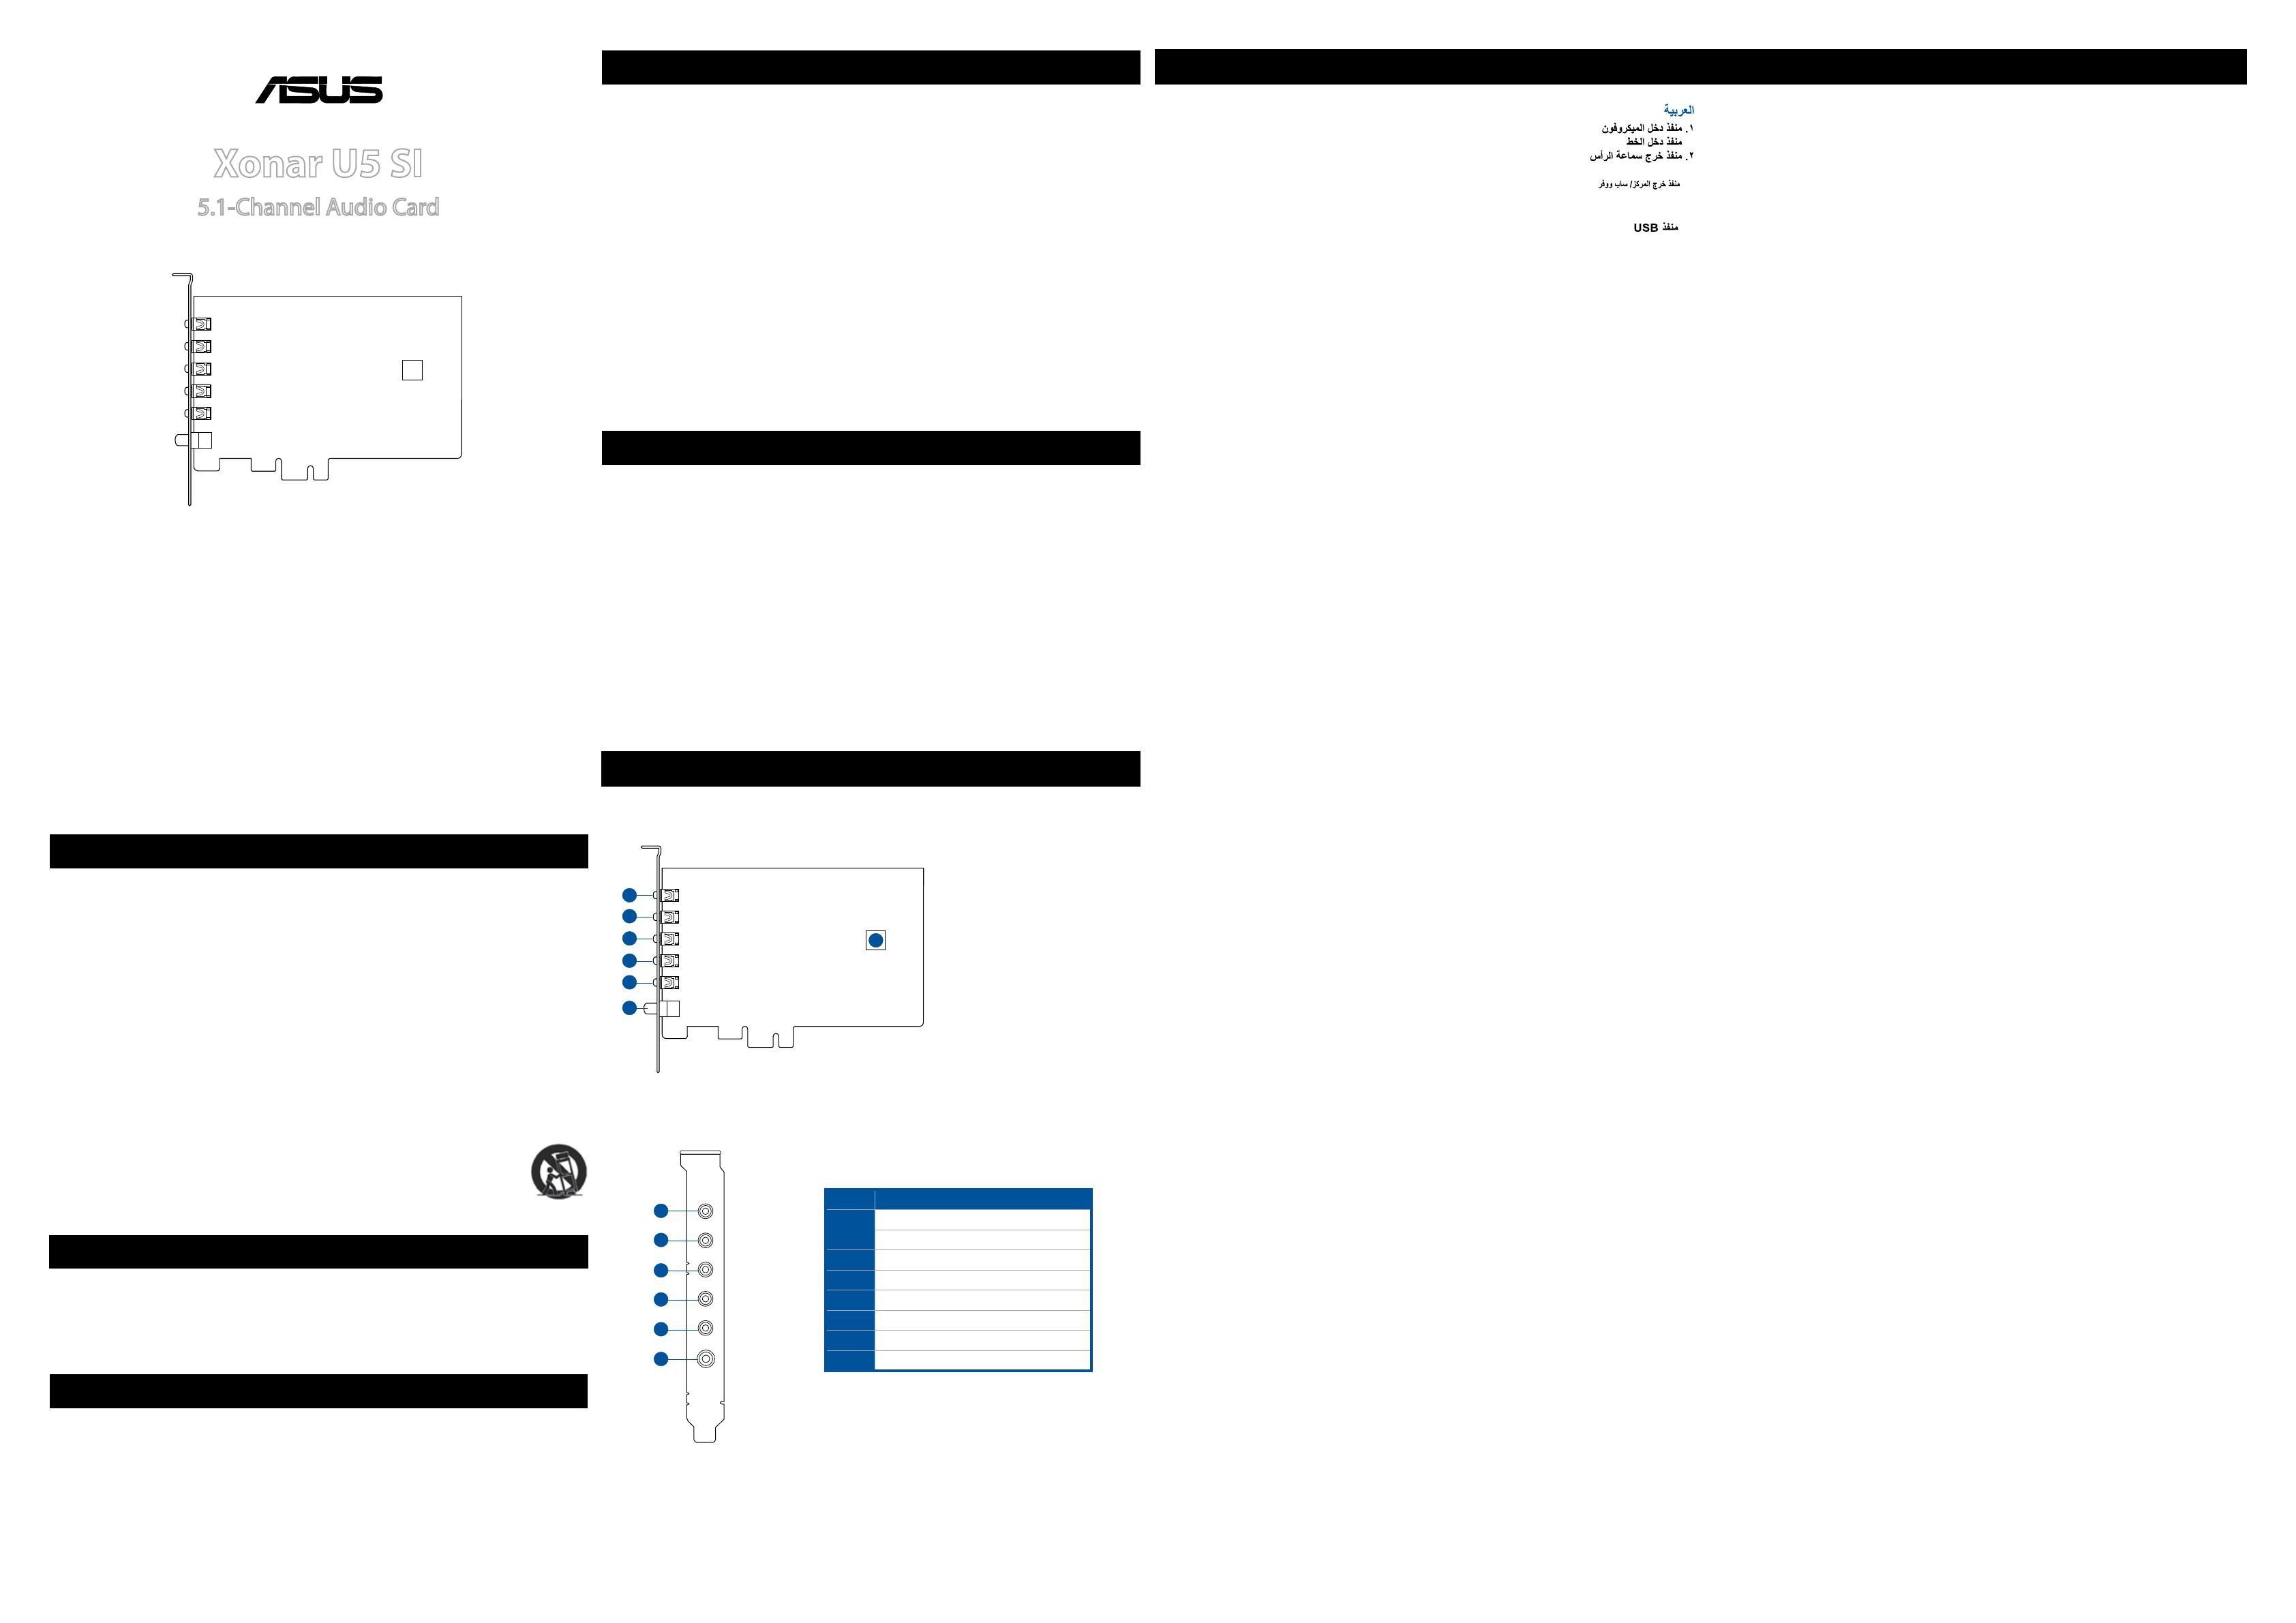
Hardware Features
Side view
Back view
Hardware Features
Vonalbemenetiport
2 Fejhallgató-csatlakozó
3 Első kimeneti port
4 Középső/Mélysugárzókimenet
5 Hátsókimenetiport
6 S/PDIF kimeneti port
7 USB-port
Bahasa Indonesia
1 PortMasukMikrofon
PortMasukSaluran
2 Port keluar headphone
3 Port output depan
4 Port keluar tengah/subwoofer
5 PortBelakangKeluar
6 S/PDIF Out header
7 PortUSB
NORSK
1 Mikrofon-inngangsport
Linje Inn-port
2 Hodetelefon-utgangsport
3 Fremre utgangsport
4 Senter/subwoofer-utgangsport
5 Bakreutgangsport
6 S/PDIF ut-port
7 USB-port
POLSKI
1 Port wejściowy mikrofonu
Wejściowy port liniowy
2 Port wyjściowy słuchawek
3 Port wyjściowy głośnika przedniego
4 Port wyjściowy głośnika centralnego/subwoofera
5 Port wyjściowy głośnika tylnego
6 Port wyjściowy S/PDIF
7 PortUSB
PORTUGUÊS
1 Porta de entrada de microfone
Porta de entrada de linha
2 Porta de saída auscultadores
3 Porta de saída frontal
4 Porta de saída central/Subwoofer
5 Porta de saída traseira
6 Porta de saída S/PDIF/Lateral
7 PortaUSB
SLOVENŠČINA
1 Vratazavhodmikrofona
line-in
2 Vratazaizhodslušalk
3 Izhodna vrata za sprednji zvočnik
4 Vratazasrednji/nizkotonskizvočnik
5 Vratazazadnjizvočnik
6 VratazaizhodS/PDIF
7 VrataUSB
ESPAÑOL
1 Puerto Entrada de micrófono
Puerto Entrada de línea
2 Puerto para Auriculares
3 Puerto de salida frontal
4 Puerto de Salida Central/Subwoofer
5 Puerto Salida posterior
6 Puerto Salida S/PDIF/Salida lateral
7 PuertoUSB
SVENSKA
1 Mikrofonin-port
Inledningsport
2 Hörlursutgång
3 Framsida ut-port
4 Center-/subwooferutgångsport
5 Bakreutgång
6 S/PDIF-utgång
7 USB-port
TÜRKÇE
1 MikrofonGirişportu
HatGirişportu
2 KulaklıkÇıkışportu
3 ÖnÇıkışbağlantınoktası
4 Merkez/SubwooferÇıkışportu
5 ArkaÇıkışbağlantınoktası
6 S/PDIFÇıkışı/YanÇıkışbağlantınoktası
7 USBBağlantıNoktası
УКРАЇНСЬКА
1 Порт входу мікрофону
Порт входу лінії
2 Порт виходу навушників
3 Передній порт виходу
4 Порт Центр / Вихід сабвуфера
5 Задній порт виходу
6 Порт виходу S/PDIF
7 ПортUSB
No. Item
1MicrophoneInport
Line In port
2HeadphoneOutport
3Front Out port
4Center/Subwoofer Out port
5Rear Out port
6S/PDIF Out port
7USBPort
繁體中文
1 麥克風輸入插孔
音源輸入插孔
2 耳機輸出插孔
3 前方喇叭輸出
4 中央 / 重低音喇叭輸出
5 後方喇叭輸出
6 S/PDIF 輸出插孔
7 USB 連接埠
簡體中文
1 麥克風輸入插孔
音源輸入插孔
2 耳機輸出插孔
3 前方揚聲器輸出
4 中央 / 重低音揚聲器輸出
5 後方揚聲器輸出
6 S/PDIF 輸出插孔
7 USB 接口
FRANÇAIS
1 Port d’entrée microphone
Port d’entrée audio
2 Prise casque
3 Sortie audio avant
4 Sortie centrale/caisson de basses
5 Port de sortie arrière
6 Sortie S/PDIF
7 PortUSB
DEUTSCH
1 Mikrofoneingang
Line In-Port
2 Kopfhörerausgang
3 VordererAnschluss
4 Center/Subwoofer-Ausgang
5 Rück-Surround-Ausgang
6 S/PDIF-/Seiten-Ausgang
7 USB-Port
ITALIANO
1 PortaIngressoMicrofono
Porta ingresso linea audio
2 Porta Uscita Cue
3 Uscita altoparlanti anteriori
4 Porta Uscita Centro/Subwoofer
5 Porta Uscita Posteriore
6 Uscita altoparlanti laterali/ Uscita S/PDIF
7 PortaUSB
日本語
1 マイク入力ポート
ライン入力ポート
2 ヘッドホン出力ポート
3 フロント出力ポート
4 センター / サブウーファ出力ポート
5 リア / バックサラウンド出力ポート
6 S/PDIF 出力ポート
7 USB ポート
РУССКИЙ
1 Разъем для микрофона
Аудиовход
2 Разъем для наушников
3 Выход фронтального канала
4 Выход центрального канала/сабвуфера
5 Выход тылового канала
6 S/PDIF-выход
7 USB-порт
한국어
1 마이크 입력 포트
Line 입력 포트
2 헤드폰 출력 포트
3 전면 출력 포트
4 센터 / 서브우퍼 출력 포트
5 후면 출력 포트
6 S/PDIF 출력 / 측면 출력 포트
7 USB 포트
S/PDIF
БЪЛГАРСКИ
1 Вход за микрофон
Line In порт
2 Изход за слушалки
3 Изходен порт отпред
4 Изходен порт център/събуфер
5 Заден изход
6 S/PDIF изход
7 USBпорт
HRVATSKI
1 Ulazni priključak za mikrofon
Linijski ulazni priključak
2 Izlaznipriključakslušalica
3 Prednji izlazni priključak
4 Priključak izlaza srednjeg/bas zvučnika
5 Stražnji izlazni priključak
6 S/PDIF izlazni/bočni priključak
7 USBpriključak
ČEŠTINA
1 Port vstupu mikrofonu
Linkový vstup
2 Výstupníportpropřipojenísluchátek
3 Přednívýstupníport
4 Portvýstupustředovéhoreproduktoru/subwooferu
5 Zadní výstupní port
6 VýstupníportS/PDIF
7 PortUSB
DANSK
1 Mikrofonindgangsstik
Linje-indgang
2 Høretelefonudgangsstik
3 Udgangsstik foran
4 Midter/Subwoofer-udgangsstik
5 Udgangsstikbagpå
6 S/PDIF-udgangsstik
7 USB-port
NEDERLANDS
1 Microfooningang
Lijningang
2 Hoofdtelefoonuitgang
3 Uitgang voor
4 Midden/subwooferuitgang
5 Uitgang achter
6 S/PDIF-uitgang
7 USB-poort
SUOMI
1 Mikrofonituloportti
Linja sisään -portti
2 Kuulokelähtöportti
3 Etulähtöportti
4 Keski-/Subwoofer-lähtöportti
5 Takalähtöportti
6 S/PDIF-lähtöportti
7 USB-portti
ΕΛΛΗΝΙΚΆ
1 Θύρα εισόδου μικροφώνου
Θύρα εισόδου γραμμής
2 Θύρα εξόδου ακουστικών
3 Πρόσθια θύρα εξόδου
4 Κεντρική/Subwoofer θύρα εξόδου
5 Οπίσθια θύρα εξόδου
6 Θύρα εξόδου S/PDIF
7 ΘύραUSB
MAGYAR
1 Mikrofon-csatlakozó
Hardware Installation
NOTE:Beforeyouproceedwiththefollowinginstallationsteps,it’srecommendedthatyoudisableyour
onboardaudiodeviceinyourBIOSsettings,oruninstallanyotheraudiocardsonyourPC.(For
BIOSsettingoruninstallationofothersoundcards,refertotheusermanualsofyourmotherboard
and audio card.)
ToinstalltheXonarU5SIAudiocard:
1. Power OFF the computer, the monitor, and all other peripheral devices connected to your computer.
2. Unplug the computer power cord from your computer and power outlet.
3. Touch the metal back or side panel of the computer to avoid static electricity.
4. Remove the chassis cover.
5. RemovethemetalbracketfromanavailablePCIeslotfortheXonarU5SIaudiocard.
6. Carefully insert the audio card into the PCIe slot. Ensure the audio card sits properly in place.
7. ConnecttheUSBportofXonarU5SItotheinternalUSBportofyourmotherboardwithacableprovidedbyASUS.
8. Secure the audio card with screws and the metal bracket.
9. Put back the chassis cover.
10. Reconnect all cables.
11. Plug the power cord to the computer and to a power outlet.
12. PowerONthecomputer.
7
3
2
1
4
5
6
Mic/Line-in
Headphone
Front
Rear
Center
S/PDIF
3
2
1
4
5
6

