Page is loading ...


TABLE OF CONTENTS
Introduction............................. 2
Features .............................. 3-5
Getting Started ......................... 5-6
Adjusting The Monitor Settings .............. 6-7
Lighting .............................. 7-8
Ice Fishing Application ..................... 8
Open Water Application .................... 9
Battery Charging ....................... 9-10
Product Performance Specifications ........... 10
Warranty.............................. 11
Service Information ...................... 12

INTRODUCTION
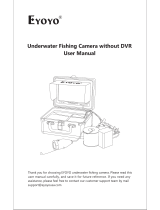
Thank you for purchasing the VS820 underwater viewing system
from MarCum Technologies Inc., the most technologically advanced
underwater viewing system available.
Welcome to the world of underwater viewing. MarCum Technologies
has incorporated the latest technology in producing the most
compact, technologically advanced and versatile underwater
viewing system available. Your new VS820 can be used to hunt for
underwater treasures, locate the “spot on the spot”, observe fish
in their natural habitat or learn how fish react to your lure or bait
presentation. The applications are endless.
MarCum’s primary objective is to enhance the experience of the
outdoor enthusiast. We believe we’ve created a feature laden viewing
system that is not only user friendly but as easy to use in open water
as it is on the ice. You will now be able to stop guessing at what is
below the surface and start seeing the real mysteries of underwater
life. Have fun and good viewing!
2

3
FEATURES
•600vx800hsuper-highresolutionLCDmonitorequippedwith
a sophisticated, thermostatically controlled heater to enhance
your viewing experience in winter conditions.
•SonyCCDSuperHADblackandwhitecamera.
•MantacameradesignutilizingDarkwatertechnologylighting
system.
•Dualunderwaterlightingoption.Choosebetweensuperhigh
intensityblueL.E.D.lightsorstealthyinfraredlighting.
•75feetofhighstrength,flexiblecameracable.
•Removabledown-viewandtrollingfin.
•Frontkeypadcontrolpanel.
•Onscreenmonitoradjustments.
•VideoOutputjack.
•90°cableconnectionstopreventcablewear.
•Paddedsoftpackencompassesinternalmoldedcasethatstores
battery,cameracable,andMantacamera.Providesfor
maximum portability and protection.
•7.2amp12vrechargeablebatterywith1-amp,2-stagecharger.
•Full1YearWarranty
The600vx800hsuperhighresolutionLCDmonitorontheVS820
viewing system provides for an extraordinarily sharp and clear
picture under most viewing conditions. The daylight viewable monitor
requiresnosunshieldwhileviewingoutdoors.Thismakesitmore
versatile for summer use or while viewing outside on the open
ice. It’s recommended when viewing outdoors, that the backlight
(brightness) be increased to enhance your viewing experience.
Althoughclassifiedasdaylightviewable,itisrecommendedthatyou
turnthemonitorawayfromdirectsunlight.Asindicated,thescreen
brightness can be adjusted to improve outside viewing but with direct
lightandmonitorglareitcandetractfromthepicturequality.
Theultra-thinmonitorhousingissealedwitharubbergasketandall
plug-inconnectionsarepottedtoprotecttheinternalelectronicsfrom
theharshelements.TheVS800seriesLCDsystemsareconsidered
water resistant. They’re designed to be used in the outside
elements under most conditions but they’re not recommended to
be submerged underwater. While operating in cold temperature’s,
theVS820utilizesasophisticated,thermostaticallycontrolledLCD
heating element which allows the monitor to operate at near optimal
temperature. You may experience some blurriness or slow down
inLCDperformancewhenyoufirstpowerupthescreenincold

temperatures. It can take up to several minutes before the screen
temperature reaches the appropriate operating range.
Inordertocreateanultraclear-highresolutionpicture,there
needstobeamatchinghighqualitycamera.TheVS820usesthe
bestcameramoduleavailable;theSonySuperHADultralowlux
CCD.Thiscameraoffersa90°angleofview,givingtheuserawide
coverage area for maximum visibility.
TheMantacameradesignmatchesthehighqualitySonySuper
HADCCDcameratoachoicebetweenadjustablehighintensityblue
LED’sorstealthyinfraredlighting.Bothlightingoptionsincorporate
MarCum’sexclusiveDarkwaterlightingtechnology.Theusercan
switch between the two lighting options and control the intensity of
theLED’sbymakinguseofthedigitalkeypad.Darkwatertechnology
greatly reduces particulate reflection and increases viewing distance
by positioning the lights above and behind the actual camera lens.
Adjustingthesettingsonamonitorhasneverbeensoeasy.The
digital keypad activates an onscreen display for making adjustments
to the monitor brightness, contrast, color and sharpness. In
addition to adjusting the monitor screen settings, the digital keypad
also controls underwater lighting options, dimmer for controlling
underwaterlightingintensityandpowerON/OFF.
To clean the monitor screen, use a cleaner recommended for plastic
and a soft cloth towel.
Sharing your video is easy. The video output jack located on the rear
of the monitor allows for adding an external monitor such as a bigger
screen TV or a video recording device.
Thecameraandpowercableshavebeendesignedwith90°terminal
connectionstopreventcablewear.Alongwiththe90°connections,
each cable connector is keyed differently to prevent plugging the
cable into the wrong port. The rear cable access panel provides
cable strain relief and is screwed to the back of the monitor. The
panel securely holds the cables in place and prevents unnecessary
wear.
The75feetofreinforcedcameracableisflexibleforeaseofhandling
yet offers high tensile strength.
The Manta camera incorporates internal ballast weights within
4

5
the camera housing. The amount of weight is ideal for trolling at
lowspeedsorkeepingthecameratrackingsmoothincurrent.For
added open water stability or to use as a down view camera, the
fin (included) snaps into the rear of the Manta camera housing with
ease.
FollowingMarCum’sstandards,theVS820isprotectedwithastylish
reinforced padded soft pack case. Under the soft pack is a molded
ABShardcasewithabuiltinbatterytrayandaVelcrostrapto
securelyholdthebatteryinplace.Nexttothebatteryisastorage
compartment for the camera and camera cable. The monitor folds
down flat and the padded case encompasses the entire system
protectingitduringtransportation.Ontheleftsideofthecaseisa
carrying handle for ease of transport.
Thesealed7.2amprechargeablelead-acidbatterycanprovideup
to8hoursofcontinuoususeduringidealconditions.Batteryruntime
will vary depending on the condition of the battery, use of underwater
LEDlighting,levelofscreenbacklight(brightness)andLCDheater
system.The1amp,two-stagechargerwillquicklychargethebattery
backtofullcapacity.Oncecharged,asmallgreenLEDlightwillbe
illuminated to indicate the charger has switched to a trickle charge
mode.
The VS820 offers a full one year warranty backed by MarCum’s
first-ratecustomerservice!
GETTING STARTED
TheVS820hasbeenset-upandtestedatthefactorybeforebeing
placed into its retail packaging.
RemovetheVS820fromthepackagingandplaceonalevelsurface
with the MarCum Technologies logo facing towards you and right side
up.OpenthetopcoverofthesoftpackbyliftingupontheVelcro
closersoneachsideandfrontofthesoftpack.Onceopened,loosen
the knobs on the either side of the gimbal bracket (at the base of
themonitor)byturningeachonecounter-clockwise.Makesureto
loosen the knobs a considerable distance. Than depress both knobs
by pushing inwards and hold in place. This releases the lock on the
monitor angle. While depressing the knobs with the base of your
palms, use the index fingers of each hand and gently lift the monitor
up to the desired viewing position and release tension on the gimbal
knobs.Onceyouhavesetthemonitortothedesiredviewingangle,

gently tighten the knobs until they are snug. The battery, camera
and cable are now accessible behind the monitor. It’s easiest to
removetheVelcrostrapsandunzipthesoftpackcase.Thebattery
cable connectors can now be connected to the battery by attaching
the corresponding wire colors to the correct terminal. The positive
(red) wire from the monitor can be connected to the positive (red)
terminal on the battery. The negative (black) wire coming from the
monitor can be connected to the negative (black) terminal on the
battery.Aftertheterminalshavebeenconnected,theVS820isready
for use. (Note: The battery leads should stay connected at all
times other than while charging. This will be covered later in the
charging process.)
ToturnONtheVS820,pressthepowerkeywhichislocatedonthe
keypadonlowerleftsideonthefrontofthemonitor.Afterpressing
thepowerkey,asmallredLEDindicatorlight–locatednexttothe
powerbutton-willturnON.Themonitorshouldnowbedisplaying
the image being transmitted from the camera. The camera can now
be unwrapped from the cable spool and deployed into the water to
the desired depth.
The depth of field (distance the camera can see underwater)
depends on the clarity of the water and available light at the depth
the camera is used. In clear water, the depth of field can be many
feet but in cloudy or muddy water the depth of view can be reduced
to only a few inches due to particles suspended in the water.
ADJUSTING THE MONITOR SETTINGS
The VS820 monitor has four different adjustments that can be
madebyutilizingtheon-screendisplay.Theseadjustmentscan
be made to enhance the image on the monitor to the user’s
preference. (note: The VS820 has been pre-set with factory
defaults for normal viewing.) To access the settings menu,
press the menu key on the digital keypad. The settings menu will
be displayed on the screen (note: if you wait too long before
selecting an adjustment, the menu screen will time out and
disappear).Tochangebetweenon-screenadjustmentchoices
(brightness, contrast, color, sharpness), continue to press the
menukey.Theselectedon-screenadjustmentwillbehighlighted
ontheLCDscreen.Tochangethesettingswithinaselected
menu,usetheUPandDOWNarrowslocatedonthefarright
of the digital keypad. You will see the numbers of the selected
adjustment increase or decrease depending on the arrow
6

7
direction you are depressing. To accept the changes, release
theUP/DOWNarrowandsettingswillbesaved.Oncethe
settingsareadjustedproperly,theon-screenmenuwillshutoff
automatically.
Contrast -Contrastisthedifferenceinbrightnessbetweenlightest
anddarkesttonesinapicture.Apicturewithtoomuchcontrasthas
highlights (lighter tones) that are too bright and no detail and shadow
areasthataretooblack.Apicturewithtoolittlecontrastlooksdull,
withnotrueblacksandmoregrayishhighlights.Differentwater
clarities coupled with the amount of light available will affect the
contrast.Adjustthecontrasttothedesiredsettingforthebestoverall
picture.
Brightness-Usethebrightnessadjustmenttochangetheoverall
brightness of a picture. You can lighten a picture that's too dark,
ordarkenonethat'stoolight.Differentlightingconditionsand
waterclaritywillaffectthebrightnessofthepicture.Byadjusting
the brightness, the backlight of the monitor will increase making
the picture brighter. This can be helpful when viewing the VS820
outdoorsduringdaylighthoursAdjustingthebrightnesscanmakethe
monitor easier to see.
Sharpness-Sharpnessistheamountofhigh-frequencydetail
intheimage.Adjustthesharpnessaccordingtopersonal
preference. (note: increasing the contrast can give an
impression of increased sharpness, so try this first).
Color -Increasingthecolorsaturationwithablackandwhitemonitor
will increase the darkness of the blacks and make the picture look
darkeroverall.Decreasingthecolorsaturationwillmaketheblacks
and darker colors look washed out and gray.
LIGHTING
The VS820 gives the user an option to use either super high intensity
blueLEDlightsorthestealthierinvisibleinfraredlights.TheVS820
incorporatesDarkwatertechnologywhichgreatlyreducesparticulate
reflection and increases viewing distance by positioning the lights
above and behind the actual camera lens.
ToturnthelightingsystemON,pressthekeytitledLIGHTS,located
onthedigitalkeypadonthefrontofthemonitor.Bypressingthe
keyonetime,asmallyellowLEDlighttotherightofthebuttonwill

beilluminated.ThisindicatesthatthehighintensityinfraredLED
lightsareON.BypressingtheLIGHTkeyasecondtime,thesame
LEDlightnexttotheLIGHTkeywillbeilluminatedgreentoindicate
thesuperhighintensityblueLEDlightsareON.Toturnthelighting
systemOFF,pressthelightbuttonathirdtime.Whenthelights
arefirstturnedON,theywillbeatthelowestlevelofintensity.To
increase the intensity of either lighting option while the lights are
ON,presstheUParrowkeyontherightsideofthedigitalkeypad.
There are (4) levels of lighting intensity. To decrease the intensity of
thelightswhilethelightsareON,pressthedownkeyontheright
sideofthedigitalkeypad(note:whentheLEDlightsarefirstturned
on, they will always be set at the lowest level of light intensity). The
amountofLEDlightrequiredwilldependontheclarityandamount
ofparticulatesinthewater.Darker,stainedwaterwillrequiremore
light while clear water will have sufficient light penetration therefore
decreasingtheneedforLEDintensity.
ICE FISHING APPLICATION
The VS820 can be used to entertain the kids or as the perfect tool
to enhance your ice fishing experience. The VS820 can be used to
search for that perfect weed line or locate the crib or rock pile where
fish will generally school To use as a search tool, drill a series of
holes through the ice in the location you’re interested in fishing. The
VS820 is small enough to hold in your arms while walking from hole
tohole.Dropthecameradowneachholeinsearchforthebestspot
oruntilyoulocatefish.Onceyou’velocatedthespot,drillahole3
or 4 feet away from the hole you’re actually going to fish in. Set the
VS820 on the ice and lower the camera down the second hole. To
assist in keeping the camera at the desired depth and direction, it
isrecommendedthataCameraCompassorIceArm(purchased
separately)beused.Onceyousendalureorbaitdownandlocate
it with the VS820, you’re ready to fish. The depth and direction of the
VS820 can be changed at any time by lowering or raising the camera
and rotating the camera cable between your fingers. The VS820 also
includes a down viewing fin that snaps into the back of the Manta
camera.Oncethefinisattached,thecameracablecanbeinserted
through the cutout at the rear of the fin and locked into place. It
is recommended that you leave about six inches of excess cable,
forming a loop, before locking the cable into place. The camera can
now be lowered into the hole to view what is directly below you. This
can be very helpful while fishing in shallow water.
8

9
OPEN WATER APPLICATION
To locate fish, look for treasure or find that perfect spot, simply turn
thecamerapowerONanddroptheMantacameraintothewater.If
you’re drifting with the wind or using a trolling motor with the VS820,
attach the supplied trolling fin to the rear of the Manta Camera for
added stability. The internal weight is enough to keep the camera
down while the fin assists in keeping the Manta camera tracking
straight through the water. If the camera becomes hung up, back
up from the direction you were traveling from and slowly try to back
the camera out of the snag. DO NOT pull directly upward with force
unless all other avenues have been pursued.
BATTERY CHARGING
Rechargingthebatteryaftereveryuseisrecommended.Thecharger
thatwassuppliedwiththeVS820isa1-amptwo-stageDCcharger.
To charge your system, simply connect the positive (red) and
negative (black) female connector from the charger to the positive
(red)andnegative(black)maleendatthebattery.Onceconnected,
plugthechargerintoa110voltACwalloutlet.TheLEDindicator
light on the charger will be red when the charger is in a charging
mode.TheLEDindicatorlightonthechargerwillturngreenwhen
thechargerswitchestoatricklecharge.The7.2amphour,12-volt
battery that was supplied with the VS820 system should take about
8to10hourstochargefromacompletelydischargedstate.
WhenthegreenLEDlightison,disconnectthechargerfromthe
batteryandwalloutlet.IfthegreenLEDlightdoesnotcomeon
after10to12hoursofchargingtimeorthegreenLEDlightcomes
on relatively soon after the charger is plugged in, this may indicate
that the battery will not accept a full charge. If this occurs and your
camera run time is greatly diminished, you may want to replace the
batterywithabatteryofequalspecification.
Ifyourviewingimageappearscloudy,fuzzyorthescreenbegins
toshrink,checkyourbatterycharge.Oneofthemajorsymptoms
ofadeadornear-deadbatteryisthedegradationofyourviewing
image. Try charging your battery or if the battery is unable to hold
a charge, replace it with a new one of similar specification. If you
need to remove the battery, unplug the two battery terminals from the
battery.RemovetheVelcrostrapthatisholdingthebatteryinplace
and lift the battery out. To replace the battery, place a new battery
into the battery compartment and secure it with the Velcro strap and
re-connectthepositiveandnegativeterminals. MarCum does not

warranty batteries beyond 90 days from date of purchase.
Tip: To preserve battery run time, try to keep the VS820 in a
relativelywarmenvironmenttominimizetheuseofthebuiltinLCD
heatersystem.Bystartingoutwithawarmmonitor,thereisless
powerconsumedandlesswarmuptimerequired.
PRODUCT PERFORMANCE SPECIFICATIONS
Battery..............................................12voltDC,7.2Amphr.
Charger.............................................12voltDC,1Amp
Camera:
ImageSensor..............................1/3”SonySUPERHADCCD(B/W)
Resolution...................................400horizontallines
LightSensitivity........................... 0luxwithlightson
FieldofView............................... 90degrees
Monitor.............................................8”4:3aspectTFTLCD(600vx800h)
Current Draw:
SystemON(lightsoff).................630mA
SystemON(lightson—full).........815mA
10

11
One-Year Warranty
To activate your warranty, you must send the original sales
receipt or photo copy with the warranty card. The warranty will
beVOIDwithouttheaccompanyingsalesreceipt.Foraperiod
of one year from the date of purchase, MarCum Technologies
will provide free parts and labor on any defects in materials
or workmanship, with exception of the following conditions:
damaged or cut cables, lost components, damage due to
misuse,unauthorizedmodifications,orrepairs.
MarCum does
not warranty batteries beyond 90 days from date of purchase.
The manufacturer must perform all warranty work or repairs.
Ifyourunderwaterviewingsystemrequiresservice,callus
atthenumberlistedbelowtoreceiveaReturnMerchandise
Authorization(RMA)numberorgoonlineto
www.marcumcustomerservice.com. DO NOT return product to
ourPOBox.Thisreturnprocesshasbeenimplementedbecause
we may be able to save you the inconvenience of returning the
unit. Some problems may be resolvable by a technician over
the phone. If the unit is sent back to MarCum Technologies for
repair,marktheRMAnumberontheoutsideofthepackage
andenclosealetterindicatingtheproblem.Pleaseincludeyour
return address and daytime phone number.
Foryourconvenience,savetheoriginalboxandpacking
materialsforuseiffactoryreturnisrequired.Forwarrantyrepair
and/orservice,callacustomerservicerepresentativeat(763)-
323-0456.

12
Service Information
MarCum Technologies is dedicated to providing you with the
best customer service possible. We have designed a web site
dedicated to providing you, our customer, with answers to your
questions,accesstoproductaccessories,repairinformation,
online owner’s manuals, etc. These services can be obtained
by going on line at www.marcumcustomerservice.com. We
highly recommend that you take advantage of this service and
utilizeitasyourfirstlineofcontact.Forthoseofyouthatdon’t
have access to a computer, you can call our customer service
departmentat(763)-323-0456,MondaythroughFridayfrom
9:00amto5:00pmCST.
When returning product for repair, please obtain a return
merchandiseauthorization(RMA)numberbygoingonlineat
www.marcumcustomerservice.com or by calling
(763)323-0456Thisnumbermustbedisplayedontheoutside
of the box and will be used as a reference number when
checkingontherepairstatus.Alwaysincludeanotewithyour
returnstatingtheproblem,RMA#andreturnshippingaddress
(NoP.O.boxes,youmustutilizeaUPSshippableaddress).
Pleaseshipinoriginalfactorycartonandaddadequateinternal
packingmaterialasrequired.Wemakeeveryattemptto
completeourrepairswithin48-72hoursofreceipt.Itisourgoal
tohaveyoubackonthewaterfishingasquicklyaspossible.
Thank you in advance for your patience.
Ship product returns to:
MarCum Technologies Service Center
1034McKinleySt.
Anoka,MN55303


/