Page is loading ...

SAFETY INSTRUCTIONS....................... i
SYSTEM CONFIGURATION ................. iii
EQUIPMENT LISTS .............................. iv
1. Mounting ........................................... 1
1.1 Monitor Unit/Control Unit..........................1
1.2 Transceiver Unit .......................................6
1.3 Hull Unit ...................................................9
1.4 Interface Unit..........................................21
1.5 Motion Sensor MS-100 (option).............22
2. Wiring .............................................. 23
2.1 Wiring among Units................................23
2.2 Transceiver Unit .....................................26
2.3 Hull Unit .................................................29
2.4 Interface Unit..........................................30
3. ADJUSTMENTS ............................... 31
3.1 General Checks..................................... 31
3.2 TX Frequency Checking........................ 32
3.3 Heading Adjustment/Soundome Setting
......................................................... 34
3.4 Adjustment of Motion Sensor ................ 37
3.5 System Back Up.................................... 38
3.6 Setting of Interface Unit......................... 40
Input/Output Description....................41
PACKING LISTS ................................ A-1
OUTLINE DRAWINGS ....................... D-1
INTERCONNECTION DIAGRAMS..... S-1
Installation Manual
SEARCHLIGHT SONAR
CH-250/CH-250S
www.furuno.com
All brand and product names are trademarks, registered trademarks or service marks of their respective holders.

The paper used in this manual
is elemental chlorine free.
・FURUNO Authorized Distributor/Dealer
9-52 Ashihara-cho,
Nishinomiya, 662-8580, JAPAN
A : MAR 2000
.
Printed in Japan
All rights reserved.
M : DEC . 01, 2011
Pub. No. IME-13160-M
*
00080895013
*
*
00080895013
*
(REFU ) CH-250/250S
*
00080895013
*
*
00080895013
*
* 0 0 0 8 0 8 9 5 0 1 3 *

i
WARNING
ELECTRICAL SHOCK HAZARD
Do not open the equipment.
Only qualified personnel
should work inside the
equipment.
Be sure no water leaks in at the transdu-
cer installation site.
Water leakage can sink the vessel.
Also confirm that the transducer will not
loosen by ship's vibration.
The installer of the equipment is solely
responsible for the proper installation of the
equipment. FURUNO will assume no
responsibility for any damage
associated with improper installation.
WARNING
If a steel tank is installed on a wooden
or FRP vessel, take appropriate
measures to prevent electrolytic
corrosion.
Electrolytic corrosion can damage the hull.
Be sure that the power supply is
compatible with the voltage rating of
the equipment.
Connection of an incorrect power supply
can cause fire or equipment damage.
The voltage rating of the equipment appears
on the label above the power connector.
Turn off the power at the switchboard
before beginning the installation.
Fire or electrical shock can result if the
power is left on.
Do not install the equipment where it
may get wet from rain or water splash.
Water in the equipment can result in fire,
electrical shock or equipment damage.
Installe the specified transducer tank
in accordance with the installation
instructions. If a different tank is to be
installed the shipyard is solely respon-
sible for its installation, and it should
be installed so the tank doesn't strike
an object.
The tank or hull may be damaged if the
tank strikes an object.
SAFETY INSTRUCTIONS
WARNING
Indicates a condition that can cause death or serious
injury if not avoided.
CAUTION
Indicates a condition that can cause minor or moderate
injury if not avoided.
Warning, Caution
Mandatory Action
Prohibitive Action
Read these safety instructions before you operate the equipment.

ii
CAUTION
Observe the following compass safe
distances to prevent deviation of a
magnetic compass:
Ground the equipment to
prevent electrical shock and
mutual interference.
Monitor unit/
Control unit
Transceiver
unit
Interface
unit
Standard Steering
0.80 m 0.55 m
0.50 m 0.35 m
0.95 m 0.65 m
WORKING WITH THE SONAROIL
Precautions
Keep oil away from eyes. Wear protective
gloves when working with the oil. The oil
can cause inflammation of the eyes.
Do not touch the oil. Wear protective
gloves when working with the oil. The oil
can cause inflammation of the skin.
Do not ingest the oil. Diarrhea or vomiting
can result.
Keep the oil out of reach of children.
Emergency
If the oil enters eyes, flush with clean
water about 15 min. Consult a physician.
If the oil contacts skin, wash within soap
and water.
If the oil is ingested, see a physician
immediately.
Disposal of oil and its container
Dispose of oil and its container in
accordance with local regulations.
For further details, contact place of
purchase.
Storage
Seal container to keep out foreign
material. Store in dark place.
CAUTION
Install the monitor unit MU-100C out of
direct sunlight.
It is difficult to see the display in direct
sunlight.
Turn the main power off before this check,
otherwise the raise/lower motor action
may cause injurely

iii
SYSTEM CONFIGURATION
HULL UNIT
SPEAKER
DATA/VIDEO OUT
MOTION SENSOR
12-32 VDC
Note 1
Note 2
12-32 VDC
Speaker
Motion Sensor
VGA Ext.
Monitor
Control Unit
Display
Unit
CONTROL UNIT CH-252
Remote
Controller
HULL UNIT
CH-254/254S
CH-255/255S
12/24-32 VDC
Navigator
Note 2
MONITOR UNIT MU-100C
Note 1: MU-100C is the standard supply
display unit. An external monitor
may be connected via the
interface unit (option). The drawing
above shows the system configuration
with the MU-100C.
Note 2: For blackbox type, MU-100C is
not supplied. Connect external
monitor (user supply) and control
unit to the interface unit.
TRANSCEIVER UNIT
CH-253
INTERFACE UNIT IF-8000

iv
EQUIPMENT LISTS
Standard Supply
Name Type Code no. Qty Remarks
Control Unit/
Monitor Unit
CH-252/
MU-100C
1 Not supplied with blackbox type
Control Unit CH-252 1 Not supplied with unibody type
Interface Unit IF-8000 1 For blackbox type
Transceiver Unit CH-253 1
CH-254
CH-254S
400 stroke
CH-255
Hull Unit
CH-255S
1
250 stroke
See the following
table for Hull Unit
Standard Supply.
SP06-01100 000-068-488
For unibody type, SP06-01102*,
SP06-01103*
SP06-01110 000-068-489
1
For blackbox type, SP06-01102*,
SP06-01111*, SP06-01103*
Spare Parts
SP06-01101* 006-556-200 For unibody type
Installation
Materials
1
CP06-01251* and two cables (page
viii)
FP02-05100 000-012-474
For unibody type, FP02-05101*,
FP06-01102*
FP06-01120* 006-556-260
1
For blackbox type
Accessories
06-021-2121 100-320-101 1
Hard cover
For blackbox type
*: See the lists at the back of this manual.

v
Hull Unit (1)
Spec. Code no. Type
Stroke Power Frequency Shaft Cable
000-068-515 CH-254-1-60-22-35 60 kHz
000-068-516 CH-254-1-88-22-35 88 kHz
000-068-517 CH-254-1-150-22-35 150 kHz
000-068-518 CH-254-1-180-22-35 180 kHz
000-068-519 CH-254-1-240-22-35 240 kHz
2.2 m 3.5 m
000-068-559 CH-254-1-60-22-52 60 kHz
000-068-560 CH-254-1-88-22-52 88 kHz
000-068-561 CH-254-1-150-22-52 150 kHz
000-068-562 CH-254S-1-180-22-52 180 kHz
000-068-563 CH-254S-1-240-22-52 240 kHz
2.2 m 5.2 m
000-068-520 CH-254-1-60-38-52 60 kHz
000-068-521 CH-254-1-88-38-52 88 kHz
000-068-522 CH-254-1-150-38-52 150 kHz
000-068-523 CH-254S-1-180-38-52 180 kHz
000-068-524 CH-254S-1-240-38-52
12 V
240 kHz
3.8 m 5.2 m
000-068-525 CH-254-2-60-22-35 60 kHz
000-068-526 CH-254-2-88-22-35 88 kHz
000-068-527 CH-254-2-150-22-35 150 kHz
000-068-528 CH-254S-2-180-22-35 180 kHz
000-068-529 CH-254S-2-240-22-35 240 kHz
2.2 m 3.5 m
000-068-564 CH-254-2-60-22-52 60 kHz
000-068-565 CH-254-2-88-22-52 88 kHz
000-068-566 CH-254-2-150-22-52 150 kHz
000-068-567 CH-254S-2-180-22-52 180 kHz
000-068-568 CH-254S-2-240-22-52 240 kHz
2.2 m 5.2 m
000-068-530 CH-254-2-60-38-52 60 kHz
000-068-531 CH-254-2-88-38-52 88 kHz
000-068-532 CH-254-2-150-38-52 150 kHz
000-068-533 CH-254S-2-180-38-52 180kHz
000-068-534 CH-254S-2-240-38-52
400 mm
24 V-32 V
240 kHz
3.8 m 5.2 m
000-068-535 CH-255-1-60-22-35 60 kHz
000-068-536 CH-255-1-88-22-35 88 kHz
000-068-537 CH-255-1-150-22-35 150 kHz
000-068-538 CH-255S-1-180-22-35 180 kHz
000-068-539 CH-255S-1-240-22-35 240 kHz
2.2 m 3.5 m
000-068-540 CH-255-1-60-38-52 60 kHz
000-068-543 CH-255-1-88-38-52 88 kHz
000-068-544 CH-255-1-150-38-52 150 kHz
000-068-547 CH-255S-1-180-38-52 180 kHz
000-068-548 CH-255S-1-240-38-52 240kHz
3.8 m 5.2 m
000-068-569 CH-255-1-60-22-52 60 kHz
000-068-570 CH-255-1-88-22-52 88 kHz
000-068-571 CH-255-1-150-22-52 150 kHz
000-068-572 CH-255S-1-180-22-52 180 kHz
000-068-573 CH-255S-1-240-22-52
12 V
240 kHz
2.2 m 5.2 m
000-068-549 CH-255-2-60-22-35 60 kHz
000-068-550 CH-255-2-88-22-35 88 kHz
000-068-551 CH-255-2-150-22-35 150 kHz
000-068-552 CH-255S-2-180-22-35 180 kHz
000-068-553 CH-255S-2-240-22-35 240 kHz
2.2 m 3.5 m
000-068-554 CH-255-2-60-38-52 60 kHz
000-068-555 CH-255-2-88-38-52 88 kHz
000-068-556 CH-255-2-150-38-52 150 kHz
000-068-557 CH-255S-2-180-38-52 180 kHz
000-068-558 CH-255S-2-240-38-52 240 kHz
3.8 m 5.2 m
000-068-574 CH-255-2-60-22-52 60 kHz
000-068-575 CH-255-2-88-22-52 88 kHz
000-068-576 CH-255-2-150-22-52 150 kHz
000-068-577 CH-255S-2-180-22-52 180 kHz
000-068-578 CH-255S-2-240-22-52
250 mm
24 V-32 V
240 kHz
2.2 m 5.2 m

vi
Hull Unit Standard Supply
Name Type Code no. Qty Remarks
CH-2541 -
CH-2541S -
CH-2551 -
Raise/lower
Drive Unit
CH-2551S -
1 set
CH-2542 -
Soundome
CH-2542S -
1 set
See the following Soudome
table.
Flange CH-2543 006-557-810 1 set Flange, grease cotton
Assembly Kit for
field
CH-2544 006-557-820 1 set
Shaft, retraction tank, seal,
adhesives, tank guide,
material box
SHJ-0006-1 661-000-061 2.2 m, for 3.5/5.2 m cable Shaft
06-007-1572-0 600-715-720
1
3.8 m, for 5.2m cable
Sonar Oil 4 lit. 000-824-033 1

vii
Shaft parts
Name Type Code no. Qty Remarks
Pipe cap SHN-0011-0 661-400-110 1
Jubilee Clip 1X28-41 000-801-857 1
Hex. bolt M10X35 SUS304 000-862-175 2
U-nut M10 SUS304 000-863-930 2
Flat washer M10 SUS304 000-864-131 4
Tank parts
Name Type Code no. Qty Remarks
Hex. bolt M20X80 SUS304 000-801-893 8
Hex. nut M20 SUS304 000-863-116 16
Flat washer M20 SUS304 000-864-136 16
Spring washer M20 SUS304 000-864-270 8
Adhesives
Name Type Code no. Qty Remarks
Kinolastar 855 000-801-328 1 Anti-corrosion
Three Bond 1104 000-854-104 1 Sealant, 200g
Cemedine High Super 6G 000-856-520 1 adhesive
Tank guide
Name Type Code no. Qty Remarks
Tank guide CH-2544 006-557-200 1
Assembly kit for field (Material Box)
Name Type Code no. Qty Remarks
Socket set screw TWB-40 000-804-423 1 4 mm
Shim (0.5) 06-021-4035 100-295-420 2 0.5 mm
Shim (1.0) 06-021-4036 100-295-430 2 1.0 mm
Shim (2.0) 06-021-4037 100-295-440 4 2.0 mm

viii
Cables for Installation materials
Code no. Specification (Cable between unit) Type
Monitor unit (or IF)
and Transceiver unit
Transceiver unit and Hull unit Crimp-on lug
CP06-01200 000-068-496 06S4080*15m* CP06-01251*
CP06-01201 000-068-497 06S4080*30m* CP06-01251*
CP06-01202 000-068-498
06S4078*5m*
06S4080*50m* CP06-01251*
CP06-01203 000-068-499 06S4080*15m* CP06-01251*
CP06-01204 000-068-500 06S4080*30m* CP06-01251*
CP06-01205 000-068-502
06S4078*10m*
06S4080*50m* CP06-01251*
Control unit cable
Type Code no. Qty Remarks
CP02-06600* 000-012-486 1 MJ-A10SPF0002-0015, for unibody type
CP02-06610* 000-012-480 MJ-A10SPF0002-015, 1.5 m
CP02-06620* 000-012-481
1
MJ-A10SPF0002-050, 5 m
For blackbox type
*: See lists at the back of this manual.
Options
Name Type Code no. Qty Remarks
Remote Controller CH-256-E 000-068-492 1 set
Interface Unit IF-8000 000-068-495 1 set
Motion Sensor MS-100 - 1 set
Speaker SC-05WR 000-136-156 1
Signal Cable S06-9-5 006-556-270 1 Extension cable for speaker
MJ-A6SSPF0012-050 000-134-424 6pin-6pin, 5m
MJ-A6SSPF0012-100 000-133-817 6pin-6pin, 10m
MJ-A6SSPF0011-050 000-132-244 6pin-4pin, 5m
Cable assy.
MJ-A6SSPF0011-100 000-132-336
1
6pin-4pin, 10m
OP06-15-1.5 NEW 006-559-140 For desktop, with 1.5 m
OP06-15-5 NEW 006-559-150
1
For desktop, with 5 m
OP02-83-1.5 001-413-600 1 For flush mount, with 1.5 m cable
Control Unit
Separate Kit
OP02-83-5 001-413-610 1 For flush mount, with 5m cable
OP06-16 006-556-300 1 For unibody type Flush mount kit
OP06-17 006-556-310 1 For separate type display unit
Control unit flush
mount kit
OP06-18 006-556-320 1
Rectifier RU-1746B-2 000-030-439 1
06-007-1570-1 600-715-701 1 Steel, 1m
SHJ-0001-1 661-000-011 1 Steel, 1.8m
06-007-1571-1 600-715-711 1 Steel, 3.5m
06-021-4024-0 100-295-470 1 FRP, 1m
06-007-1573-0 600-715-730 1 FRP, 1.8m
Tank
OP10-5 000-069-763 1 Aluminum, 1m
Fairing 06-021-4502 001-159-790-10 1 set For an FRP ship

1
1. Mounting
NOTICE
Do not apply paint, anti-corrosive sealant
or contact spray to coating or plastic
parts of the equipment.
Those items contain organic solvents that
can damage coating and plastic parts,
especially plastic connectors.
1.1 Monitor Unit/Control Unit
This searchlight sonar has two types of shipment, standard type which is shipped with monitor
unit and blackbox type which is shipped without monitor unit, but has interface unit. For
blackbox type, see page 4.
The control unit can be installed together with the monitor unit, or independently of the monitor
unit. On installing separately, the optional monitor kit is required. These units can be installed on
a tabletop or flush mounted in a console or panel.
1.1.1 General mounting considerations
• Keep the monitor unit out of direct sunlight.
• Select a location where the unit(s) can easily be operated while observing the fishing ground
or area surrounding the vessel.
• For maintenance and checking purposes, leave sufficient space at the sides and rear of the
unit and leave slack in cable. (Refer to the outline drawing at the back of this manual.)
• A magnetic compass will be affected if place too close to the monitor unit. Observe the
following compass safe distance to prevent deviation to a magnetic compass: Standard
compass: 0.80 m, Steering compass: 0.55 m.
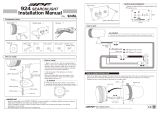
1.1.2 Mounting method of monitor unit (Standard type)
1. Fasten the mounting base to the mounting location with four tapping screws.
FRONT
Mounting base

2
2. For unibody mounting;
a) Fasten the bracket at the rear of monitor and control units with four binding screws (M4x10).
1
1
2
2
3
3
4
4
Bracket (rear view)
Bracket, rear view
3. For separate/blackbox mounting;
a) Dismount the coupling plate to separate monitor unit and control unit.
b) Attach the bracket at rear of the monitor unit with four binding screws (M4x10).
1
2
3
4
1
2
3
4
Bracket (rear view)
Bracket, rear view
4. Coat threads of upset screws (M6x16, 2 pcs.) used to fasten bracket to mounting base.
5. Fasten the bracket to the mounting base with two upset screws. (Use the upper holes to tilt
the monitor unit 20°; lower holes to tilt it 9°.)
Upset Screw
HANGER
MOUNTING
BASE
Fastening hanger to mounting base

3
Flush mounting
Flush mounting for unibody (Type: OP06-16, Code no.: 006-556-300)
Name Type Code No. Qty Remarks
Fixing metal 06-021-1311-2 100-279-612-10 1
Self-tapping screw 5x20 000-162-609-10 6
Hex. bolt M4x12 000-162-939-10 4
1. Make holes at the place to mount (W287 x H297).
2. Fasten monitor and control units with the fixing metal (supplied as option) and four hex.
bolts (supplied as option).
3. Fasten the fixing metal assembled at step 2 to holes made at step 1 with six tapping screws
(supplied as option).
Hex. Bolts
Fixing metal
Flush mounting for monitor unit (Type: OP06-17, Code no. 006-556-310)
Name Type Code No. Qty Remarks
Fixing metal 06-021-1321-2 100-279-622-10 1
Self-tapping screw 5x20 000-162-609-10 4
Hex. bolt M4x12 000-162-939-10 4
1. Make holes at the place to mount (W287 x H207).
2. Fasten the fixing metal (supplied as option) to the monitor unit with four hex. bolts (M4x12,
supplied as option).
3. Fasten the fixing metal assembled at step 2 to holes made at step 1 with four tapping
screws (5x20, supplied as option).

4
Hex. Bolts
Fixing Metal
Flush mounting for control unit Type:
OP02-83-1.5, Code no.: 001-413-600 (1.5 m cable)
OP03-83-5, Code no.: 001-413-610 (5m cable)
Name Type Code No. Qty Remarks
Fixing metal 06-021-2101-2 100-279-732-10 1
Self-tapping screw 5x20 000-162-609-10 4
Hex. bolt M4x12 000-162-939-10 2
MJ-A10SPF0002-0
15
000-142-878 1 1.5 m Cable assembly
MJ-A10SPF0002-0
50
000-131-411 1 5 m
Select one.
1. Make holes at the place to mount (W287 x H87).
2. Fasten the fixing metal to the control unit with two hex. bolts (supplied as option).
3. Fasten the fixing metal assembled at step 2 to holes made at step 1 with four tapping
screws (supplied as option).
Hex. Bolts
Fixing metal
1.1.3 Blackbox type
The blackbox type is required to connect a standard VGA monitor via the interface unit IF-8000.
Supply monitor and interconnection cable (Max. length 15 m with Dsub-15P connectors of male,
three rows of 15 pins) locally. The monitor used should satisfy the specifications shown below.
• VGA type
• ANALOG RGB 0.7 Vpp, positive polarity
• TLL level H, V, Negative polarity

5
1.1.4 Control unit
On blackbox type, fix the control unit to the mounting plate (supplied as accessories).
See the parts list of FP06-01120 and outline drawings at the back of this manual.
1. Fix the mounting plate to the place selected with two tapping screws (5x20, supplied).
2. Fix the bracket to the control unit with two hex. screws (M4x12, supplied).
3. Insert the screw driver from the top of the mounting plate holes and then tighten two hex.
screws (M4x12) loosely.
4. Attach the control unit to the mounting plate, and fasten two hex. screws tightly.
5. Attach two cosmetic caps to holes at the top of the mounting plate.
Cable entrance hole
Mounting plate
Cable
Tapping screws (5x20)
Fasten the screws to fix
the bracket.
Bracket
Bracket
Insert to the hex.
screws tightened
at step 3.
Cable can be passed this direction.
6. Attach hard cover to protect the control unit.
How to remove the hard cover
Place your thumbs at the locations shown with
circles in the illustration at right, and then lift the
cover while pressing it with your thumbs.
On mounting the control unit separate from the monitor unit, the optional control unit separate kit
is required. Mount the control unit same as the above procedure. See the outline drawing at the
back of this manual to mount.
Type: OP06-15-1.5 NEW Code no.: 006-559-140: with 1.5 m cable
Type: OP06-15-5 NEW Code no.: 006-559-150: with 5 m cable
Name Type Code no. Qty Remarks
MJ-A10SPF0002-015 000-142-878 For 1.5 m cable Cable
MJ-A10SPF0002-050 000-131-411
1
For 5 m cable
Bracket 06-021-2112 100-281-880-10 1
Mounting Plate 06-021-2111-1 100-279-741-10 1
Tapping Screw 5x20 000-162-608-10 2
Cosmetic Cap DP-687 000-165-997-10 2
Hex. Screw M4x12 000-162-939-10 4
Bind Screw M4x10 000-807-331 4 For monitor

6
1.2 Transceiver Unit
1.2.1 General mounting considerations
• The mounting location should be well ventilated and dry.
• The unit can be mounted on bulkhead or the deck.
• Secure the maintenance space shown in drawing below for ease of maintenance and
service.
• The maximum cable length between the transceiver unit and the raise/lower drive unit cable
is 50 m.
• The maximum cable length between the transceiver unit and the monitor (interface) unit is
10 m.
1.2.3 Mounting method
Fasten the transceiver unit with four tapping screws (5X20, local supplied).
For bulkhead mounting, tighten upper tapping screws so there is 5 mm clearance between
bottom of screw head and bulkhead, and screw slots of the unit. Then fasten lower screws.
1.3 Hull Unit
1.3.1 General mounting considerations
• Noise and air bubbles will affect performance.
• Do not turn on the equipment with the transducer exposed to air. Exposing the transducer to
air may damage it.
1.3.2 Installation position considerations
Discussion and agreement are required with the dockyard and ship owner in deciding the
location for the hull unit. When deciding the location, take into account the following points:
• Select an area where propeller noise, cruising noise, bubbles and interference from
turbulence are minimal. Generally, the point at 1/3 to 1/2 of the ship’s length from the bow or
near the keel is the best. On-the-keel installation is advantageous for minimizing oil
consumption in comparison with of-the-keel. If the hull unit cannot be installed on the keel,
the center of the retraction tank should be within 1 meter of the keel to prevent a rolling
effect.

7
Wealding bead
Wealding bead
1/2
1/3
Within 1 meter
Installation location for hull unit
• Select a place where interference from the transducers of other sounding equipment is
minimal. The hull unit should be at least 2.5 meters away from the transducers of other
sounding equipment.
• An obstacle in the fore direction not only causes a shadow zone but also aerated water,
resulting in poor sonar performance. Be sure to locate the transducer well away from any
obstacle in the fore direction.
Mounting method
A typical mounting method is shown in the outline drawing at the back of this manual. Consult
ship’s owner, dockyard and user to determine appropriate mounting method. Pay attention to
safety (strength, watertightness) first, followed by ease of maintenance and inspection.
1.3.3 Transducer tank
Tank length
Shorten the transducer tank so the transducer is
lowered into water as deep as possible. Pay particular
attention to the tank length Lt. Determine the length of
the main shaft.
• Length of main shaft = Lt + 200 mm (for 400 stroke)
• Length of main shaft = Lt + 50 mm (for 250 stroke)
Note : When the retraction tank is constructed locally,
finish it so that welding beads do not protrude on
the inner surface of the tank. The tank guide will hit
the bead, burning out the raise/lower motor. Also,
do not position the welding bead in the ship’s
fore-aft line.

8
For small FRP ship
For small FRP ship retraction tank should be 2 degrees against ship’s draft. Therefore, this
creates high water pressure in the tank because of the resistance at the rear of the tank well. To
solve this problem, attach a fin to the hull at the location shown in figure below.
Retraction dome
Fin
Bottom of ship
This fin makes a smooth stream in the retraction dome. Attach the fin (height:1-1.5 cm, FRP).
Mounting of transducer tank
Install the transducer tank referring to the hull unit outline drawings at the back of this manual.
Note 1: When making a retraction tank locally, the inside diameter of the retraction tank should
not be more than φ190±0.5 as shown on outdrawing at the back of this manual. If larger,
the hull unit may be danger.
Note 2: Locate the retraction tank so that the center of any two bolt holes is facing the ship’s
bow.
Bow
a=b
a
b

9
1.3.4 Assembling and mounting of hull unit
The hull unit is shipped as the parts shown in the hull unit kit on Equipment Lists (page iv and
after). Assemble the hull unit as shown in the procedure below.
Necessary tools
Name Specification Remarks
Wrench For M10 (Hex. size 17 mm)
Recommended: double offset
wrench
Wrench For M20 (Hex. size 20 mm)
Pipe Wrench 55 mm For fixing gland
Ball Wrench Hex size 4 mm For fixing the dome
1. Calculate necessary length of main shaft from the length of retraction tank
Lt and cut off the
spare portion. When 1 m or 1.8 m long tank is used, main shaft (1.17 m or 1.97 m) can be
used without cutting off any portion.
Supplied length: 2.2 m or 3.8 m
Lt + 200 mm for 400 mm stroke
Lt + 50 mm for 250 mm stroke
Take care
not to damage.
Chamfer the edge to
protect O-ring from
damage.
2. Remove hex bolt, nut, spring washers, flat washers and trunnion pins from the main body
flange. And then, mount the raise/lower drive unit on the shaft sleeve by using the hardware
removed.

10
WARNING
W
A
R
N
IN
G
Hex. bolt
(M10X30)
Spring washer
Flat washer
Flat
washer
Nut
Trunnion pin
Raise/lower
section
Shaft sleeve
Shaft sleeve and raise/lower drive unit assembly
3. Pass the transducer cable through the main shaft.
/