Page is loading ...

Satellite Antenna
for SAT-A 1 and SAT-B1 Satellite Receivers
Installation Manual
IIIUI_ IATI_ I_lll
SAN-18D1
SAN-18S1
0 1995 by Sony Corporation

Precautions
Warnings
Avoid contact with high voltage electrical
equipment. Contact with power lines, lights and
circuits may prove fatal.
Avoid contact with underground utility lines.
Check with your local utility companies before
digging in your yard if you are unsure of the
location of your electric, telephone, gas, water or
sewer lines.
Owner's Record
The model and serial numbers are located on the
back of the satellite antenna. Record the numbers
on the spaces provided below and refer to them
whenever you call your sales and/or service
representative regarding this product.
Model No.
Serial No.
Installation
O Read through the entire manual before you
attempt any installation and keep this
document for future reference.
O Do not use power tools to tighten the bolts.
Hand tighten only.
_1 Check zoning codes, covenants and community
restrictions in your area before installation.
O Choose an installation site that is structurally
sound and able to withstand severe storm
conditions.
O Do not attempt to install the antenna in rainy or
windy conditions.
_1 Do not install the antenna where it can be
bumped or jarred because this might cause
bodily injury and damage the antenna.
O Installation on aluminum or vinyl siding is not
recommended.
O Installation on composite materials is not
recommended.
0 Installation on a chimney should be used only
when no other locations are available.
O Ground the antenna and cables to prevent
possible damage from electrical charges and
lightning strikes. Grounding and installation
should comply with local cedes and the
appropriate sections of the National Electrical
Code (NEC). Refer to the National Electrical
Codes in the Appendix for specific information
on grounding requirements.
Customer Support
To arrange for the installation of your DSS system,
call the dealer from whom you purchased your
system.
For general information, or to resolve problems
related to the operation of your satellite receiver or
antenna, contact your Sony DSS dealer. If your
dealer is unable to answer your questions, call the
Sony DSS Customer Support line at
1-800-838-SONY (7669).
Signal Seeker is a trademark of Sony Corporation.
DIRECTV _ and DSS®are registered trademarks of
DIRECTV, Inc., a unit of GM Hughes Electronics.
2

Contents
Introducing the Satellite Antenna
Welcome 6
Installation Overview 7
Unpacking the Satellite Antenna 8
Selecting an Antenna Location
Locating the Satellite 10
Choosing an Installation Site 13
Installing the Antenna
Installing the Mast or a Pole 16
Installing the Antenna 31
Installing the Cables 33
Aiming the Anterma 36
Grounding the Antenna and Cables 43
Other Information
National Electrical Code 48
Specifications 50
Limited Warranty 51
Glossary 53
Index 55
3


Introducing the Satellite
Antenna
This chapter introduces the satellite antenna.
The sections covered in this chapter are:
Q Welcome 6
Q Installation Overview 7
_1 Unpacking the Satellite Antenna 8

Welcome
Congratulations on your purchase of the Sony brand Digital Satellite
System (DSS®). This product will enhance your overall entertainment
experience.
This installation manual is provided to help you plan and complete
the installation of your satellite antenna. The step-by-step instructions
are organized in sequential order for your convenience. Read through
the entire manual once before you attempt to install the antenna.
SONY
0 ©
6 Chapter 1: Welcome

Installation Overview
The satellite antenna can be installed in a few hours. You may choose
to install it yourself, or you may prefer to have it professionally
installed. If you plan on installing the antenna yourself, you should
be able to:
Q Use a power drill, magnetic compass and bubble level.
UI Drill a hole through an exterior wall of your house.
l:l Locate plumbing, electrical utilities and support beams hidden in
your walls.
O Comply with local building and electric codes.
Route cable under floors and through walls.
Have your antenna professionally installed if you do not feel
comfortable performing any of these functions. Your authorized
Sony retailer can provide a referral to a professional contractor in
your area who has been trained to install the Sony brand Digital
Satellite System (DSS).
If you decide to install the antenna yourself, use this manual to help
you plan and complete the installation. To further assist you, Sony
has an Installation Kit which is sold separately. The kit contains an
installation video and an assortment of cables, bolts, grounding
supplies and other items needed for most installations.
Installation Kit contents:
1RG-6 coaxialcable with weatherproof F-connect_rs and weatherboot (75ft.)
1RG-6 coaxialcable with weatherproof F-connectors and weatherbcot (25ft.)
1Silicon sealant (1 oz.)
4 Cable ties (11 in.)
8Cable clips
4Togglers
4 Double expansion anchors
4 Lag screws (5/16"x 2")
2 Lag screws (1/4"x 3")
4 Machine screws (I/4"- 20 x 3")
4 Washers (5/t6')
1Grounding block (dual)
1Grounding wire (30 ft.)
1Telephone in-line modular coupler
1 Telephone modular T connector
2Telephone line cords with modular connectors (25 ft.)
1 Compass
1 Grounding strap
1 Installation Video Guide
Chapter 1: Installation Overview 7

Unpackingthe Satellite Antenna
Depending on which model you purchased, the carton should
contain either an SAN-18S1 single output or an SAN-18D1 dual
output satellite antenna.
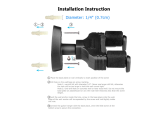
SAN-18S1
Reflector
Mast
BasePlate
O0
Snap-in Cable Guides
0
LNB with Single
Output
\
LNB Support Arm
Weatherboot
SAN-18DI
Reflector
Mast
Base Plate
dSd5
Snap-in Cable Guides
\
O0
LNB with Dual
Output
LNB Support Arm
Weatherboots
8 Chapter 1: Unpacking the Satellite Antenna

Selecting an
Antenna Location
This chapter contains instructions for selecting a location to install the
satellite antenna.
The sections covered in this chapter are:
[3 Locating the SateLlite 10
Q Choosing an Installation Site 13

Locating the Satellite
Before you can select a location to install the antenna, you need to find
the direction and elevation of the satellite relative to your house.
After you know where the satellite is located, you can find a suitable
location to install the antenna. Use the following instructions to
identify the directional coordinates and locate the satellite.
Notes
* At this stage it is not necessary tofind
the exact location of the satelIite. A
rough estimate is sufficient.
• The satellite is located due south of
Texas over the equator.
• The azimuth is a compass heading.
Use the map to estimate the directional coordinates:
Use the map below to estimate the directional coordinates of the DSS
satellite. You may also obtain the coordinates by using the on-screen
zip code or latitude/longitude features described on pages 36-38.
Magnetic North Azimuth
130" 140" 150' 160_170' 180_190"200_210"220_ 230' 240'
30"
35'
c 4_
._o
>
u_ 45o
5_
1 Find your location on the map.
2 Use the azimuth and elevation markings on the top and side of
the map to estimate the directional coordinates of the satellite.
(For example, the directional coordinates for Los Angeles are:
Azimuth: 135 and Elevation: 45.)
3 Record the dixectional coordinates on the spaces provided
below.
Azimuth: Elevation:
These directional coordinates will be used on the following pages to
locate the satellite in the sky. Continue with the instructions on the
next page to find the satellite direction with the azimuth.
10 Chapter 2: Locating the Satellite

Note
• The arrow on the compass in this
illustration indicates the 135 ° azimuth
from the example on the previous page.
Find the satellite direction with the azimuth:
The azimuth is a compass heading used to determine the direction of
the satellite relative to your house. Once you know where the
satellite is located you can choose an installation site that has an
unobstructed view of the satellite.
1 Take a compass outdoors. Hold it level to allow the needle to
rotate freely.
2 Rotate the compass until the dial aligns with the magnetic
needle which is pointing North.
3 The compass dial has numbers ranging from 0° to 360 °. Find the
azimuth coordinate you recorded on the previous page on the
compass dial.
Azimuth
4 Look in the direction of the azimuth.
The satellite is located in the direction you are facing. Continue with
the instnlctions on the next page to find the elevation of the satellite.
(continued)
Chapter 2: Locating the Satellite 11

Locating the Satellite (continued)
Note
• The position o.fthe satellite in this
illustration corresponds to the 45°
elevation from the example on page 10.
Find the elevation of the satellite:
Use the elevation coordinate you recorded on page 10 to find the
elevation of the satellite. Finding the elevation, or angle, of the
satellite enables you to choose an installation site that has an
unobstructed view of the satellite.
1 Locate three reference points to help you estimate the location of
the satellite:
121 0° -- located at the horizon in front of you.
D 90 ° -- located directly above you.
CI 45° -- located midway between 0° and 90°.
2 Use the elevation coordinate you recorded on page 10 and these
three reference points to estimate the elevation of the satellite.
60°
Satellite " .-
',
45 °
2s°-_'.. ".,
90"
\
\
0 a _
You should now be able to point to the approximate location of the
satellite. Use this information when you choose an installation site for
the antenna.
12 Chapter2: Locatingthe Satellite

Choosing an Installation Site
You now know where the satellite is located in the sky. Keep the
location in mind as you look around your property for a good place to
install the antenna. Use the following suggestions to ease the
installation and extend the life of the antenna:
o
0
0
O
Keep a clear view -- avoid areas where trees, buildings and roof
overhangs interfere with the satellite signal. Also consider the
effects of future tree growth or building construction.
Protect the antenna -- avoid installing the antenna where it can
be bumped or jarred by people, furniture, doors or pets. Also
avoid installing under gutters, due to the possibility of icicles or
ice buildup.
Simplify the installation -- try to avoid an installation that
requires the use of a ladder.
Choose a sturdy site -- windy conditions can generate several
hundred pounds of pressure on the base plate. To avoid
problems, choose an installation site that is structurally sound and
able to withstand severe storm conditions.
0 Choose an accessible site -- if snow falls where you live, you will
need to brush the snow off the antenna.
0 Locate the antenna close to the receiver -- cable run should be
100' or less. If more than 100', you must use Sony brand DSS
Ampifier EAC-DA1.
(continued)
Chapter2: Choosingan InstallationSite 13

Choosing an Installation Site (continued)
Where to Install the Antenna
This manual provides instructions for installing the antenna on
several surfaces:
Metal Pole
Q Wood
Brick
Q Cinder Block
Read through the rest of the manual before you begin installing the
antenna. Planning the installation will save you time and help you
avoid mistakes.
14 Chapter 2: Choosing an InstallaUon Site

Installing the Antenna
This chapter provides instructions for installing, aiming and
grounding the antenna.
The sections covered in this chapter are:
_1 Installing the Mast or a Pole 16
Installing the Antenna 31
Q Installing the Cables 33
Aiming the Antenna 36
_1 Grounding the Antenna and Cables 43

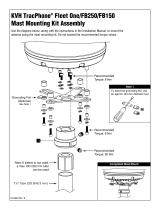
Installing the Mast or a Pole
This section contains four different sets of installation instructions.
Choose and follow one set, depending on the type of surface on which
you install the antenna:
UI Metal Pole, on this page.
Q Wooden Surface, on page 19.
Q Brick Surface, on page 24.
Q Cinder Block Surface, on page 27.
Metal Pole
Notes
• Th_ antermcl can be mounted on an
existing metal pole which meetsthe
installationand materialspecifications
listed in this chapter.
• You do not need the mast provided
with the antenna for this installation.
However, you should store the mast in
case you decide to relocate the antenna
at a later date.
The antenna can be mounted directly onto a metal pole in your yard.
The metal pole should be installed in soi! conditions that provide a
firm foundation. Do not install a metal pole if your soil contains:
Q Many rocks, which prevent you from digging a hole.
Q Excess moisture, which prevents concrete from curing properly.
16 Chapter 3: Installing the Mast or a Pole

Tools and materials needed for this installation:
I brick
2 bags ready-mix cement
Container to mix cement
Guy wires/wooden stakes
Hacksaw
Level
Metal pole (6' long rain. x 11/4"- 11/2" galvanized steel pipe)
Shovel
>Warning
• Do not install the antenna near power lines.
>'Caution
• Avoid underground electric, telephone, gas, water and sewer lines when
digging in your yard. Contact your local utility companiesfor help locating
underground utility lines.
• Do not install the antenna where it could be bumped or jarred by people,
furniture, doors or pets.
• Do not attempt any installation in rainy or windy conditions.
Note
• Burythe pole6"belowthefrost lineif
youlive in an areathat experiences
freezing temperatures.
Installation instructions:
1 Dig a hole at least8"in diameter and 36" deep.
2 Cut the bottom of the pole at a 45° angle with a hacksaw. This
prevents the pole from rotating after installation.
(continued)
Chapter 3: Installing the Mast or a Pole 17

Installing the Mast or a Pole (continued)
3
Place a stone or brick at the bottom of the hole. The 45° cut on
the bottom of the pole should sit on top of the stone or brick.
This allows the cement to cover the angled cut.
/ MetalPole
36"
Min.
Note
• Stop pouring the c_nent three inches
below the top of the hole if you intend
to cover the cement with dirt or replant
grass after the cement has dried.
4 Mix ready-mix cement and pour it into the hole.
5 Hold the pole upright and level it with a bubble level. Place the
level along the side of the pole and take at least two readings 90°
(at right angles) from each other. The pole must be vertically
level to aim the antenna properly.
. _Metal Pole
90o'_ _- Level the Pole
"_, at Right Angles
Side View Top View
6 Secure the pole with guy wires or wooden braces while the
cement is drying.
7 Check to make sure the pole is still level and adjust if necessary.
8 Wait for the cement to dry completely before you remove the
guy wires or wooden braces.
Proceed to Installing the Antenna on page 31.
18 Chapter3: Installingthe Mast or a Pole

Wooden Surface
The satellite antenna can be installed on a variety of wooden surfaces.
This section provides instructions for mounting the mast onto the
following:
Side of your house
Installation on aluminum or
vinyl siding not recommended.
Deck railing or floor
Roof
Installation on wooden roof and
rafter under asphalt shingles
only.
Do not install the antenna on composite materials unless a wall stud
or rafter can be located behind the surface. These wood products are
not strong enough by themselves to secure the antenna properly. The
materials to avoid are:
Q Strand Board
rl Chip Board
Q Fiberboard
Particleboard
(continued)
Chapter 3: Installing the Mast or a Pole 19

Installing the Mast or a Pole (continued)
Tools and materials needed for this installation:
Drill bits (1/8", 3/ld')
*Lag screws (2) 1/4"x 3", (4) s/_d' x 2"
Level
Pencil/chalk
Power drill
*Silicon sealant
Tape measure
*Washers (4)s/16"
Wrench (3/8")
*Includedin the Installation Kit.
>Warning
• Do not install the antenna near power lines.
>.Caution
• DOnot install the antenna where it could be bumped or jarred by people,
furniture, doors or pets.
• Do not attempt any installation in rainy or windy conditions.
Installation instructions:
1 Choose a secure location to install the base plate:
UI Side of your house -- find a wall stud on which you can
secure the base plate. Wall studs can be located by a vertical
line of nails where siding is attached to the house, or with a
stud finder.
Outside Holes
(4) 5/16"x 2"
Lag Screws
Center Holes
(2) 1/4"x3"
LagScrews
Wooden Shim (for
Siding only)
20 Chapter 3: Installing the Mast or a Pole
/