
COPYRIGHT ©
2010.
ALL
RIGHTS RESERVED BY KING CANADA TOOLS INC.
13” PROFESSIONAL
LAMINATE FLOORING CUTTER
INSTRUCTION MANUAL
MODEL KC-13LCT
WARRANTY INFORMATION
2-YEAR
LIMITED WARRANTY
FOR THIS 13” LAMINATE CUTTER
KING CANADA TOOLS
OFFERS A 2-YEAR LIMITED WARRANTY
FOR NON-COMMERCIAL USE.
PROOF OF PURCHASE
Please keep your dated proof of purchase for warranty and servicing purposes.
REPLACEMENT PARTS
Replacement parts for this product are available at our authorized King Canada service
centers across Canada.
LIMITED TOOL WARRANTY
King Canada makes every effort to ensure that this product meets high quality and
durability standards. King Canada warrants to the original retail consumer a 2-year limited
warranty as of the date the product was purchased at retail and that each product is free
from defects in materials. Warranty does not apply to defects due directly or indirectly to
misuse, abuse, normal wear and tear, negligence or accidents, repairs done by an
unauthorized service center, alterations and lack of maintenance. King Canada shall in no
event be liable for death, injuries to persons or property or for incidental, special or
consequential damages arising from the use of our products.
To take advantage of this limited warranty, return the product at your expense together with
your dated proof of purshase to an authorized King Canada service center. Contact your
retailer or visit our web site at www.kingcanada.com for an updated listing of our author-
ized service centers. In cooperation with our authorized serviced center, King Canada will
either repair or replace the product if any part or parts covered under this warranty which
examination proves to be defective in workmanship or material during the warranty period.
NOTE TO USER
This instruction manual is meant to serve as a guide only. Specifications and references
are subject to change without prior notice.
PARTS DIAGRAM & PARTS LISTS
Refer to the Parts section of the King Canada web site for the most updated parts diagram
and parts list.
KING CANADA INC. DORVAL, QUÉBEC, CANADA H9P 2Y4
www.kingcanada.com

GENERAL & SPECIFIC
SAFETY INSTRUCTIONS
1. FOR YOUR OWN SAFETY, READ
INSTRUCTION MANUAL BEFORE
OPERATING.
Learn the tool’s application
and limitations as well as the specific
hazards peculiar to it.
2.
MAINTAIN PRODUCT IN TOP
CONDITION. Keep knife honed and
sharpened for best results. Follow
instructions in the maintenance section.
3.
IF YOU ARE NOT thoroughly familiar
with the operation of the laminate cutter,
obtain advice from your supervisor,
instructor or other qualified person.
4.
THE USE of knives or attachments which
are not recommended may result in
product damage or the risk of personal
injury.
5.
KEEP HANDS AWAY FROM BLADE.
Blade is very sharp!
6.
ALWAYS WEAR SAFETY GLASSES
Always wear safety glasses (ANSI Z87.1)
during the use of the laminate cutter.
Everyday eyeglasses only have impact
resistant lenses, thet are
NOT safety
glasses.
7.
WARNING: DO NOT operate your
laminate cutter until it is completely
assembled and working according to the
instruction manual.
8.
BE CAREFUL when releasing the
handle, it is spring loaded.
9.
DO NOT LIFT the laminate cutter by the
handle. Always use on a level surface.
10.
CHECK DAMAGED PARTS. Before
further use of the product, a guard,
support or other parts that are damaged
should be carefully checked to ensure
that they will operate properly and
perform their intended function. Check
for alignment of moving parts, binding of
moving parts, breakage of parts,
mounting, and any other conditions that
may affect its operation. A guard, sup-
port or other parts that are damaged
should be properly repaired or replaced.
11.
KEEP CHILDREN AWAY. All visitors
should be kept a safe distance from
work area.
12.
DON’T FORCE. It will do the job better
and safer at the rate for which it was
designed.
13.
KEEP WORK AREA CLEAN. Cluttered
areas and benches invite accidents.
Make sure the floor is clean and not
slippery due to wax or sawdust build-up.
14.
WEAR PROPER APPAREL. Do not
wear loose clothing, neckties or jewelry
(rings, watch) which may get caught in
moving parts. Non-slip footwear is
recommended. Wear protective hair
covering to contain long hair.
15.
USE RECOMMENDED ACCESSORIES.
Consult the manual for recommended
accessories. Follow the instructions that
accompany the accessories. The use of
improper accessories may cause risk of
injury to persons.
ASSEMBLY & OPERATION
Unpacking
The laminate flooring cutter is shipped
complete in one carton and requires some
assembly. Carefully unpack all loose
items from the carton.
Assembly
1. Assemble the table assembly (A) Fig.1
to the knife assembly (B) using 4 small
Phillips head screws (C) to secure the
top of the table. Use two larger pan
head screws (D) to secure the table
brace.
2. Assemble the handle (A) Fig.2 to the
top of the knife assembly. First, loosen
the three fixing screws (B) using a hex.
key. Insert the handle shaft into the
cylindrical hole (C), make sure the
recessed hole (D) lines up with the
center screw. Once properly aligned
and inserted, tighten the center fixing
screw using a hex. key. Then tighten the
other two fixing screws.
Setting up for operation
1. The laminate flooring cutter is shipped
with the knife assembly in the down and
locked position. This safety feature
ensures that the cutting edge of the
knife is not exposed during transport or
storage. To unlock the knife assembly,
loosen the safety lock knob (A) Fig.3,
depress the handle then slide the lock
knob to the right to disengage the lock
(B).
Warning! Secure handle in the down
position and re-engage the safety lock
before storing, carrying or transporting your laminate flooring cutter.
Figure 1
Figure 2
Figure 3

OPERATION
Making cuts
The laminate cutter is a manually operated tool. The shearing handle is spring loaded,
once a cut is made, slowly lift the handle. If handle is released after a cut, the handle may
spring upwards and hit the operator.
Warning! Knife is very sharp. Keep your hands away from the knife while operating.
Wearing gloves and safety glasses are recommended.
1. Unlock the safety lock (Fig.3) and lift the shearing handle to its upright position to lift the
knife upwards.
2. Set the miter gauge (A) Fig.4 angle.
Loosen the miter gauge lock knob (B)
and position the miter gauge in the
desired angle. Make sure the rounded
section (C) of the miter gauge rests
against the frame post as shown before
tightening lock knob.
3. Place material no wider than 13” and no
thicker than 19/32” onto the table. Place
the bottom side of the material flat on
the table. Slide the material up against
the miter gauge and then under the
knife. Line up the material cutting mark
with the cutting edge of the knife. See
Fig.5.
4. Hold the material in place using one
hand, and with the other hand lower the
handle. Push handle down to make cut.
Some effort may be required,
depending on the thickness or hardness
of the material.
5. Once the cut is made, slowly lift the
handle to its upright position.
6. Once you have finished using the
laminate cutter, lower handle and lock
the safety lock before carrying, storing or transporting.
IMPORTANT NOTE: A burr may form on the flat edge of the knife within the first 40-100
cuts. This is normal. Use a honing stone to remove the burr. Refer to the maintenance
section for further instructions.
Figure 4
Figure 5
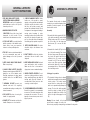
MAINTENANCE
HONING, SHARPENING OR REPLACING KNIFE
Honing knife
Removing burrs from the flat edge of the knife is
very important, honing a new knife should be done
after the first 40-100 cuts, after every 100+ cuts
and when the knife has been re-sharpened.
With the knife (B) Fig.6 installed and positioned
roughly 1/8” above the table top, lay the flat side of
your honing stone (A) against the flat side of the
knife. Move the honing stone from one end to the
other a few times until burr has been removed.
Sharpening or replacing knife
The included knife can be sharpened.
Only the beveled edge of the knife must
be sharpened. The flat edge of the knife
must remain flat. We recommend that this
operation be done by a qualified
professional.
Warning! Knife is very sharp. Wear
gloves when handling knife.
1. To remove the knife (A) Fig.7, remove
the seven allen head screws (B) using
the supplied hex. key. Carefully remove
the knife.
2. Have the knife sharpened by a qualified professional. If the knife is damaged and needs
replacement, a replacement knife (King model KW-133) is available for purchase, for
more information, contact your nearest retailer of King Canada products.
3. Once knife has been sharpened or replaced, it
can be re-installed. Position the knife (A) Fig.8
with its flat edge facing the table (B). Make sure
the mounting surface and knife are clean,
re-install the knife with the seven allen head
screws removed earlier using the supplied hex.
key.
Lubrication
To prevent surface corrosion, it is recommended to
apply a small amount of light machine oil on the
sliding parts of the laminate cutter
. Lubrication should be done once every two months or
once a month if working in dirty or dusty conditions.
Figure 7
Figure 6
Figure 8
-
 1
1
-
 2
2
-
 3
3


Ask a question and I''ll find the answer in the document
Finding information in a document is now easier with AI
Related papers
-
King Canada PDM-30 User manual
-
-
-
-
-
-
-
King Industrial KC-5100C User manual
-
-


