Page is loading ...

1
WS-9020U 915MHZ
INTELLIGENT WEATHER STATION
Instruction Manual
FEATURES
INTELLIGENT WEATHER STATION
• Immediate update (every 4 seconds!) of all your outdoor data
measured from the sensors (note: 4 second may vary while
updating)
• WWVB Radio-controlled time with manual setting option
• WWVB reception ON/OFF (user selectable)
INSTANT TRANSMISSION is the state-
of-the-art new wireless transmission
technology, exclusively designed and
developed by LA CROSSE
TECHNOLOGY. INSTANT
TRANSMISSION offers you an
immediate update (every 4 seconds!) of
all your outdoor data measured from
the sensors: Chart the weather as it
happens!
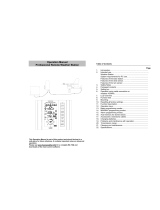
This product offers:
Hanging hole
Battery
compartment
LCD
Display
Function Keys
Removable Stand
Weather
information
text

2
• 12/24 hour time display
• Time zone option ±12 hours
• Calendar display (weekday, date, month, year)
• Weather forecasting with 4 weather icons and weather tendency
indicator
• Temperature display in °F/ºC
• Humidity display as RH%
• Indoor temperature and humidity display with MIN/MAX and
time/date of recording
• Outdoor temperature and humidity display with MIN/MAX and
time/date of recording
• Low/High outdoor temperature alarm
• Relative air pressure unit in hPa or inHg
• Air pressure tendency indicator for last 12h (bar graph format)
• “Intelligent” weather information display
• Can receive up to 3 remote sensors
• LCD contrast selectable
• Low battery indicator
• Display in 5 languages selectable: English, German, French, Italian
and Spanish
• Wall mounting or free standing
REMOTE TEMPERATURE/HUMIDITY SENSOR
• Remote transmission of outdoor temperature and
humidity to the intelligent weather station by 915
MHz signal
• Weather resistant casing
• Wall mounting case
• Mount in a sheltered place. Avoid direct rain and
sun.
QUICK SET-UP GUIDE
Hint: Use good quality Alkaline Batteries and avoid
rechargeable batteries.
1. Have the intelligent weather station and remote
temperature/humidity sensor 3 to 5 feet apart.
2. Batteries should be out of both the intelligent weather station and
remote temperature/humidity sensor units for 10 minutes.
3. Place the batteries into the remote temperature/humidity
sensor first and then into the intelligent weather station.
4. DO NOT PRESS ANY BUTTONS FOR 15 MINUTES.

3
In this time the intelligent weather station and remote
temperature/humidity sensor will begin to communicate with each other
and the display will show the temperature/humidity, outdoor
temperature/humidity. If the intelligent weather station does not display
all information after the 15 minutes, please retry the set up as stated
above. After all information has been displayed for 15 minutes you can
place your sensors outdoors and set your time.
Important Notes on Set-up and Operation
• The remote temperature/humidity sensor should be placed in a
dry, shaded area.
• Fog and mist will not harm your remote temperature/humidity
sensor but direct rain must be avoided.
• The remote temperature sensor should be placed in a dry,
shaded area. The remote temperature sensor has a range of 330
feet. Keep in mind that the 330 feet is in open air with no
obstructions and that radio waves DO NOT curve around objects.
Actual transmission range will vary depending on what is in the
path of the signal. Each obstruction (roof, walls, floors, ceilings,
thick trees, etc.) will effectively cut signal range in half.
Example: A wireless weather station receiver with a 330 feet
range is mounted on an interior wall, so that the signal has to pass
through one interior wall, one exterior wall, and across the 10 foot
width of the room between the 2 walls. The first wall will reduce
the range to 165 feet, and the second wall will reduce the range to
87 feet. Factoring in the 10 foot room, this leaves a maximum of
77 feet of remaining signal range.
This allowance is typically enough for a frame wall with non-
metallic siding; however certain materials can reduce range even
further. Metal siding, stucco, and some types of glass can reduce
signal range by as much as ¾ or more, compared to the ½
reduction typical of most obstructions. It is possible to receive a
signal through these materials, however maximum range will be
much less due to their tendency to absorb or reflect a much larger
portion of the sensor’s signal.
• The remote temperature/humidity sensor transmits a signal every
4 seconds – with variations during updating periods. After the
batteries have been installed, the intelligent weather station will
search for the signal for the duration of 45 seconds. If there is no
temperature or humidity reading in the OUTDOOR LCD after 5
minutes, make sure the units are within range of each other, or
repeat the battery installation procedure.

4
• If a button is pressed before the intelligent weather station
receives the signal from the remote temperature/humidity sensor,
you will need to follow the battery installation procedure again.
To complete the set up of your new wireless intelligent weather station
after the 5 minutes have passed, please follow the steps in the “Manual
Settings” section.
Note:
If the outdoor sensor signal reception is not successful on the first
frequency of 915MHz for 45 seconds, the frequency is changed to
920MHz, and the learning is tried for another 45 seconds. If it is still not
successful the reception is tried for 45 seconds on 910MHz. This will
also be done during re-synchronization.
BATTERY INSTALLATION
INTELLIGENT WEATHER STATION
The intelligent weather station uses 3 x
AA (alkaline recommended) batteries.
When the batteries need to be
replaced the low battery symbol will
appear on the LCD (or replace the
batteries annually). To install and
replace the batteries, please follow the
steps below:
1. Remove the cover.
2. Insert batteries observing the
correct polarity (see battery
compartment marking).
3. Replace battery cover.
REMOTE TEMPERATURE/HUMIDITY SENSOR
The remote temperature/humidity sensor uses 2 x AA
(alkaline recommended) batteries. To install and
replace the batteries, please follow the steps below:
1. Remove the battery cover at the front side with a
small screwdriver.
2. Insert the batteries, observing the correct polarity
(see battery compartment marking).
3. Replace the battery cover on the unit.
Note:
When changing the batteries in any of the units, all units need to be
reset by following the “Quick Set Up Guide” procedures. This is because

5
a random security code is assigned by the sensor at start-up, and this
code must be received and stored by the intelligent weather station in
the first few minutes of power being supplied to it.
BATTERY CHANGE:
It is recommended to replace the batteries in all units on an annual
basis to ensure optimum accuracy of these units.
Please participate in the preservation of the environment.
Return used batteries to an authorized facility.
ABOUT WWVB (Radio Controlled Time)
The NIST (National Institute of Standards and Technology—Time and
Frequency Division) WWVB radio station is located in Ft. Collins,
Colorado, and transmits the exact time and date signal continuously
throughout the United States at 60 kHz. The signal can be received up
to 2,000 miles away through the internal antenna in the intelligent
weather station. However, due to the nature of the Earth’s Ionosphere,
reception is very limited during daylight hours. The intelligent weather
station will search for a signal every night when reception is best. The
WWVB radio station derives its signal from the NIST Atomic clock in
Boulder, Colorado. A team of atomic physicists is continually measuring
every second, of every day, to an accuracy of ten billionths of a second
per day. These physicists have created an international standard,
measuring a second as 9,192,631,770 vibrations of a Cesium-133 atom
in a vacuum. For more information on the atomic clock and WWVB
please see the NIST website at
http://www.boulder.nist.gov/timefreq/stations/wwvb.htm
.

6
FUNCTION KEYS
Intelligent weather station:
The intelligent weather station has 5 easy to use function keys on the
right side of the unit.
SET key
• Press and hold the key to enter manual setting modes: LCD
contrast, 12/24 hour time display, time zone, daylight saving time
ON/OFF, manual time setting, calendar, WWVB ON/OFF, ºF/ºC
temperature unit, pressure unit, relative pressure setting and
language display
• Confirm weather alarm in the setting mode
• Reset individual MIN/MAX temperature/humidity record
• Turn weather alarm off when sounding
!<deleted bullet>!
CH key (Channel key)
• Select channel 1, 2, or 3 (if more than 1 sensor is used)
• Exit setting mode
• Detect/Re-detect sensor’s signal for all channels
• Turn weather alarm off when sounding
SET key
MAX/+ key
CH key
MIN/- key
A
LARM ke
y

7
MAX/+ key
• Display MAX indoor / outdoor temperature and humidity records
with time of recording
• Increase all values in manual setting modes
• Increase the weather alarm values
• Turn weather alarm off when sounding
• Reset max/min record
MIN/- key
• Display MIN indoor and outdoor temperature and humidity records
with time of recording
• Decrease all values in manual setting modes
• Decrease the weather alarm values
• Turn weather alarm off when sounding
• Reset max/min record
ALARM key
• Enter the weather alarm time setting mode
• Set next weather alarm in weather alarm setting mode

8
LCD SCREEN
The LCD screen is split into 6 sections displaying the information for
outdoor data, indoor data, time and date, weather forecast, air pressure
and air pressure history, weather information display.
*When the signal from the remote temperature/humidity sensor is
successfully received by the intelligent weather station, this signal
reception will be switched on. (If not successful, the icon will not be
shown on LCD) So the user can easily see whether the last reception is
successful (icon on) or not (icon off). On the other hand, the short
blinking of the icon shows that reception is currently taking place.
A
ir pressure
tendency
indicator
Relative air
pressure
display in
hPa or inHg
Weather display information in English,
German, French, Italian and Spanish
A
ir pressure
history bar
graph
Outdoor
temperature
in °F or ºC
Indoor relative
humidity in
RH%
Indoor Temperature
in °F or ºC
Outdoor
sensor
identification
number
Calendar
display
WWVB reception icon
(for WWVB time)
Weather
forecast icon
Time
display
Outdoor relative
humidity in
RH%
Signal reception
icon*

9
MANUAL SETTINGS
The following manual settings can be changed when pressing and
holding the SET key for approximately 4 seconds:
• LCD contrast setting
• 12/24 hour time display
• Time zone setting
• Daylight time saving ON/OFF
• Manual time setting
• Calendar setting
• WWVB time reception ON/OFF setting
• °F/°C temperature unit setting
• Air pressure unit setting
• Relative pressure value setting
• Language display setting
LCD CONTRAST SETTING
The LCD contrast can be set within 8 levels, from LCD 1 to LCD8
(default setting is LCD 5):
1. Press and hold the SET key for about 4 seconds until the digit
start flashing.
2. Use the MAX/+ or MIN/- key to view all levels of contrast.
3. Select the desired LCD contrast. Press and release the SET key
to confirm selection and to enter the 12/24 Time Display setting.
12/24 HOUR TIME DISPLAY SETTING:
The time display can be set to view time in 12 or 24 hour format. The
default time display mode is “12h”. To set to “24h” time display:
1. Use the MAX/+ or MIN/- key to toggle the value.
2. Press and release the SET key to confirm selection and to enter
the Time Zone setting.
TIME ZONE SETTING
Last digit flashing
Digit flashing
Digit flashing

10
The time zone can be set ±12 hour. The default time zone is set to
Eastern Time zone (“EST”). To set a different time zone:
1. The current time zone value starts flashing.
2. Use the MAX/+ or MIN/- key to set the time zone. The MAX/+ key
increases the value and the MIN/- key decreases the value in
consecutive 1 hour intervals.
3. Press and release the SET key to confirm selection and to enter
the Daylight saving time On/Off setting.
DAYLIGHT TIME SAVING ON/OFF SETTING
The Daylight Saving Time setting may be turned “on” or “off”.
1. The digit “ON” will start flashing on the LCD.
2. Use the MAX/+ or MIN/- key to turn OFF the daylight time saving
function.
3. Press and release the SET key to confirm selection and to enter
the Manual Time setting.
MANUAL TIME SETTING:
In case the intelligent weather station cannot detect the WWVB-signal
(for example due to disturbances, transmitting distance, etc.), the time
can be manually set. The clock will then work as a normal Quartz clock.
1. The hour digit will start flashing.
2. Use the MAX/+ or MIN/- key to set the hour.
3. Press again the SET key to switch to the minutes. The minute
digits start flashing.
4. Use the MAX/+ or MIN/- key to set the minutes.
5. Press and release the SET key to confirm selection and to enter
the Calendar setting.
Note:
The unit will still try to receive the WWVB signal between 0:00 and 6:00
am every day despite it being manually set, if the WWVB reception
function has been set ON. When it does receive the signal, it will change
Minutes
flashing
Hour
flashing
Flashing
Digit flashing

11
the manually set time into the received time. During reception attempts
the WWVB tower icon will flash. If reception has been unsuccessful,
then the WWVB tower icon will not appear but reception will still be
attempted the following hour.
CALENDAR SETTING:
The date default of the intelligent weather station is 1. 1. in the year
2005. Once the radio-controlled time signals are received, the date is
automatically updated. However, if the signals are not received, the date
can also be set manually.
1. The year starts flashing.
2. Use the MAX/+ or MIN/- key to set the year. The range runs from
2005 to 2030.
3. Press the SET key again to confirm and to enter the month
setting. The month starts flashing.
4. Use the MAX/+ or MIN/- key to set the month.
5. Press the SET key again to confirm and to enter the date setting
mode. The date starts flashing.
6. Use the MAX/+ or MIN/- key to set the date.
7. Press and release the SET key to confirm selection and to enter
the WWVB Time Reception ON/OFF setting.
WWVB TIME RECEPTION ON/OFF SETTING
In area where reception of the WWVB time is not possible, the WWVB
time reception function can be turned OFF. The clock will then work as a
normal Quartz clock. (Default setting is ON).
4. The digit “ON” will start flashing on the LCD.
5. Use the MAX/+ or MIN/- key to turn OFF the time reception
function.
Flashing
Year
"Date. Month." (for 24h time display)
"Month. Date." (for 12h time display)
Weekday

12
6. Press and release the SET key to confirm selection and to enter
the ºF/ºC Temperature Unit setting.
Note:
If the WWVB time reception function is turned OFF manually, the clock
will not perform any reception of the WWVB time as long as the WWVB
OFF function is activated.
The WWVB reception icon will not be displayed on the LCD.
°F/°C TEMPERATURE UNIT SETTING
The temperature display can be selected to show temperature data in °F
or °C. (default °F)
1. Use the MAX/+ or MIN/- key to toggle between “°F” or “°C”.
2. Confirm with the SET key and enter the Air Pressure Unit
setting.
RELATIVE AIR PRESSURE UNIT SETTING
The relative air pressure unit can be set in inHg or hPa unit. (default unit
is inHg).
1. Use the MAX/+ or MIN/- key to toggle between “inHg”, “hPa” or
“mmHg”
2. Press and release the SET key to confirm selection and to enter
the Relative Pressure Value setting.
Note:
The default reference pressure value of the barometer is 29.91 inHg
(1013 hPa). For an exact measurement it is necessary to first adjust
the barometer to your local relative air pressure (related to
elevation above sea level). Ask for the present atmospheric pressure
of your home area (Local weather service, calibrated instruments in
public buildings, airport).
RELATIVE PRESSURE VALUE SETTING
The default relative pressure value is 29.91 inHg (1013 hPa). This
corresponds to the average air pressure. Pressure below this is referred
to as low-pressure area (weather to become worse), pressure above as
high-pressure area (weather to improve). The relative air pressure can
Flashing
Flashing

13
Digit flashing
be manually set to another value within the range of 28.35 to 30.72 inHg
(960 – 1040 hPa) for a better reference.
1. The current relative pressure value will start flashing
2. Use the MAX/+ or MIN/- key to increase or decrease the value.
Keep holding the key allows the value to advance faster.
3. Press and release the SET key to confirm selection and to enter
the Language display setting.
Note:
This calibration facility is useful for those users living at various
elevations above sea level, but wanting their air pressure display based
on sea level elevation.
LANGUAGE DISPLAY SETTING:
The language for the calendar and “Intelligent” weather information
display can be set to view in German (D), French (F), Italian (I), Spanish
(S) & English (E) Default setting is English. To set another language:
1. Use the MAX/+ or MIN/- key to set the desired language.

14
2. Press and release the SET key to confirm selection and exit the
Manual settings.
TO EXIT THE MANUAL SETTING MODE
To exit the manual setting anytime during the manual setting modes,
press the CH key anytime or wait for an automatic timeout. The mode
will return to normal time display.
OUTDOOR TEMPERATURE AND HUMIDITY:
The first LCD section can show the outdoor temperature, the reception
indicator, the minimum or maximum reading. A number in the bottom
part will also be shown if more than one sensor has been used.
INDOOR RELATIVE HUMIDITY AND INDOOR
TEMPERATURE:
The indoor temperature and humidity data are automatically updated
and displayed in the second section of the LCD.
TOGGLING BETWEEN MIN/MAX INDOOR AND OUTDOOR
RECORDINGS:
To toggle between the current, minimum and maximum data and the
times they were recorded, press the MIN/- key for viewing the minimum
values, and press the MAX/+ key for viewing the maximum values
(shown in MIN or Max displays).
When pressing the MIN/- or the MAX/+ key, the MIN and the MAX data
will be displayed as following sequences:
1. MAX or MIN outdoor temperature data with time and date of
recordings. Data will flash
1. MAX or MIN outdoor humidity data with time and date of
recordings. Data will flash
Indoor relative
humidity in %
Indoor temperature
in °F or ºC
Outdoor temperature
in °F or °C
Sensor identification number (only if there is
more than one sensor)
Outdoor reception signal
Outdoor humidity
display in RH%
MIN/MAX icon
Outdoor temperature
alarm icon

15
2. MAX or MIN indoor temperature data with time and date of
recordings. Data will flash
3. MAX or MIN indoor humidity data with time and date of recordings.
Data will flash
4. Return to current indoor and outdoor data.
ADDING SENSORS (OPTIONAL)
The WS-9020U is able to receive signals from 3 remote
temperature/humidity sensors (TX28U-IT). These extra sensors can be
purchased through the same dealer as this unit
TO SET-UP OF MULTIPLE SENSORS
1. Remove all the batteries from the receiver and sensor(s) and wait
60 seconds. During these 60 seconds, press any button 20 times
to discharge any excess power.
2. Insert the batteries to the first Thermo-hygro sensor.
3. Within 2 minutes of powering up the first sensor, insert the
batteries to the Weather Station. Once the batteries are in place,
all segments of the LCD will light up briefly. Following the
indoor/outdoor temperature and humidity, time as 12:00, calendar,
and weather icons will be displayed. If they are not shown in LCD
after 60 seconds, remove the batteries and wait for at least 60
seconds before reinserting them.
4. The outdoor temperature and humidity from the first sensor
(channel 1) should then be displayed on the Weather station. If
this does not happen and the signal reception icon is not shown,
after 2 minutes, the batteries will need to be removed from both
units and reset from step 1.
5. Insert the batteries to the second sensor as soon as the outdoor
temperature and humidity readings from the first sensor are
displayed on the Weather station.
NOTE: You must insert the batteries into the second sensor
within 45 seconds of reception of the first sensor.
6. The outdoor temperature and humidity from the second sensor
and the "channel 2" icon should then be displayed on the Weather
station. If this does not happen after 2 minute, the batteries will
need to be removed from all the units and reset from step 1.
7. Insert the batteries to the third sensor as soon as the "channel 2"
icon and outdoor data are displayed on the Weather station. Then
within 2 minutes, the channel 3 outdoor data from the third sensor
will be displayed and the channel icon will shift back to "1" once
the third sensor is successfully received. If this is not happen, user
shall restart the setting up from step 1.
NOTE: You must insert the batteries into the third sensor
within 45 seconds of reception of the second sensor.

16
IMPORTANT: Transmission problems will arise if the setting for
multiple sensors is not followed as described above. Should
transmission problems occur, it is necessary to remove the
batteries from all units and start again the set-up from step 1.
TO VIEW MIN/MAX INDOOR AND OUTDOOR RECORDS:
To toggle between the current, minimum and maximum data and the
times they were recorded, press the MIN/- key for viewing the minimum
values, and press the MAX/+ key for viewing the maximum values
(shown in MIN or Max displays).
When pressing the MIN/- or the MAX/+ key, the MIN and the MAX data
will be displayed as following sequences:
1. MAX or MIN outdoor temperature data with time and date of
recordings. Data will flash.
2. MAX or MIN outdoor humidity data with time and date of
recordings. Data will flash.
3. MAX or MIN indoor temperature data with time and date of
recordings. Data will flash.
4. MAX or MIN indoor humidity data with time and date of
recordings. Data will flash.
5. Return to current indoor and outdoor data.
TO VIEW THE MIN/MAX DATA FROM DIFFERENT
SENSORS
When more than 1 sensor used
1. To toggle between sensors, press the CH key:
Once to show sensor 2
Twice to show sensor 3
Three times to return to sensor 1
2. While the outdoor MIN/MAX humidity and temperature date is
being displayed, press the CH key. The display will toggle
between the different channels MIN/MAX data.
Note:
For example, when the MIN outdoor temperature data is displayed and
the MAX/+ key is pressed, MAX data outdoor temperature will be
Max icon

17
displayed. If the MAX outdoor temperature data is displayed and the
MIN/- key is pressed, MIN outdoor data will be displayed.
While MIN/MAX data is displayed, the channel can be changed by
pressing the CH key.
TO RESET THE MIN/MAX VALUES TO CURRENT VALUES:
To reset individual indoor and outdoor MIN/MAX values to current
values:
1. Press the MAX/+, MIN/- and CH key to select the desired
MIN/MAX value.
2. Press the SET key to reset the selected value to current value
Note:
To reset all indoor and outdoor MIN/MAX values to current values, press
and hold the MAX/+ or MIN/- key for 3 seconds.
OUTDOOR CHANNEL RE-LEARN MODE
In case the temperature data in a particular outdoor channel often
shows “--.-“ due to low battery level or false reset of a sensor, that
sensor can be set up again.
To re-learn ALL channels:
Press and hold the CH key for 3 seconds (outdoor reception signal will
show next to channel display).
WEATHER ALARM SETTING
The intelligent weather station can be set to alert when a specific
weather condition is reach.
The following Weather Alarm settings can be changed when
pressing and holding the ALARM key for approximately 4 seconds:
• LOW outdoor temperature alarm
• HIGH outdoor temperature alarm
Default alarm values:
Low 32ºF Temperature
alarm
High 86ºF
LOW OUTDOOR TEMPERATURE ALARM SETTING
Note:
The outdoor temperature alarm can only be set for channel 1 sensor.

18
To set the LOW outdoor temperature alarm (default OFF):
1. Press and hold the ALARM key for about 3 seconds to enter the
alarm setting mode.
2. Press the MAX/+ or MIN/- key to set the alarm ON or OFF.
3. Press the SET key to enter the alarm value setting (alarm value
flashing)
4. Use the MAX/+ or MIN/- key to set the alarm value.
5. Press the SET key to confirm and enter the HIGH outdoor
temperature alarm setting.
HIGH OUTDOOR TEMPERATURE ALARM SETTING
1. The On/ Off icon is flashing. Press the MAX/+ or MIN/- key to
activate the alarm ON/OFF.
2. Press the SET key to enter the alarm value setting (alarm value
flashing)
3. Use the MAX/+ or MIN/- key to set the alarm value.
4. Press the SET key to confirm and enter the HIGH outdoor
temperature alarm setting.
The On/ Off
icon is flashing
Weather alarm
indicato
r
alarm icon
(low alarm)
alarm value
The On/Off
icon is flashing
Weather alarm
indicator
alarm icon
(high alarm)
alarm value

19
Note:
•
The outdoor temperature alarm is only applicable to Channel 1.
•
The alarm icon “ “ (outdoor high alarm) or “ “ (outdoor low
alarm) will be shown in normal display when the weather alarm is
set ON.
When the alarming outdoor temperature is reached, the alarm will sound.
The weather alarm indicator , high or low alarm icon and the
temperature reading will be flashing on LCD. The alarm will sound for
120 seconds if no one stops the alarm. User may press any key to stop
the buzzer ringing. Then the weather alarm indicator, alarm icon and the
temperature reading will be still flashing but the sound is stopped.
If the alarm key is not pressed, the weather alarm indicator will keep
flashing, indicating that alarm temperature has been reached before.
User may press the Alarm key once to switch off the weather alarm
indicator.
WEATHER ALARM OPERATIONS
WEATHER ALARMS
The Weather alarms are selectable for when certain weather conditions
are met according to the user’s requirements. For example, the user can
set the thresholds for the outdoor temperature to +104°F (+40ºC) (high)
and +14ºF
(-10°C) (low), while only enabling the high alarm and disabling the low
alarm (i.e. temperatures < +14ºF (-10°C) won’t trigger alarm, but
temperatures > +104ºF (+40°C) will).
Alarm setting Minimum Maximum
Outdoor Temperature -40°F (40ºC) +139.8°F (59.9ºC)
HYSTERESIS
To compensate for fluctuation of the measured data, which may cause
the weather alarm to sound constantly if the measured reading is close
to user set level, a hysteresis function has been implemented for each
weather alarm. For example, if the high temperature alarm is set to
+77°F (+25°C) and the current value moves to +77°F (+25°C), the alarm
will be activated (if it has been enabled). Now when the temperature
drops to +76.8°F (+24.9°C) or below and thereafter again increases to
beyond +78°F (+25°C), the data will be blinking, but no alarm will be
activated. It has to drop to below +75.2°F (+24°C) (with a pre-set
hysteresis of 2ºF (1°C)) so that the alarm can be produced again.
Hysteresis values for the various weather data types are given in the
following table:

20
Sunny
Cloudy with
sunny
intervals
Cloudy
Rainy
Weather data Hysteresis
Temperature 2°F
Humidity 3% RH
Air pressure 0.03 inHg
WEATHER FORECAST AND WEATHER TENDENCY:
WEATHER FORECASTING ICONS:
There are 4 weather icons in the fourth section of LCD which can be
displayed in any of the following combinations:
For every sudden or significant change in the air pressure, the weather
icons will update accordingly to represent the change in weather. If the
icons do not change, then it means either the air pressure has not
changed or the change has been too slow for the intelligent weather
station to register. However, if the icon displayed is a sun or rainy, there
will be no change of icon if the weather gets any better (with sunny icon)
or worse (with rainy icon) since the icons are already at their extremes.
The icons displayed forecasts the weather in terms of getting better or
worse and not necessarily sunny or rainy as each icon indicates. For
example, if the current weather is cloudy and the rainy icon is displayed,
it does not mean that the product is faulty because it is not raining. It
simply means that the air pressure has dropped and the weather is
expected to get worse but not necessarily rainy.
The change of weather forecast icon is in agreement with the
relationship between current relative pressure and the pressure change
in the last three hours.
If the weather is changing, both old weather icon and new weather icon
will be shown with a weather tendency indicator (animated arrows). If
the weather has not changed within 6 hours, only the new weather icon
in the middle display will be shown.
/