LOWER ELEMENT: This method of cooking uses the lower
element to direct heat upward to the food. For slow-cooking
recipes or for warming up meals.
CONVENTIONAL OVEN (top and lower element): This
method of cooking provides traditional cooking, with heat from
the top and lower elements. This function is suitable for
17
roasting and baking on one shelf only.
CONVECTION OVEN AND FAN: This method of cooking
provides traditional cooking with heat from the top and the
lower element, it also utilises the circulation fan. This ensures
a fast and even distribution of the heat. Suitable for light and
delicate baking, such as pastries.
FAN OVEN: This method of cooking uses the circular element
while the heat is distributed by the fan. This results in a faster
and more economical cooking process. The fan oven allows
food to be cooked simultaneously on different shelves,
preventing the transmission of smells and tastes from one dish
onto another.
DEFROST MODE: The fan runs without heat to reduce the
defrosting time of frozen foods. The time required to defrost
the food will depend on the room temperature, the quantity
and type of food. Always check food packaging for the
defrosting instructions.
FAN AND GRILL: This method of cooking utilises the top
element in conjunction with the fan, which helps to provide a
quick circulation of heat. This function is suitable where quick
browning is required and “sealing” the juices in, such as
steaks, hamburgers, some vegetables etc.
PYROLYTIC CLEANING: This function cleans the oven cavity
by raising the inner oven temperature to approximately
500°C. The resultant ash deposits can be wiped away with a
soft damp cloth once the oven has cooled down.
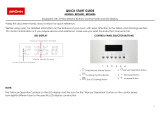
Thermostat control knob
The oven thermostat control knob sets the
required temperature of the oven. It is possible to
regulate the temperature within a range of 50 -
250°C.
The temperature that you have set will appear on
the oven programmer.