Bose aviation headset series ii User manual
- Category
- CD players
- Type
- User manual

Bose
®
Aviation Headset Series II
Owner's Guide

2
As with any complex electronic device, it is possible for this headset to
experience a failure during operation. Such a failure may include loud
tones, distortion and loss of communications signal in the headset when
used in the active or “on” position. The system is “on” when the rocker
switch is “up”.
Note:
This failure could prevent continued use of the headset in the “on”
position.
These loud tones and the related loss of communications can be elimi-
nated for the duration of the flight simply by switching the headset off. (The
system is off when the rocker switch is “down.”) With the switch off, the
headset continues to function in the passive mode, maintaining full
communication capabilities.
We strongly recommend that as a responsible pilot, you ensure you can
hear and recognize typical aircraft sounds while you are using the headset.
Limit the volume of your headset to safe levels so it does not interfere with
your ability to hear informational sounds, such as those emitted by warning
alarms; i.e., stall warning, gear up.
Avoid setting the volume controls at high levels that may affect your
hearing during extended periods of headset use.
The Bose
®
Aviation Headset Series II has been tested and found to comply
with limits for a class B digital device, pursuant to part 15 of the FCC rules.
These limits are designed to provide reasonable protection against harmful
interference in a residential installation. This equipment generates, uses,
and can radiate radio frequency energy and, if not installed and used in
accordance with the instruction, may cause harmful interference to radio
communications. However, there is no guarantee that interference will not
occur in a particular installation. If this equipment does cause harmful
interference to radio or television reception, which can be determined by
turning the equipment off and on, the user is encouraged to try to correct
the interference by one or more of the following measures:
• Reorient or relocate the receiving antenna.
• Increase the separation between the equipment and the receiver.
• Connect the equipment into an outlet on a circuit different from that to
which the receiver is connected.
• Consult the dealer or an experienced radio/television technician for
help.
This apparatus does not exceed the class B limits for radio noise emis-
sions from digital apparatus set out in the Radio Interference Regulations
of the Canadian Department of Communications. It also complies with
Canadian ICES-003 Class B.
Operational Advisories

3
Operational Advisories
This headset meets or exceeds all requirements of EN352-4, 1996
(European Standard-Hearing Protectors-Safety Requirements and
Testing-Part 4: Level-Dependent Ear Muffs).
• The wearer should ensure that:
i. The ear muffs are fitted, adjusted, and maintained in
accordance with the manufacturer’s instructions.
ii. The ear muffs are worn at all times in noisy surroundings.
iii. The ear muffs are regularly inspected for serviceability.
WARNING:
If the above recommendations are not adhered to, the
protection afforded by the ear muffs will be severely impaired.
• This product may be adversely affected by certain chemical sub-
stances. Further information can be sought from the manufacturer.
• Ear muffs, and in particular cushions, may deteriorate with use and
should be examined at frequent intervals for cracking and punc-
tures, for example.
EN352-4 also calls for HML Criterion Levels and other data to be
provided to describe the hearing protection performance of level-
dependent devices. At present, no standard has been drafted or
accepted defining how to measure the hearing protection provided by
active noise cancelling headphones. In the absence of an accepted
method, Bose
®
Corporation has had the product’s attenuation mea-
sured by an accredited U.S. testing laboratory using a combination of
real head methods. Based on this information, the Bose Aviation
Headset Series II provides sufficient hearing protection in any noise up
to 108 dB(A) in sound pressure level. For more information on the
methods used and the results obtained, please contact the Bose
Aviation Headset Service Department (page 23).
This headset complies with RTCA/DO-214 Audio Systems Characteris-
tics and Minimum Operational Performance Standards for Aircraft
Audio Systems and Equipment:
• Transient RF Susceptibility per RTCA/DO-214 ¶ 2.5.11.1 and RTCA/
DO-160C ¶ 20.0, Category T.
• Sustained RF Susceptibility per RTCA/DO-214 ¶ 2.5.11.2 and
RTCA/DO-160C ¶ 20.0, Category T.

4
Declaration of Conformity
We, the offerer:
Bose
®
Corporation, The Mountain, Framingham, MA 01701-9168 USA
acknowledge our sole responsibility, that the product:
Kind of equipment: Headset
Type designation: Bose Aviation Headset Series II
in accordance with EMC Directive 89/336/EEC and Article 10(1) of the Directive,
is in compliance with the following norms:
Technical regulations:
Electromagnetic Compatibility Emissions EN55011, EN55013, EN55022
Electromagnetic Compatibility Susceptibility EN50082-1, EN55020
Accredited by Bose Corporation
14 March 1997
Bose B.V.
Nijverheidstraat 8,1135 GE Edam
The Netherlands
Anton Schalkamp
General Manager, Bose Europe
Manufacturer’s authorized EU representative
Operational Advisories

5
Operational Advisories ............................................................ 2
Introduction ............................................................................. 6
Description ....................................................................... 6
Warranty card................................................................... 6
Using the Bose
®
Aviation Headset ........................................... 7
For proper headset fit....................................................... 7
Interconnect plug ............................................................. 8
Microphone placement .................................................... 8
Adjusting the volume........................................................ 9
Fail-resistant operation..................................................... 9
Microphone boom relocation ......................................... 10
Headset cable relocation................................................ 11
Powering the headset .................................................... 12
Portable battery pack .............................................. 12
Installed connector .................................................. 15
Installed DC power connector ................................. 17
Care and Maintenance .......................................................... 18
Cleaning instructions...................................................... 18
Clear Comfort
TM
cushion replacement
and maintenance............................................................ 18
In Case of Difficulty ............................................................... 20
Technical Information ............................................................ 21
Service and Warranty Information ......................................... 23
Contents

6
Introduction
Description
Congratulations on your purchase of the Bose
®
Aviation Headset Series
II. This headset uses an advanced combination of electro-acoustical
noise reduction circuitry and a patented cushioning system to signifi-
cantly reduce aircraft noise. It actively reduces noise elements in addition
to muffling noise. The patented Clear Comfort
TM
cushions require only
slight pressure to provide high passive noise attenuation. As a result, this
headset can be worn comfortably for extended periods.
The headset may be powered in one of two ways: a portable battery
pack, or a connector installed into your aircraft.
ATTENTION: With the headset’s combination of both active and
passive attenuation, typical aircraft sounds (for example, those from
engines, propellers, warning alarms, and other sound sources) may
sound different to you.
We strongly recommend that you ensure you can hear and recog-
nize these sounds while you are using the Bose aviation headset
while operating any aircraft.
In addition, should you choose to listen to in-flight entertainment
through a Bose headset while piloting, we remind you to limit the
volume to safe levels so that it does not interfere with your ability to
hear informational sounds, such as those emitted by warning
alarms.
Warranty card
1. Remove the headband cushion by pulling it away from the hook and
loop fastener.
2. Copy the serial number from the white label onto the warranty card.
3. Complete the warranty card and mail it to Bose.

7
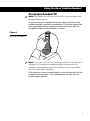
Using the Bose
®
Aviation Headset
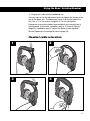
For proper headset fit
Note:
The headset must be worn with the Bose logo (located on the
earcups) facing forward.
To achieve comfort and good performance, adjust both sides of the
headband equally to provide a comfortable fit. To achieve a good seal,
lightly grasp both earcups and position them so that your ears are
completely inside the Clear Comfort
TM
cushions.
Figure 1
Adjusting the headset
Note:
If you hear a hiss or a low rumbling sound, this may indicate an
improper fit. Extending the headband slightly should correct this
condition. Wearing glasses with thick temples or a hat may interfere
with the fit and cause a problem.
Final adjustment is best accomplished in a noisy environment with the
headset system turned on. Then, reposition both earcups until the
headset seems quietest.

8
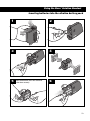
Interconnect plug
The headset interconnect plug connects the headset cable to a power
source. The power source can be an installed connector in the aircraft’s
control panel or an adapter cable connected to a portable battery pack.
The interconnect plug is designed for quick connection and removal. To
ensure correct pin alignment, the plug has a keyway.
Note:
The illustrations below show the insertion of the headset inter-
connect plug into the adapter cable. To insert the interconnect plug into
the aircraft control panel, the same procedure would be used.
To insert: rotate the plug until the keyway is aligned; then insert until it
locks in place.
Figure 2
Inserting the headset
interconnect plug into
the keyway
To remove: gently pull back on the sleeve of the connector. This
automatically unlocks the plug from the socket.
Figure 3
Pulling back on the
sleeve to remove the
interconnect plug
Microphone placement
For good communication clarity and noise rejection, locate the micro-
phone housing so that it just brushes your lips.
Figure 4
Placing the microphone
Using the Bose
®
Aviation Headset

9
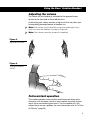
Adjusting the volume
The volume for your headset is controlled by the grooved knobs
located on the front side of the headband arms.
Avoid setting your volume controls at high levels that may affect your
hearing during extended periods of headset use.
Note:
The volume controls and the active noise reducing circuitry
work only when the headset is turned on (Figure 6).
Note:
The volume cannot be turned off completely.
Figure 5
Adjusting the volume
Figure 6
Turning the headset
ON/OFF
Fail-resistant operation
The headset provides communication and the earcups block some
noise even with the power switch on your headset turned off, bypass-
ing all active noise reducing electronics. Turn the headset off if you
suspect there may be a problem; for more information, refer to “In Case
of Difficulty” (page 20).
Using the Bose
®
Aviation Headset
VOLUME
ON
OFF

10
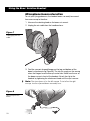
Microphone boom relocation
To suit your flying preference, the headset boom can easily be moved
from one earcup to the other.
1. Unscrew the retaining knob on the boom mic mount.
2. Unplug the mic cable from the headband arm.
Figure 7
Unplugging the mic
cable
3. Find the crescent-shaped flanges on the top and bottom of the
boom’s attachment clip (Figure 8). The clip fits snugly on the earcup
when the flanges face the earcup’s outer side. Make sure the arc of
the boom curves in front of the headset. Attach the clip to the
headset by tightening the attachment knob until the clip is secure.
Note:
The view shown is for the left earcup. To install on the right
earcup, turn the clip-and-boom assembly over.
Figure 8
Relocating the mic
boom
Using the Bose
®
Aviation Headset

11
4. Plug the mic cable into the headband arm.
You may want to use the adjustment screw to tighten the tension of the
clip on the boom mic. The adjustment screw is on the flat end of the
clip. Use a
3
⁄
32
in. hex wrench to tighten it. Do not over-tighten.
Experience in using the headset helps establish your sense of how it
should sound. If you notice a problem, refer to “In Case of Difficulty”
(page 20). If problems persist, contact the Bose Aviation Headset
Service Department to arrange for service (page 23).
Using the Bose
®
Aviation Headset
1
2
3
4
Headset cable relocation

12
Using the Bose
®
Aviation Headset
Powering the headset
The Bose Aviation Headset Series II may be powered in one of two
ways: a portable battery pack, or a connector installed into the
aircraft’s instrument panel.
Portable battery pack
The portable battery pack is available in two versions: NICAD
rechargeable and alkaline.
The NICAD rechargeable battery pack:
• Operates for 12-16 hours
• Recharges in 90 minutes (maximum)
CAUTION
:
Be sure to use the correct charger (Bose model numbers
BC-QC120 for 120V or BC-QC230 for 230V). Using the wrong charger
may damage your charger or battery pack.
The alkaline battery pack:
• Operates for approximately 40 hours
• Holds 6 AA alkaline batteries
Charging the NICAD battery pack
Note:
Completion of the charging cycle is indicated by the flashing
light on the charger. The battery will not be damaged if left connected
to the charger.
Click
Click
2
1

13
Using the Bose
®
Aviation Headset
2
4
1
65
Spin the batteries once with thumb to
seat them securely.
3
Inserting batteries into the alkaline battery pack

14
12
Click
Click
11
10
9
8
7
Using the Bose
®
Aviation Headset

15
Installed connector
An optional installed connector is available for pilots who want to hardwire the
DC power, incoming audio, and outgoing microphone functions permanently
into their plane. The panel mount receptacle comes wired with a 6 foot harness
to simplify the installation process. To order this connector, contact the Bose
Aviation Headset Service Department (page 23).
The Bose
Aviation Headset Series II uses a self-latching, precision designed
quick connector. A mechanical keying system ensures greater ease in mating.
Installing the wire harness
Note:
This installation must be done by mechanics qualified to perform this type
of avionics installation for the aircraft in which the installed connector will be used.
A .5 in. x .56 in. (1.27 cm x 1.42 cm) cutout is required to mount the connector as
shown in Figure 9. There are 6 wires to connect: 2 for microphone, 2 for audio, 1
for power, and 1 for ground. The audio and microphone wires should be con-
nected to the back of the existing microphone and phone jacks. This leaves the
existing jacks intact for use with conventional headsets and is usually the fastest
installation method.
The pinout for the optional installed connector is as follows:
Pin Wire Description
1 Red Headset power (7-32 Volts DC). Use a .5 amp fuse or circuit
breaker.
2 Black System ground. Connect to the existing audio ground.
3 White Phone communication-left.
4 Black Phone communication-right.
5 White Mic/Hi-audio. Connect to the existing portion of the mic jack
that corresponds to the ring position of a headset micro-
phone plug. Do not connect to the tip (PTT) segment.
6 White/Blue Mic/Lo-ground. Connect to the existing portion of the mic
jack that corresponds to the barrel position of a headset
microphone plug.
Notes:
1. If used with a stereo intercom, connect the left and right channels to their
respective positions. For mono operation, connect Pins 3 & 4 together to the
tip portion of the existing phone jack.
2. Do not bend or use excessive force on the installed connector. Doing so may
damage or break the internal solder joints.
3. If the boom mic works on radio transmit but not through the intercom, check
Pin 6. It is probably miswired to the PTT segment of the mic jack.
4. The wire connecting Pins 3 & 4 and 5 & 6 are shielded, twisted pair with a
shield termination exiting with a black wire for each pair. Connect shields to
existing audio wiring shields, or audio ground if the existing wiring is not
shielded.
Using the Bose
®
Aviation Headset

16
Using the Bose
®
Aviation Headset
5. Approved adhesives for use with this connector are Ciba-Geigy Uralane 5754-
A/B, Lord 710, or VTCS-6 Vibratite. Do not let any cyanoacrylate-based
adhesives (e.g., Loctite), flux remover, or other caustic compounds come into
contact with the installed connector body. These chemicals will cause
deterioration and/or irreparable damage to the connector. For information on
chemical compatibility and connector part number, contact LEMO USA, Santa
Rosa, CA
at 1-800-444-5366.
Figure 9
Connector technical
information
PIN 6
PIN 1
PANEL HOLE REQUIRED
AIRCRAFT INTERFACE SCHEMATIC
RED
•
1 V+IN
BLK
•
2 GND
WHT
•
3 COMM L
BLK
•
4 COMM R
WHT
•
5 MIC HI
WH/BLU
•
6 MIC LO
BLK
BLK
12.6mm
.5"
14.1mm
.56"
RECEPTACLE - PINOUT (FRONT VIEW)

17
Installed DC power connector
An optional installed connector is available for pilots who want to use
their plane’s DC power, instead of the battery pack, with the portable
adapter cable. The connector’s small size allows it to be installed in a
convenient location in the control panel, for example, near the head-
phone and mic jacks.
Installing the DC power connector
Note:
This installation must be done by mechanics qualified to
perform this type of avionics installation for the aircraft in which the
installed connector will be used.
1. Install the wires from the DC power connector into the plane.
The pinout for the connector is as follows:
Pin Wire Description
1 Red Headset power (7-32 Volts DC). Use a .5 amp fuse or
circuit breaker.
2 Black System ground. Connect to the existing audio ground.
2. Plug the headset adapter power plug into the connector.
Figure 10
Inserting headset plug
into the connector
3. Insert the headphone and microphone plugs into their receptacles
in the aircraft’s control panel.
Figure 11
Location of headphone
and microphone
receptacles in a typical
plane’s control panel
Using the Bose
®
Aviation Headset

18
Cleaning instructions
Clean the headset exterior and cushions by wiping them with a moist
cloth. Mild soap may be used.
CAUTION:
Do not immerse the headset in water.
The headband cover is made from leather and sheepskin. If it becomes
soiled, it may be removed and cleaned using mild soap. To remove the
headband cover, peel apart the hook and loop fastener along the flap.
Clear Comfort
TM
cushion replacement and
maintenance
To maintain good noise reduction, the Clear Comfort cushions in the
headset should be replaced periodically; annual replacement is
recommended. As the cushions wear, the silicone gel rings may spread
apart, causing uneven thicknesses and gaps in coverage. This can
lead to air leaks that result in reduced noise attenuation. Popping or
fluttering sounds are also common when wearing worn cushions. If the
gel leaks, replace the cushion. Frequent flying may require replacement
more often.
To order a replacement cushion kit, call the Bose
®
Aviation Headset
Service Department (page 23). Before ordering, remove the cushions
and inspect the foam liners in the earcups. If you note significant
deterioration, order foam liner replacements also.
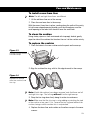
To remove the cushion and foam liner
Note:
Do not use a hard object such as a screwdriver, which can mar
the earcup.
1. Unsnap the trim ring on one earcup by gently prying the edge loose
with your fingers.
Figure 12
Unsnapping the trim ring
from the earcup
Once the trim ring has popped loose, work your way around the
earcups until the trim ring is completely free.
2. Lift out the old cushion. If you will be installing a new foam liner,
proceed to the next section. Otherwise, skip to “To replace the
cushion” (page 19).
Care and Maintenance

19
To install a new foam liner
Note:
The left and right foam liners are different.
1. Lift the old foam liner out of the earcup.
2. Place the new foam liner in the earcup.
With the correct foam liner in place, nesting along the walls of the cavity,
its half-moon shaped opening should cover the microphone, and the
small opening in the foam liner should fit over the small hole.
To clean the cushion
Using a baby wipe or a cloth moistened with isopropyl alcohol, gently
wipe the side of the cushion that touches the ear. Let the cushion air dry.
To replace the cushion
1. Place the holes in the new cushion onto the posts on the earcup.
Figure 13
Placing the new cushion
onto the earcup
2. Align the cushion/trim ring, with its flat edge forward, to the earcup.
Figure 14
Alignment of earcup,
foam liner, cushion, and
trim ring
Note:
If both old cushions have been removed, note that there are left
and right trim rings. The left ring
will not
fit on the right earcup.
3. Snap the trim ring down firmly along its entire circumference.
Note:
Make sure that the trim ring is not grabbing or pinching the side
of the cushion at any spot. If it is, remove the trim ring and reattach the
cushion, being sure the cushion skin is not pinched.
4. Replace the foam liner and cushion on the other earcup in the same
manner.
Care and Maintenance

20
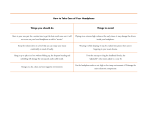
Communication but no
active noise reduction in
both ears.
Problem What to do
In Case of Difficulty
• Make sure that your headset is powered, and that the power switch is “ON.”
• If using DC power from the aircraft, check the aircraft fuse or breaker.
• If using the NICAD battery pack, verify that it is charged.
• If using the alkaline battery pack, verify that:
– batteries are installed with the correct polarity. The negative terminal of
each battery attaches to the springs in the battery holder (refer to step 4
on page 13).
– batteries are fully seated and in contact with the top and bottom contacts
of the battery holder. If necessary, spin the installed batteries once with
your thumbs to fully seat them (refer to step 5 on page 13).
– batteries are fresh.
– the headset plug is fully seated in battery pack (refer to step 11 on page 14).
Check to see if the volume controls are turned too low (rotate up to increase
the volume).
Check the holes at the bottom of each earcup to make sure they are not blocked.
If dust or dirt has built up here, carefully use a small wire or the end of a bent
paper clip to unclog the hole. You may need to remove the microphone to clean
the holes.
• Adjust the earcup fit to create a better seal to your head. Be sure that a hat
or eyeglasses do not interfere with the seal.
• Inspect the seal between the cushion and the earcup. The cushion should
sit on the earcup evenly, without gaps.
• Check the holes at the bottom of each earcup to make sure they are not
blocked. If dust or dirt has built up here, carefully use a small wire or the end
of a paper clip to unclog the hole.
You may need to remove the microphone
to clean the holes.
• Adjust the earcup fit to eliminate the sound.
• Inspect the seal between the cushion and the earcup. The cushion should
sit on the earcup evenly, without gaps.
Check to see if the ear cavity foam liner is missing or severely damaged. If so,
refer to “Care and Maintenance” (page 18).
Active noise reduction
but no (or very low
volume) communication
in both ears.
Reduced active noise
reduction, intermittent
clicking sounds, or
communication distortion
in a loud environment.
Popping sound audible
with headset turned on
in a loud environment.
Low rumbling sound with
the headset turned on in
a quiet environment.
Squealing, whistling, or
chirping sound when the
system is turned on.
Do not attempt to disassemble or service the inside of the earcups or other parts
of the headset. Only the microphone boom assembly, Clear Comfort
TM
cushions,
trim rings, foam liners, headband cover, and foam pad are designed for replace-
ment by the user. For instructions on how to care for your headset and how to
replace the cushions, refer to “Care and Maintenance” (page 18). If problems
persist, contact the Bose
®
Aviation Headset Service Department (page 23).
Page is loading ...
Page is loading ...
Page is loading ...
Page is loading ...
Page is loading ...
Page is loading ...
Page is loading ...
Page is loading ...
-
 1
1
-
 2
2
-
 3
3
-
 4
4
-
 5
5
-
 6
6
-
 7
7
-
 8
8
-
 9
9
-
 10
10
-
 11
11
-
 12
12
-
 13
13
-
 14
14
-
 15
15
-
 16
16
-
 17
17
-
 18
18
-
 19
19
-
 20
20
-
 21
21
-
 22
22
-
 23
23
-
 24
24
-
 25
25
-
 26
26
-
 27
27
-
 28
28


Bose aviation headset series ii User manual
- Category
- CD players
- Type
- User manual
Ask a question and I''ll find the answer in the document
Finding information in a document is now easier with AI
Related papers
-
Bose Aviation Headset X Installation guide
-
Bose Aviation Headset Owner's manual
-
-
-
-
-
-
Bose A20 Aviation Owner's manual
-
-
Other documents
-
Sunnydaze Decor MLM-665 Installation guide
-
Cyber Acoustics AC-850 Datasheet
-
 Mindkoo BEJ035BB-N1 User guide
-
 TruVoice HD-100 Professional Single Ear Headset User guide
-
-
 Able Planet Clear Harmony NC600 User manual
-
Creative HN-900 Quick start guide
-
Soundstream VHP-12 User manual
-
DPA In-Ear Broadcast Headset Microphone User manual
-
Sennheiser PX 200W User manual


