Zebra UMAN-MZS-007 User manual
- Category
- Print & Scan
- Type
- User manual
This manual is also suitable for

Zebra Technologies Corporation
475 Half Day Road, Suite 500
Lincolnshire, IL 60069 USA
T: +1 847.634.6700 or +1 800.423.0442
UMAN-MZS-007 rev. B
May, 2013


3
MZ Series User Guide
continued
Table of Contents
Proprietary Statements ............................................................................................5
Document Conventions ...........................................................................................7
Introduction to the MZ Series ................................................................................8
Unpacking and Inspection ............................................................... 8
Reporting Damage ........................................................................... 8
Getting Ready to Print ........................................................................................... 10
Battery ............................................................................................. 10
Installing and Removing the Battery ..........................................................10
MZ Series Quad Power Station ..................................................................14
Battery Safety ..............................................................................................15
Charger Safety .............................................................................................15
Loading the Media (All models) .................................................... 16
Using Pre-Printed Receipt Media .................................................. 17
Operator Controls .......................................................................... 19
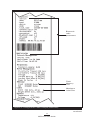
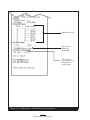
Verify the Printer Is Working ......................................................... 21
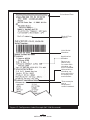
Printing a Configuration Label ....................................................................21
Connecting the Printer ................................................................... 21
Cable Communication .................................................................................22
IR Communications .....................................................................................23
Wireless Communications with Bluetooth™ ..............................................24
Bluetooth Networking Overview ................................................................24
WLAN Overview ............................................................................. 25
Setting Up the Software ................................................................ 25
Wearing the Printer ................................................................................................. 26
Belt Clip ........................................................................................................26
Adjustable Shoulder Strap ..........................................................................27
Preventive Maintenance ....................................................................................... 28
Extending Battery Life ...................................................................28
General Cleaning Instructions ....................................................... 29
Troubleshooting ...................................................................................................... 31
Interpreting Indicators ................................................................... 31
Troubleshooting Topics ................................................................. 31
Resetting an MZ Series Printer ..................................................... 33
Determining Your Printer Version ...............................................................33
Troubleshooting Tests ...................................................................34
Printing a Configuration Label ....................................................................34
Communications Diagnostics .....................................................................34
Calling Technical Support ...........................................................................35
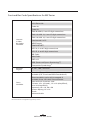
Specications ............................................................................................................ 39
Printing Specifications ...............................................................................39
Memory and Communications Specifications, MZ series.........................39
Media Specifications ...................................................................................39
Font and Bar Code Specifications for MZ Series .......................................40
USB Communications Port .........................................................................41
Physical, Environmental and Electrical Specifications ..............................41
MZ Series Accessories ...............................................................................43
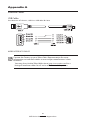
Appendix A ................................................................................................................48
Interface Cables ...........................................................................................48
USB Cable ....................................................................................................48

4
MZ Series User Guide
More Interface Cables ................................................................................48
Appendix B................................................................................................................. 49
Media Supplies ............................................................................................49
MZ Series Media .........................................................................................49
Appendix C ................................................................................................................49
Maintenance Supplies .................................................................................49
Appendix D ................................................................................................................ 50
Battery Disposal ..........................................................................................50
Product Disposal .........................................................................................50
Appendix E ................................................................................................................. 51
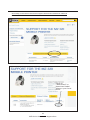
Product Support ..........................................................................................51
Product Support Contacts ..........................................................................52
Appendix F ................................................................................................................. 53
Using zebra.com..........................................................................................53
Index .............................................................................................................................55
Patent Numbers .......................................................................................................56

5
MZ Series User Guide
Proprietary Statements
This manual contains proprietary information of Zebra Technologies Corporation. It is
intended solely for the information and use of parties operating and maintaining the equip-
ment described herein. Such proprietary information may not be used, reproduced, or dis-
closed to any other parties for any other purpose without the expressed written permission
of Zebra Technologies Corporation.
Product Improvements
Since continuous product improvement is a policy of Zebra Technologies Corporation, all
specifications and signs are subject to change without notice.
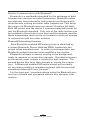
FCC Compliance Statement
NOTE: This equipment has been tested and found to comply with the limits or a Class B
digital device, pursuant to Part 15 of the FCC Rules. These limits are designed to provide
reasonable protection against harmful interference in a residential installation. This equip-
ment generates, uses and can radiate radio frequency energy and, if not installed and used
in accordance with the instructions, may cause harmful interference to radio communica-
tions. However, there is no guarantee that interference will not occur in a particular instal-
lation. If this equipment does cause harmful interference to radio or television reception,
which can be determined by turning the equipment off and on, the user is encouraged to
try to correct the interference by one or more of the following measures:
• Reorient or relocate the receiving antenna.
• Increase the separation between the equipment and receiver.
• Connect the equipment into an outlet or circuit different from that to which the re-
ceiver is connected.
• Consult the dealer or an experienced radio/TV technician for help.
WARNING: Exposure to Radio Frequency radiation. To conform to FCC RF exposure re-
quirements this device shall be used in accordance with the operating conditions and in-
structions listed in this manual. Note that there are several radio options available with this
printer. Additional regulatory information is contained in later sections devoted to each
radio individually.
NOTE: This unit was tested with shielded cables on the peripheral devices. Shielded
cables must be used with the unit to insure compliance.
Changes or modifications to this unit not expressly approved by Zebra Technologies Cor-
poration could void the user’s authority to operate this equipment.
Canadian Compliance Statement
This Class B digital apparatus complies with Canadian ICES-003.
Cet appareil numérique de la classe B est conforme à la norme NMB-003 du Canada.
“IC:” before the equipment certification number signifies that the Industry Canada techni-
cal specifications were met. It does not guarantee that the certified product will operate to
the user’s satisfaction.
Agency Approvals and Regulatory Information
• Design certified by TUV • FCC part 15
• Canadian STD RSS-210 • EN55024:1998 European Immunity Standard
• EN60950: 2000 Safety Standard • NOM/NYCE (Mexico)
• C-Tick (Australia) • EN55022:1998 Class B European
Electromagnetic Radiation Standard
Liability Disclaimer
Inasmuch as every effort has been made to supply accurate information in this manual,
Zebra Technologies Corporation is not liable for any erroneous information or omissions.
Zebra Technologies Corporation reserves the right to correct any such errors and disclaims
liability resulting therefrom.
No Liability for Consequential Damage
In no event shall Zebra Technologies Corporation or anyone else involved in the creation,
production, or delivery of the accompanying product (including hardware and software)
be liable for any damages whatsoever (including, without limitation, damages for loss of
business profits, business interruption, loss of business information, or other pecuniary
loss) arising out of the use of or the results of use of or inability to use such product, even
if Zebra Technologies Corporation has been advised of the possibility of such damages.
Because some states do not allow the exclusion of liability for consequential or incidental
damages, the above limitation may not apply to you.
continued

6
MZ Series User Guide
Copyrights
The copyrights in this manual and the label print engine described therein are owned by
Zebra Technologies Corporation. Unauthorized reproduction of this manual or the software
in the label print engine may result in imprisonment of up to one year and fines of up to
$10,000 (17 U.S.C.506). Copyright violators may be subject to civil liability.
This product may contain ZPL
®
, ZPL II
®
, and ZebraLink
tm
programs; Element Energy Equal-
izer
®
Circuit; E3
®
; and AGFA fonts. Software © ZIH Corp. All rights reserved worldwide.
ZebraLink and all product names and numbers are trademarks, and Zebra, the Zebra logo,
ZPL, ZPL II, Element Energy Equalizer Circuit, and E3 Circuit are registered trademarks of
ZIH Corp. All rights reserved worldwide.
Monotype
®
, Intellifont
®
and UFST
®
are trademarks of Monotype Imaging, Inc. registered in
the United States Patent and Trademark Office and may be registered in certain jurisdic-
tions.
Andy
TM
, CG Palacio
TM
, CG Century Schoolbook
TM
, CG Triumvirate
TM
, CG Times
TM
, Monotype
Kai
TM
, Monotype Mincho
TM
and Monotype Sung
TM
are trademarks of Monotype Imaging,
Inc. and may be registered in some jurisdictions.
HY Gothic Hangul
TM
is a trademark of Hanyang Systems, Inc.
Angsana
TM
is a trademark of Unity Progress Company (UPC) Limited.
Andale
®
, Arial
®
, Book Antiqua
®
, Corsiva
®
, Gill Sans
®
, Sorts
®
and Times New Roman
®
are
trademarks of The Monotype Corporation registered in the United States Patent and Trade-
mark Office and may be registered in certain jurisdictions.
Century Gothic™, Bookman Old Style
TM
and Century Schoolbook
TM
are trademarks of The
Monotype Corporation and may be registered in certain jurisdictions.
HGPGothicB is a trademark of the Ricoh company, Ltd. and may be registered in some ju-
risdictions.
Univers
TM
is a trademark of Heidelberger Druckmaschinen AG, which may be registered in
certain jurisdictions, exclusively licensed through Linotype Library GmbH, a wholly owned
subsidiary of Heidelberger Druckmaschinen AG.
Futura
®
is a trademark of Bauer Types SA registered in the United States Patent and Trade-
mark Office and may be registered in some jurisdictions.
TrueType
®
is a trademark of Apple Computer, Inc. registered in the United States Patent and
Trademark Office and may be registered in certain jurisdictions.
All other product names are the property of their respective owners.
All other brand names, product names, or trademarks belong to their respective holders.
©
2013 ZIH Corp.

7
MZ Series User Guide
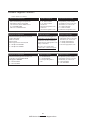
Document Conventions
The following conventions are used throughout this docu-
ment to convey certain information:
If you are viewing this guide online, click the underlined text
to jump to a related Web site. Click on italic text (not under-
lined) to jump to that location in this manual.
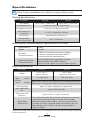
Cautions, Important, and Note
Caution • Warns you of the potential for electrostatic discharge.
Caution • Warns you of a potential electric shock situation.
Caution • Warns you of a situation where excessive heat could cause
a burn
Caution • Advises you that failure to take or avoid a specic action
could result in physical harm to you.
Caution • Advises you that failure to take or avoid a specic action
could result in physical harm to the hardware.
Important • Advises you of information that is essential to complete a
task.
Note • Indicates neutral or positive information that emphasizes or
supplements important points of the main text.

8
MZ Series User Guide
Introduction to the MZ Series
Thank you for choosing one of our Zebra
®
MZ™ series
Mobile Printers. These rugged printers are sure to become
productive and efficient additions to your workplace thanks
to their innovative design. Because they are made by Zebra
Technologies, you’re assured of world-class support for all of
your bar code printers, software, and supplies.
• This user’s guide gives you the information you will need
to operate any MZ series printer.
• The MZ series uses the CPCL programming language. To
create and print labels using the CPCL language, refer to
the Mobile Printing Systems CPCL Programming Guide
and our Label Vista™ label creation program which are
both available on either the MZ series product CD or
at
www.zebra.com.
Unpacking and Inspection
Inspect the printer for possible shipping damage:
• Check all exterior surfaces for damage.
• Open the media cover (refer to “Loading the Media” in
the Getting Ready to Print section) and inspect the media
compartment for damage.
In case shipping is required, save the carton and all packing
material.
Reporting Damage
If you discover shipping damage:
• Immediately notify and file a damage report with the ship-
ping company. Zebra Technologies Corporation is not re-
sponsible for any damage incurred during shipment of
the printer and will not cover the repair of this damage
under its warranty policy.
• Keep the carton and all packing material for inspection.
• Notify your authorized Zebra re-seller.

9
MZ Series User Guide
1
2
3
4
5
6
7
8
9
10
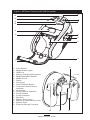
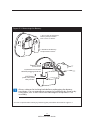
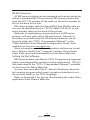
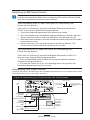
1. Feed Switch
2. Media Status Light
3. USB Port
4. Battery Charging Receptacle
5. Media/Black Bar Sensor
6. Media Cover
7. Platen
8. Printhead
9. Latch Release Button
10. Communications Status
Indicator
11. IR window
12. Charge Status Indicator
13. Power Switch
14. Power Indicator
15. Belt Clip
16. Battery Door Latch
17. Battery Compartment Cover
18. Battery Pack
19. External Charge Contacts
Figure 1: MZ Series Overview (MZ 220 Illustrated)
15
18
19
17
11
12
13
14
16

10
MZ Series User Guide
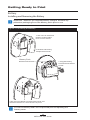
Getting Ready to Print
Battery
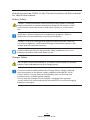
Installing and Removing the Battery
Important • Batteries are shipped partially charged. Remove any
protective packaging from new battery packs prior to use.
Figure 2.1: Installing the Battery
1. Use a coin to rotate the
Battery Compartment
lock
1
/
4
turn as shown.
2. Remove the Battery
Compartment Cover
3. Plug the Battery
Pack connector into the
Printer.
Battery Pack
Note location of label
4. Re-install the Battery Compartment Cover and
rotate the lock back
1
/
4
turn to lock it in place .
Ensure the battery leads are not pinched prior to replacing the
battery cover.

11
MZ Series User Guide
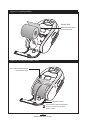
Figure 2.2: Removing the Battery
1. Use a coin to rotate the
Battery Compartment
lock
1
/
4
turn as shown.
2. Remove the Battery
Compartment Cover
Battery Pack
Connector
Squeeze lock to release
before unplugging connector.
Lift Battery
pack free from
the printer.
4. Install a replacement battery by following the procedure described in Figure 2.1
Always release the locking barb before unplugging the battery
connector. Do not attempt to remove the connector by force, or by
using pliers, etc. as this could cause damage to the printer’s CPU
assembly.

12
MZ Series User Guide
When the battery is first installed, the printer power and
charge indicators should indicate the battery is not fully
charged (see “Charging the Battery” below and “Operator
Controls”).
You must charge the battery fully before using the printer for the rst
time.
Charging the Battery
Preparing the Charger Power Supply
Before charging the battery for the first time, you must pre-
pare the Charger Power Supply. Refer to Figure 3 below:
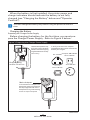
Figure 3: Preparing the Charger Power Supply
continued
1. Remove the power sup-
ply from its box. Remove
and discard the shipping
ring from the mains recep-
tacle cavity.
Shipping Ring
Remove and discard
2. Verify that the mains adapter
shipped with your Printer is the correct
one for your region.
Mains Adapter
3. Install the mains adapter into
the Power Supply by hooking
the top edge into the mains
receptacle cavity, and rotating
it until it snaps into place.
US/Japan-100-110 VAC
China-220 VAC
UK -230 VAC
Euro -230 VAC
Aust-240 VAC

13
MZ Series User Guide
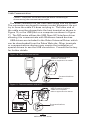
Charging the battery
Refer to Figure 4.
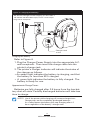
1. Plug the Charger Power Supply into the appropriate A.C.
wall receptacle. Then insert the charge cable into the
printer’s charger jack.
2. The printer’s charger indicator will indicate the status of
the charger as follows:
• An amber light indicates the battery is charging, and that
the battery is less than 90% charged.
• A green light indicates the battery is fully charged. The
battery is ready for use.
Approximate Charge Times :
Batteries are fully charged after 2.5 hours from the low-bat-
tery shut-off state. Partially discharged batteries will take less
time to charge.
NOTES: Use of the printer while charging will increase charge times.
Charge times are for completely discharged batteries.
As a safety feature the battery will stop charging after 4.5
hours regardless of the battery’s charge state.
Charger Jack
12 VDC
Figure 4: Charging the Battery
MZ Series Charger Power Supply p/n AT17947-1
110-240 VAC 50-60 Hz 0.6A Input; 12 VDC 1.25 A output
Plug into AC receptacle

14
MZ Series User Guide
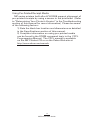
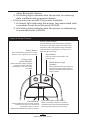
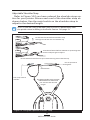
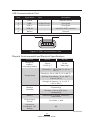
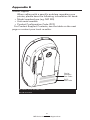
MZ Series Quad Power Station
The MZ series Quad Power Station is designed to dock and
charge up to four MZ series printers of either type simultane-
ously.
1. Ensure that the Power Station has been installed properly
per its instruction manual. Ensure that the power supply
is properly connected and its power indicator light is on.
2. Slide a printer into any one of the four docking bays as
shown in Figure 5.
NOTES: If you are using a shoulder strap, ensure it is pulled away
from the printer when installing in the Power Station.
Do not use the printer when it is installled in the Power
Station
The printer’s charge status indicator will turn amber if the
printer is properly inserted and the battery is less than
90% charged.
The printer’s charge indicators will allow you to monitor the
Figure 5: MZ Series Quad Power Station
Green (Power)
Indicator
Slide Printer into docking bay
MZ 220 Printer
MZ 320 Printer
Amber/Green (Charge)
Indicator

15
MZ Series User Guide
charging process. Refer to the Controls section of this manual
for more information.
Battery Safety
Caution • Avoid accidental short circuiting of any battery. Allowing
battery terminals to contact conductive material will create a short
circuit which could cause burns and other injuries or could start a
re.
Important • Always dispose of used batteries properly. Refer to
Appendix D for more battery recycling information.
Caution • Use of any charger not approved specically by Zebra for
use with its batteries could cause damage to the battery pack or the
printer and will void the warranty.
Read carefully and always observe the safety guidelines for Li-Ion
batteries provided with each Battery Pack.
Charger Safety
Do not place the Power Station in locations where liquids or metallic
objects may be dropped into the charging bays.
Use care when installing either the Charger Power Supply shipped
with the printer or the power supply supplied with the MZ series
Power Station. Do not block the ventilating slots on the top and
bottom covers of either power supply.
Ensure that the Charger Power Supply is plugged into a power
source which will not accidently be turned o if you will be charging
batteries overnight.

16
MZ Series User Guide
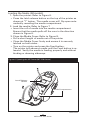
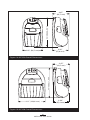
Loading the Media (All models)
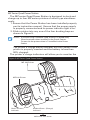
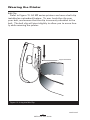
1. Open the printer: Refer to Figure 6.
• Press the latch release button on the top of the printer as
shown at “1” below. The media cover will flip open auto-
matically revealing the media compartment.
2. Load the media: Refer to Figure 7
• Insert the roll of media into the media compartment.
Ensure that the media pulls off the core in the direction
shown in Figure 6.
3. Close the Media Cover: Refer to Figure 8.
• Pull a short length of media out of the printer
• Close the Media Cover firmly and ensure it is securely
latched on both sides..
• Turn on the printer and press the Feed button.
The printer will advance media until the Feed button is re-
leased. Verify the media is feeding properly and without
binding or skewing sideways.
Figure 6: Opening the MZ Printer (MZ 220 shown)
continued
Media Compartment
Latch Release
Button

17
MZ Series User Guide
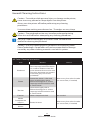
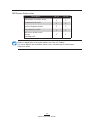
Using Pre-Printed Receipt Media
MZ series printers built after 6/16/2008 support alignment of
pre-printed receipts by using a sensor in the printhead. (Refer
to “Determining Your Printer’s Version” in the Troubleshooting
section of this manual for more information) Please be aware
of the following factors:
1) Note the black bar location and dimensions as detailed
in the Specifications section of this manual.
2) Complete information on using pre-printed media
can be found in the FORM command topic in the CPCL
Programming Manual. The CPCL manual is available
on the MZ Product CD or on the Zebra Web site at
http://www.zebra.com/manuals
.

18
MZ Series User Guide
Figure 7: Installing Media
Media Roll
Note direction media
pulls o the roll.
Media Cover
Pull a short length of media
out of the Printer
Figure 8: Closing the Media Cover
Ensure both sides of the media
cover are securely latched
when closed.

19
MZ Series User Guide
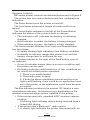
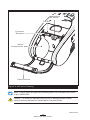
Operator Controls
MZ series printer controls are detailed below and in Figure 9.
The printer has two control buttons and four multipurpose
indicators.
The Power Button turns the printer on and off.
The Feed Button advances a length of media until it is re-
leased.
The Green/Amber indicator to the left of the Power Button
indicates the status of the printer’s built-in charger:
• The indicator is off indicates the battery is not being
charged.
• If the indicator is amber the battery is being charged.
• If the indicator is green, the battery is fully charged.
The Green Indicator between the Power and Feed buttons
has two states:
• A rapidly blinking light indicates a low battery condition.
• A steadily lit indicator means that power is on and the
battery charge level is sufficient for use
The Amber Indicator to the right of the Feed button is an er-
ror indicator.
• An un-lit indicator means there is no error condition and
the printer can be used.
• A blinking indicator could mean one of two conditions ex-
ist, which will inhibit printer operation:
1. There is no media loaded.
2. The media cover is open.
3. If both the above conditions are met and the error
light is still flashing, there could be no application load-
ed in the printer, or the application could have become
corrupted.
The Blue Indicator just above the product I.D. label is a com-
munications indicator. Its functions vary depending on the
wireless communications option installed in the printer.
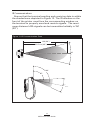
• If the printer uses only standard IrDA
®
wireless commu-
nication:
A blinking light indicates data is being received from a
linked IrDA device.
• If the printer has a Bluetooth™ radio option:
1. A steady light indicates the printer has paired with an-

20
MZ Series User Guide
other Bluetooth device.
2. A blinking light indicates that the printer is receiving
data via Bluetooth communications.
• If the printer has an 802.11b/g radio installed:
1. A steady light indicates the printer has associated with
a wireless Local Area Network (WLAN).
2. A blinking light indicates that the printer is attempting
to associate with a WLAN.
Figure 9: Printer Controls
Power Button
Press until Power Light turns on, then
release. Press again to turn unit o.
Feed Button
Press to advance the media. Re-
lease to stop.
Communication Light (Blue)
When lit steadily indicates a wireless
communications link is established, when
blinking indicates data transmission.
Charge Light
(Green/Amber)
Green indicates a fully charged
battery. Amber indicates
the battery is less than 90%
charged.
IrDA Window
IrDA enabled devices must be located
within the printer’s IR zone for IR
communications to occur.
Refer to the IR Communications section.
Media Status Light
(Amber)
When o Indicates normal opera-
tion.Blinking indicates either no
media or that the media compart-
ment is open.
Power Light (Green)
Indicates power status and battery condition.
A steadily lit indicator means the battery has
more than a 30% charge remaining. A blinking
indicator means the battery has less than a
30% charge remaining.
Page is loading ...
Page is loading ...
Page is loading ...
Page is loading ...
Page is loading ...
Page is loading ...
Page is loading ...
Page is loading ...
Page is loading ...
Page is loading ...
Page is loading ...
Page is loading ...
Page is loading ...
Page is loading ...
Page is loading ...
Page is loading ...
Page is loading ...
Page is loading ...
Page is loading ...
Page is loading ...
Page is loading ...
Page is loading ...
Page is loading ...
Page is loading ...
Page is loading ...
Page is loading ...
Page is loading ...
Page is loading ...
Page is loading ...
Page is loading ...
Page is loading ...
Page is loading ...
Page is loading ...
-
 1
1
-
 2
2
-
 3
3
-
 4
4
-
 5
5
-
 6
6
-
 7
7
-
 8
8
-
 9
9
-
 10
10
-
 11
11
-
 12
12
-
 13
13
-
 14
14
-
 15
15
-
 16
16
-
 17
17
-
 18
18
-
 19
19
-
 20
20
-
 21
21
-
 22
22
-
 23
23
-
 24
24
-
 25
25
-
 26
26
-
 27
27
-
 28
28
-
 29
29
-
 30
30
-
 31
31
-
 32
32
-
 33
33
-
 34
34
-
 35
35
-
 36
36
-
 37
37
-
 38
38
-
 39
39
-
 40
40
-
 41
41
-
 42
42
-
 43
43
-
 44
44
-
 45
45
-
 46
46
-
 47
47
-
 48
48
-
 49
49
-
 50
50
-
 51
51
-
 52
52
-
 53
53


Zebra UMAN-MZS-007 User manual
- Category
- Print & Scan
- Type
- User manual
- This manual is also suitable for
Ask a question and I''ll find the answer in the document
Finding information in a document is now easier with AI
Related papers

Other documents
-
Approx APPUSBWALLV2 Datasheet
-
Sharp AN3DG40 User manual
-
 Printronix Auto ID M4l2 User manual
-
 Psion Teklogix MLP 3040 Series User manual
-
AMT Datasouth Fastmark M3 User guide
-
 EDGE Tech QL Series User manual
-
SATO MB400 User manual
-
 BK TECHNOLOGIES BKR0300 Desktop Smart Charger User manual
-
 Zebra Technologies I28MD-ZBR5QLN User manual
-
Argox AME-3230B User manual


