Orion STARSHOOT 52174 User manual

Category
Telescopes
Type
User manual

This manual is also suitable for

Orion STARSHOOT 52174 is a versatile video eyepiece that allows you to capture detailed, full-color videos of astronomical objects and even terrestrial subjects during the day. With its easy-to-use design and compatibility with most telescopes, you can start imaging the planets, Moon, and Sun (with optional solar filter) right away. Stacking multiple video frames using image processing software can greatly enhance the quality of your planetary images, revealing intricate details and improving contrast.

Orion STARSHOOT 52174 is a versatile video eyepiece that allows you to capture detailed, full-color videos of astronomical objects and even terrestrial subjects during the day. With its easy-to-use design and compatibility with most telescopes, you can start imaging the planets, Moon, and Sun (with optional solar filter) right away. Stacking multiple video frames using image processing software can greatly enhance the quality of your planetary images, revealing intricate details and improving contrast.

Orion
®
StarShoot
Video Eyepiece
#52174 / #52176
INSTRUCTION MANUAL
Providing Exceptional Consumer Optical Products Since 1975
OrionTelescopes.com
Customer Support (800) 676-1343
Corporate Offices (831) 763-7000
89 Hangar Way, Watsonville, CA 95076
© 2010 Orion Telescopes & Binoculars
IN 403 Rev. B 11/10
2
3
Welcome to a new world of adventure. Your new StarShoot
Solar System Video Eyepiece (SSVE) is capable of display-
ing detailed, full-color video of astronomical objects in our
solar system. The planets, Moon, and Sun (with optional
solar filter) can all be imaged to create spectacular views
on your TV Screen. The SSVE can even be used during the
day to take images of terrestrial subjects. You’ll find that
this inexpensive, yet capable and easy to use camera will
enhance all of your journeys with your telescope.
Please read this instruction manual before attempting to
use the camera.
Parts List
StarShoot Video Eyepiece (SSVE)•
9V power adapter•
System Requirements (refer to Figure 1)
Telescope
The SSVE can be used with virtually any telescope that is compatible with
1.25" format eyepieces. The camera simply is inserted into a focuser in the
same way as a standard eyepiece (Figure 1). If you use a star diagonal, you
should remove it. If your telescope does not have enough inward focus travel,
you will need to use an optional 1.25" Barlow lens to extend the telescope’s
focal plane to the camera’s imaging plane.
For most types of astro-imaging with the SSVE, using a telescope with a
focal length of at least 1000mm is recommended. Otherwise, the image scale
may be too small. To increase the effective focal length of your system, use a
Barlow lens or other type of tele-extender lens.
Mount
While using an equatorial (EQ) mount is recommended to achieve the best
results, one is not absolutely required for general imaging with the SSVE.
Since the maximum exposure time is only a fraction of a second, astronomical
objects will not drift significantly through a telescope attached to an altazimuth
mount or Dobsonian base during single image captures. Use a sturdy mount
that is appropriately sized for the telescope tube being used.
For obtaining the best planetary images, however, we do recommend an equa-
torial mount. Planetary imaging requires combining many individual images,
and having an equatorial mount will prevent the planet from drifting out of the
field of view of the camera during the time it takes to acquire the large number
of images necessary. A motor drive (single-axis) is recommended too, so you
can track the target object as you transmit live images to your laptop or PC.
Video can be recorded via standard VCR’s, DVR’s or Camcorder’s equipped
with a composite RCA input. Movie files can then be downloaded to a PC for
image processing.
Image Processing Software
http://www.astronomie.be/registax
http://www.avistack.de
Website links are provided above to download popular free Image processing
software to be used with your image files to enhance your astro Images.
Image Processing Software such as RegiStax or AviStack can Align and Stack
(combine) hundreds of individual images into a single resultant image and per-
Figure 1.
To use the SSVE, a telescope, mount and viewing/recording device that
accepts RCA composite input such as TV, Camcorder, DVR and VCR.
4
5
form some additional image processing to bring out subtle details or to make
the image appear more pleasing overall.
Both software applications are a recommended addition to any astro-imagers
arsenal of image processing software.
Getting Started During Daylight
We recommend using the SSVE for the first time during the day. This way,
you can become familiar with the camera and its functions without having to
stumble around in the dark. Set up your telescope and mount so the optical
tube is pointing at an object at least a couple of hundred feet away. Insert an
eyepiece and focus as you normally would.
To obtain first images with the SSVE, follow these step-by-step instructions:
Plug the 9v Power adapter into the SSVE. 1.
Plug the RCA composite output from the SSVE into your viewing device 2.
(TV, DVR, VCR, Camcorder).
To connect the camera to the telescope, simply replace the telescope’s 3.
1.25" eyepiece with the camera. Make sure the securing thumbscrew on
the focuser drawtube is tightened after the camera is inserted.
You will now need to refocus the camera for the centered object. Focusing 4.
will be the hardest thing to learn in the initial stages. If the daytime image
brightness is still too bright to produce an acceptable image on your
computer screen, you may need to stop-down the aperture of your tele-
scope.
Look at the 5. Live Video Window on the screen and adjust the focus knob
accordingly to determine best image focus.
Note: The camera’s field of view is fairly small. It is approximately equivalent to
the field of view through the telescope when looking through a typical (i.e. not
wide-field) 5mm Ultrascopic eyepiece.
Image orientation can be changed by rotating the camera within the 6.
focuser drawtube. Simply loosen the thumbscrew on the drawtube and
rotate the camera until the desired image orientation is achieved. Retighten
the thumbscrew on the focuser drawtube when done. You may need to
slightly refocus (using the telescope’s focus knob) if the focuser drawtube
has moved a bit inward or outward when the camera was rotated.
If you have attached a VCR, DVR or Camcorder you can now record a 7.
video of the live view.
You have now taken your first images with the SSVE! This simple method
of imaging is exactly how the camera is used to capture terrestrial subjects
during daylight hours. Close-up images of birds and other wildlife or faraway
vistas can all be obtained in this way with the SSVE. Solar images can also
be taken during the day with an optional
full-aperture solar filter over the front of
the telescope.
Take some time to use the camera dur-
ing the day to become familiar and com-
fortable with its basic operation.
Astronomical
Imaging
Now that you’re familiar with basic cam-
era operation, it’s time to take the SSVE
out at night under the stars to capture
some astronomical images. We recom-
mend starting with the Moon, as it is
easy to acquire into the camera’s field
of view, and typically does not require
stacking of multiple exposures as plan-
etary images do.
Imaging the Moon
Imaging the Moon is much like imaging
terrestrial objects during the day. Since
the exposure is very short, it is not criti-
cal that the telescope be precisely polar aligned.
When the moon is past half full, it is hard to get detail due to the tremendous
glare off of the lunar surface. Most detail, even on a sliver of a moon, will be at
the terminator (that tiny thin line between the shadow and light, see Figure 2).
To get more of the moon in the image, a focal reducer will need to be used.
For close-ups of craters use a Barlow lens (see “Using Focal Reducers and
Barlow Lenses”).
Imaging Planets
The best planetary images will be obtained by stacking (combining) many indi-
vidual images in order to improve image contrast, brightness, and detail.
A great way to obtain images for stacking is to take several seconds of video
of the planet, then break the video into individual frames for stacking. Since the
SSVE has a frame rate of 30 frames per second (NTSC) or 25 frames per second
(PAL), you can literally obtain hundreds of images for stacking in seconds! You
save time by taking one video instead of dozens of individual pictures!
Since you will be taking multiple images over a period of time, it is important
you have a decent polar alignment in order to keep the planet within the field of
view of the camera. To this end, having a motor drive (at least single-axis) will
Figure 2.
The moon’s surface detail
looks the best along the terminator.
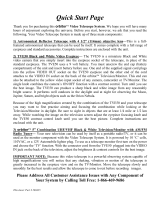
Figure 3. (left) Jupiter live image.
(right) 500 frames Aligned, stacked
and enhanced using Registax
Image Processing Software. Image
taken with Orion 180mm Mak-Cass
telescope.
6
7
also be helpful. Otherwise, you will periodically need to rotate the R.A. slow-
motion knob to keep the planet within the camera’s field.
Tips
Focusing
One of the hardest things to do in planetary imaging is achieving good focus.
You can make this process easier by simply watching the Live Video on your
display device to focus. Depending upon the viewing conditions you may
notice that the image goes in and out of focus this is due to viewing conditions.
This is to be expected and one of the reasons why post processing software
can bring out the best in your captured images. Focus as best as possible with
the average frame being at best focus to ensure more in focus frames than
out of focus. Image processing software can then be used to select the best
frames to combine for best results.
Refocus often throughout your imaging session. This ensures at least some
of your images will have an excellent focus. It is also not uncommon for tele-
scope movements to alter the focus slightly, so be sure to refocus for any new
astro-imaging targets.
Choosing a Site for Astro-imaging
Once you have a focused image, you may find your image shifting and washed
out. This can be caused by many environmental factors. Poor seeing (move-
ment of molecules in the air, such as heat rising) and poor transparency (mois-
ture, smoke, or other sky contaminants) will all serve to reduce image quality.
That is why most major astronomical telescopes are on high mountains in thin
air, to get above much of the seeing and transparency problems. Also, wind
will move your telescope and affect images. Your eyes viewing through an
eyepiece can change slightly to compensate for disturbances like these, but
the camera cannot. Keep these factors in mind when choosing an observing
site for astronomical imaging.
For the best astro-images, we recommend finding a location with dry air, some
altitude, and away from city or streetlights. Even a nearby hilltop in the coun-
tryside can provide better viewing conditions than many convenient backyard
locations.
Using Focal Reducers and Barlow Lenses
Focal reducers serve to decrease the focal length of your telescope. This
increases the field of view seen by the camera (decreases camera magnifica-
tion). This can be useful for obtaining images of wider objects, such as the full
Moon or a landscape vista.
Barlow lenses, or other tele-extenders, increase the focal length of your tele-
scope, which makes the camera field of view narrower (increases camera mag-
nification). This is useful for high-power planetary images. Keep in mind that
when the focal length is doubled, the image will become four times dimmer, so
a longer exposure may be necessary.
For best planetary imaging, you should shoot with an effective focal ratio
(telescope focal length ÷ telescope aperture) of f/20 or greater. This will give
you a good combination of image brightness and image scale for planets. For
most telescopes, a Barlow lens will be required to obtain this focal ratio. For
example, Schmidt-Cassegrain telescopes usually have a focal ratio of f/10.
A 2x Barlow lens doubles the effective focal length of the telescope, which
makes the focal ratio f/20. Similarly, a 3x Barlow lens will yield of focal ratio
of f/30. You can also try using multiple Barlows to obtain even greater effec-
tive focal ratios. There is a limit to how large a focal ratio your telescope and
seeing conditions can handle, however. Experimentation will be needed to see
what your telescope is capable of in the seeing conditions on a given night. If
the image appears somewhat dim and fuzzy on the computer screen, you may
want to consider removing the Barlow lens.
(Focal Reducers and Barlow lenses available through Orion, check the catalog
or OrionTelescopes.com).
Filters
For some types of planetary imaging, you may want to use color filters to bring
out subtle details. Any standard Orion 1.25" filter will thread into the front of the
SSVE’s barrel. Try using different color filters on a planet to see which filters
help best show planetary details.
Neutral-density Moon filters and variable-polarizer filters are useful to reduce
the glare from the moon. They can also be used to reduce the glare from
Venus.
Solar Filters
Warning: Always use a full aperture solar filter when viewing the sun.
With a properly fitting full-aperture solar filter attached to your telescope, you
can use the SSVE to take images of the Sun and the sunspots on its surface.
(Filters available through Orion, check the catalog or OrionTelescopes.com for
more information).
Flip Mirror
As easy as flipping a switch, the Imaging Flip Mirror enables the astropho-
tographer to find, center and focus a target visually with a 1.25" telescope
eyepiece, then photograph it with a CCD camera. All without swapping out any
equipment. It’s a real timer saver, making the normally tedious task of focusing
with the CCD camera alone easier and quicker. (available through Orion, check
the catalog or OrionTelescopes.com for more information).
8
9
Things to Do
Moon
Learn your way around our closest
celestial neighbor.
Image the craters, mountains and •
valleys.
Image the different phases from •
New moon to Full Moon
Image the detail at the terminator •
Create a moon mosaic (Figure 4)•
Planets
Take a movie of the position of the great red spot of Jupiter during the •
Gas Giant’s <10 hour day.
Image Jupiter’s moons and their shadows as they transit across the •
Gas Giant
Follow in Galileo’s footsteps by Imaging the different phases of Venus•
Solar
Using a full aperture Solar Filter to image sunspots (Figure 5)•
Terrestrial
Image animals from a far distance so as not to disturb feeding and •
nesting spots
Recommended Reading
(Books available through Orion, check the catalog or OrionTelescopes.com for
more information).
Specifications
Sensor OMM Vision Color CMOS sensor
Sensor size 1/3"
Number of pixels NTSC 510 x 496 pixel layout, PAL 628 x 586 pixel layout;
0.3 megapixel resolution
Pixel size 9.2µm x 7.2µm
Video frame rate NTSC 30 frames/second, PAL 25 frames/second
A/D conversion 8 bit
IR filter Yes
Connection Standard Composite RCA Video Out
Barrel 1.25" threaded for filters
Figure 4. Use software to assemble individual frames to create a higher resolution
image. Image taken using Orion Apex 90mm Mak-Cass telescope and Orion 0.5x Focal
reducer. 10 Individual images assembled In Adobe Photoshop.
Figure 5. Image taken using Orion
Apex 90mm Mak-Cass telescope. 100
frames Processed using RegiStax.
One-Year Limited Warranty
This Orion StarShoot Video Eyepiece is warranted against defects in materials or workman-
ship for a period of one year from the date of purchase. This warranty is for the benefit of the
original retail purchaser only. During this warranty period Orion Telescopes & Binoculars will
repair or replace, at Orion’s option, any warranted instrument that proves to be defective,
provided it is returned postage paid to: Orion Warranty Repair, 89 Hangar Way, Watsonville,
CA 95076. If the product is not registered, proof of purchase (such as a copy of the original
invoice) is required.
This warranty does not apply if, in Orion’s judgment, the instrument has been abused, mis-
handled, or modified, nor does it apply to normal wear and tear. This warranty gives you
specific legal rights, and you may also have other rights, which vary from state to state. For
further warranty service information, contact: Customer Service Department, Orion Telescopes
& Binoculars, 89 Hangar Way, Watsonville, CA 95076; (800) 676-1343.
OrionTelescopes.com
89 Hangar Way, Watsonville, CA 95076
Customer Support Help Line (800) 676-1343
© 2010 Orion Telescopes & Binoculars
This device complies with Part 15 of the FCC Rules. Operation is subject to the following
two conditions: (1) this device may not cause harmful interference, and (2) this device
must accept any interference received, including interference that may cause undesired
operation.
Changes of modifications not expressly approved by the party responsible for compli-
ance could void the userís authority to operate the equipment.
Note: This equipment has been tested and found to comply with the limits for a Class B
digital device, pursuant to Part 15 of the FCC Rules. These limits are designed to pro-
vide reasonable protection against harmful interference in a residential installation. This
equipment generates, uses and can radiate radio frequency energy and, if not installed
and used in accordance with the instructions, may cause harmful interference to radio
communications. However, there is no guarantee that interference will not occur in a
particular installation. If this equipment does cause harmful interference to radio or
television reception, which can be determined by turning the equipment off and on, the
user is encouraged to try to correct the interference by one or more of the following
measures:
Reorient or relocate the receiving antenna.
Increase the separation between the equipment and receiver.
Connect the equipment into an output on a circuit different from that to which the
receiver in connected.
Consult the dealer or an experienced radio/TV technician for help.
A shielded cable must be used when connecting a peripheral to the serial ports.
  • Page 1 1
  • Page 2 2
  • Page 3 3
  • Page 4 4
  • Page 5 5
  • Page 6 6

Orion STARSHOOT 52174 User manual

Category
Telescopes
Type
User manual
This manual is also suitable for

Orion STARSHOOT 52174 is a versatile video eyepiece that allows you to capture detailed, full-color videos of astronomical objects and even terrestrial subjects during the day. With its easy-to-use design and compatibility with most telescopes, you can start imaging the planets, Moon, and Sun (with optional solar filter) right away. Stacking multiple video frames using image processing software can greatly enhance the quality of your planetary images, revealing intricate details and improving contrast.

Ask a question and I''ll find the answer in the document

Finding information in a document is now easier with AI