Honeywell TE529ELW User manual
- Category
- Weather stations
- Type
- User manual
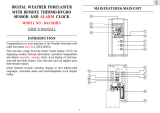
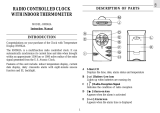
Honeywell TE529ELW is a weather forecaster that includes weather forecast with pressure trend, precise time keeping and temperature and humidity monitoring features that you can use from the comfort of your home. This device includes:
- Precise time and date set via RF signal from the US Atomic Clock
- Calendar displays date with month and weekday in English, Spanish, French, German or Italian
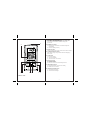
- Five weather forecast icons: Sunny, Partly Cloudy, Cloudy, Rainy and Snowy
- Weather forecast in 5 large graphic icons: Sunny, Partly Cloudy, Cloudy, Rainy and Snowy
- Indoor and Outdoor temperature/humidity readings
Honeywell TE529ELW is a weather forecaster that includes weather forecast with pressure trend, precise time keeping and temperature and humidity monitoring features that you can use from the comfort of your home. This device includes:
- Precise time and date set via RF signal from the US Atomic Clock
- Calendar displays date with month and weekday in English, Spanish, French, German or Italian
- Five weather forecast icons: Sunny, Partly Cloudy, Cloudy, Rainy and Snowy
- Weather forecast in 5 large graphic icons: Sunny, Partly Cloudy, Cloudy, Rainy and Snowy
- Indoor and Outdoor temperature/humidity readings


-
 1
1
-
 2
2
-
 3
3
-
 4
4
-
 5
5
-
 6
6
-
 7
7
-
 8
8
-
 9
9
-
 10
10
-
 11
11


Honeywell TE529ELW User manual
- Category
- Weather stations
- Type
- User manual
Honeywell TE529ELW is a weather forecaster that includes weather forecast with pressure trend, precise time keeping and temperature and humidity monitoring features that you can use from the comfort of your home. This device includes:
- Precise time and date set via RF signal from the US Atomic Clock
- Calendar displays date with month and weekday in English, Spanish, French, German or Italian
- Five weather forecast icons: Sunny, Partly Cloudy, Cloudy, Rainy and Snowy
- Weather forecast in 5 large graphic icons: Sunny, Partly Cloudy, Cloudy, Rainy and Snowy
- Indoor and Outdoor temperature/humidity readings
Ask a question and I''ll find the answer in the document
Finding information in a document is now easier with AI
Related papers
-
Honeywell TE211W - Atomic Clock With Wireless Thermometer User manual
-
-
Honeywell Clock RC182W User manual
-
-
-
-
-
-
-
Other documents
-
Home Accents Holiday NH4136 Installation guide
-
-
 Oregon Scientific BAR182HG User manual
-
-
 Oregon Scientific RM962A User manual
-
Cresta WX171 User manual
-
ACU-RITE 754 Quick Setup Manual
-
Irox HBR329 Owner's manual
-
 Wind & Weather ID3591 User manual
-
Chaney Instrument wireless weather station User manual


