Page is loading ...

FREEWAVE
FUSION BASIC
WIRELESS FLASH/SHUTTER
REMOTE TRIGGER

2
The Vello FreeWave Fusion Basic is your
passport to a new world of photography.
It expands your photographic options
with an easy-to-use radio remote trigger
system that can trigger hot-shoe flashes
or studio lights up to 50 feet away. Or you
can trigger your camera’s shutter up to
50 feet away (for photographing wildlife,
for instance). Whether you’re working
on location or in a studio, the Fusion
Basic frees you from sync cords so that
you can put your flash and your camera
exactly where you want them, producing
exactly the photograph that you want.
The FreeWave Fusion Basic does not
require line-of-sight alignment, as its radio
waves pass through and around objects
such as walls, windows, floors, and trees.
You can take single shots or shoot in
continuous mode. You can use your camera’s
Bulb mode for long-exposure photographs.
The FreeWave Fusion Basic is ideal for
taking close-up or macro shots, too. The
slightest camera movement (even when
the camera is mounted on a tripod) while
shooting these types of photos may cause
blurry images. The FreeWave Fusion Basic
allows you to trip the shutter without
disturbing the camera, so there’s no danger
of camera movement. You can even make
time-delay photos, perfect for when you
want to include yourself in the picture.
Welcome to your new world
of wireless photography.
THANK YOU FOR CHOOSING VELLO

3
Contents ................................................................ 4
Key Features .......................................................... 6
Precautions ............................................................ 8
Overview .............................................................0
Compatible Devices .......................................... 2
Before You Begin ................................................ 3
Powering Up ........................................................4
Getting Started ................................................... 5
Wirelessly Trigger a Hot-Shoe Flash ............. 7
Wirelessly Trigger a Studio Flash ................... 9
Using the FreeWave Fusion Basic as a
Remote Shutter Release ...................................2
Trigger your Camera for Single Shots ........... 22
Trigger your Camera for Continuous
Shooting ............................................................... 23
Trigger your Camera in Bulb Mode for a Long
Exposure .............................................................. 24
Trigger your Camera in Self-Timer (Delay)
Mode ..................................................................... 25
Specifications ...................................................... 26
Troubleshooting ................................................. 28
FCC Compliance................................................29
One-Year Limited Warranty ............................ 30
TABLE OF CONTENTS

FWB-C / FWB-N / FWB-S2
FWB-R / FWB-S2R
4
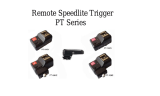
• FreeWave Fusion Basic Transmitter
• FreeWave Fusion Basic Receiver
• 2.5 mm to 3.5 mm sync cord
• 2.5 mm to PC male sync cord
• 3.5 mm to /4˝ phono adapter
CONTENTS
• Two AAA alkaline batteries
• One 23A 2 V alkaline battery
• Instruction manual
• One-Year Limited Warranty
Transmitter and Receiver Set (FWB-C, FWB-N, and FWB-S2)

5
Also Included With Canon
Set (FWB-C)
• Shutter Remote 2.5 mm to Canon 2.5 mm
Shutter Release Cable (RCC-C)
• Shutter Remote 2.5 mm to Canon 3-Pin
Camera Shutter Release Cable (RCC-C2)
Also Included With Nikon
Set (FWB-N)
• Shutter Remote 2.5 mm to Nikon 0-Pin
Camera Shutter Release Cable (RCC-N)
• Shutter Remote 2.5 mm to Nikon DC2
Camera Shutter Release Cable (RCC-N2)
Receiver set (FWB-R and FWB-S2R)
• FreeWave Fusion Basic Receiver
• 2.5 mm to 3.5 mm sync cord
• 2.5 mm to PC male sync cord
• 3.5 mm to /4˝ phono adapter
• Two AAA alkaline batteries
• Instruction manual
• One-Year Limited Warranty

6
Wireless Hot-Shoe Flash Trigger
System: Trigger a hot-shoe (on-
camera-type) flash up to 50 feet away.
Wireless Studio Flash Trigger System:
Trigger a studio flash up to 50 feet away.
Wireless Control System: Trigger your
camera’s shutter up to 50 feet away.
Flash Sync Speed of up to 1/200s: Take
advantage of sync speeds that match the
rating of your camera up to /200th of
a second (compatible cameras only).
16 Channels: Multiple channels allow you
to change your transmitter/receiver
settings to avoid interference from
other wireless remote controls.
Multi-Purpose Flash Trigger: Yo u
can use multiple optional receivers
(available separately) to trigger many
flashes with a single transmitter.
Multi-Purpose Shutter Trigger: Yo u
can use the shutter release remote
trigger to trigger multiple cameras,
as well as dierent types of cameras,
by simply swapping out the included
connection cable for a dierent
connection cable (available separately).
LED Indicator Lights: Confirms
communication of trigger system
with pre-focus, shutter release, and
flash trigger in wireless mode.
Dual-Function Shutter Release
Button: Press halfway to focus;
press fully to trigger the shutter.
KEY FEATURES

7
Long-Exposure Photography: Use
the FreeWave Fusion Basic with your
camera’s Bulb setting to make exposures
as long as the camera will support,
without touching the camera, as even the
slightest touch may cause blurred photos.
Macro Photography: The lightest touch
to your camera, such as pushing the
shutter release button, is magnified when
shooting macro or close-up photos,
resulting in blurred pictures—using the
FreeWave Fusion Basic eliminates the
chance of accidental camera movement.
Compatible: Most hot-shoe lights, studio
lights, and cameras are compatible
with the FreeWave Fusion Basic .
Single Shot & Continuous Shooting
Modes: Allows user to fire the camera
without touching the camera itself,
avoiding possible camera shake.
Wildlife Photography: Use the
FreeWave Fusion Basic to release
the shutter from a safe distance for
photos of hard-to-approach wildlife.

8
• There are no user-serviceable parts
inside the devices. Do not attempt to
disassemble or perform any unauthorized
modification.
• Do not operate the FreeWave Fusion
Basic in the presence of flammable gas
or vapors.
• Do not handle with wet hands or
immerse in or expose to water or rain.
Failure to observe this precaution could
result in fire or electric shock.
• Keep out of reach of children. This device
contains small parts which may pose a
choking hazard.
• Observe caution when handling
batteries. Batteries may leak or explode
if improperly handled. Use only the
batteries listed in this manual. Make
certain to align the batteries with the
correct polarity.
• Batteries are prone to leakage when
fully discharged. To avoid damage to the
product, be sure to remove the batteries
when leaving the product unattended for
prolonged periods or when no charge
remains.
• Handle the unit with care.
PRECAUTIONS

9
• Do not use or leave the devices in
conditions of extreme heat, severe cold,
or high humidity.
• Turn o the camera’s power before
inserting or removing the remote cord.
• Dispose of used batteries, packaging,
and old devices in accordance with
appropriate local environmental
regulations.
• Please read and follow these instructions,
and keep this manual in a safe place.
• Clean the unit with a soft, dry cloth.
• Use only parts provided by the
manufacturer.
• Make sure the item is intact and that
there are no missing parts.
• All photos are for illustrative only.

Retractable
Antenna
Sync Port
Battery
Compartment
Channel
Selector
Confirmation
LED Lamp
Trigger Button
Function
Switch
Hot-Shoe Flash
Connection
Front Back
0
OVERVIEW
Transmitter

Confirmation
LED Lamp
Hot-Shoe
Flash Mount
Function/
O Switch
Battery
Compartment
Channel
Selector
Flash Trigger
Port
Shoe Locking Wheel
with /4˝-20 Mount
Camera Shutter
Trigger Port
Front Bottom Back
Receiver

2
FWB-C, FWB-N, and FWB-R
These models of the FreeWave Fusion
Basic are compatible with most hot-shoe
flashes, studio lights, and cameras.
Pentax, Sony/Minolta, and Sony Multi-
Interface flashes are not compatible.
FWB-S2 and FWB-S2R
This is designed specifically for flashes with
the Sony Multi-Interface shoe (MIS) and is
recommended for use only with devices
that are compatible with this shoe.
All FreeWave Fusion Basic Models
The FreeWave Fusion Basic does not transmit
through-the-lens (TTL) settings; therefore,
we recommend using a flash that can be
controlled manually with this device. The
power output must always be set to manual.
All FreeWave Basic transmitters and
receivers operate on the same frequency
and can be used interchangeably. For
example, you can use the FWB-C (Canon)
transmitter to trigger a Sony MIS flash with
the FWB-S2R receiver, and vice versa.
COMPATIBLE DEVICES

1 2 3 4
5 6 7 8
9 10 11 12
13
14
15
16
3
When you remove the Transmitter and
the Receiver from the box, you will notice
a set of four small numbered switches
on the top of each instrument. These
identical channel selector switches allow
you to change the channel on which your
Transmitter and Receiver operate. Each
of the four switches has two positions.
Note: Make sure that both the Transmitter and
Receiver are set to the same channel.
You can change the channel by moving the
position of one or more channel switches
using a ballpoint pen. In this way, you can
avoid interference from any source. For
instance, if other photographers are working
in the same area as you and using radio
remote controls, you can change the channel
on your FreeWave Fusion Basic Transmitter
and Receiver so that their transmitters
don’t trigger your lights, and vice versa.
BEFORE YOU BEGIN

4
After you’ve set both the Transmitter and
Receiver to the same channel, place the
correct batteries in the devices. Insert the
two included AAA batteries in the battery
compartment of the Receiver, being careful
to orient them with the correct polarity
marked on the inside of the battery cover.
Then, open the battery compartment on
the Transmitter and insert the included
23A battery using the correct polarity.
On the side of the Receiver is a switch
labeled Camera/O /Flash. To conserve
battery power, you should keep the switch
in the O position except when the
Receiver is actually in use. Slide the switch
to “Flash” if you’re using it as a remote
flash trigger or to “Camera” if you’re
using the set as a remote wireless camera
shutter trigger. The Transmitter battery
has a life of approximately two years in
standby mode. It has no On/O button.
Note: Many modern flashes and cameras have
a Sleep mode. You must turn o the Sleep mode
in your flash or camera before using the Fusion
Basic. Refer to your flash or camera user manual
for instructions.
POWERING UP

5
The FreeWave Fusion Basic can perform two
major functions (with several variations):
A) It can wirelessly trigger a hot-shoe flash
or a studio flash or B) it can wirelessly
trigger a camera shutter, including single
shot and continuous shooting, long
exposures (Bulb mode), and time-delay.
When using the Fusion Basic to trigger
a flash, follow these instructions.
Note: the shutter release and flash trigger
options cannot be used simultaneously.
GETTING STARTED
Mounting the Transmitter
. With your camera and Receiver O,
loosen the Transmitter’s hot-shoe locking
ring.
2. Insert the Transmitter’s hot shoe into the
camera’s hot-shoe mount.
3. Tighten the Transmitter’s hot-shoe
locking ring.

6
Mounting the Receiver
There are two ways you can
mount the Receiver:
. Mount the Receiver to a light stand
using the threaded socket for a standard
/4˝ screw mount on the bottom of the
Receiver.
2. Use the accessory shoe (cold shoe) foot
to mount the Receiver to a cold-shoe
bracket.
Note: For cameras with a PC connection,
you can use the included 2.5 mm to PC sync
cable to connect to the Transmitter. Mount
the Transmitter on a bracket, plug the PC end
of the cable into the camera’s PC connection
and plug the other end into the Transmitter’s
sync port.

7
. Check to be sure that both the
Transmitter and Receiver are set to the
same channel.
2. With your hot-shoe flash and Receiver
o, mount your flash onto the hot shoe of
the Receiver.
WIRELESSLY TRIGGER A HOT-SHOE FLASH
3. Move the Function Switch on both the
Receiver and on the Transmitter to
“Flash.”
4. Confirm that the camera, Transmitter,
Receiver, and flash are all powered on.

8
5. Set the desired power output on the flash
manually.
6. Fully press the shutter button on your
camera. All lights connected to Receivers
operating on the same channel as the
Transmitter should fire simultaneously.
Note: We recommend using a fully manually
controlled flash with this device. The FreeWave
Fusion Basic does not transmit TTL settings, so
you will always need to set the power output
manually.
Note: If the FreeWave Fusion Basic doesn’t
trigger your flash or camera on the first attempt,
try changing the channel on the Transmitter and
the Receiver using the Channel Selectors until you
find a channel that works.

9
Using the FreeWave Fusion Basic helps you
to eliminate cord clutter when setting up
studio lights. You can also trigger multiple
lights by using additional FreeWave Fusion
Basic Receivers (available separately).
To use the FreeWave Fusion Basic
to wirelessly trigger a studio flash,
follow these instructions:
. Check to be sure that both the
Transmitter and Receiver are set to the
same channel.
2. Turn your camera and Receiver O.
3. Use the included studio light (2.5 mm
to 3.5 mm) sync cable to connect to a
studio flash.
4. Plug the 2.5 mm side of the cable into the
Receiver’s flash sync [
] port.
WIRELESSLY TRIGGER A STUDIO FLASH

20
5. Plug the 3.5 mm side of the cable into the
studio flash sync jack.
6. If your studio flash has a /4˝ phono jack,
use the included 3.5 mm to /4˝ phono
adapter.
7. With your camera and Transmitter
o, loosen the Transmitter’s hot-shoe
locking ring.
8. Insert the Transmitter’s hot shoe into the
camera’s hot-shoe mount, and tighten the
hot-shoe locking ring.
9. Move the Function Switch on both the
Receiver and on the Transmitter to
“Flash.”
0. Confirm that the camera, Transmitter,
Receiver, and studio light are all powered
on.
. Fully press the shutter button on your
camera. All lights connected to Receivers
operating on the same channel as the
Transmitter should fire simultaneously.
/