Page is loading ...

3
Welcome Guide
•
English
Contents:
Before getting started, ensure the package contains the following components:
A
x1
F
x1
B
x1
G
(Only for entry lever)
x2
C
x1
H
x1
D
x1
I
x4
E
x1
J
x2

4
Before First Use
• Check for transport damage.
Risk of suffocation! Keep any packaging materials away from children – these
materials are a potential source of danger, e.g. suffocation.
Installation
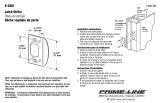
Step 1: Latch Backset Adjustment
4
1. The backset is the distance from the door edge to the center of the hole on the door
face. Some locks are supplied with an adjustable latch which can fit a 2-3/8" (60 mm) or
2-3/4" (70 mm) backset. Just follow the steps shown blow to change the backset.
2. This latch is set for a 2-3/8" (60 mm) backset.
3. Keep the spindle cam in correct position as illustrated. Pull the spindle cam all the way to the
right.
4. Your latch is now set for a 2-3/4" (70 mm) backset. To reset a 2-3/8" (60 mm) backset, just
push the spindle cam back to the left side. Please make sure that the cams stay with a squared
shape.
DANGER

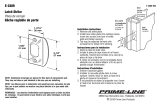
5
Latch face plate
Prior to installation, please make sure that the face plate is appropriate for the latch.
Replace the face plate
1. Use the slotted screwdriver to pry open the face plate and the lock body.
2. Install the appropriate face plate onto the latch body.
Installation of the round face plate
• Align the round face plate to the head of the latch, and lock it into position.
1
2
Drive-in latch

6
Installation
Step 2: Determine Handing of Your Door
Hinges
Left-hand door
Hinges
Right-hand door
• Stand at the exterior side and face towards your door.
1. Your door is a left-hand door if the hinges were installed at your left.
2. Your door is a right-hand door if the hinges were installed at your right.

7
Installation
Step 3: Mark Door with Template
• Start at 36" (914 mm) from the floor, then fold and apply the template and mark the center of
door edge.
• Select a 2-3/8" (60 mm) or 2-3/4" (70 mm) backset as desired and mark the center of hole on
the door face.
The backset on the door face must be the same as the backset of your lock.
Step 4: Drill Holes
• Drill the holes as marked.
Drill a 2 -1/8" (54 mm) hole from both sides of the door to avoid splitting wood.
NOTICE
NOTICE

8
Installation
Step 5: Install Latch
Optional
1. Insert the latch into the hole, and keep it parallel to the door face. Mark the outline of the face
plate and remove the latch.
2. Chisel 1/8" (3 mm) deep or until the face plate is flush with the door edge.
3. Insert latch and tighten screws.
Optional
• It is not necessary to chisel the door edge for the faceplate installation if you use the drive-in
latch. You may install it into the edge bore directly, but make sure the bevel is facing the outside
assembly.

9
Installation
Step 6: Install Outside Lever
• Insert the spindle through the latch. Press flush against the door.

10
• Use handle tool (provided) to depress inside lever catch through the hole of the inside trim
collar. Pull lever off of rosette/mounting plate assembly.
•
Push down on trim plate at arrow point location with screwdriver to release trim from mounting plate.
Make sure the slot and dimple are aligned.
Round rose
Square rose
NOTICE

11
Installation
Step 7: Install Inside Lever
Interior rose concealed mounting screws
Round rose
• For the round rose cover, align the dimple with this notch.
Inside liner
Interior mount screws
Interior rose
Interior lever
Square rose
• Make sure that the anchor is aligned with the notch as shown.
Inside liner
Interior mount
screws
Interior rose
Interior lever

12
Installation
Step 8: Install Strike
1. Close the door to make the horizontal center line of the strike.
2. Measure one-half of the door thickness starting from the door stop and mark the vertical center
line of strike. Drill a 1" (25 mm) hole that is 1/2" (13 mm) deep at intersection of horizontal and
vertical line of the strike. Match the screw holes on the strike with the center lines on the jamb.
Mark an outline and chisel 1/16" (1.6 mm) deep for the strike.
3. Install the strike and tighten the screws.
Cleaning and Maintenance
• Check the components regularly to make sure all screws and bolts are tightened.

13
Feedback and Help
Love it? Hate it? Let us know with a customer review.
AmazonBasics is committed to delivering customer-driven products that live up to your high
standards. We encourage you to write a review sharing your experiences with the product.
US: amazon.com/review/review‑your‑purchases#
UK: amazon.co.uk/review/review‑your‑purchases#
US: amazon.com/gp/help/customer/contact‑us
UK: amazon.co.uk/gp/help/customer/contact‑us
— or —
Contact Customer Service at +1 877‑485‑0385

MADE IN TAIWAN
HECHO EN TAIWÁN
FABRIQUÉ EN TAÏWAN
amazon.com/AmazonBasics

Fold on the dotted line and fit on the door
edge.
45
1-3/4"
1-9/16"
1-3/8"
40 35
Fits 2-1/8" (54 mm)
Make a 1" (25.4 mm) hole at the center of the
door edge.
For a 2-3/4" (70 mm) backset
For a 2-3/8" (60 mm) backset
2-1/4" (57 mm)
5/32" (4 mm) x
2 hole for metal
door only.
Template
Doble por la línea punteada y
encájela en el borde de la puerta.
45 mm
1-3/4 pulgadas
1-9/16
pulgadas
1-3/8
pulgadas
40 mm 35 mm
Para 54 mm (2-1/8 pulgadas)
Taladre un agujero de 25,4mm (1 pulgada) en el
centro del borde de la puerta.
Para un agujero de cerradura
de 70 mm (2-3/4 pulgadas)
Para un agujero de cerradura
de 60 mm (2-3/8 pulgadas)
Hoyo de 57 mm
(2-1/4 pulgadas)
2 orificios de 4 mm
(5/32 pulgada) para
puertas metálicas
solamente.
Plantilla
Pliez-le sur la ligne pointillée, puis
placez-le sur le rebord de la porte.
45 mm
1-3/4 po 1-9/16 po1-3/8 po
40 mm 35 mm
Correspond à 54 mm (2-1/8 po)
Percez un trou de 25,4 mm (1 po) au centre du
rebord de la porte.
Pour un retrait de 70 mm (2-3/4 po)
Pour un retrait de
60 mm (2-3/8 po)
57 mm (2-1/4 po)
4 mm (5/32 po) x 2
trous pour porte en
métal uniquement.
Gabarit
/