Epson LS500B Installation guide

Category
Data projectors
Type
Installation guide

This manual is also suitable for

Epson LS500B is a laser projection TV that combines stunning visuals, innovative features, and flexible placement options to transform your living space into a cinematic haven. It delivers exceptional image quality with its laser-powered projection system, producing vibrant colors and sharp details. Enjoy immersive viewing experiences with a large projected screen of up to 120 inches, creating a truly cinematic ambiance in your home.

Epson LS500B is a laser projection TV that combines stunning visuals, innovative features, and flexible placement options to transform your living space into a cinematic haven. It delivers exceptional image quality with its laser-powered projection system, producing vibrant colors and sharp details. Enjoy immersive viewing experiences with a large projected screen of up to 120 inches, creating a truly cinematic ambiance in your home.

Epson
®
EpiqVision™ Ultra LS500
Laser Projection TV Installation Guide
IMPORTANT: Before using this product, make sure you read these instructions and the safety instructions in the
ELPSC35/ELPSC36 Safety Guide and online User’s Guide. Visit www.epson.com/support/LS500 (U.S.) or
www.epson.ca/support/LS500 (Canada) to view online guides.
Required Supplies
Before you begin, make sure you have the following items:
Level
Note: We recommend a bubble level for leveling the furniture and projector, and a laser level for leveling the screen.
Tape measure
Electric drill
Wall bracket mounting screws
Note: You will need 8 screws to attach the supplied wall brackets. Use screws that are appropriate for the wall on which you will mount
the screen.
Pencil
Computer with an HDMI output and an Internet connection
HDMI cable
Stud finder (if your installation location requires attaching to studs)
Note: We recommend that you use painter’s tape to avoid scratching your wall during installation. See “Mounting the Screen” for details.
Box Contents
Your Epson EpiqVision Ultra LS500 Laser Projection TV box contains the following items:
Epson LS500 projector
Epson ELPSC35 100" or ELPSC36 120" screen
Cardboard jig for projector positioning
2 pairs of white gloves for carrying and mounting the screen
Video
Visit www.epson.com/support/LS500 (U.S.) or www.epson.ca/support/LS500 (Canada) to view the supplemental installation
video.
2 Placing the Furniture
Placing the Furniture
Before proceeding with the installation, move the furniture you will place the projector on to its final location. This will give the
furniture time to settle into the floor as needed, which is especially important for softer surfaces like carpets and rugs.
1. Place the furniture based on the projector to wall distance measurements indicated below.
2. If your furniture has adjustable feet, use them to level the furniture along both axes (allow time for settling as needed).
Assembling the Jig
To help you with projector positioning, Epson has provided a cardboard jig that you can use to determine the required distance
between your projector and the wall.
1. Place the jig with the
DO NOT DISCARD labels facing down, then fold one of the larger flaps and its tab up.
2. Fold the smaller flap and its tabs up.
Wall
Furniture
31.5 inches/80 cm (for 100" screen)
36.5 inches/92.7 cm (for 120" screen)
17 inches/43.2 cm (for 100" screen)
22 inches/55.9 cm (for 120" screen)
Projector
Placing the Projector 3
3. Insert the tab into the notch.
4. Repeat the process on the other side of the jig to complete the assembly.
Placing the Projector
1. Place the projector on top of your furniture.
2. Place the jig against the wall, aligning the center of the jig with the expected center of your screen.
Note:
To make sure you’ve correctly oriented the jig, follow the instructions on the labels attached to it.
After positioning the jig, leave it in place until you are instructed to remove it.
3. Slide the projector until it touches the arms on the other end of the jig.
Wall
4 Projecting the Wall Bracket Guide
4. Connect the power cable to the projector and an HDMI cable to the projector’s HDMI1 port.
Note: Don’t plug the projector in or connect the other end of the HDMI cable yet.
5. Remove the projector’s lens cap and front cover.
6. Align the projector’s center with the expected center of your screen.
7. Use the projector’s adjustable feet to level it along both axes.
Projecting the Wall Bracket Guide
To help you identify drill hole locations for the wall brackets, Epson has created a guide image that you can project onto your wall.
1. Connect the free end of the HDMI cable to your computer, then turn the computer on.
2. Visit www.epson.com/support/LS500 (U.S.) or www.epson.ca/support/LS500 (Canada) and download the
Wall Bracket
Guide
file for your screen size.
3. Set your computer’s resolution to a value with a 16:9 aspect ratio (1920 × 1080, 3840 × 2160, etc.).
Note: If your computer does not offer a 16:9 resolution option, wait until after you turn on the projector and then check the available
resolutions again.
Projecting the Wall Bracket Guide 5
4. Open the wall bracket guide file and display it in full screen mode.
Note: Make sure the screen size indicated at the top of the image matches the screen that came with your projector.
5. Plug in the projector and press the P power button on the remote control to turn the projector on. The guide is projected
onto your wall.
6. Press the x menu button on the remote control, select the
Settings menu, and choose Reset.
7. Select the
Settings menu, select Zoom, and make sure the image is at its maximum size. If it isnt, press the left arrow button
repeatedly to enlarge it to the maximum size.
8. Raise or lower the focus lever to sharpen the image.
Note: For best results, wait 20 minutes after turning the projector on before you adjust the focus.
100" screen 120" screen
6 Attaching the Wall Brackets
9. Confirm that the To p scre w and Bottom screw lines are level across the entire projected image. If they are not, rotate the
projector slightly (with the jig still in place) or adjust the projector feet until the lines are level.
Note: For best results, use a laser level or a bubble level longer than the distance between your bracket mounting points.
10. Measure the height of the projected image on the left and right sides. Make sure the value is the same on each side, and make
sure it matches the height value displayed in the projected image. Additionally, measure the width and make sure it matches
the width value shown in the image.
Note: If the values do not match, make sure you enlarged the projector's image all the way, and adjust the position of the projector as
needed. You can remove the jig If you need to move the projector closer to the wall to make the values match.
Attaching the Wall Brackets
1. Drill a hole in the To p s c re w line on the upper left side of the projected image.
Note: If you are attaching the wall brackets to studs, place the hole where the line intersects with the center of a stud. Otherwise, place
the hole anywhere on the line, but preferably in the green Optimal bracket location area.
2. Insert one of the screws you selected for the wall, then hang a wall bracket on the screw.
Note: Do not tighten the screw all the way.
3. Make sure the top of the bracket is level, then make a drill hole mark in the bottom hole of the bracket.
4. Remove the bracket, drill the bottom hole, then rehang the bracket.
5. Insert the bottom screw, then fully tighten both screws.
6. Repeat steps 1-5 to install the bracket on the upper right side, and then the brackets on the bottom.
Assembling the Screen 7
Assembling the Screen
Assembling the Frame
1. Spread out the included transparent sheet on the floor.
Note: Make sure you clear the floor of any objects beforehand. You will need an 88" × 50" floor space for a 100" screen, or a 106" × 60"
floor space for a 120" screen
2. Place the frame on the transparent sheet, with the screw holes facing up.
Warning: The frame pieces have sharp edges. Handle them carefully to avoid injury.
3. Insert the brackets into the shorter frame pieces.
4. Connect the shorter frame pieces to the longer frame pieces.
8 Assembling the Screen
5. Insert four of the supplied M5 × 8 mm screws in each corner.
Note: Make sure there are no gaps between the frame pieces before you tighten the screws all the way.
Testing the Frame Position
1. Remove the jig from the front of the projector.
2. Remove the frame from the sheet.
3. Hang the frame on the wall brackets, with the screws facing the wall.
4. Move the frame left or right as needed to align it with the projected image, and make sure the arrow heads in the projected
image extend to the outer edges of the frame.
Note: If the image is not aligned, slightly adjust the position of the projector as needed.
Attaching the Screen Material
1. Remove the screen material from the tube and unroll it on the transparent sheet. The back of the screen should be facing you.
Caution: Do not lift the screen until after you have attached the frame.
Note: The back of the screen has a DOWNSIDE label attached. Make sure the side of the screen with the label is closest to the wall.
2. Center the frame on top of the screen material, with the screw holes facing up.
DOWNSIDE
Assembling the Screen 9
3. Fold the screen material over the frame to check the alignment.
In each corner, the edges of the screen material should align with the dashed lines shown in the illustration below, and the
circled screw holes should not be covered by the screen material.
4. Hook one of the supplied springs through the hole in the corner of the screen material, and then use one of the included hooks
to attach the other end of the spring to the inside of the frame. Repeat this process for the other hole closest to the corner.
Warning: To avoid injury, attach the springs with the hooks and not your hands.
Caution: You can touch the screen material near the holes, but do not touch the screen material on the other side of the frame or you
may damage the screen.
Note: Hold the frame in place so that it does not move out of position while you are attaching each spring. If the frame moves, refer to
step 3 to reposition it correctly.
Note: Be careful not to bend or crease the screen material while attaching the springs.
5. Repeat step 4 for the opposite corner, and then for the two remaining corners.
2 mm
2 mm
10 Assembling the Screen
6. Use the supplied springs to attach the centers of the long sides of the screen, and then attach the centers of the short sides.
7. Use the supplied springs to attach the remaining sections of the screen, starting from the centers of the sides and moving
outward.
8. Attach the frame edges, with the screw holes facing up, and the corner guards.
Note: One of the short frame edges has an Epson logo on it. Install that frame edge on the side of the screen that has the DOWNSIDE
label.
9. Insert two of the supplied M5 × 15 mm screws in each corner.
Note: Hold the frame tightly while tightening the screws so that the corner guards do not move.
Mounting the Screen 11
10. Install the supplied angle adjustment screws at the bottom edge of the frame.
Note: The bottom edge is closest to the DOWNSIDE label.
11. Hook one of the supplied springs into the hole in the bottom edge of the frame, and then hook the other end to the inside of
the frame.
Mounting the Screen
Caution:
Make sure you are wearing the provided white gloves before you pick up the screen. If you touch the screen material with your bare hands,
you may damage the screen.
To avoid scratching the wall when you mount the screen, we suggest covering the backsides of the frame’s top corners with painter's tape. Once
you have properly positioned the screen, you can remove the tape. Be careful not to scratch the wall if you remove the screen from the wall.
1. Carry the screen to the wall, then lean it against the wall at a 15° angle.
Caution: Always hold the screen by the left and right edges when moving it.
Note: Make sure the DOWNSIDE label is at the bottom of the screen and facing the wall. If you install the screen upside down, the
image quality will be poor.
15°
12 Making Final Adjustments
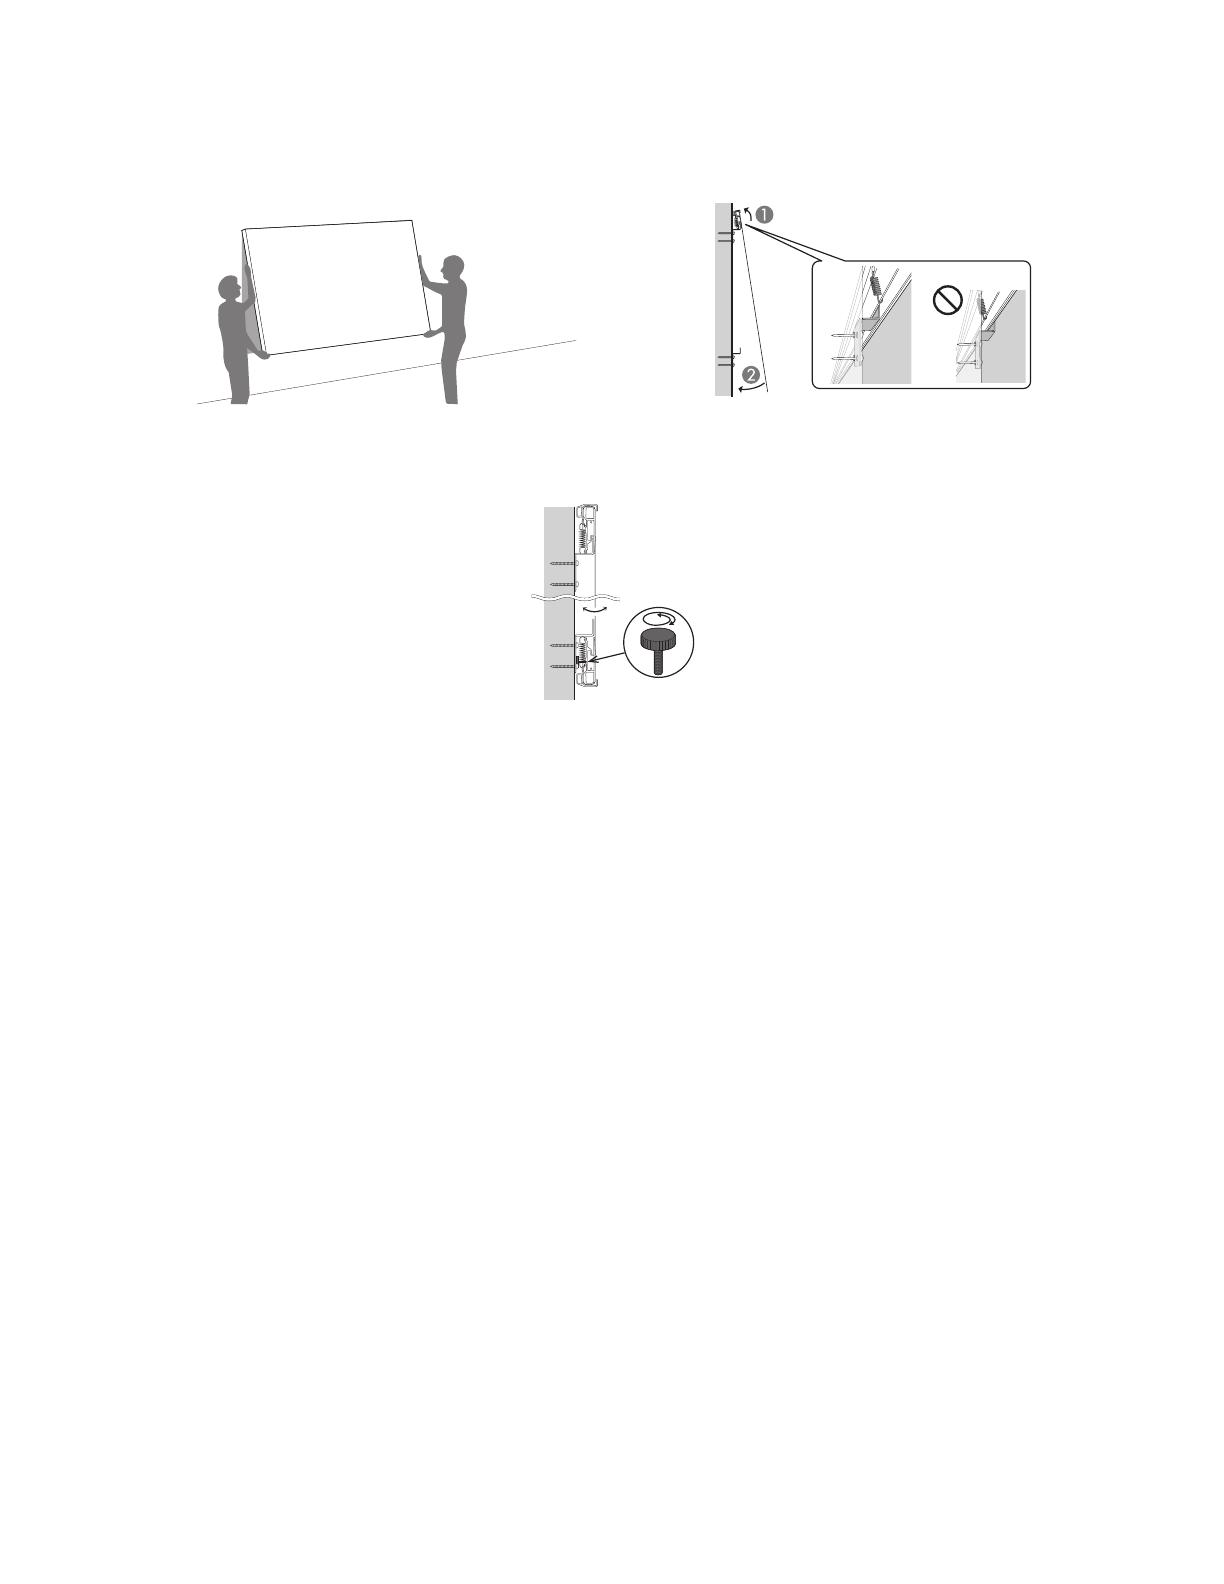
2. Lift the screen while maintaining the angle and hook the wall brackets into the grooves at the top of the screen. Then lower the
screen onto the brackets and rest the bottom of the screen against the wall.
Note: Make sure the wall brackets are securely in the grooves and not touching any of the springs.
3. Move the screen left or right as needed if the projected image falls outside of the screen range.
4. If the screen is not vertically straight, turn the angle adjustment screws as needed.
Making Final Adjustments
1. Select the Settings menu, then select Installation Guide. Raise or lower the projector’s focus lever to sharpen the grid in the
upper left corner of the screen.
2. If you see any image misalignment, use one or more of the following methods to correct it:
Adjust the projector feet.
Turn the angle adjustment screws on the back of the screen.
Move the projector, but only in small increments.
3. If you still see misalignment after trying the adjustment methods above, you can use the projectors keystone correction, Quick
Corner, or Blanking features for further correction. See the projectors online User’s Guide for instructions.
In some cases, alignment issues may be caused by your installation location and not the product. For example:
The floor may be curved or not level, which may tilt the console or cause the furniture to not sit level on the floor.
The furniture surface may be curved or not level, which may tilt the projector or cause the projector to not sit level on the
furniture.
The wall may be curved or not at a 90° angle to the floor, which may tilt the screen or cause its surface to be distorted.
Installing the Streaming Device
1. 1) Turn the projector off.
2. 2) Remove the HDMI cable from the
HDMI1 port.
Note: Be careful not to move the projector while you are removing the HDMI cable or installing the streaming device.
Installing the Streaming Device 13
3. Remove the projector’s storage space cover.
4. Connect the HDMI extension cable to the
HDMI3 port and the USB power cable to the DC Out (2.0A) port.
5. Connect the HDMI and USB cables to the included streaming device and fit the device securely inside the projector by
arranging the cables as shown.
Caution: Do not force the device into the projector; you may damage the projector, cables, and/or the device.
6. Replace the storage space cover.
Note: Make sure the cables are positioned as described in step 5, or they may block the cover from closing.
7. Replace the front cover.
Setting Up Android TV
1. Turn the projector on.
2. Follow the on-screen instructions to pair the remote control, select your language, and connect your projector to your wireless
network and Google account.
Note: Your projector comes with two remote controls. Make sure you are using the remote control shown on the screen.
EPSON is a registered trademark, EPSON Exceed Your Vision is a registered logomark, and EpiqVision is a trademark of Seiko Epson Corporation.
Android TV is a trademark of Google LLC.
General Notice: Other product names used herein are for identification purposes only and may be trademarks of their respective owners. Epson disclaims
any and all rights in those marks.
This information is subject to change without notice.
© 2021 Epson America, Inc., 1/21
CPD-60338
Printed in U.S.A.
  • Page 1 1
  • Page 2 2
  • Page 3 3
  • Page 4 4
  • Page 5 5
  • Page 6 6
  • Page 7 7
  • Page 8 8
  • Page 9 9
  • Page 10 10
  • Page 11 11
  • Page 12 12
  • Page 13 13
  • Page 14 14

Epson LS500B Installation guide

Category
Data projectors
Type
Installation guide
This manual is also suitable for

Epson LS500B is a laser projection TV that combines stunning visuals, innovative features, and flexible placement options to transform your living space into a cinematic haven. It delivers exceptional image quality with its laser-powered projection system, producing vibrant colors and sharp details. Enjoy immersive viewing experiences with a large projected screen of up to 120 inches, creating a truly cinematic ambiance in your home.

Ask a question and I''ll find the answer in the document

Finding information in a document is now easier with AI