Page is loading ...

1
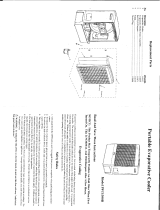
CP70 PORTABLE
EVAPORATIVE COOLER
USE & CARE GUIDE
Read and Save These Instructions
If you have any problems with this product, please call 1-800-643-8341
BEFORE returning it to your retailer.
NOTICE
: This Product May Temporarily Produce An Odor When First Turned On
.
This is NORMAL and will dissipate after a few hours.
About Evaporative Cooling
Evaporative cooling is an economical way to cool and is highly effective in arid
climates. Air is cooled while being drawn across wet evaporative media. The
movement of this fresh cooled air over the skin is what makes it feel cool.
In order for evaporative coolers to be effective in an enclosed area, a fresh air
source and adequate exhaust need to be present. These coolers will not work well
without an outlet to exhaust the hot air. Humidity will build up in the enclosed space
and the unit will not cool adequately.
72853 9-2014 Printed in China

2
Safety Rules
1. Unit must be in the Off Position and Unplugged from power receptacle when
performing any maintenance.
2. To reduce the risk of electric shock, plug unit into a properly grounded 120 Volt
A.C., 60 Hz receptacle.
3. To reduce the risk of electric shock, install only on a circuit protected with a
Ground Fault Circuit Interrupter (GFCI).
4. This appliance is not intended for use by persons (including children) with
reduced physical, sensory or mental capabilities, or lack of experience and
knowledge, unless they have been given supervision or instruction concerning
use of the appliance by a person responsible for their safety. Children should
be supervised to ensure that they do not play with the appliance.
5. Do Not operate any fan with a damaged cord or plug. Discard fan or return to
an authorized service facility for examination and/or repair.
6. Do Not run cord under carpeting. Do Not cover cord with throw rugs, runners or
similar coverings. Do Not route cord under furniture or appliances. Arrange
cord away from traffic area and where it will not be tripped over.
WARNING: To reduce the risk of fire or electric shock, do not use this fan with
any “solid-state fan speed control device.”
Assembly
For shipping purposes, the base and casters have been stored inside the body.
1. Open the back of the unit by removing 2 screws at the top of the back, tilt the
frame back and press in at the bottom (on PUSH button) to release the back and
access the contents. Disconnect water hose from media frame.
2. Remove casters, base and hardware from body cavity and set aside for
installation.
3. Reattach water distribution hose onto media frame, reposition media frame onto
lower section and reinstall two screws fastening the body together.
CAUTION: Do not damage hose connecting pump to media frame.
When
removing back disconnect the water hose that connects the pump to the media
frame.
PUSH
2
1
3

3
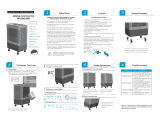
Install Casters
This unit comes with 4 stem casters: 2 locking
and 2 non-locking.
4. With the base still detached, install one caster into
each corner hole of the base. The stem should fit
snugly into hole.
NOTE
Install both locking casters on the same side
(front or back) to ensure equal and secure locking
.
Attach Body and Base
5. To attach the base to the body, turn the unit on its side. Line up the connect
points on the pedestal and the base of the unit.
6. Use the four screws provided to attach the base to the body of unit. Set upright.
Fill with Water
The reservoir on this unit holds 6 gallons.
1. To fill the reservoir, open the water fill door
at the front and fill with fresh, clean water
using a fill hose or pitcher. DO NOT
OVERFILL.
CAUTION: If moving the unit for filling, make
sure the casters are unlocked for easy mobility.
Do not tip unit.
2. A fill indicator to the left of the fill door
shows the water level. When the reservoir is
full, the window will show a full blue fill. As
the water level decreases, the blue fill level
will lower in the window. Observe this fill indicator to monitor the water level.
Fill Indicator
Fill door

4
OPERATIONS
Operating Instructions
With the unit filled and plugged in, press the POWER button and the backlit control
panel will illuminate.
NOTE: The backlit control panel stays illuminated for 3 minutes after initial power-
up and anytime the controls are adjusted.
NOTE: For best cooling, we recommend turning on the pump 2 or 3 minutes before
turning on the fan. This allows the media to become saturated for faster cooling
effect.
NOTE: This unit can be used as a fan only or an evaporative cooler. If no
evaporative cooling is desired, simply do not engage the pump and use only the
fan feature.
For Evaporative Cooling:
With the unit already turned on:
1. Press the PUMP button. This will activate the pump to begin saturating the
media.
2. Press the SPEED button to engage the fan. The 3-speed fan starts in High and
can be adjusted down by pressing the SPEED button again.
3. During this function, the FAN portion of the display will show the icon
representing the selected speed, the PUMP portion of the display will be
illuminated and active, and the center portion of the display will show the COOL
(snowflake) icon indicating the evaporative cooling function in engaged.
ALLICONSSHOWNFORREFERENCE

5
For Fan Only Operation:
With unit turned on:
1. Press the SPEED button and adjust as desired.
2. The FAN portion of the panel will show icons indicating the selected speed and
the VENT icon will be illuminated in the center of the panel.
Low Water Indication:
1. When the water tank has been depleted to a certain level, a LOW WATER
indicator will display on the PUMP portion of the Control Panel. The COOL
(snowflake) icon will go off, and the VENT (fan) icon will illuminate. The pump
will stop operating and an audible beeping will sound for 60 seconds or until
the PUMP button is pressed.
NOTE: If refilled within 60 seconds of the beeping, the pump will restart
automatically.
2. Otherwise, refill the tank and press the PUMP button to restart the pump.
Additional Features:
Oscillate Feature:
1. When the OSCILLATE button is pressed the vertical louvers on the front grill
move left and right.
2. The OSCILLATE portion of the display will indicate activation of this feature.
3. Press again to turn feature off. This feature is available anytime the FAN
function is turned on.
Timer Feature:
This unit has a timer feature that allows setting the duration of operation from half an
hour to 8 hours, in 0.5 hour increments. When the set time is on the last half hour,
the time will count down in tenths until it reaches 0.0 and turns off completely.
1. To set the timer, press TIMER and keep pressing until the desired amount is
displayed in the TIMER section of the display.
2. Once the desired time is displayed, release the button. After 5 seconds the
time is confirmed.
3. To cancel (after confirmation) press the TIMER button again.
NOTE: If continuous operation is desired Press TIMER and set at 0.0. The fan will
run continuously. The pump will not operate if there is no water in the unit.

6
Maintenance:
CAUTION: Turn off and unplug unit from power before any maintenance is
performed.
GENERAL INFORMATION:
The cellulous media used in these portable evaporative coolers must be kept in
good condition to maintain the stated cooling capabilities. We recommend draining
the unit weekly and refilling to keep water fresh and reduce mineral build-up on
media.
Weekly Draining:
(Accomplish when water level is low or unit is out of water.)
1. Turn unit off. Unplug and move it to
an area that will not be damaged by
water.
2. Unscrew the drain cap from the
bottom of the back of the unit. Allow
any remaining water to drain out of
unit.
3. When cleaning the media pad,
try to preserve the integrity of the
fluted surface.
4. Reinstall drain cap and refill with
fresh water. Plug in and operate per
instructions.
Regular Servicing:
(Accomplish at least twice a season,
more often in areas with hard water.)
1. Remove back section (see Step 1
under Assembly.)
2. Using water hose, wash out back with
fresh water. Clean media pad. DO
NOT use chemicals or pressure
washer on media.
3. Using a screw driver or other tool, pry
off the four keeper discs, then push
the stems back through the media
and extract them through the back.
Remove pad.
4. Rinse media with water. Light
scrubbing may be necessary.
Be careful not to damage the media.
NOTE: Average life expectancy of the rigid
media pad is 2 years, though water with high
mineral content will deteriorate the integrity
of the media sooner.
UNSCREW CAP
TO DRAIN
RESERVOIR
STEM
KEEPER
DISC

7
45°
15°
Pad Replacement
1. Remove back section and disconnect
water line (see Step 1 under assembly.)
NOTE: Proper orientation of the media is
critical to ensure cooling effectiveness.
2. Install the media pad so that the
steeper angle of the flute slopes down
toward the bottom of the media frame.
3. Insert the stems through the four
screw holes in the media frame.
4. Push stems through the media and
fasten media in place with the four
keepers. Take care not to damage the
media.
5. Reattach water line to media frame.
6. Reinstall media frame onto the body
using two screws.
End of Season Servicing
1. Accomplish Regular Servicing procedures. Ensure unit is fully drained of water.
2. Carefully inspect media to verify media is not crushed, broken and clogged or
heavily encrusted with minerals. If so, dispose and replace media pad.
3. Clean interior with clean water. Wipe down outside with clean damp cloth.
4. Store in safe, dry place. Do not store with water in reservoir.
Trouble shooting :
PROBLEM PROBABLE CAUSE REMEDY
Pump is not working Unit may be out of water
Pump may be defective
Fill reservoir with water
and activate pump.
Replace pump
Fan not operating No power supplied.
Verify unit is plugged into
a 120V power outlet and
turned on.
Check fuse or breaker.
If connected to GFCI
outlet, check if tripped and
reset.
Unit is not cooling as
well as previously
Insufficient air flow
(input and exhaust.)
Clogged or dirty media
Ensure windows/doors
are open for correct air
flow.
Check media pad and wash
or replace as necessary.

8
CP70 Cooler Replacement Parts
Item
Number
Description Part Number
1 Evaporative media 110132-3
2 Evaporative media frame assembly 110874-1
3 Water tray 110874-3
4 Water distributor nozzle 1100874-4
5 Keepers ( set of 4) 110871
6 Pump 110439-4
7 Drain cap 110698-2
8 Float assembly 110873
9 Swivel casters - Non-locking 110822-6
10 Swivel casters - Locking 110822-7
11 Pedestal 110874-2
12 Water distributor tubing 110734-1
13 M3.5 x 12mm Truss Head SS Screws (Qty 2) 111130
14 M4 x12mm Truss Head SS Screw (Qty 4) 111131
To purchase parts call 1.800 643.8341, or visit championcooler.com
8
5
5
1
9
10
9
10
6
7
11
2
12
4
3
13
14

9
Cooler Limited Warranty policy
SALES RECEIPT REQUIRED AS PROOF OF PURCHASE FOR ALL
WARRANTY CLAIMS.
This warranty is extended to the original purchaser of an evaporative
cooler installed and used under normal conditions. It does not cover
damages incurred through accident, neglect, or abuse by the owner. We
do not authorize any person or representative to assume for us any other
or different liability in connection with this product.
Terms and Conditions of the Warranty
For One Year from date of purchase, we will replace any original
component provided by Champion Cooler which fails due to any defect in
material or factory workmanship only.
Exclusions from the Warranty
We are not responsible for replacement of evaporative media. These are
disposable components and should be replaced periodically. We are not
responsible for any incidental or consequential damage resulting from any
malfunction.
We are not responsible for any damage received from the use of water
softeners, chemicals, de-scale material or plastic wrap.
We are not responsible for the cost of service calls to diagnose the cause
of trouble, or labor charge to repair and/or replace parts.
How to Obtain Service Under this Warranty
Contact the Dealer where you purchased the evaporative cooler. If for any
reason you are not satisfied with the response from the dealer, contact
the Customer Service Department: Champion Cooler, 5800 Murray
Street, Little Rock, Arkansas 72209. 1-800-643-8341or at
Some states do not allow the exclusion or limitation of incidental or
consequential damages, so the above may not apply to you.
This warranty gives you specific legal rights, and you may also have other
rights which vary from state to state.
This limited warranty applies to the original purchaser only.
Register your cooler on line at: www championcooler.com

10
Intentionally left blank

11
GUÍA DE USO Y
CUIDADO DEL
ENFRIADOR
POR EVAPORACIÓN
PORTÁTIL CP70
Lea y guarde estas instrucciones
Si tiene algún problema con este producto, llame al 1-800-643-8341
ANTES de devolverlo al distribuidor.
AVISO
: Este producto puede generar olor, temporalmente, la primera vez que se
enciende
.
Esto es NORMAL y se disipará después de unas horas.
Acerca del enfriamiento por evaporación
El enfriamiento por evaporación es una forma económica de enfriar y es muy
efectivo en climas áridos. El aire se enfría mientras ingresa en medios de
evaporación húmedos. El movimiento de este aire fresco enfriado hacia la piel es lo
que lo hace a usted sentirse fresco.
Para que los enfriadores por evaporación sean efectivos en un área cerrada, es
necesario tener una fuente de aire fresco y un escape adecuado. Estos enfriadores
no funcionarán bien sin una salida para expulsar el aire caliente. La humedad se
acumulará en el espacio cerrado y la unidad no se enfriará adecuadamente.
72853 9-2014 Impreso en China

12
Reglas de seguridad
1. La unidad debe estar en la posición Off (apagado) y desenchufada de la fuente
de energía cuando se le realice mantenimiento.
2. Para reducir el riesgo de descarga eléctrica, enchufe la unidad a una toma
adecuada con conexión a tierra de 120 voltios CA, 60 Hz.
3. Para reducir el riesgo de descarga eléctrica, instálelo solamente en un circuito
protegido con un Interruptor del circuito de fallos de conexión a tierra (GFCI).
4. Este equipo no está diseñado para ser utilizado por personas (incluidos niños)
con capacidades físicas, sensoriales o mentales deficientes, o falta de
experiencia y conocimiento, a menos que sean supervisados o hayan sido
capacitados respecto al uso del dispositivo por una persona responsable para
su seguridad. Los niños deben ser supervisados para garantizar que no
jueguen con el equipo.
5. No encienda ningún ventilador con un cable o enchufe dañado. Deseche el
ventilador o devuélvalo a un centro de servicio autorizado para su examen
o reparación.
6. No pase el cable debajo de una alfombra. No cubra el cable con alfombras,
correderas o protectores similares. No guíe el cable debajo de muebles
o equipos. Coloque el cable lejos de áreas transitadas, donde nadie
pueda tropezarse.
PRECAUCIÓN: Para reducir el riesgo de incendios o de descarga eléctrica, no
use este ventilador con ningún “dispositivo de control de velocidad de
ventilador en estado sólido”.
Montaje
Por motivos de envío, la base y las ruedas deben almacenarse dentro del cuerpo.
1. Abra la parte trasera de la unidad, quitando 2 tornillos de la parte superior
trasera, incline el marco trasero y ejerza presión en la base (en el botón PUSH)
para liberar la parte trasera y acceder al contenido. Desconecte la manguera del
agua de la estructura del medio.
2. Quite las ruedas, la base y las piezas de la cavidad del cuerpo y déjelos a un
lado para instalarlo.
3. Unir nuevamente la manguera de distribución de agua a la estructura del medio,
reposicionar la estructura del medio en la sección inferior y volver a colocar los
dos tornillos para asegurarla al cuerpo.
ADVERTENCIA: No dañe la bomba de conexión de la manguera con la
estructura del medio.
Al quitar la parte trasera, desconecte la manguera de
agua que conecta la bomba con la estructura del medio.
PUSH
2
1
3

13
Instalar las ruedas
Esta unidad viene con 4 ejes de ruedas: 2 con
fijación y 2 sin fijación.
4. Con la base aún sin ensamblar, instale una rueda
en cada orificio de las esquinas de la base. El eje
debería caber perfectamente en el orificio.
OBSERVACIÓN
Instale ambas ruedas con fijación
en el mismo lado (frente o trasero) para asegurar
una fijación igual y segura
.
Unir el cuerpo a la base
5. Para unir la base al cuerpo, gire la unidad a un lado. Alinee los puntos de
conexión en el pedestal y la base de la unidad.
6. Utilice los cuatro tornillos provistos para unir la base al cuerpo de la unidad.
Enderécelo.
Llénelo con agua
El depósito en esta unidad tiene una capacidad
de 6 galones.
1. Para llenar el depósito, abra la puerta
de llenado de agua en la parte frontal
y llénelo con agua fresca y limpia usando
una manguera o una jarra. NO LLENE
EN EXCESO.
ADVERTENCIA: Si se mueve la unidad para
su llenado, asegúrese de que las ruedas estén
desbloqueadas para mover con facilidad. No
incline la unidad.
2. El indicador de llenado en el lado izquierdo
de la puerta de llenado muestra el nivel de agua. Cuando se llena el depósito,
la ventana mostrará una señal azul de llenado completo. Al disminuir el nivel
del agua, el nivel de llenado azul disminuirá en la ventana. Observe este
indicador de llenado para controlar el nivel de agua.
Indicado
r
de llenado
Puerta
de llenado

14
OPERACIONES
SEMUESTRANTODOSLOSÍCONOSPARAREFERENCIA
Instrucciones de funcionamiento
Con la unidad llena y enchufada, presione el botón de POWER (encendido) y se
encenderá el panel de control retroiluminado.
NOTA: El panel de control retroiluminado permanece encendido por 3 minutos, luego
del encendido inicial y en cualquier momento en que se ajusten los controles.
NOTA: Para un mejor enfriamiento, recomendamos encender la bomba 2 o 3
minutos antes de encender el ventilador. Esto permite que el medio se sature para
un efecto de enfriamiento más rápido. por evaporativo. Si no desea el enfriamiento
evaporativo, simplemente, no accionar la bomba y solo use la función de
ventilador.
Para enfriamiento por evaporación:
Con la unidad ya encendida:
1. Presione el botón PUMP (bomba). Esto activará la bomba para que comience
la saturación del medio.
2. Presione el botón SPEED (velocidad) para activar el ventilador. El ventilador de
3 velocidades comenzará en la velocidad Alta y se podrá disminuir al presionar,
nuevamente, el botón de SPEED (velocidad).
3. Durante esta función, la sección del FAN (ventilador) en la pantalla mostrará el
ícono que representa la velocidad escogida; la sección de la PUMP (bomba) de
la pantalla estará encendida y activa; y la parte central de la pantalla mostrará
el ícono de COOL (enfriamiento) (copo de nieve), que indica que la función de
enfriamiento por evaporación está activada.

15
Para el funcionamiento solo del ventilador:
Con la unidad encendida:
1. Presione el botón de SPEED (velocidad) y ajuste como desee.
2. La sección del FAN (ventilador) del panel de control mostrará los íconos que
indican la velocidad seleccionada y se encenderá el ícono de FAN
(ventilación) en el centro del panel.
Indicación de nivel de agua bajo:
1. Cuando el tanque de agua se haya vaciado hasta cierto nivel, se mostrará un
indicador de LOW WATER (nivel de agua bajo) en la sección de la PUMP
(bomba) del Panel de control. Desaparecerá el ícono de COOL (enfriamiento)
(copo de nieve) y se encenderá el ícono de FAN (ventilador). La bomba
dejará de funcionar y sonará un pitido por 60 segundos o hasta que se
presione el botón de la PUMP (bomba).
NOTA: Si se rellena dentro de los 60 segundos de duración del pitido, la
bomba se reiniciará automáticamente.
2. De otra forma, rellene el tanque y presione el botón de la PUMP (bomba)
para reiniciar la bomba.
Funciones adicionales:
Función de oscilación:
1. Al presionar el botón de OSCILLATE (oscilación), las persianas verticales en
la rejilla frontal se moverán a la izquierda y a la derecha.
2. La sección de OSCILLATE (oscilación) de la pantalla indicará la activación de
esta función.
3. Presiónelo nuevamente para desactivar la función. Esta función
está disponible en cualquier momento en que se encienda la función
de ventilador.
Función de temporizador:
Esta unidad tiene una función que permite el ajuste de la duración de la operación
desde media hora hasta 8 horas, con incrementos de 0,5 horas. Cuando el ajuste
del tiempo está en la última media hora, el tiempo disminuirá en decenas hasta
llegar a 0,0 y se apagará completamente.
1. Para ajustar el temporizador, presione TIMER (temporizador) y manténgalo
presionado hasta que se muestre la cantidad deseada en la sección de
TIMER (temporizador) de la pantalla.
2. Una vez que se muestre el tiempo deseado, suelte el botón. Luego de 5
segundos, se confirma el tiempo.
3. Para cancelar (después de la confirmación), presione el botón de TIMER
(temporizador) nuevamente.
NOTA: Si desea una operación continua, presione el TIMER (temporizador) y
ajústelo en 0,0. El ventilador se ejecutará continuamente. La bomba no
funcionará si no hay agua en la unidad.

16
Mantenimiento:
ADVERTENCIA: Apague y desenchufe la unidad de la fuente de energía antes
realizar el mantenimiento.
INFORMACIÓN GENERAL:
El medio de celulosa utilizado en estos enfriadores evaporativos portátiles deben
mantenerse en buen estado para mantener la capacidad de enfriamiento establecida.
Recomendamos drenar la unidad semanalmente y rellenarla para mantener el agua
fresca y limpia con el fin de reducir la acumulación mineral en el medio.
Drenaje semanal:
(se lleva a cabo cuando el nivel del agua está bajo o cuando la unidad está vacía).
1. Apague la unidad. Desenchúfela
y trasládela a un área donde no sea
dañada por agua.
2. Destornille la tapa de drenaje de la parte
inferior trasera de la unidad. Deje drenar
toda el agua remanente de la unidad.
3. Al limpiar la almohadilla del medio,
intente preservar la entereza de la
superficie acanalada.
4. Vuelva a instalar la tapa de drenaje
y rellene el tanque con agua fresca.
Enchúfelo y contrólelo según
las instrucciones.
Mantenimiento estándar:
(Llevar a cabo, al menos, dos veces por
estación; más frecuente en áreas con
agua dura).
1. Retire la sección trasera
(consulte el Paso 1 en Montaje.)
2. Con la manguera de agua, lave la parte
trasera con agua dulce. Limpie la
almohadilla del medio. NO utilice
productos químicos ni un lavador de
presión en el medio.
3. Con un destornillador u otra
herramienta, retire los cuatro discos
sujetadores; luego, empuje los ejes a
través del medio y extráigalos por la
parte trasera. Retire la almohadilla.
4. Enjuague el medio con agua.
Es posible que sea necesaria un
ligero restregado.
Tenga cuidado en no dañar el medio.
NOTA: El tiempo de vida esperado de la
almohadilla rígida del medio es de 2 años,
aunque el agua con alto contenido mineral
deteriorará la integridad del medio antes.
Sujetadores
Los ejes
Desenrosque
el tapón para
drenar el
reservorio

17
45°
15°
Reemplazo de la almohadilla
1. Retire la sección trasera y desconecte
la línea de agua (consulte el Paso
1 en Montaje.)
NOTA: La indicación apropiada del medio
es crítica para asegurar la efectividad
de enfriamiento.
2. Instale la almohadilla de tal forma que el
ángulo más inclinado de la canaleta se
incline hacia la parte posterior de la
estructura del medio.
3. Inserte los ejes a través de los cuatro
orificios en la estructura del medio.
4. Empuje los ejes a través del medio
y asegure el medio en su lugar con los
cuatro sujetadores. Tenga cuidado en
no dañar el medio.
5. Vuelva a unir la línea de agua con la estructura del medio.
6. Instale nuevamente la estructura del medio con el cuerpo, utilizando
dos tornillos.
Mantenimiento de fin de estación
1. Lleve a cabo los procedimientos estándares de mantenimiento. Asegúrese de
que el agua de la unidad esté completamente drenada.
2. Inspeccione el medio cuidadosamente para verificar que no esté aplastado, roto
y obstruido o demasiado incrustado de minerales. De ser así, deseche
y reemplace la almohadilla del medio.
3. Limpie el interior con agua limpia. Limpie el exterior con un paño húmedo limpio.
4. Almacene en un lugar seco y seguro. No guarde la unidad con agua en el depósito.
Solución de problemas:
PROBLEMA CAUSA PROBABLE SOLUCIÓN
La bomba
no funciona
Es posible que la
unidad esté sin agua
Es posible que la
bomba esté defectuosa
Llene el depósito con agua
y active la bomba.
Reemplace la bomba
El ventilador
no funciona
No hay alimentación
de energía.
Verifique que la unidad esté
enchufada a una fuente de energía de
120V y verifique que esté encendida.
Revise el fusible o el disyuntor.
Si estuviera conectado a un
tomacorriente GFCI, revise si está
activado y reinícielo.
La unidad no
enfría tan bien
como antes
Flujo de aire
insuficiente
(entrada y escape).
Medio obstruido o
con suciedad
Asegúrese de que las
ventanas/puertas estén abiertas
para un flujo de aire correcto.
Revise la almohadilla del medio
y lávela o reemplácela, si fuese
necesario.

18
Repuestos para el enfriador CP70
Número de
elemento
Descripción
Número de
repuesto
1 Medio evaporativo 110132-3
2
Montaje de la estructura del
medio evaporativo
110874-1
3 Bandeja de agua 110874-3
4 Boquilla de distribución de agua 1100874-4
5 Sujetadores (conjunto de 4) 110871
6 Bomba 110439-4
7 Tapa de drenaje 110698-2
8 Montaje del flotador 110873
9 Ruedas giratorias: sin fijación 110822-6
10 Ruedas giratorias: con fijación 110822-7
11 Pedestal 110874-2
12 Tubería del distribuidor de agua 110734-1
13
Tornillos de cabeza segmental acero
inoxidable M3.5 x 12mm (Cantidad 2)
111130
14
Tornillos de acero inoxidable Phillips
M4 x12mm (Cantidad 4)
111131
Para comprar repuestos llame al 1.800 643.8341, o visite championcooler.com
8
5
5
1
9
10
9
10
6
7
11
2
12
4
3
13
14

19
Política de garantía limitada del
ENFRIADOR
EN CASOS DE RECLAMOS RELACIONADOS CON LA GARANTÍA, ES
NECESARIO PRESENTAR EL RECIBO COMO PRUEBA DE COMPRA.
Esta garantía se concede al comprador original del enfriador evaporativo
instalado y usado en condiciones normales. La garantía no cubre daños
incurridos por accidente, negligencia o abuso del propietario. No
autorizamos que ninguna persona o representante asuma, en nuestro
nombre, cualquier otra responsabilidad o responsabilidad diferente en
relación con este producto.
Términos y condiciones de la garantía
Por un año a partir de la fecha de la compra, reemplazaremos cualquier
componente original provisto por Champion Cooler que falle debido a
algún defecto material o de fábrica, únicamente.
Exclusiones de la garantía
No nos haremos responsables por el remplazo del medio evaporativo.
Estos son componentes desechables y deben ser reemplazados
periódicamente. No somos responsables por ningún daño incidental o
consecuente, resultante de cualquier mal funcionamiento.
No somos responsables por ningún daño recibido por el uso de
suavizantes de agua, químicos, materiales de desincrustación o
envolturas plásticas.
No somos responsables por el costo de las llamadas de servicio para
diagnosticar el problema o costos de mano de obra para reparar o
reemplazar repuestos.
Cómo obtener servicio bajo esta garantía
Comuníquese con el Distribuidor donde adquirió el enfriador evaporativo.
Si por alguna razón no está satisfecho con la respuesta del distribuidor,
comuníquese con el Departamento de servicio de atención al cliente:
Champion Cooler, 5800 Murray Street, Little Rock, Arkansas 72209. 1-
800-643-8341 o a [email protected]m
Algunos estados no permiten la exclusión o limitación de daños
incidentales o consecuentes, por lo tanto, es posible que lo mencionado
no se aplique a usted.
Esta garantía le da derechos legales específicos y es posible que
también tenga otros derechos que varían de estado a estado.
Esta garantía limitada se aplica solamente al comprador original.
Registre su enfriador en línea, en: www championcooler.com.

20
ADivisionofChampionCooler
5800MurraySt.
LittleRock,AR72209
/