Page is loading ...

1
CP35 PORTABLE
EVAPORATIVE COOLER
USE & CARE GUIDE
Read and Save These Instructions
If you have any problems with this product, please call 1-800-643-8341
BEFORE returning it to your retailer.
NOTICE
: This Product May Temporarily Produce An Odor When First Turned On
.
This is NORMAL and will dissipate after a few hours.
About Evaporative Cooling
Evaporative cooling is an economical way to cool and is highly effective in arid
climates. Air is cooled while being drawn across wet evaporative media. The
movement of this fresh cooled air over the skin is what makes it feel cool.
In order for evaporative coolers to be effective in an enclosed area, a fresh air source
and adequate exhaust need to be present. These coolers will not work well without an
outlet to exhaust the hot air. Humidity will build up in the enclosed space and the unit
will not cool adequately.
72852 9-2014 Printed in China

2
WATER
ACCESS
DOOR
Safety Rules
1. Unit must be in the Off Position and Unplugged from power receptacle when
performing any maintenance.
2. To reduce the risk of electric shock, plug unit into a properly grounded 120 Volt
A.C., 60 Hz receptacle.
3. To reduce the risk of electric shock, install only on a circuit protected with a
Ground Fault Circuit Interrupter (GFCI).
4. This appliance is not intended for use by persons (including children) with
reduced physical, sensory or mental capabilities, or lack of experience and
knowledge, unless they have been given supervision or instruction concerning
use of the appliance by a person responsible for their safety. Children should be
supervised to ensure that they do not play with the appliance.
5. Do Not operate any fan with a damaged cord or plug. Discard fan or return to an
authorized service facility for examination and/or repair.
6. Do Not run cord under carpeting. Do Not cover cord with throw rugs, runners or
similar coverings. Do Not route cord under furniture or appliances. Arrange cord
away from traffic area and where it will not be tripped over.
WARNING: To reduce the risk of fire or electric shock, do not use this fan with
any “solid-state fan speed control device.”
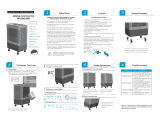
Assembly
Remove unit from carton, and remove packing material.
Install Casters
This unit comes with 4 stem casters:
2 locking and 2 non-locking.
1. Insert casters into four holes on
bottom of unit. The stem should
fit snugly into hole.
NOTE
Install both locking casters on
the same side (front or back) to
ensure equal and secure locking
.
Fill with Water
The reservoir on this unit holds 3.8 gallons.
1. To fill the reservoir, open the water fill door
at the back and fill with fresh, clean water
using a fill hose or pitcher. DO NOT
OVERFILL.
CAUTION: If moving the unit for filling, make
sure the casters are unlocked for easy mobility.
Do not tip unit.

3
2. A gauge on the front of the unit shows the water level. When the reservoir is full,
the window will show a full blue fill. When
the reservoir is low, an indication of LOW
WATER will appear in the window.
Observe this gauge to monitor the water
level.
OPERATIONS
Operating Instructions
When first plugged in the control panel will momentarily light up and unit will beep.
The unit is in Standby mode, and the Power button will stay illuminated in red.
With the unit filled and plugged in, press the Power button and it will change from
Red to Blue.
NOTE: For best cooling, we recommend turning on the pump 2 or 3 minutes before
turning on the fan. This allows the media to become saturated for faster cooling
effect.
NOTE:
This unit can be used as a fan only or an evaporative cooler. If no evaporative cooling
is desired, simply do not engage the pump and use only the fan feature.
For Evaporative Cooling:
With the unit already filled and turned on:
1. Press the PUMP button. This will activate the pump to begin saturating the
media. The two Droplet icons will alternately flash.
2. Press the SPEED button to engage the fan. The 3-speed fan starts in High and
can be adjusted down by pressing the SPEED button again. The FAN display
shows 6 bars for High, 4 bars for Medium and 2 bars for Low.
For Fan Only Operation:
With unit turned on:
1. Press the SPEED button. The fan proceeds from High speed to Medium to Low
speed.
2. The FAN icon will be progress from 6 bars ( high speed) to four bars (medium.
speed) to 2 bars ( low speed). It will cycle in this order when pressed.
ALLICONSSHOWNFORREFERENCE

4
Additional Features:
Oscillate Feature:
1. When the OSCILLATE button is pressed the vertical louvers on the front grill
move left and right.
2. The OSCILLATE icon on the display will illuminate with activation of this feature.
3. This feature is available anytime the FAN function is turned on.
Timer Feature:
1. This unit has a timer feature that allows setting the duration of operation from
half an hour to 12 hours, in 30 minute increments.
2. To set the timer, press TIMER and keep pressing until the desired amount is
displayed in the TIMER section of the display.
3. Once the desired time is displayed, release the button. After 5 seconds the time
is confirmed.
4. When the set time is on the last half hour, the time will count down in tenths
until it reaches 0.0 and the unit will go into standby mode (all icons off, except
the POWER button which illuminates red.)
5. Once the desired time is displayed, release the button. After 5 seconds the time
is confirmed.
6. To cancel (after confirmation) press the TIMER button again.
NOTE: If continuous operation is desired Press TIMER and set at 0.0. The fan will
run continuously. The pump will not operate if there is no water in the unit.
Low Water Indication:
1. When the water tank has been depleted to a certain level, a red LOW WATER
icon will display on the Control Panel. The pump will stop operating and an
audible beeping will sound for 60 seconds or until the PUMP button is pressed.
2. If unit is filled within 60 seconds of the beeping, the pump will start again
automatically. Otherwise refill and press PUMP
again.
3. Fill the water tank to reset the LOW WATER
indications.
Remote Control:
The CP35 unit comes with a remote control that allows
operation of the of the cooler from a distance.
1. Extract the remote control from the bag the manual
came in and open the case. Unwrap the two AAA
batteries included in the bag. Insert them into the
remote.
2. Point the remote at the control panel. The controls
on the remote will function the same as the control
on the unit.
3. The remote is effective up to approximately 30 feet,
but must be in line of vision. The sensor is located
in the upper right hand corner of the control screen
.
ON/OFF
SPEED
PUMP
TIMER
OSCILLATE

5
Maintenance:
CAUTION: Turn off and unplug unit from power before any maintenance is
performed.
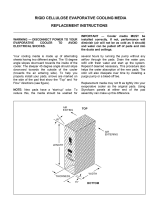
GENERAL INFORMATION:
The cellulous media used in these portable evaporative coolers must be kept in
good condition to maintain the stated cooling capabilities. We recommend draining
the unit weekly and refilling to keep water fresh and reduce mineral build-up on
media.
WeeklyDraining
(Accomplish when water level is low or unit is out of
water.)
1. Turn unit off. Unplug and move it to an area that
will not be damaged by water.
2. Unscrew the drain cap from the bottom of the
back of the unit. Allow any remaining water to
drain out of unit.
3. When cleaning the media pad, try to preserve
the integrity of the fluted surface.
4. Reinstall drain cap and refill with fresh water.
Plug in and operate per instructions.
Regular Servicing:
(Accomplish at least twice a season, more often in
areas with hard water.)
1. Remove media frame section by extracting one
screw from center of upper grate.
2. Using a water hose, wash out back with fresh
water. Clean media pad. DO NOT use chemicals
or pressure washer on media.
3. Using a screw driver or other tool, pry off the four
keeper discs, then push the stems back through
the media and extract them through the back.
Remove pad.
4. Rinse media with water. Light scrubbing may be
necessary. Be careful not to damage the media.
NOTE: Average life expectancy of the rigid media
pad is 2 years, though water with high mineral content
will deteriorate the integrity of the media sooner.
STEM
KEEPER
DISC

6
Pad Replacement
1. Remove media frame from unit side by extracting one screw.
2. Remove and dispose of used media.
3. Install new media pad per instructions
noted here.
NOTE: Proper orientation of the media is
critical to ensure cooling effectiveness.
4. Install the media pad so that the steeper
angle of the flute slopes down toward the
bottom of the media frame.
5. Insert the stems through the four screw
holes in the media frame.
6. Push stems through the media and
fasten media in place with the four
keepers. Take care not to damage the
media.
7. Reinstall media frame onto the body
using one screw.
End of Season Servicing
1. Accomplish Regular Servicing procedures. Ensure unit is fully drained of water.
2. Carefully inspect media to verify media is not crushed, broken and clogged or
heavily encrusted with minerals. If so, dispose and replace media pad.
3. Clean interior with clean water. Wipe down outside with clean damp cloth.
4. Store in safe, dry place. Do not store with water in reservoir.
Trouble shooting :
PROBLEM PROBABLE CAUSE REMEDY
Pump is not working Unit may be out of water
Pump may be defective
Fill reservoir with water and
activate pump.
Replace pump
Fan not operating No power supplied. Verify unit is plugged into a
120V power outlet and
turned on.
Check fuse or breaker.
If connected to GFCI outlet,
check if tripped and reset.
Unit is not cooling as well
as previously
Insufficient air flow
(input and exhaust.)
Clogged or dirty media
Ensure windows/doors are
open for correct air flow.
Check media pad and wash
or replace as necessary.
45°
15°

7
CP35 Replacement Parts
Item
Number
Description Part Number
1 Evaporative media 110132-1
2 Evaporative media frame assembly 110870-11
3 Keepers & Stems ( set of 4) 110871
4 Pump 110439-4
5 Drain plug assembly 110698-2
6 Water indicator float 110872-2
7 Swivel casters- Non-locking 110822-8
8 Swivel casters - Locking 110822-9
9 Remote control 110101-2
12 Water distributor tubing 110734-1
To purchase parts call 1.800 643.8341, or visit XXXXXXXXX.com
5
8
7
4
6
8
7
3
2
1
3
9
10

8
Cooler Limited Warranty policy
SALES RECEIPT REQUIRED AS PROOF OF PURCHASE FOR ALL
WARRANTY CLAIMS.
This warranty is extended to the original purchaser of an evaporative
cooler installed and used under normal conditions. It does not cover
damages incurred through accident, neglect, or abuse by the owner. We
do not authorize any person or representative to assume for us any
other or different liability in connection with this product.
Terms and Conditions of the Warranty
For One Year from date of purchase, we will replace any original
component provided by Champion Cooler which fails due to any defect
in material or factory workmanship only.
Exclusions from the Warranty
We are not responsible for replacement of evaporative media. These are
disposable components and should be replaced periodically. We are not
responsible for any incidental or consequential damage resulting from
any malfunction.
We are not responsible for any damage received from the use of water
softeners, chemicals, de-scale material or plastic wrap.
We are not responsible for the cost of service calls to diagnose the
cause of trouble, or labor charge to repair and/or replace parts.
How to Obtain Service Under this Warranty
Contact the Dealer where you purchased the evaporative cooler. If for
any reason you are not satisfied with the response from the dealer,
contact the Customer Service Department: Champion Cooler, 5800
Murray Street, Little Rock, Arkansas 72209. 1-800-643-8341or at
Some states do not allow the exclusion or limitation of incidental or
consequential damages, so the above may not apply to you.
This warranty gives you specific legal rights, and you may also have
other rights which vary from state to state.
This limited warranty applies to the original purchaser only.
Register your cooler on line at: www xxxx.xxxxx
/