Danfoss 013G6515 Installation guide
- Category
- Thermostats
- Type
- Installation guide

28°
24°
20°
16°
8°
MAX.
MIN.
1
5
4
3
2
12°
* Frost Protection
If you leave your home for a longer period of time, you can safely
turn the thermostat to *. At this setting, the temperature will keep
the room temperature at about 7-8 0C.
Night Setback
To save energy, simply lower the room temperature at night or at
times when nobody is at home.
Cleaning
The radiator thermostat can be cleaned with mild detergents such
as dish washing liquid. Do not use scourers, alcohol, solvents or
bleaching agents as they can damage the radiator thermostat.
User Guide
D
A
N
I
S
H
Q
U
A
L
I
T
Y
.
D
Ä
N
I
S
C
H
E
Q
U
A
L
I
T
Ä
T
.
Q
U
A
L
I
T
É
D
A
N
O
I
S
E
.
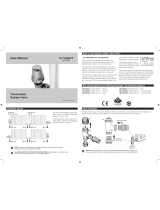
What is a thermostatic radiator valve (TRV)?
TRVs sense the air temperature around them and regulate the ow
of water through the radiator which they are tted to.
They should be set at a level that gives you the room temperature
you want. These settings may have to be dierent in each room,
and you should set the TRVs to suit each room and then leave them
to do their job. As guide to the temperatures is shown on the right.
Turning a TRV to a higher setting will not make the room heat up
any faster. How quickly the room heats up depends on the boiler
size and setting, and the radiator size. Turning a TRV to a lower set-
ting will result in the room being controlled at a lower temperature,
and saves energy.
Set and Forget
The thermostat maintains a constant temperature in your room, set
your preferred room temperature according to the thermometer
below and that’s it. The thermostat will open and close depending
on the heat demand thereby utilizing the free heat from sunlight,
appliances and people.
Additional heat saves energy
Sunlight, kitchen appliances and electric light give o additional
heat. The thermostat registers such additional heat by automatical-
ly closing down. When there no longer is enough additional heat
available, the thermostat automatically opens again.
Please do not cover the thermostat!
The thermostat must be able to register the temperature of the
room. If it is covered by e.g. thick curtains or furniture, use a ther-
mostat with remote sensor.
HOME thermostat set
RTW-RA, RLV-S & RA-FN
(Angle)
(Straight)

Installation Guide
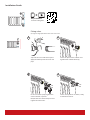
Easy Installation
Scan for video guide
1 2
Fit the valve to the pipe; tighten the
union nut with a spanner.
Now, t the valve to the tail piece and
tighten the union nuts.
3
4
Separate the valve and the tail piece.
Apply the PTFE tape to the valve and
pipe
Fit the tail piece to the radiator and
tighten with a 10mm Allen key
Fit the valve position as shown, ready
to mount the sensor.
Fitting valve:
(Straight or Angled) Radiators with side connection.
B
A
C
A

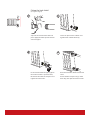
Fitting the lock shield
(Straight or Angled)
1 2
Fit the lock shield to the pipe; tighten
the union nut with a spanner. Next,
t the lock shield to the tail piece and
tighten the union nuts.
3
4
Separate the lock shield and the tail
piece. Apply the PTFE tape to the lock
shield and pipe
Fit the tail piece to the radiator and
tighten with a 10mm Allen key
Once installed take o the lock shield
cover.
Ensure the RLV is open using a 8mm
Allen key, then put the cover back on.
B

Danfoss can accept no responsibility for possible errors in catalogues, brochures and other printed material. Danfoss reserves the right to alter its products without notice. This also applies to products already on order provided that such alterations
can be made without subsequential changes being necessary in specications already agreed. All trademarks in this material are property of the respective companies. Danfoss and the Danfoss logotype are trademarks of Danfoss A/S. All rights
reserved.
Danfoss A/S
Haarupvaenget 11
DK-8600 Silkeborg
Denmark
homeretail.danfoss.com
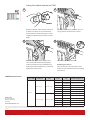
Fitting the radiator thermostat (TRV)
Danfoss Heating Segment VI JPM102 06/2015
1
4
5
2
Whilst holding the sensor rmly on the
valve secure connection by turning the
union nut clock-wise by hand. Whilst still
holding the sensor rmly on the valve fully
tighten the metal union.
5
4
3 4
Remove cap from valve and turn sensor to
5. Make sure union nut is turned loosely
up towards the sensor body until it is only
slightly free of the lower part of the sensor
body.
Press the sensor rmly onto the valve, en-
suring that the scale pointer is at top.
Set desired room temperature.
Removing the Sensor:
Turn the sensor to max. position 5. Turn
union nut anti-clockwise to release locking
mechanism.
C
Radiator
Sensor (TRV)
Lock Shield Valve
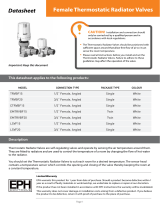
Product
Code
Pipe
size
Building Regulation
RTW- RA
RLV-S Angle RA-FN Angle
013G6506 3/8” (DN 10) DE Building Regulation
013G5607 3/8” (DN 10) FR Building Regulation
013G6508 1/2” (DN 15) DE Building Regulation
013G6509 1/2” (DN 15) FR Building Regulation
013G6514 3/8” (DN 10) SE Building Regulation
013G6515 1/2” (DN 15) SE Building Regulation
RLV-S Straight RA-FN Straight
013G6510 3/8” (DN 10) DE Building Regulation
013 G 6511 3/8” (DN 10) FR Building Regulation
013G6512 1/2” (DN 15) DE Building Regulation
013G6513 1/2” (DN 15) FR Building Regulation
013G6516 3/8” (DN 10) SE Building Regulation
013G6517 1/2” (DN 15) SE Building Regulation
HOME thermostat sets:
-
 1
1
-
 2
2
-
 3
3
-
 4
4


Danfoss 013G6515 Installation guide
- Category
- Thermostats
- Type
- Installation guide
Ask a question and I''ll find the answer in the document
Finding information in a document is now easier with AI
Related papers
-
Danfoss RA2000 User guide
-
Danfoss RA 2000 User guide
-
Danfoss 013G6500 Installation guide
-
-
-
Danfoss 013G7105 User guide
-
-
-
-
Other documents
-
Stelrad Radiator Operating instructions
-
-
Pegler TERRIER Installation guide
-
 homexpert TRV15SHWC User manual
-
 EPH Controls Thermostatic Radiator Valves Installation guide
-
Vaillant TURBOmax Plus 828/2 E Datasheet
-
Bosch 18/25 User manual
-
Vaillant TURBOmax VUW 242 E Instructions For Installation And Servicing
-
-
Gledhill GulfStream II Owner's manual

