Page is loading ...

Instruction for use
QBJ1-130A
QBJ1-150A
QBJ1-175A
QBJ1-200A
Please read this manual before usage
Retain it for future reference
Solar Water Heater
Models:

Dear User,
Thanks for choosing Haier water heater product.
Haier products have good quality and excellent performance.To facilitate you to use
the product, please read the manual and operate accordingly.Please retain it for future
reference.
The international star service of Haier Group will always accompany you.No matter
what kind of problems you meet in usage,please contact with the local after-sales
service agent.We are at your service all the time.Thanks again for choosing Haier
Product.
The water heater you purchased may not full comply with the figure in the manual
due to the improvement of product.We apologize for the inconvenience occurred
therefrom.

Content
Features
Before use
Assembly Instruction
Appearance and parts
Technical parameter
1
1
1
2
3
4
5
5
5
6
7
7
8
10
10
9
Precautions
Notice
Technical data
4
Packing list
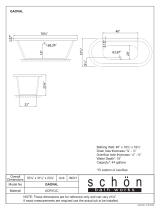
The location
Exterior and installation dimension
Tank assembly
Frame assembly
Frame fastness
Glass tube assembly
Extraventricular plumbing instructions
Indoor plumbing instructions
Installation notice
Using Instruction
The operation method
Troubles treatment
3

Technical data
1
1. Inner cylinder:
2. Insulation: Polyurethane foam, thickness-45 mm, good heat preservation effect.
3. Outer shell: Aluminium / zinc coated steel sheet.
4. Frame: Steady structure, shapely and durable .
SUS 304 stainless steel, food grade.
Features
Technical parameter
Appearance and parts
Outer shell
Evacuated tubes
Base support
Cover
Silicon seal ring
Frame
Foot cushion
Models
Specification of tubes
Collector frame angle standard fixed
Number of tubes
Aperture area
Volume of one tube
Usable water
Gross weight
58mm 1800mm all glass evacuated tubular collector
45
Remarks:1. The warp of a parameters is 3%. the warp of usable water
parameters is 5%. The permitted error limit of other parameters is 10%
perture area
A
14
16
19
22
2.6L
130L
150L 175L
200L
74kg
81kg
91kg
107kg

Precautions
Precautions
1. Avoiding irradiation without water after installation, it can't be used immediately, it
should be sheltered.
2. Supply water in the evening or in the next morning when the solar water heater is
being used at the first time or has been shined for a long time without water in the
manifold, doing so can avoid the breakage of tubes with thermal shock.
3. If the water pressure isn't enough for water supply, please install an pressurize
equipment.
4. When the hot water is to be used, don't place the spray head face yourself until the
water temperature is suitable.
5. This product can supply the water depend on the fall of the tank and the water exit ,
an pressurize equipment is recommended while the water couldn't be supplied
normally due to the low fall.
6. Do not supply cold water more than once in a low solar irradiance day.
7. The energy is from solar, in the days that lack of solar such as rainy or snowy day,
the temperature of the water may can't reach your demand.
8. Make sure the evacuated tubes clean, hose off the dust and dirt on the tubes and
the reflector before the winter comes.
9. The evacuated tubes resist as low temperature as -70 when tubes is emptied.
The tank should remain filled up during continuously cloudy or snowing days in winter,
in addition every two days the cold water in the tank should be changed to prevent the
water in the tank from freezing which might damage the tubes.
2

Before use
3
Notice
Please take time to read this manual and familiarize yourself with the function
of this production.
1. Please check out the packing list.
2. To avoid the scald, please mix the hot and the cold water before use it.
3. In order to protect the tank ,please don't refit or wall up the air supply pipe
and the overflow pipe.

Assembly Instruction
Notice: The solar water heater shall be installed by professional.
Exterior and installation dimension:
4
Models
Exterior dimension(mm)
Installation dimension(mm)
1. Please install the solar water heater in the area that avoid the thunder.
2. Solar water heater angle range: east to south for 10 , west to south for 15 .
3. There shouldn't be any hindrance in front of the heater ,or the distance should over
L, L=H/tg(66.5 a) H:height of the hindrance; a: latitude of the area
Remarks: The permitted error limit of above parameters is 10%.
The location:
B
A
D
H

Tank assembly
1. Unpacking the tank, rip off the protection film. Uninstall the nut and cushion.
2. Place tank onto tank bracket cradle, inserting protruding bolts into holes.
fasten with nuts.
Notice:
1. Rip off the protection film after the installation to avoid the destroy of the tank,
and please don't use the sharp tool.
2. Leave nuts loose since some adjustment may be necessary after fitting tubes.
Frame assembly
Please consult the accessional paper for figure of the frame and packing list in
the packing of frame.
Frame fastness
1. Peg the feet of the heater into the earth with prepared iron or into the concrete
brick with intumescent bolt.
2. Adjust the height of the frame with the water-proof cushion to keep the tank
aclinic and each foot balanceable.
Notice:
1. Make sure that the feet are all attach the floor closely, or it will cause the
distortion of the frame.
2. Please use the tight wire to fasten the tank and frame in the area that the
typhoon occurred frequently.
3. The installation of the solar water heater should be steadily or it will cause the
destruction and the accident.
Assembly Instruction
5

Assembly Instruction
Glass tube assembly
1. Keep tubes out of the irradiation while assembling the unit or a scald may be
caused.
2. Place the rounded side of rubber seal downwards on the open end of tubes.(A)
3. Insert the tube into base support of locating hole with gentle pressure and twisting
motion.
4. Holding the tube, fix base support into base bracket (B), insert tube into base
support (C).
5. Slide the tube down 1 cm, Slide black rubber seal up the tubes until it sits flush
with tank.
6. Insert one tube on either end of the tank to achieve alignment of unit.
Notice:
1. Make sure the silicon seal ring are clean and well positioned.
2. Place the rounded side of rubber seal downwards on open end of tube.
Slide it down 10 cm. Wet open end of tube to make it easier to insert.
6
Silicon seal ring
Rubber seal
Evacuated tubes
Evacuated
tubes
Rubber seal
hold position
Base support
Base support
Base bracket
Base bracket
A
C
B
D

Extraventricular plumbing instructions
Assembly Instruction
7
Air supply pipe
Over flow pipe
Over flow hole (
conect to the room
n
A
a
b
Indoor plumbing instructions
Solar water heater
Tap water
Hot water
Over
flow
pipe
Inlet/outlet hole (1/2 ), conect
to the room
Air supply hole(1/2 )
forbidden to stem
A
b
a
Remarks: The permitted error limit of above parameters is 10%.

1. Any alteration to the structure of the solar water heater may cause the trouble
while using it.
2. There are 5 connection methods of the water pipe into the room, they are smoke
way, vent-pipe hole on the wall appropriative solar well prepared cannula
and the first three kinds are common. Before the installation, our professional
will consult the room's situation and choose the suitable location to bring you
convenience. A upend slope is necessary ,and should be wind-tight to prevent
the rainy water or smell's entrance.
3. Keep the placket of the overflow pipe downwards and fasten it so that the liquid
can be lead to the cloaca directly, and please notice that the distance of the
overflow pipe and the cloaca should less than 15cm. Don't placed the pipe
optionally, so can avoid the water spatter.
4. Don't install the valve in the pipeline to insure that the signal which shows the
water is overflow will be worked normally.
5.To avoid the water in the tank flow inverted, an unilateralism valve should be
installed at the joint of the water pipe and the tap water.
6. The installation project should be confirmed by our professional service
personnel when install several sets of these series.
Assembly Instruction
8
Please install another one-
directional valve at the cold and hot
water pipes if the solar tank is
connected with other kinds of tanks
to avoid the exceed pressure in
these tanks flowing backwards to
the solar tank and lead accidents.
Other
water heaters
Tap water
Contact to the water tank
Illustration of connect the solar tank with other tanks
Hot water
Installation notice

The operation method
1.K1 K2 and K3 keep closed before use the water;
2. Open k1 to supply the water ,if the water's flowing out of the overflow pipe
indicate that the tank is full of water, close K1 at this time.
3. Open K2 when you want to use the water, open K3 to adjust the temperature if
it is too high.
4. Close K2 and K3 when finish using the water.
Using Instruction
9
Air supply pipe
Tap water
Over flow pipe
Water
supply valve

Troubles treatment
Phenomenon
No water supply
The temperature
isn't high enough
Possible reason
The tank is empty
The pipeline or the connection
is impeded
The evacuated tubes have
damaged
The water supply is paused or low
water pressure
The pipeline or the connection is
Damaged
Valve for water supply is unstuck
or already damaged
The evacuated tube can't work
effectively for there are hindrance
in front of it
Treatment
Supply water according to the
manual
Maintain the pipeline or clean
the connection
Replacing the tubes
Waiting for the supplying again
Maintain the pipeline and
the connection
Screw down the valve or
replacing it
Change the location or move
the hindranc
Using Instruction
10
The controller
can't reach the
programmed
level or there is
no water
Too much ash on the tube
Tidy the tube
1
1
1
1
Packing list
Main parts
Quantity
Storage
tank
box
Storage tank
Manual
Frame box
Tank
bracket
box
Left supportbracket
Right supportbracket
Evacuated tubes


Rev. 01
Specific Number 0040500680A
/