NIGHT OWL DB-WNIP2-SU Owner's manual

Type
Owner's manual

This manual is also suitable for

HD SMART DOORBELL
www.NightOwlSP.com
24/7
SUPPORT
English
Español / Français
USER’S MANUAL
2
Thank you for choosing Night Owl Security Products!
By purchasing a Night Owl product, you receive a one (1) year warranty covering manufacturing defects in
material and workmanship. In addition to warranty and technical support benefits, you have access to our
vast library of free instructional “How to Videos.”
For a step-by-step video showing the basic hardware setup of the WNIP2 doorbell, please go to
support.nightowlsp.com and enter DB-WNIP2 into the search bar.
For all of our Support Videos, click www.youtube.com/nightowlsp to access Night Owl’s YouTube page.
Night Owl’s Smart Doorbell Compatibility:
Night Owl’s HD Smart Doorbell is compatible with the WNIP2 Series Wi-Fi NVR’s.
Night Owl’s WNIP2 Series HD Smart Doorbell is specific to the WNIP2 Series and is not backward
compatible with other Night Owl® Wi-Fi products. Not all features and capabilities are shared across all
models so you may see features which are not applicable. In addition, you may see screen images that do
not exactly match those on your display.
3
Table of Contents
FCC Warnings .................................................................4
Safety Instructions ..........................................................5
Specifications .................................................................6
Package Contents ...........................................................6
Smart Doorbell Diagram ...................................................7
Chapter 1:
Preparing the Doorbell for Setup .....................................10
1.1 Testing .................................................................10
1.2 Charging the Doorbell ............................................10
Chapter 2:
Downloading Night Owl Protect ......................................12
Chapter 3:
Connecting the Doorbell to a Wi-Fi Router .......................13
3.1 Adding the Doorbell ..............................................13
3.2 Setup Using the QR Code ......................................13
3.3 Initial Firmware Update .........................................14
Chapter 4:
Adding the Doorbell to a Wi-Fi NVR ................................15
4.1 Running the Startup Wizard ...................................15
4.2 Pairing the Doorbell Using the Wi-Fi NVR’s Menu .....17
Chapter 5:
Doorbell Installation ......................................................20
Chapter 6:
Using the Doorbell with a Digital Chime ..........................22
Chapter 7:
Know Your Doorbell ...........................................................24
7.1 Booting Process ........................................................24
7.2 Smart Doorbell Functionality ......................................25
7.2.1 Resetting the Doorbell to Factory Settings ................25
7.2.2 Status Check Process .............................................26
7.2.3 Firmware Upgrade Process ......................................27
7.2.4 Ringing the Doorbell ..............................................29
Chapter 8:
Using the Night Owl Protect App ........................................30
8.1 Live View .................................................................30
8.2 Notifications ............................................................31
8.3 Settings Menu ..........................................................32
8.4 Doorbell Information .................................................33
8.5 Recording Settings ....................................................34
8.5.1 Advanced Screen ...................................................34
8.6 Notifications ............................................................36
8.7 Video Quality ............................................................36
8.8 Color and Orientation ................................................37
8.9 Doorbell ...................................................................38
8.10 Bell Type ................................................................38
8.11 Shared Users ..........................................................39
Doorbell and Chime Compatibility ......................................40
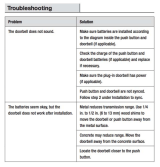
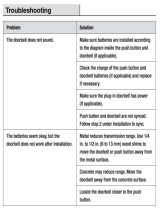
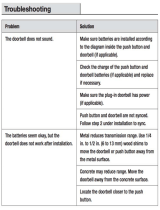
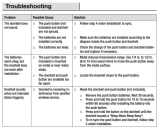
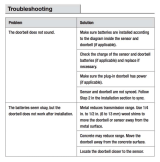
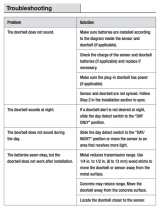
Troubleshooting ................................................................41
Status Light Key ...............................................................42
Warranty ..........................................................................43
Customer Support ................................................ Back Cover
4
FCC Warnings
FCC
This device complies with Part 15 of the FCC Rules. Operation is subject to the following two
conditions: (1) this device may not cause harmful interference and (2) this device must
accept any interference received, including interference that may cause undesired operation.
• Reorient or relocate the receiving antenna.
• Increase the separation between the equipment and the receiver.
• Connect the equipment into an outlet on a circuit different from that to which the receiver is
connected.
• Consult the dealer or an experienced radio/TV technician for help.
FCC Compliance Statement
These limits are designed to provide reasonable protection against frequency interference in
residential installation. This equipment generates, uses and can radiate radio frequency energy and
if not installed or used in accordance with the instructions, may cause harmful interference to radio
communication. However, there is no guarantee that interference will not occur in television
reception, which can be determined by turning the equipment off and on. The user is encouraged
to try and correct the interference by one or more of the following measures:
The Federal Communications Commission warns the user that changes or modifications
to the unit not expressly approved by the party responsible for compliance could void
the user’s authority to operate the equipment.
CAUTION!
5
1. The Doorbells operating temperature range is -4° F to 122° F.
2. The Doorbell works using 16V AC ~ 24V AC supply and requires a 10VA transformer. Do not connect the
device directly to AC mains while wiring the device, otherwise this may cause electric shock and permanent
damage to the device.
3. For the Doorbell setup, plug in the device ONLY using the included USB 5V power adapter (Amperage must
not be less than 1A or it may cause damage to the device).
Warranty is void if the device is plugged in directly or using any other adapter.
4. Please make sure you have a strong Wi-Fi connection in the location where you plan to install the device.
Weak Wi-Fi connections will reduce the quality of the video streaming.
5. Turn off power to the area where you will install the Doorbell at the circuit breaker or fuse box before
beginning installation. Failure to turn off the power before installation may result in serious electrical shock,
injury or death.
6. Do not restore power until the Doorbell has been completely installed. Restoring power before installation
is complete may result in serious electrical shock, injury or death. If you need to replace your transformer, we
recommend that you use a licensed professional.
7. All electronic operation should be in strict compliance with the electrical safety regulations, re prevention
regulations and other related regulations in your local region.
8. When the product is installed on a wall, the device MUST be rmly xed.
9. If smoke, odors or noise come from the Doorbell, turn it off at once by unplugging the power cable and then
contact technical support.
10. Never attempt to disassemble the device yourself. (We shall not assume any responsibility for problems
caused by unauthorized repair or maintenance.)
11. Do not drop the device or subject it to physical shock. Also, do not expose it to high electromagnetism
radiation. Avoid installing the Doorbell on surfaces that vibrate or places subject to shock. Doing so may
damage the Doorbell.
Safety Instructions
You may be subjected to severe electrical shock if you remove the cover of the Doorbell.
CAUTION!
6
Depending on your model #, the following items may or may not be included:
Varies by Model
1 x 1080p Doorbell
Drill
Drill Bit (15/64) (3/64)
Router/Modem
USB Power Adapter
Mobile Device (Phone or tablet iOS
®
/Android™)
Phillips Head Screwdriver
2 x Security Screws
1 x Doorbell
Mounting Template
1 x Torx Key
1 x microSD Card 1 x Paintable
Faceplate
1 x Flat
Mount
1 x Angled
Mount
3 x Mounting Hardware
1 x USB to micro
USB cable
Items Not Included
THIS DEVICE WILL REPLACE YOUR EXISTING WIRED DOORBELL. YOU MUST HAVE AN EXISTING
WIRED DOORBELL TO USE THIS PRODUCT.
NOTE: Storage size may
vary. If included, microSD
card will be pre-installed.
Specifications
Doorbell Requirements
Please be sure that your mobile device complies with the following specifications:
Android™: 8.0 and above
iOS
®
: 12.4 and above
4.2 Package ContentsPackage Contents
THIS MANUAL WAS ACCURATE AT THE TIME IT WAS COMPLETED. DUE TO OUR ONGOING EFFORT
TO CONSTANTLY IMPROVE OUR PRODUCTS, FUNCTIONS MAY HAVE BEEN ADDED OR CHANGED.
7
Smart Doorbell Diagram
Ring Button:
Press to ring the Night Owl Doorbell. The LED
status light turns blue and spins clockwise for
approximately 30 seconds.
A notication is sent to the mobile device running
the Night Owl Protect App. Tapping on the
notication allows the user to answer the door.
Doorbell Lens
LEDs for Night Vision
FRONT VIEW
8
LEFT SIDE VIEW
NOTE: The faceplate must be removed in order to access the sides of the Doorbell.
Reset Button:
Press and hold the “Reset”
button for approximately 3
seconds to return the Doorbell
to FACTORY SETTINGS. This
process reboots the Doorbell,
cuts the connection with Night
Owl Protect (Doorbell may still
appear in the App), and places
it in PAIRING MODE. The LED
status light turns white and
spins clockwise when in PAIR-
ING MODE.
Micro-USB Input:
Requires 5V of voltage and at
least 1A of current intensity.
microSD Card:
The microSD card can be
formatted from the Night Owl
Protect App.
9
Wiring Connectors:
Connect the wires from your existing
Doorbell to the Night Owl Doorbell. Make
sure the wires are properly fastened. The
recommended voltage range is 16-24 Volts.
Check out my rear!
REAR VIEW
10
OR
Test 1:
Does your current Doorbell work? If the current
Doorbell chime doesn’t work, please consult an
electrician prior to installation.
For the best results, perform the setup process close to your wireless router or Wi-Fi NVR.
Using a mobile device, verify you have at least 50%
Wi-Fi signal strength at the Doorbells location.
Test 2:
RESET
LAN1 LAN2 LAN3 LAN4 WA N
YOU MUST HAVE AN EXISTING WIRED DOORBELL TO USE THIS PRODUCT.
Chapter 1: Preparing the Doorbell for Setup
1.1 Testing
1.2 Charging the Doorbell
11
Carefully remove the faceplate from the Night Owl Doorbell. Insert the small end of the provided
USB cable into the micro USB port on the Doorbell.
Connect the other end of the cable to a USB power adapter and plug it into an outlet. If you do
not have a USB power adapter, you may use a USB charging port.
Be patient as the Doorbell powers up. Listen for the audio message “Doorbell is in Pairing
Mode.” The Doorbells LEDs turn white and spin in a clockwise direction when the Doorbell is in
Pairing Mode.
Continue charging until it is time to install the Doorbell.
Doorbell is in
Pairing Mode.
NOTE: USB Power Adapter not included.
1
2
3
4
12
Chapter 2: Downloading Night Owl Protect
NOTE: Setup is the same for Smartphone and Tablet.
Create and verify your Night Owl Protect account. Log into the App.
If you're a First Time User, download Night Owl Protect from the App Store or Google Play
Store onto your Smart Device. If you already have an account skip to Step 3.1.
1
2
13
Chapter 3: Connecting the Doorbell to a Wi-Fi Router
NOTE: The Router’s security protocol MUST be set to WPA/WPA2 (strong security).
NOTE: The QR Code Setup is the recommended method to add your Doorbell to the App.
NOTE: To add the Doorbell using your network to discover it
or by using its UID number, tap on the appropriate selection
and follow the App’s onscreen step-by-step instructions.
3.1 Adding the Doorbell
3.2 Setup using the QR Code
1 2
Tap “Add New.”
Select “Doorbell”
from the device list.
Hover your Smart Device over the Doorbell’s QR Code until it is captured.
1
2
Once the QR Code is captured, tap the listed Doorbell and the App leads
you through the rest of the process.
14
3.3 Initial Firmware Update
If the pairing process is successful, your device looks for a rmware update. Once the rmware is up
to date, you can name the Doorbell. Tap “Live View to see the Doorbells video stream.
1 2 3
15
Chapter 4: Adding the Doorbell to a Wi-Fi NVR
4.1 Running the Startup Wizard
Add the Doorbell to a Wi-Fi NVR by running the Startup Wizard or using the Wi-Fi NVR’s menu.
Right-click on the Live View to access the menu. Click on the Startup Wizard icon.
Navigate through the Startup Wizard until you reach the Power On screen, and if you have
not already done so, plug the Doorbell in using the included USB cable.
1
2
NOTE: Keep the Doorbell connected to a power source until you are ready to install it.
16
Doorbell is in
Pairing Mode.
Make sure the Doorbell is in Pairing Mode before clicking “Start.” The Doorbell’s voice
prompt says, “Doorbell is in Pairing Mode” and the indicator light turns white and spins
clockwise rapidly.
Once the Doorbell is in Pairing Mode, click “Start.” The Wi-Fi NVR searches for the
Doorbell. If the Doorbell is found, it shows up on the list as DB-WNIP2-SU with a status
of “Connect Success.”
If the Doorbell is not in Pairing Mode:
Press and hold the reset button until you hear “Please be patient, as Doorbell
restores its factory settings”
The Doorbell’s voice prompt then says, “Doorbell is ready for use” and “Doorbell is
in Pairing Mode”
3
5
4
A
B
17
Next, confirm you see the Doorbell’s Live View. If so, click “Continue” to complete the
Startup Wizard. If not, make sure the Doorbell is in Pairing Mode and click “Search again.”
6
4.2 Pairing the Doorbell Using the Wi-Fi NVR’s Menu
Doorbell is in
Pairing Mode.
Power on the Doorbell and wait for it to enter Pairing Mode. The Doorbell’s voice prompt says,
“Doorbell is in Pairing Mode” and the indicator light turns white and spins clockwise rapidly.
Right-click on the Live View to access the menu.
1
3
If the Doorbell is not in Pairing Mode:
Press and hold the reset button until you hear “Please be patient, as Doorbell
restores its factory settings”
The Doorbell’s voice prompt then says, “Doorbell is ready for use” and “Doorbell is
in Pairing Mode”
2
NOTE: The Wi-Fi NVR menu refers to the Doorbell as a camera.
A
B
18
Click on the Menu icon:
Navigate to the Camera Menu and click on the Add Camera tab
The top portion of the screen lists cameras that have been found but not yet paired
The bottom portion of the screen shows all cameras that are currently paired to the Wi-Fi NVR
4
A
B
C
Click on (A) “Wireless Add.” The Wi-Fi NVR searches for the Doorbell. The Doorbell does
not appear in the (B) bottom portion of the screen with the other cameras until the Wi-Fi
NVR pairs to the Doorbell.
5
A
B
A
B
C
19
Within the Wireless Add screen, the “Number of Cameras Connected” signifies those cameras
that are already paired to the Wi-Fi NVR and will not immediately reflect the Doorbell.
If you have not exceeded the channel limitation, the Doorbell appears in a vacant video field
once paired. The Doorbell will show up on the list as DB-WNIP2-SU.
6
7
NOTE: You cannot exceed the number of Wi-Fi NVR channels you have. If you have a
10-channel system, the maximum number of devices you can have paired is 10.
20
Chapter 5: Doorbell Installation
TURN OFF THE POWER AT THE BREAKER
BEFORE TOUCHING ANY WIRES!
Remove the old Doorbell.
Place the Doorbell on the wall or use the
provided mounting template to mark the
positioning for the new holes.
For stucco, brick, or concrete, make the new
holes using a 15/64 drill bit and insert the
provided plastic anchors into the holes. For
wood or siding, use a 3/64 drill bit and save
the wall anchors for another project.
1
2
3
4
OFF
OR
  • Page 1 1
  • Page 2 2
  • Page 3 3
  • Page 4 4
  • Page 5 5
  • Page 6 6
  • Page 7 7
  • Page 8 8
  • Page 9 9
  • Page 10 10
  • Page 11 11
  • Page 12 12
  • Page 13 13
  • Page 14 14
  • Page 15 15
  • Page 16 16
  • Page 17 17
  • Page 18 18
  • Page 19 19
  • Page 20 20
  • Page 21 21
  • Page 22 22
  • Page 23 23
  • Page 24 24
  • Page 25 25
  • Page 26 26
  • Page 27 27
  • Page 28 28
  • Page 29 29
  • Page 30 30
  • Page 31 31
  • Page 32 32
  • Page 33 33
  • Page 34 34
  • Page 35 35
  • Page 36 36
  • Page 37 37
  • Page 38 38
  • Page 39 39
  • Page 40 40
  • Page 41 41
  • Page 42 42
  • Page 43 43
  • Page 44 44
  • Page 45 45

NIGHT OWL DB-WNIP2-SU Owner's manual

Type
Owner's manual
This manual is also suitable for

Ask a question and I''ll find the answer in the document

Finding information in a document is now easier with AI