Page is loading ...

SERIES 70
TUNNEL DAMPER MODEL ELECTRIC ACTUATOR
OPERATION AND MAINTENANCE MANUAL


BRAY Series 70 Tunnel Damper Electric Actuator
Operation and Maintenance Manual
1
Table of Contents
Safety Instructions - Definition of Terms . . . . . . . . . . . . . . . . . . . . . . . . . . . . . . . . . . . . . .2
1.1 Hazard-free use . . . . . . . . . . . . . . . . . . . . . . . . . . . . . . . . . . . . . . . . . . . . . . .2
1.2 Qualified Personnel . . . . . . . . . . . . . . . . . . . . . . . . . . . . . . . . . . . . . . . . . . . . .2
Introduction . . . . . . . . . . . . . . . . . . . . . . . . . . . . . . . . . . . . . . . . . . . . . . . . . . . . .3
Principle Of Operation . . . . . . . . . . . . . . . . . . . . . . . . . . . . . . . . . . . . . . . . . . . . .3
Electrical Operation. . . . . . . . . . . . . . . . . . . . . . . . . . . . . . . . . . . . . . . . . . . . . . .3
Mechanical Operation . . . . . . . . . . . . . . . . . . . . . . . . . . . . . . . . . . . . . . . . . . . . .3
CW vs CCW . . . . . . . . . . . . . . . . . . . . . . . . . . . . . . . . . . . . . . . . . . . . . . . . . . .3
Elevated Temperature Ratings . . . . . . . . . . . . . . . . . . . . . . . . . . . . . . . . . . . . . . . . .3
Manual Override Operation (Declutchable) . . . . . . . . . . . . . . . . . . . . . . . . . . . . . . . . . .4
Pre-Installation Storage. . . . . . . . . . . . . . . . . . . . . . . . . . . . . . . . . . . . . . . . . . . . .4
Installation. . . . . . . . . . . . . . . . . . . . . . . . . . . . . . . . . . . . . . . . . . . . . . . . . . . . . .4
Mounting to a Valve . . . . . . . . . . . . . . . . . . . . . . . . . . . . . . . . . . . . . . . . . . . . . .4
Field Wiring . . . . . . . . . . . . . . . . . . . . . . . . . . . . . . . . . . . . . . . . . . . . . . . . . . .4
Travel Limit Switch and Mechanical Travel Stop Adjustment . . . . . . . . . . . . . . . . . . . . . . . . .5
Clockwise Travel Switch adjustment . . . . . . . . . . . . . . . . . . . . . . . . . . . . . . . . . . . . . .5
Counter-Clockwise Travel Switch adjustment . . . . . . . . . . . . . . . . . . . . . . . . . . . . . . . . .6
Heater . . . . . . . . . . . . . . . . . . . . . . . . . . . . . . . . . . . . . . . . . . . . . . . . . . . . . .6
Typical Wiring Diagrams . . . . . . . . . . . . . . . . . . . . . . . . . . . . . . . . . . . . . . . . . . . .7
Disassembly and Assembly . . . . . . . . . . . . . . . . . . . . . . . . . . . . . . . . . . . . . . . . . . . . .8
Appendix A - Basic Tools . . . . . . . . . . . . . . . . . . . . . . . . . . . . . . . . . . . . . . . . . . . . . .9
Appendix B - Actuator Troubleshooting Chart . . . . . . . . . . . . . . . . . . . . . . . . . . . . . . . . . .9
Exploded View Series 70 Tunnel Damper Model Housing Size 12 . . . . . . . . . . . . . . . . . . . . . . . 10
Exploded View Series 70 Tunnel Damper Model Housing Size 30 . . . . . . . . . . . . . . . . . . . . . . . 11

BRAY Series 70 Tunnel Damper Electric Actuator
Operation and Maintenance Manual
2
1.1 HAZARD-FREE USE
This device left the factory in proper condition to be safely
installed and operated in a hazard-free manner. The notes
and warnings in this document must be observed by the
user if this safe condition is to be maintained and hazard-
free operation of the device assured.
Take all necessary precautions to prevent damage to the
actuator due to rough handling, impact, or improper
storage. Do not use abrasive compounds to clean the
actuator, or scrape metal surfaces with any objects.
The control systems in which the actuator is installed must
have proper safeguards to prevent injury to personnel, or
damage to equipment, should failure of system components
occur.
1.2 QUALIFIED PERSONNEL
A qualified person in terms of this document is one who
is familiar with the installation, commissioning and opera-
tion of the device and who has appropriate qualifications,
such as:
• Is trained in the operation and maintenance of electric
equipment and systems in accordance with established
safety practices
• Is trained or authorized to energize, de-energize,
ground, tag and lock electrical circuits and equipment
in accordance with established safety practices
• Is trained in the proper use and care of personal
protective equipment (PPE) in accordance with
established safety practices
• Is trained in first aid
• In cases where the device is installed in a potentially
explosive (hazardous) location – is trained in the
operation, commissioning, operation and maintenance
of equipment in hazardous locations
!
WARNING
The actuator must only be installed, commissioned,
operated and repaired by qualified personnel.
The device generates large mechanical force during
normal operation.
All installation, commissioning, operation and
maintenance must be performed under strict observation
of all applicable codes, standards and safety regulations.
Reference is specifically made here to observe all
applicable safety regulations for actuators installed in
potentially explosive (hazardous) locations.
SAFETY INSTRUCTIONS - DEFINITION OF TERMS
READ AND FOLLOW THESE INSTRUCTIONS
SAVE THESE INSTRUCTIONS
WARNING indicates a potentially hazardous situation which, if not avoided, could re-
sult in death or serious injury.
CAUTION indicates a potentially hazardous situation which, if not avoided, may result
in minor or moderate injury.
NOTICE
used without the safety alert symbol indicates a potential situation which, if
not avoided, may result in an undesirable result or state, including property
damage.
!
!
!

BRAY Series 70 Tunnel Damper Electric Actuator
Operation and Maintenance Manual
3
INTRODUCTION
The Bray Series 70 Tunnel Damper Electric Actuator is a
quarter turn electric actuator with manual override for use
on any quarter turn valve requiring up to 5000 in.lb of torque.
Operating speeds vary between 15 to 18 seconds.
PRINCIPLE OF OPERATION
The Series 70 Tunnel Damper electric actuator is divided
into two internal sections; the power center below the
switchplate, and the control center above the switchplate.
Below the switchplate the capacitor and gearmotor, with
its spur geartrain, drive a non-backdriveable worm gear
output. The override mechanism for manual operation
is also housed here. Above the switchplate is where user
required, readily accessible components are placed. The
camshaft assembly, limit switches, terminal strips, and
heater are all placed here for easy access. External to the
unit are adjustable mechanical travel stops, the unique
manual override handwheel, and dual conduit entry ports.
The external coating is a high quality polyester powder coat
which has exceptional UV as well as chemical resistance.
ELECTRICAL OPERATION
The motors used in the Bray Series 70 Tunnel Damper elec-
tric actuator are permanent induction split capacitor design
(single phase AC power). Travel limit switches are mechanical
form ZZ(DPDT-DB) with contacts rated at 10 amp (0.8 PF),
1/2 HP 125/250 VAC. In cases where the torque capacity of
the unit is exceeded to the point where the motor stalls and
overheats, a thermal protector switch built into the motor
windings will automatically disconnect the motor power.
Once the motor cools sufficiently the thermal protector
switch will reset.
MECHANICAL OPERATION
Mechanically, the ratio of the gear motor determines the
speed of the unit. The gear motor utilizes high efficiency
spur gears. Initial gear reduction through the spur gears is
then transferred to the worm shaft. The final gear reduction
and output is through a non-backdriveable worm gear set.
Positioning is determined by an indicator-cam shaft linked to
the output shaft. In the declutchable condition the manual
override drives the worm shaft when engaged.
CW VS CCW
Due to the fact that the Series 70 is a rotary actuator, there are
two directions that it can turn to actuate a device: clockwise
and counter-clockwise. Depending on the application the
actuator is going into, and the physical constraints that
application presents, it may be preferential to designate
which direction the actuator turns to open and close. This
is accomplished with the /Z designator, which assigns the
open direction of the actuator: CW for clockwise and CCW
for counter-clockwise. This can be easily determined locally
by looking at which direction the open arrow is pointing
on the actuator hand wheel, and should be kept in mind
when mounting the actuator to the device. To ensure proper
function, the direction of travel should always align with
the arrows on the hand wheel and the /Z designator in
actuator part number.
ELEVATED TEMPERATURE RATINGS
The Series 70 actuator is certified to meet NEMA type 4/4x
specifications. The actuator utilizes a thermally protected,
permanent split-capacitor (PSC) motor coupled to a gear
train, allowing operation after experiencing elevated
ambient temperatures. It has been tested to and complies
with NYCTA Master Specification 15ID dated 7/16/12 –
Dampers and Accessories for Tunnel Ventilation and Station
Smoke Management, certifying it for use after soaking at
an elevated ambient temperature of up to 302°F (150°C)
for a minimum of 1 hour without the use of an insulated
thermal blanket.
Part NumberiNg SyStem refereNce chart
SerieS torque code SPeed Product Style Voltage trim dir
70 AAA W 113 X Y 536 /Z
houSiNg
Size Part Number torque
(In.Lbs)
SPeed, ¼ turN
(Seconds)
SuPPly
(Voltage)
12 70-0122-113E0-536 1200 15 120 VAC
12 70-0202-113E0-536 2000 15 120 VAC
30 70-0302-113E0-536 3000 18 120 VAC
30 70-0502-113E0-536 5000 18 120 VAC
Use this chart as a guide to interpret the S70 Tunnel Damper electric actuator part number.
W - DESIGNATES THE SPEED
215/18 seconds
X - DESIGNATES STYLE
EBasic Unit - Declutchable
Y - DESIGNATES THE VOLTAGE
0120VAC
/Z - DESIGNATES DIRECTION OF OPEN TRAVEL
/CW Clockwise
/CCW Counter-Clockwise

BRAY Series 70 Tunnel Damper Electric Actuator
Operation and Maintenance Manual
4
MANUAL OVERRIDE OPERATION
(DECLUTCHABLE)
The manual override operates similar to a watch adjusting
knob. To engage the manual override, simply pull the hand-
wheel to its outermost position. A yellow stripe is revealed
for visual indication that the unit cannot run electrically.
The two handwheel positions, engaged and disengaged,
are held in place with the use of spring plungers. The hand-
wheel remains in position until physically moved. Rotating
the handwheel in the clockwise direction will rotate the
output shaft in the same clockwise direction and vice-versa.
!
CAUTION
A label on the handwheel hub warns users not to exceed
a specific rim pull force, for each size of actuator. If the
rim pull force is exceeded, the roll pin securing the hand-
wheel onto the manual override shaft is designed to shear,
thus preventing more serious internal gearing damage.
PRE-INSTALLATION STORAGE
Actuators are not weatherproof until properly installed
on the valve or prepared for storage. Bray cannot accept
responsibility for deterioration caused on-site once the
cover is removed.
!
NOTICE
Units are shipped with two metal screw-in plugs to pre-
vent foreign matter from entering the unit. To prevent
condensation from forming inside these units, maintain
a near constant external temperature and store in a well-
ventilated, clean, dry room away from vibration.
Power should be supplied to the heater via conduit entry
and appropriate sealing gland.
Store units on a shelf or wooden pallet in order to protect
against floor dampness.
Keep units covered to protect against dust and dirt.
INSTALLATION
MOUNTING TO A VALVE
All Bray Series 70 electric actuators are suitable for direct
mounting on Bray butterfly valves. With proper mounting
hardware, the S70 actuator can be installed onto other
quarter-turn valves or devices, such as a damper.
!
NOTICE
The standard mounting position for the actuator is to
orient the unit with its handwheel in a vertical plane and
parallel to the pipeline. If the actuator is to be mounted
on a vertical pipe, it is recommended that the unit be
positioned with the conduit entries on the bottom to
prevent condensation from entering the actuator by
way of the conduit. In all cases, the conduit should be
positioned to prevent drainage into the actuator.
The actuator should be mounted to the valve as follows:
1. Manually operate the actuator until the output shaft
of the actuator is in line with the valve stem. If pos-
sible, select an intermediate position (i.e. valve disc/
stem and actuator both half open).
2. Place the proper adapter, if required, onto the valve
stem. It is recommended that a small amount of grease
be applied to the adapter to ease assembly.
3. Mount the actuator onto the valve stem. It may be
necessary to swing or manually override the actuator
to align the bolt patterns.
4. Install the furnished mounting studs by threading them
all the way into the actuator base.
5. Fasten in place with the furnished hex nuts and lock
washers.
FIELD WIRING
!
WARNING
Turn off all power and lock out service panel before
installing or modifying any electrical wiring.
Each actuator is provided with two (2) conduit entries (one
for power and one for control).
1. The motor full load current is noted on the nameplate
of the actuator. The terminal strip will accept wire
sizes ranging from 14 to 22 AWG.
!
NOTICE
18 AWG minimum wire is recommended for all field
wiring.
Note that heaters use approximately 0.5 amps at 110 volts.
2. All actuators have their applicable wiring diagram
attached to the inside of the cover. Field wiring
should be terminated at the actuator terminal strip
in accordance with this wiring diagram.

BRAY Series 70 Tunnel Damper Electric Actuator
Operation and Maintenance Manual
5
!
NOTICE
The conduit connections must be properly sealed to main-
tain the weatherproof integrity of the actuator enclosure.
!
CAUTION
Do not reverse motor instantaneously when it is still run-
ning. Reversing direction to actuator motor when it is
running can cause damage to motor, switches and gear-
ing. Directional control switching can be done by PLC in
20ms or by a small relay in 46ms. Therefore time delay
of 1s has to be incorporated into the control scheme to
avoid damage.
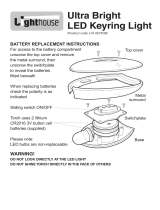
TRAVEL LIMIT SWITCH AND MECHANICAL
TRAVEL STOP ADJUSTMENT
!
CAUTION
The electrical travel switches must be set to activate
(depress) prior to reaching the mechanical travel stops.
The cams are color coded (green for CCW, red for CW).
NOTE: Manual travel stops are designed to prevent manual
overtravel from turning the handwheel, not to stop the
electric motor. The travel stops have an adjustment range
of approximately 10-degrees.
CLOCKWISE TRAVEL SWITCH ADJUSTMENT
1. Loosen the mechanical stop for the CW position and
back it off so that it does not interfere with actuator
travel (CW stop located on right when viewed from
travel stop side of actuator).
2. Reference the striker bar for damper position.
3. Manually operate the actuator handwheel clockwise
until the valve reaches the desired fully CW position.
4. Rotate the red adjusting knob by hand or with a flat
head screwdriver until the cam lobe just activates (de-
presses) the switch from a clockwise direction.
NOTICE: All actuators have a cam locking screw. Cam
locking screw must be slackened before cam adjust-
ments and re-tightened after cam adjustments.
NOTE: It is possible that the rotation of one cam will
move the other cam. If this occurs, hold the other
knobs or cams during adjustment.
5. With the travel switch in the CW position, rotate the
handwheel clockwise 1 turn for Housing Size 12 and
½ turn for Housing Size 30. Adjust the CW travel stop
bolt until it bottoms against the output gear and lock
it in position with the locknut.
6. After all travel switch adjustments have been com-
pleted, secure the actuator cover.
Striker Bar
UPPER GREEN
“CCW” CAM
LOWER RED
“CW” CAM
CAM ADJUSTMENT KNOB
(ONLY ADJUST IF LOCKING
SCREW IS SLACKENED)
POT DRIVE GEAR
“BLACK” NOT SHOWN
FOR CLARITY REASONS
CAM
LOCKING
SCREW

BRAY Series 70 Tunnel Damper Electric Actuator
Operation and Maintenance Manual
6
COUNTER-CLOCKWISE TRAVEL SWITCH
ADJUSTMENT
1. Loosen the mechanical stop for the CCW position and
back it off, so that it does not interfere with actua-
tor travel. The CCW stop is located on the left, when
viewed from travel stop side of actuator.
2. Reference the striker bar for damper position.
3. Manually operate the actuator handwheel counter-
clockwise until the valve reaches the desired CCW
position.
4. Rotate the green adjusting knob until the cam lobe
just activates (depresses) the switch from a counter-
clockwise direction.
NOTICE: All actuators have a cam locking screw. Cam
locking screw must be slackened before cam adjust-
ments and re-tightened after cam adjustments.
NOTE: It is possible that the rotation of one cam will
move the other cam. If this occurs, hold the other
knobs or cams during adjustment.
5. With the travel switch in the open position, rotate the
handwheel counterclockwise 1 turn for Housing Size
12 and ½ turn for Housing Size 30. Adjust the CCW
travel stop bolt until it bottoms against the output
gear and lock in position with the locknut.
6. After all travel stop adjustments have been completed,
secure the actuator cover.
HEATER
To prevent condensation from forming inside the actuator,
Bray offers a heater as standard in Series 70 Tunnel
Damper models. The heater is a PTC (Positive Temperature
Coefficient) style which has a unique temperature -
resistance characteristic. The heater self-regulates by
increasing its electrical resistance relative to its temperature.
The heater does not require external thermostats or
switches to control its heat output. It is constructed of
a polycrystalline ceramic, sandwiched between two
conductors, and wrapped inside a thermally conductive
electrical insulator.
Connect the heater wires to the terminal strip as indicated
on the wiring diagram.
NOTE: The heater must have a constant power supply to
be effective.
!
WARNING
The heater surface can reach temperatures in excess of
200 degrees Celsius (392°F)
Heater Kit Consists of:
1. Heater with flying leads
2. Heater Mounting Bracket
3. #10 pan head screw, Phillips drive
Tools required:
• For terminal wiring: Screwdriver, 1/4” tip flat blade
• For heater mounting screw: Screwdriver, No.1 Phillips
Installation procedure:
The heater is mounted through a hole provided in the
switchplate.
Before servicing unit, switch all power off at the service panel
and lock the service disconnecting means to prevent power
from being switched on accidentally. When the service discon-
necting means cannot be locked, securely fasten a prominent
warning device, such as a tag, to the service panel.
Disconnect all power to the unit.
1. Place the heater snugly into its mounting bracket until
approx. 1/2 to 1” is left above the bracket as shown
in diagram.
2. Slip the heater into its mounting hole.
3. Align the fastening hole in the bracket with the
threaded screw hole in the plate. Fasten the heater
to the switchplate.
4. Connect the heater wires to the terminal strip as
indicated on the wiring diagram.
A Division of BRAY INTERNATIONAL, Inc.
R
DECIMAL INCH
PRIMARY UNITS
11/11/2014
ERN-161731 GA-03075
DRAWING NO.
RELEASED
ERN
3
REV.
BUSA
DIVISION
2 OF 5
SHEET
THIRD ANGLE
CUSTOMER P.O. NO.
CUSTOMER PROJECT
CUSTOMER PROJECT NO.
CERTIFIED CORRECT BY
BUSA Jim Schmidt
11/11/2014
PRESSURE RATING
FLANGE DRILLING
BRAY ORDER NO.
CUSTOMER NAME
THE INFORMATION CONTAINED HEREIN
SHALL NOT BE COPIED, TRANSFERRED,
CONVEYED OR DISPLAYED IN ANY MANNER
THAT WOULD VIOLATE ITS PROPRIETARY
NATURE WITHOUT THE EXPRESS WRITTEN
PERMISSION OF BRAY INTERNATIONAL,INC.
BUSA Cindy Downey
SERIES 70, SIZE 30 - NYCTA MODEL
ELECTRIC ACTUATOR
ISOMETRIC EXPLODED VIEW

BRAY Series 70 Tunnel Damper Electric Actuator
Operation and Maintenance Manual
7
Wiring diagram for CW OPEN unit with form-ZZ (DPDT-DB) travel
switches. (Drawn for actuator in its fully open [CW] Condition.)
Wiring diagram for CCW Open Unit with form-ZZ (DPDT-DB) travel switches
(Drawn for actuator in its fully closed [CW] condition)
Field Wiring Actuator
Field Wiring Actuator
Note: Bray Series 70 Tunnel Damper electric actuator wiring is the same, regardless of
CW or CWW application. Control is achieved through field wiring.
TYPICAL WIRING DIAGRAMS

BRAY Series 70 Tunnel Damper Electric Actuator
Operation and Maintenance Manual
8
DISASSEMBLY AND ASSEMBLY
Tools required:
See Appendix A for a complete list of basic tools.
Procedure:
!
WARNING
Turn off all power and lock out service panel before
installing or modifying any electrical wiring.
1. Remove the switchplate by unscrewing the seven
Phillips head mounting screws. The switchplate should
lift out as an assembly with the camshaft attached.
2. Disconnect motor wires from the 3-terminal strip (motor
neutral, open, and close).
3. The switchplate can be independently disassembled.
4. To remove the Gearmotor, first disconnect the motor
leads which run to the capacitor, and unscrew the
mounting screws (four lower, one upper). The motor
can now be removed vertically out of the unit. Note:
do not misplace the alignment pin.
5. To remove the worm shaft spur gear, remove the spring
pin using a 3⁄32" punch, then slide the gear off the end
of the worm shaft for Housing Size 12 . Remove bowed
E-clip retainer for Housing Size 30.
6. To remove the output drive worm gear, back off both
mechanical travel stops. Remove the retaining ring
and thrust washer, then lift the output drive worm
gear out of its base.
7. The handwheel is held by a spring pin.
!
CAUTION
8. Further disassembly of the unit requires special tools and
procedures, and thus will not be covered in this manual.
NOTE: Assembly is
the opposite of removal
A Division of BRAY INTERNATIONAL, Inc.
R
DECIMAL INCH
PRIMARY UNITS
11/11/2014
ERN-161731 GA-03075
DRAWING NO.
RELEASED
ERN
3
REV.
BUSA
DIVISION
3 OF 5
SHEET
THIRD ANGLE
CUSTOMER P.O. NO.
CUSTOMER PROJECT
CUSTOMER PROJECT NO.
CERTIFIED CORRECT BY
BUSA Jim Schmidt
11/11/2014
PRESSURE RATING
FLANGE DRILLING
BRAY ORDER NO.
CUSTOMER NAME
THE INFORMATION CONTAINED HEREIN
SHALL NOT BE COPIED, TRANSFERRED,
CONVEYED OR DISPLAYED IN ANY MANNER
THAT WOULD VIOLATE ITS PROPRIETARY
NATURE WITHOUT THE EXPRESS WRITTEN
PERMISSION OF BRAY INTERNATIONAL,INC.
BUSA Cindy Downey
SERIES 70, SIZE 30 - NYCTA MODEL
ELECTRIC ACTUATOR
ISOMETRIC EXPLODED VIEW
A Division of BRAY INTERNATIONAL, Inc.
R
DECIMAL INCH
PRIMARY UNITS
11/11/2014
ERN-161731
GA-03075
DRAWING NO.
RELEASED
ERN
3
REV.
BUSA
DIVISION
4 OF 5
SHEET
THIRD ANGLE
CUSTOMER P.O. NO.
CUSTOMER PROJECT
CUSTOMER PROJECT NO.
CERTIFIED CORRECT BY
BUSA Jim Schmidt
11/11/2014
PRESSURE RATING
FLANGE DRILLING
BRAY ORDER NO.
CUSTOMER NAME
THE INFORMATION CONTAINED HEREIN
SHALL NOT BE COPIED, TRANSFERRED,
CONVEYED OR DISPLAYED IN ANY MANNER
THAT WOULD VIOLATE ITS PROPRIETARY
NATURE WITHOUT THE EXPRESS WRITTEN
PERMISSION OF BRAY INTERNATIONAL,INC.
BUSA Cindy Downey
SERIES 70, SIZE 30 - NYCTA MODEL
ELECTRIC ACTUATOR
ISOMETRIC EXPLODED VIEW
A Division of BRAY INTERNATIONAL, Inc.
R
DECIMAL INCH
PRIMARY UNITS
11/11/2014
ERN-161731 GA-03075
DRAWING NO.
RELEASED
ERN
3
REV.
BUSA
DIVISION
5 OF 5
SHEET
THIRD ANGLE
CUSTOMER P.O. NO.
CUSTOMER PROJECT
CUSTOMER PROJECT NO.
CERTIFIED CORRECT BY
BUSA Jim Schmidt
11/11/2014
PRESSURE RATING
FLANGE DRILLING
BRAY ORDER NO.
CUSTOMER NAME
THE INFORMATION CONTAINED HEREIN
SHALL NOT BE COPIED, TRANSFERRED,
CONVEYED OR DISPLAYED IN ANY MANNER
THAT WOULD VIOLATE ITS PROPRIETARY
NATURE WITHOUT THE EXPRESS WRITTEN
PERMISSION OF BRAY INTERNATIONAL,INC.
BUSA Cindy Downey
SERIES 70, SIZE 30 - NYCTA MODEL
ELECTRIC ACTUATOR
ISOMETRIC EXPLODED VIEW

BRAY Series 70 Tunnel Damper Electric Actuator
Operation and Maintenance Manual
9
APPENDIX A - BASIC TOOLS
Common To All Units
Terminal connections, cam adjustment
Screwdriver, 1/4” tip flat tip blade
All switches, terminal strip, torque switch plate
Screwdriver, No.1 Phillips
Switchplate screws, capacitor
Screwdriver, No.2 Phillips
Housing Size 12 Housing Size 30
Mounting nuts (small pattern) Wrench, 1/2”Mounting nuts, travel stop jam nuts Wrench, 3/4”
Mounting nuts (large pattern) Wrench, 3/4”Cover captivated capscrews Hex key, 3/8”
Cover captivated capscrews Hex key, 5/16”Travel stop adjusting studs Wrench, 3/4”
Travel stop adjusting bolts Wrench, 9/16”Motor mount socket head shoulder bolt Hex key, 5/32”
Travel stop nuts Wrench, 9/16”Motor mount socket head cap screws Hex key, 3/16”
Motor mount socket head capscrew Hex key, 5/32”Conduit Entry Plug Hex key, 9/16”
Conduit Entry Plug Hex key, 9/16”
APPENDIX B - ACTUATOR TROUBLESHOOTING CHART
Problem PoSSible cauSe SolutioNS
Actuator does not operate
Override is engaged Push handwheel in all the way
Wiring is incorrect Check wiring and power supply
Actuator motor has reached its thermal shutdown
temperature Allow time to cool
Actuator operates in reverse
directions Field wiring is reversed Rewire field wiring
Actuator does not fully close
damper (or open damper)
Limit switches are depressed Readjust travel limit switches
Mechanical travel stop is stopping actuator Adjust mechanical travel stops
Damper torque requirement is higher than actuator
output
Manually override out of seat, try angle seating or larger
actuator
Voltage power supply is low Check power source.
Engaging override handwheel
does not shut off motor
Override pin is corroded or damaged Clean and check for smooth operation of the override
switch pin
Override switch is damaged Replace switch
Disengaging override hand-
wheel does not restart motor
Not completely disengaged Push handwheel in as far as possible (no yellow showing)
Override pin is damaged or and does not activate
switch Replace override pin
Incorrect wiring of override switch Check wiring
Motor runs but worm and
gear segment do not
Worm gear segment is not meshing with worm Remove switchplate and inspect, adjust travel stops to
prevent gear disengaging
Pin/Key on Worm/Motor drive gear sheared Replace Pin/Key on drive gear
Corrosion inside unit Condensation forming Test heater wiring, should have constant power
Water leaking in Check all seals and possible water entry through conduit

BRAY Series 70 Tunnel Damper Electric Actuator
Operation and Maintenance Manual
10
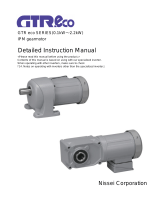
EXPLODED VIEW SERIES 70 TUNNEL DAMPER
MODEL HOUSING SIZE 12
ON / OFF
1 COVER PLATE WITH STUD
2 OIL RESISTANT GASKET
3 COVER FASTENING SCREW
4 COVER
5 O RING-S271
6 STEEL BACK PLATE
7 WASHER
8 HEX NUT,NYLOCK
9 INDICATOR SHAFT ASSY
10 CCW SWITCH LABEL
11 CW SWITCH LABEL
12 SWITCH MOUNTING SCREW
13 FIBER WASHER
14 SWITCH ASSY,CCW
15 SWITCH ASSY,CW
16 COVER PLATE
17 PAN HD SCREW
18 HEATER MOUNTING BRACKET
19 HEATER
20 WIRE ASSEMBLY
21 INSULATOR
22 O’RIDE SWITCH(SPDT FORM C)
23 SCREW, PAN HEAD
24 OVERRIDE SWITCH TRIGGER PIN
25 BUSHING
26 THRUST WASHER
27 RETAINING RING
28 OUTPUT WORM GEAR SEGMENT
29 O RING-S-128
30 CAPACITOR
31 TERMINAL STRIP
32 ARMACELL TUBING
33 OVERRIDE SPRING PIN
34 TRAVEL STOP BOLT
35 HEX NUT
36 NYLON FLAT WASHER
37 O RING
38 WORM SHAFT
39 OVERRIDE DRIVE PIN
40 SPRING PLUNGER
41 MANUAL OVERRIDE SHAFT
42 MANUAL OVERRIDE SLEEVE
43 O RING-S-126
44 O RING-S118
45 RETAINING RING
46 HAND WHEEL, CW TO OPEN
47 HANDWHEEL WARNING LABEL
48 HANDWHEEL CCW TO OPEN
49 PIN,SLOT SPRING 1/8”DIA
50 MANUAL OVERRIDE BUSHING
51 THRUST WASHER
52 THRUST ROLLER BEARING
53 THRUST WASHER
54 DISC SPRING
55 WORM
56 WORM GEAR ROLL PIN
57 RETAINING RING
58 THRUST WASHER
59 BASE
60 3/4”-14 NPT PLUG
61 NAME TAG
62 BUSHING
63 GEAR SPACER
64 DOWEL PIN
65 DRIVE GEAR
66 RETAINING RING
67 GEARMOTOR
68 LOCK WASHER
69 SOCKET HEAD CAP SCREW
70 CONDUIT WIRE DEFLECTOR
71 SWITCH PLATE
72 WASHER TERMINAL GROUND
73 GROUND SCREW
74 FLAT HEAD SCREW
75 TERMINAL STRIP TAG: 1 - 9
76 TERMINAL STRIP
77 SCREW
78 TERMINAL STRIP TAG: 10 - 18
79 RELAY KIT
80 SCREW, PAN HEAD
1
3
4
5
6
7
9
12
14
15
13
16
17
18
28
27
29
31
30
33 34
35
36
37
38 39 40 41 42
43 44 45
47
49 48
25 15 05
54
55
56
57
58
59
60
61
62
63
64
65
66
67
68
69
70
71
74
75
76
77
79
80 8
20
21
22
23
24
25
26
19
72
73
51 52
54
2
78
32
10
11
46
53
53
81

BRAY Series 70 Tunnel Damper Electric Actuator
Operation and Maintenance Manual
11
EXPLODED VIEW SERIES 70 TUNNEL DAMPER
MODEL HOUSING SIZE 30
ON / OFF
1 COVER FASTENING SCREW
2 COVER
3 O-RING
4 CAM ASSEMBLY
5 SWITCH MOUNTING SCREW
6 FIBER WASHER
7 SWITCH ASSY,CCW
8 SWITCH ASSY,CW
9 CW SWITCH LABEL
10 CCW SWITCH LABEL
11 SWITCH PLATE COVER
12 PAN HD SCREW
13 HEATER MOUNTING BRACKET
14 HEATER
15 WIRE ASSEMBLY
16 INSULATOR
17 O’RIDE SWITCH(SPDT FORM C)
18 SCREW, PAN HEAD
19 OVERRIDE SWITCH TRIGGER PIN
20 BUSHING
21 THRUST WASHER
22 RETAINING RING
23 OUTPUT WORM GEAR SEGMENT
24 O RIBG-S-232
25 CAPACITOR
26 TERMINAL STRIP
27 ARMACELL TUBING
28 OVERRIDE SPRING PIN
29 TRAVEL STOP BOLT
30 LOCK NUT
31 NYLON FLAT WASHER
32 O-RING
33 WORM SHAFT
34 OVERRIDE DRIVE PIN
35 SPRING PLUNGER
36 MANUAL OVERRIDE SHAFT
37 MANUAL OVERRIDE SLEEVE
38 O RING-S-126
39 O RING-S118
40 RETAINING RING, INTERNAL
41 HAND WHEEL, CW TO OPEN
42 HANDWHEEL WARNING LABEL
43 HAND WHEEL, CCW TO OPEN
44 PIN,SLOT SPRING 1/8”DIA
45 MANUAL OVERRIDE BUSHING
46 THRUST WASHER
47 THRUST ROLLER BEARING
48 THRUST WASHER
49 DISC SPRING
50 WORM
51 WORM GEAR ROLL PIN
52 RETAINING RING,EXT
53 THRUST WASHER
54 BASE
55 3/4”-14 NPT PLUG
56 NAME TAG
57 BUSHING
58 DRIVE GEAR KEY
59 DRIVE GEAR
60 RET RING, BOWED E-RING
61 GEARMOTOR
62 LOCK WASHER
63 SOCKET HEAD CAP SCREW
64 DOWEL PIN
65 SOCKET HEAD SHOULDER SCREW
66 WIRE ENTRY GUARD
67 SWITCH PLATE
68 WASHER,GROUND TERMINAL
69 GROUND SCREW
70 FLAT HEAD SCREW
71 TERMINAL STRIP TAG: 1 - 9
72 TERMINAL STRIP TAG: 10 - 18
73 TERMINAL STRIP
74 SCREW
75 RELAY KIT
76 SCREW, PAN HEAD
1
2
3
4
5
6
7
12
11
13
14
15
17
18
19
29
30
31
32
33 34 35 36 37 38 39 40
41
43 42
44
45
48 47 46
50
51
5253
54
55
60
59
58
57
56
61
62
63
64
65
66
67
72
73
74
76
8
46
47
48
49
49
68
69
70
71
9
10
75
16
21
22
23
24
25
26
27
28
20

BRAY Series 70 Tunnel Damper Electric Actuator
Operation and Maintenance Manual
12

BRAY Series 70 Tunnel Damper Electric Actuator
Operation and Maintenance Manual
13

A Division of BRAY INTERNATIONAL, Inc.
13333 Westland East Blvd. Houston, Texas 77041
281-894-5454 FAX 281/894-9499 www.bray.com
Bray® is a registered trademark of BRAY INTERNATIONAL, Inc.
© 2014 Bray International. All rights reserved. OM-70TD-001 11-2014
R
CONTROLS
/