Page is loading ...

IMPORTANT SAFEGUARDS
READ AND FOLLOW ALL SAFETY INSTRUCTIONS.
When using electrical equipment, basic safety precautions should always be followed including the following:
• DISCONNECT AC POWER SUPPLY BEFORE SERVICING.
• Installation and servicing of this equipment should be performed by qualified service personnel only.
• Ensure that the electrical wiring conforms to the National Electrical Code NEC® and local regulations
if applicable.
• To prevent early lamp failure, lamp should only be installed in operating environments ranging between -20°C
and +40°C (-4°F and +104°F).
• Do not mount near gas or electrical heaters.
• Equipment should be mounted in locations and at heights where it will not be readily subjected to tampering
by unauthorized personnel.
• The use of accessory equipment not recommended by the manufacturer may cause an unsafe condition.
• Any modification or use of non-original components will void the warranty and product liability.
• Do not use this equipment for other than intended use.
SAVE THESE INSTRUCTIONS!
Technical Support ■ (623) 580-8943 ■ [email protected]
BRK-8A Series
Installation Instructions
20070190 REV 1 - 09/22 1800-533-3948 www.barronltg.com

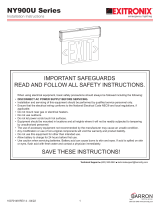
8” LED Recessed Kit Installation without Existing frame
1. Shut the power OFF to the fixture.
2. Cut a 7.75” diameter hole in the ceiling. (Fig. 1)
3. Fasten the LED kit MC cable (included) to the J-box. (Fig. 2)
4. Install the LED kit by lifting upward both retention tabs. Push the kit until it sits flush against the ceiling. (Fig. 3 & 4)
5.
Make electrical connections; see Electrical Connections section.
6. Turn the power ON.
Fig. 1 Fig. 2 Fig. 3
Fig. 4
BRK-8A Series
Installation Instructions
20070190 REV 1 - 09/22 2800-533-3948 www.barronltg.com

BRK-8A Series
Installation Instructions
20070190 REV 1 - 09/22 3 800-533-3948 www.barronltg.com
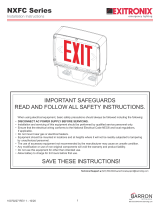
8” LED Recessed Kit Installation with Existing Frame
Note: Fixture J-box must be accessible through existing hole in the ceiling. The 8” LED Recessed Kit is designed to be
installed in a standard 8” mounting frame. LED Retrofit kit includes: 8” LED module (1), Conduit with connector (1), and
Wire nuts (5). Not all existing mounting frames will be compatible with the 8” LED. To ensure compatibility, a test
installation should be conducted.
1. Shut the power OFF to the fixture.
2. Remove the CFL, Incandescent or HID lamp. (Fig. 5)
3. Remove the reflector from the mounting frame. (Fig. 6)
4. Remove the socket assembly from the reflector. (Fig. 7)
5. Remove the J-Box metal plate with existing lamp ballast. Do not dispose. Disconnect all the wires from the ballast.
(Fig. 8)
6. Remove the J-Box from the existing lamp metal conduit (MC) cable. (Fig. 9)
7. Fasten the LED retrofit kit MC cable (included) to the J-Box. (Fig. 10)
Fig. 7
Fig. 5 Fig. 6
Fig. 10
Fig. 8 Fig. 9

BRK-8A Series
Installation Instructions
20070190 REV 1 - 09/22 4800-533-3948 www.barronltg.com
Electrical Connections (Fig. 14)
All electrical connections should be made inside the J-box. Make
electrical connection as follows:
120-277VAC
Black - 120-277VAC
White - Common
Green - Ground
If dimming is used:
Purple - Positive (+)
Gray - Negative (–)
Note: Cap unused leads to prevent shorting.
Fig. 14 – Wiring Diagram
Black Line
White Neutral
Green Ground
DIM+ Factory
Purple Connected to Sensor
DIM– Factory
Gray Connected to Sensor
8” LED Recessed Kit Installation with Existing Frame, Continued
8.
Make electrical connections; see Electrical Connections section. (Fig. 11 & 12)
9. Install the retrofit kit in the rough-in by lifting upward both retention tabs. Push the kit until it sits flush against the
ceiling. (Fig. 13)
10. Turn the power ON.
Fig. 13
Fig. 12
Fig. 11
/