Muratec MFX-3535 Quick Demo Guide
- Category
- Multifunctionals
- Type
- Quick Demo Guide
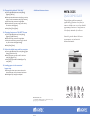
Muratec MFX-3535
The Muratec MFX-3535 is a multi-function printer that can copy, scan, fax, and print. It has a number of features that make it a great choice for businesses and home offices, including:
- Fast printing speeds: The MFX-3535 can print up to 35 pages per minute.
- High-quality printing: The MFX-3535 produces sharp, professional-looking prints.
- Versatile scanning: The MFX-3535 can scan documents to a variety of destinations, including email, USB drives, and network folders.

MFX-3535
Quick Demo GuiDe
This quick demo guide demonstrates the
popular MFX-3535 functions. Press [Reset] to
return to a default screen once you have finished
programming a function or to simply start over.
Select [Start] to initiate the job in all cases.
Visit and log in to the Muratec Webcenter
at www.muratec.com/webcenter for
additional information.
Additional features/notes
Muratec America, Inc.
3301 East Plano Parkway, Suite 100, Plano, Texas 75074
(469) 429-3300 • www.muratec.com
MK3262
13. Change/edit a default “Soft Key”
a. From the My MFP default screen, select [Setting],
[Register], [Soft Key].
b. Select the mode which contains the soft key you wish to
change. For this demonstration select [Copy Functions].
c. Select the soft key you want to change/replace.
d. Select the function you want to assign to the soft key.
For this demo, select [Bypass].
e. Select [Enter], [Close], [Reset].
14. Changing features on “My MFP” Screen
a. From the My MFP default screen, select [Setting],
[Register], [My MFP Shortcut].
b. Select the soft key you want to change/replace.
c. Select the new function you want to assign to the soft
key. For this demo select [Paper Settings].
d. Select [Enter], [Reset].
15. Select the default copy and fax cassettes
a. From the My MFP default screen, select [Setting], [Paper
Settings], [Select Print Cass].
b. Select the cassette you want to edit. For the demo
select [Fax], [Bypass Tray].
c. Select [On]/[Off] to enable and disable Bypass Tray,
select [Enter].
16. Loading paper in the cassettes/
bypass tray
a. Pull out paper drawer, press cassette down until it
latches. Place paper on top of cassette, close drawer.
b. Unfold bypass tray, load paper as depicted.

1. Make a copy (from ADF or glass)
a. Place document in the ADF, from the Copy default
screen press [Start].
b. Open the platen cover and set document on the glass.
Close the platen cover, from the Copy default screen
press [Start].
2. Make a duplex copy
a. Place a two-page document in the ADF.
b. From the Copy default screen, select [Duplex Copy].
c. Select [1:2 sided], select [Enter].
d Press [Start].
3. Card Copy mode
a. Open the platen cover and set the card or check-sized
object(s) on the glass according to the orientation guide
shown at the top of the platen glass.
b. From the Copy default screen select [Card Copy],
select the preferred card or check copy mode, select
[Enter].
c. Press [Start]. The machine will scan the first side and
then prompt you to scan the next document.
d. Flip the card(s)/check(s) over, select [Next Doc]. The
machine will scan the second side of the card and print
the document.
e. Select [Complete] to close the job.
4. Scan to email
(Send a hard-copy document to an email inbox)
a. Place document in the ADF.
b. From the scanner default screen, select [Advanced].
c. Select [Mail Address] to manually enter an email
address, enter the destination email address using the
QWERTY keyboard.
d. Select [Enter], [Close], press [Start].
5. Customizing a scan to email
(Subject line, message text)
*Please note that the email template setting must be
turned off via OfficeBridge
TM
; MachineSettings>Machine
Default Settings>E-Mail Settings>E-Mail Template>Off
a. From the Scanner default screen, select [Advanced],
[E-mail Subject].
b. Select [Subject] and use the QWERTY keyboard to enter
subject text, select [Enter].
c. Select [Mail Text] and use the QWERTY keyboard to
enter a message, select [Enter].
d. Select [Enter], [Close].
6. Scan to file (PC)
a. From the Scanner default screen select the PC/USB tab,
then [Folder].
b. Select [Browse].
c. Select the desired network.
d. Select the desired workstation.
e. If username and password are required for login, select
[User Name]; otherwise skip to step (h).
f. Type in username, select [Enter].
g. Select [Password], type in the password, select [Enter].
h. Select the desired folder, select [Enter], press [Start].
7. Change the file name
(Name of the document being scanned)
a. From the scanner default screen, select [Advanced].
b. Select [File Name], enter text using QWERTY keyboard
c. Select [Enter], [Close].
8. Scan to a USB flash drive
a. Place document in the ADF.
b. Insert a USB drive into the slot on the right side of the
user interface panel, select [Scan to USB] from the
pop-up menu.
c. Press [Start].
9. Sending a fax
a. From the Fax default screen, place a document in the
ADF.
b. Enter the desired fax number, press [Start].
10. Broadcasting to email and/or
fax locations
a. Place document in the ADF.
b. From the fax or scanner default screen, select
[Advanced], touch [Next] to go to page 2 of 3.
c. Scroll to [Broadcast], select [ON], [Enter], [Close].
d. Choose each email address from the address book,
press [Start].
11. Adding a cover page to the
fax transmission
a. From the fax default screen, select [Advanced],
[Cover Page], [On].
b. Select which template to use, [Enter].
12. Registering an address book location
(Each key can hold a fax number and email address)
a. From the My MFP default screen, select [Setting],
[Register], [Address Book Entry], [Edit/Delete].
b. Select the open slot for the new contact, enter the
contact’s name using the QWERTY keyboard, select
[Enter].
c. Select [Fax No.], type in the contact’s fax number using
the keypad to the right, select [Enter].
d. Select [E-mail], type in the contact’s email address using
the QWERTY keyboard, select [Enter], [Enter].
Continued
BUSINESS-CLASS DOCUMENT SOLUTIONS
MFX-3535 Quick Demo GuiDe
-
 1
1
-
 2
2


Muratec MFX-3535 Quick Demo Guide
- Category
- Multifunctionals
- Type
- Quick Demo Guide
Muratec MFX-3535
The Muratec MFX-3535 is a multi-function printer that can copy, scan, fax, and print. It has a number of features that make it a great choice for businesses and home offices, including:
- Fast printing speeds: The MFX-3535 can print up to 35 pages per minute.
- High-quality printing: The MFX-3535 produces sharp, professional-looking prints.
- Versatile scanning: The MFX-3535 can scan documents to a variety of destinations, including email, USB drives, and network folders.
Ask a question and I''ll find the answer in the document
Finding information in a document is now easier with AI
Related papers
-
Muratec MFX-C2700 User manual
-
-
321 Studios MFX- 1430 User manual
-
-
-
-
-
 Anhui Sun Create electronic MFX-C3035 User manual
-
-
Muratec F-305 User manual

