Muratec Printer MFX-3050 User manual
- Category
- Laser/LED printers
- Type
- User manual
This manual is also suitable for


© 2006 Muratec America, Inc. All rights reserved.
This manual is provided for information purposes only. All information included herein is subject to change without notice. Samsung Electronics is not
responsible for any direct or indirect damages, arising from or related to use of this manual.
• MFX-3050 is a model name of Muratec America, Inc..
• Muratec and the Muratec logo are trademarks of Muratec America, Inc.
• Centronics is a trademark of Centronics Data Computer Corporation.
• PCL and PCL 6 are trademarks of Hewlett-Packard company.
• Microsoft, Windows, Windows 98, Windows Me, Windows 2000, Windows NT 4.0, Windows XP, and Windows 2003 are registered trademarks of
Microsoft Corporation.
• PostScript 3 is a trademark of Adobe System, Inc.
• UFST® and MicroType™ are registered trademarks of Monotype Imaging Inc.
• TrueType, LaserWriter and Macintosh are trademarks of Apple Computer, Inc.
• All other brand or product names are trademarks of their respective companies or organizations.

CONTENTS
1. Introduction
Special features ...................................................................................................................................................... 1.1
Printer overview ...................................................................................................................................................... 1.2
Understanding the Status LED ............................................................................................................................... 1.5
Finding more information ........................................................................................................................................ 1.5
Selecting a location ................................................................................................................................................. 1.6
2. System setup
Menu overview ........................................................................................................................................................ 2.1
Changing the display language ............................................................................................................................... 2.2
Setting the date and time ........................................................................................................................................ 2.2
Changing the default mode .................................................................................................................................... 2.2
Setting sounds ........................................................................................................................................................ 2.3
Entering characters using the number keypad ........................................................................................................ 2.3
Using the save modes ............................................................................................................................................. 2.4
Setting print job timeout .......................................................................................................................................... 2.4
3. Software overview
Supplied software .................................................................................................................................................... 3.1
Printer driver features .............................................................................................................................................. 3.2
System requirements .............................................................................................................................................. 3.2
4. Network setup
Introduction ............................................................................................................................................................. 4.1
Supported operating systems ................................................................................................................................. 4.1
Configuring TCP/IP ................................................................................................................................................. 4.1
Configuring EtherTalk ............................................................................................................................................. 4.2
Configuring IPX frame types ................................................................................................................................... 4.2
Setting Ethernet speed ............................................................................................................................................ 4.3
Restoring the network configuration ........................................................................................................................ 4.3
Printing a network configuration page ..................................................................................................................... 4.3
5. Loading originals and print media
Loading originals ..................................................................................................................................................... 5.1
Selecting print media ............................................................................................................................................... 5.2
Loading paper ......................................................................................................................................................... 5.5
Setting the paper size and type ............................................................................................................................... 5.8
Selecting an output location .................................................................................................................................... 5.8
6. Copying
Selecting the paper tray .......................................................................................................................................... 6.1
Copying ................................................................................................................................................................... 6.1
Changing the settings for each copy ....................................................................................................................... 6.1
Changing the default copy settings ......................................................................................................................... 6.2
Using special copy features .................................................................................................................................... 6.2
Copying on both sides of paper .............................................................................................................................. 6.4
Setting copy timeout ................................................................................................................................................ 6.4

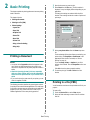
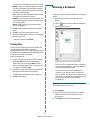
7. Basic printing
Printing a document ................................................................................................................................................ 7.1
Canceling a print job ............................................................................................................................................... 7.1
8. Scanning
Scanning basics ...................................................................................................................................................... 8.1
Scanning to an application using a local connection ............................................................................................... 8.1
Scanning using a network connection ..................................................................................................................... 8.2
Changing the settings for each scan job ................................................................................................................. 8.5
Changing the default scan settings ......................................................................................................................... 8.5
Setting up Address Book ......................................................................................................................................... 8.5
9. Faxing
Setting the fax header ............................................................................................................................................. 9.1
Adjusting the document settings ............................................................................................................................. 9.1
Sending a fax automatically .................................................................................................................................... 9.2
Sending a fax manually ........................................................................................................................................... 9.2
Confirming a transmission ....................................................................................................................................... 9.3
Automatic redialing .................................................................................................................................................. 9.3
Redialing the last number ....................................................................................................................................... 9.3
Selecting the paper tray .......................................................................................................................................... 9.3
Changing receiving modes ...................................................................................................................................... 9.3
Receiving automatically in Fax mode ..................................................................................................................... 9.4
Receiving manually in Tel mode ............................................................................................................................. 9.4
Receiving manually using an extension telephone ................................................................................................. 9.4
Receiving automatically in Ans/Fax mode .............................................................................................................. 9.4
Receiving faxes using DRPD mode ........................................................................................................................ 9.4
Receiving in secure receiving mode ....................................................................................................................... 9.5
Receiving faxes in memory ..................................................................................................................................... 9.5
Printing received faxes on both sides of paper ....................................................................................................... 9.6
Sending a fax to multiple destinations ..................................................................................................................... 9.6
Sending a delayed fax ............................................................................................................................................. 9.7
Sending a priority fax .............................................................................................................................................. 9.7
Forwarding faxes ..................................................................................................................................................... 9.8
10. Fax setup
Changing the fax setup options ............................................................................................................................. 10.1
Changing the default document settings ............................................................................................................... 10.2
Printing sent fax report automatically .................................................................................................................... 10.2
Setting up Phone Book ......................................................................................................................................... 10.2
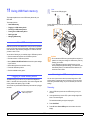
11. Using USB flash memory
About USB memory .............................................................................................................................................. 11.1
Plugging in a USB memory device ........................................................................................................................ 11.1
Scanning to a USB memory device ...................................................................................................................... 11.1
Printing from a USB memory device ..................................................................................................................... 11.2
Backing up data .................................................................................................................................................... 11.3
Managing USB memory ........................................................................................................................................ 11.3
12. Ordering supplies and accessories
Toner cartridges .................................................................................................................................................... 12.1
Accessories ........................................................................................................................................................... 12.1
How to purchase ................................................................................................................................................... 12.1

13. Maintenance
Printing reports ...................................................................................................................................................... 13.1
Cleaning your machine ......................................................................................................................................... 13.2
Maintaining the toner cartridge .............................................................................................................................. 13.3
Maintenance Parts ................................................................................................................................................ 13.6
Managing your machine from the website ............................................................................................................ 13.8
Checking the machine’s serial number ................................................................................................................. 13.8
14. Troubleshooting
Clearing document jams ....................................................................................................................................... 14.1
Clearing paper jams .............................................................................................................................................. 14.2
Understanding display messages ......................................................................................................................... 14.7
Toner cartridge-related messages ...................................................................................................................... 14.10
Solving other problems ....................................................................................................................................... 14.11
15. Installing accessories
Precautions when installing accessories ............................................................................................................... 15.1
Installing a memory DIMM .................................................................................................................................... 15.1
16. Specifications
General specifications ........................................................................................................................................... 16.1
Printer specifications ............................................................................................................................................. 16.1
Scanner and copier specifications ........................................................................................................................ 16.2
Facsimile specifications
......................................................................................................................................... 16.2
Index

i
Important Precautions and Safety Information
When using this machine, these basic safety precautions should always be followed to
reduce risk of fire, electric shock and injury to people:
1 Read and understand all instructions.
2 Use common sense whenever operating electrical appliances.
3 Follow all warnings and instructions marked on the machine and in the literature
accompanying the machine.
4 If an operating instruction appears to conflict with safety information, heed the
safety information. You may have misunderstood the operating instruction. If you
cannot resolve the conflict, contact your sales or service representative for
assistance.
5 Unplug the machine from the AC wall socket and/or telephone jack before
cleaning. Do not use liquid or aerosol cleaners. Use only a damp cloth for
cleaning.
6 Do not place the machine on an unstable cart, stand or table. It may fall, causing
serious damage.
7 Your machine should never be placed on, near or over a radiator, heater, air
conditioner or ventilation duct.
8 Do not allow anything to rest on the power. Do not locate your machine where the
cords will be abused by persons walking on them.
9 Do not overload wall outlets and extension cords. This can diminish performance,
and may result in the risk of fire or electric shock.
10 Do not allow pets to chew on the AC power, telephone or PC interface cords.
11 Never push objects of any kind into the machine through case or cabinet
openings. They may touch dangerous voltage points, creating a risk of fire or
shock. Never spill liquid of any kind onto or into the machine.
12 Your machine may have a heavy cover for optimal pressure on the document for
the best scanning and/or faxing (usually the flatbed-type machine). In this case,
replace the cover after placing document on the scan glass, by holding and
moving it down slowly until it seats on its location.
13 To reduce the risk of electric shock, do not disassemble the machine. Take it to a
qualified service technician when repair work is required. Opening or removing
covers may expose you to dangerous voltages or other risks. Incorrect reassembly
could cause electric shock when the unit is subsequently used.
14 Unplug the machine from the telephone jack, PC and AC wall outlet and refer
servicing to qualified service personnel under the following conditions:
• When any part of the power cord, plug or connecting cable is damaged or frayed.
• If liquid has been spilled into the machine.
• If the machine has been exposed to rain or water.
• If the machine does not operate properly after instructions have been followed.
• If the machine has been dropped, or the cabinet appears damaged.
• If the machine exhibits a sudden and distinct change in performance.
15 Adjust only those controls covered by the operating instructions. Improper
adjustment of other controls may result in damage, and may require extensive
work by a qualified service technician to restore the machine to normal operation.
16 Avoid using this machine during a lightning storm. There may be a remote risk of
electric shock from lightning. If possible, unplug the AC power and telephone cord
for the duration of the lightning storm.
17 The Power cord supplied with your machine should be used for safe operation. If
you are using a cord which is longer than 2 m with 110 V machine, then it should
be 16 AWG
1
or bigger.
18 Use only No.26 AWG
*
or larger telephone line cord.
19 SAVE THESE INSTRUCTIONS.
Laser Safety Statement
The printer is certified in the U.S. to conform to the requirements of DHHS 21 CFR,
chapter 1 Subchapter J for Class I(1) laser products, and elsewhere is certified as a
Class I laser product conforming to the requirements of IEC 825.
Class I laser products are not considered to be hazardous. The laser system and printer
are designed so there is never any human access to laser radiation above a Class I level
during normal operation, user maintenance or prescribed service condition.
WARNING
Never operate or service the printer with the protective cover removed from Laser/
Scanner assembly. The reflected beam, although invisible, can damage your eyes.
When using this product, these basic safety precautions should always be followed to
reduce risk of fire, electric shock, and injury to persons:
Ozone Safety
During normal operation, this machine produces ozone. The ozone
produced does not present a hazard to the operator. However, it is
advisable that the machine be operated in a well ventilated area.
If you need additional information about ozone, please request your
nearest Samsung dealer.
1 AWG: American Wire Gauge

ii
Mercury Safety
LAMP(S) INSIDE THIS PRODUCT CONTAIN MERCURY AND MUST BE
RECYCLED OR DISPOSED OF ACCORDING TO LOCAL, STATE OR
FEDERAL LAWS.
Power Saver
This printer contains advanced energy conservation technology that reduces power
consumption when it is not in active use.
When the printer does not receive data for an extended period of time, power
consumption is automatically lowered.
Recycling
Please recycle or dispose of the packaging material for this product
in an environmentally responsible manner.
Correct Disposal of This Product (Waste Electrical &
Electronic Equipment)
(Applicable in the European Union and other European countries with
separate collection systems)
This marking shown on the product or its literature, indicates that it
should not be disposed with other household wastes at the end of its
working life. To prevent possible harm to the environment or human
health from uncontrolled waste disposal, please separate this from
other types of wastes and recycle it responsibly to promote the
sustainable reuse of material resources.
Household users should contact either the retailer where they purchased this product,
or their local government office, for details of where and how they can take this item for
environmentally safe recycling.
Business users should contact their supplier and check the terms and conditions of the
purchase contract. This product should not be mixed with other commercial wastes for
disposal.
Radio Frequency Emissions
FCC Information to the User
This device complies with Part 15 of the FCC Rules. Operation is subject to the following
two conditions:
• This device may not cause harmful interference, and
• This device must accept any interference received, including interference that
may cause undesired operation.
This equipment has been tested and found to comply with the limits for a Class B digital
device, pursuant to Part 15 of the FCC Rules. These limits are designed to provide
reasonable protection against harmful interference in a residential installation. This
equipment generates, uses and can radiate radio frequency energy and, if not installed
and used in accordance with the instructions, may cause harmful interference to radio
communications. However, there is no guarantee that interference will not occur in a
particular installation. If this equipment does cause harmful interference to radio or
television reception, which can be determined by turning the equipment off and on, the
user is encouraged to try to correct the interference by one or more of the following
measures:
• Reorient or relocate the receiving antenna.
• Increase the separation between the equipment and receiver.
• Connect the equipment into an outlet on a circuit different from that to which the
receiver is connected.
• Consult the dealer or experienced radio TV technician for help.
C
AUTION
:
Change or modifications not expressly approved by the manufacturer
responsible for compliance could void the user's authority to operate the equipment.
Canadian Radio Interference Regulations
This digital apparatus does not exceed the Class B limits for radio noise emissions from
digital apparatus as set out in the interference-causing equipment standard entitled
“Digital Apparatus”, ICES-003 of the Industry and Science Canada.
Cet appareil numérique respecte les limites de bruits radioélectriques applicables aux
appareils numériques de Classe B prescrites dans la norme sur le matériel brouilleur:
“Appareils Numériques”, ICES-003 édictée par l’Industrie et Sciences Canada.
Fax Branding
The Telephone Consumer Protection Act of 1991 makes it unlawful for any person to
use a computer or other electronic device to send any message via a telephone
facsimile machine unless such message clearly contains in a margin at the top or bottom
of each transmitted page or on the first page of the transmission the following
information:
(1) the date and time of transmission
(2) identification of either business, business entity or individual sending the message;
and
(3) telephone number of either the sending machine, business, business entity or
individual.
The Telephone Company may make changes in its communications facilities,
equipment operations or procedures where such action is reasonably required in the
operation of its business and is not inconsistent with the rules and regulations in FCC
Part 68. If such changes can be reasonably expected to render any customer terminal
equipment incompatible with telephone company communications facilities, or require
modification or alteration of such terminal equipment, or otherwise materially affect its
use or performance, the customer shall be given adequate notice in writing, to allow the
customer an opportunity to maintain uninterrupted service.
Ringer Equivalence Number
The Ringer Equivalence Number and FCC Registration Number for this machine may
be found on the label located on the bottom or rear of the machine. In some instances
you may need to provide these numbers to the telephone company.
The Ringer Equivalence Number (REN) is a measure of the electrical load placed on the
telephone line, and is useful for determining whether you have “overloaded” the line.
Installing several types of equipment on the same telephone line may result in problems
making and receiving telephone calls, especially ringing when your line is called. The
sum of all Ringer Equivalence Numbers of the equipment on your telephone line should
be less than five in order to assure proper service from the telephone company. In some
cases, a sum of five may not be usable on your line. If any of your telephone equipment
is not operating properly, you should immediately remove it from your telephone line, as
it may cause harm to the telephone network.

iii
WARNING:
FCC Regulations state that changes or modifications to this equipment not expressly
approved by the manufacturer could void the user’s authority to operate this equipment.
In the event that terminal equipment causes harm to the telephone network, the
telephone company should notify the customer that service may be stopped. However,
where prior notice is impractical, the company may temporarily cease service, providing
that they:
a) promptly notify the customer.
b) give the customer an opportunity to correct the equipment problem.
c) inform the customer of the right to bring a complaint to the Federal Communication
Commission pursuant to procedures set out in FCC Rules and Regulations Subpart E
of Part 68.
You should also know that:
• Your machine is not designed to be connected to a digital PBX system.
• If you intend to use a computer modem or fax modem on the same phone line as
your machine, you may experience transmission and reception problems with all the
equipment. It is recommended that no other equipment, except for a regular
telephone, share the line with your machine.
• If your area experiences a high incidence of lightning or power surges, we
recommend that you install surge protectors for both the power and the telephone
lines. Surge protectors can be purchased from your dealer or telephone and
electronic specialty stores.
• When programming emergency numbers and/or making test calls to emergency
numbers, use a non-emergency number to advise the emergency service dispatcher
of your intentions. The dispatcher will give you further instructions on how to actually
test the emergency number.
• This machine may not be used on coin service or party lines.
• This machine provides magnetic coupling to hearing aids.
• You may safely connect this equipment to the telephone network by means of a
standard modular jack, USOC RJ-11C.
Declaration of Conformity (European Countries)
Approvals and Certifications
The CE marking applied to this product symbolizes Samsung
Electronics Co., Ltd. Declaration of Conformity with the following
applicable 93/68/EEC Directives of the European Union as of the
dates indicated:
January 1, 1995
: Council Directive 73/23/EEC Approximation of the laws of the
member states related to low voltage equipment.
January 1, 1996
: Council Directive 89/336/EEC (92/31/EEC), approximation of the laws
of the Member States related to electromagnetic compatibility.
March 9, 1999
: Council Directive 1999/5/EC on radio equipment and
telecommunications terminal equipment and the mutual recognition of their conformity.

1
2
3
4
5
7
6
9
8
11
10
12
A
Limited warranty
This warranty is made by Muratec America, Inc. (hereafter referred to as “Muratec”).
This warranty is valid only on Muratec products purchased and used in the United
States of America. This warranty applies to the product only while owned and used by
the original purchaser (“Customer”). If ownership of the product is transferred, this
warranty terminates. This warranty does not apply to any product in use for rental
purposes.
This Muratec product is warranted against defects in material and workmanship for
ninety (90) days commencing the date of original Customer purchase. If the product is
defective in material and/or workmanship (normal wear and tear excepted) during the
warranty period, Muratec or its authorized representative will, during Muratec’s estab-
lished service availability hours, make necessary adjustments and repairs, including, at
Muratec’s option, installation of replacement parts. Muratec’s service availability hours
are 8:30 am to 5:00 pm (Central time) Monday through Friday, excluding Muratec-rec-
ognized holidays. Muratec will complete the necessary adjustments and repairs within
a reasonable time period, as dictated by the nature of the problem and by Muratec’s
service schedule. Replacement parts may have been used and/or reconditioned. Parts
that have been replaced will remain the property of Muratec. This warranty is subject to
the obligations and exclusions set forth.
Obligations
1. This warranty will be honored only on presentation of the original dated autho-
rized Muratec bill of sale or Muratec dealer bill of sale or sales slip to an authorized
Muratec service representative or service center. For the name of your authorized
service center, contact Muratec (from the United States, call 1-469-429-3350; from
Canada, check your in-box materials for the number to call).
2. During the warranty period, the Customer must notify Muratec by telephone of any
defective product material and/or workmanship.
3. Transportation (including prepayment of freight and insurance charges) of the product
to and from an authorized service center, designated by Muratec, is the responsibility
of the Customer.
4. If Muratec provides maintenance or responds to a call which is outside the scope of
this warranty, such maintenance shall be billed to the Customer at Muratec’s then-
current rates for maintenance and parts and shall be due and payable in full upon
receipt of invoice.
Exclusions
1. This warranty shall not cover a product with missing or altered original identification
marks.
2. This warranty applies only to products that the purchaser has properly installed,
adjusted and operated in accordance with the instructions set forth in or provided
with product literature. This warranty does not apply to any product which has been
subjected to tampering, alteration, misuse, abuse, neglect, improper installation or
transportation damage. Nor does it apply to costs for any service requested for demon-
stration or to confirm proper operation of this product.
3. The warranty shall not apply to adjustments, repairs or replacements necessitated by
any cause beyond the control of Muratec (whether foreseeable or not) including, but
not limited to, any malfunction, defects or failure caused by or resulting from any of
the following: improper unpacking or installation, unauthorized service or parts, or
improper maintenance or cleaning, modification or repair by the Customer, accident
(including, without limitation, unavoidable accidents), fire, flood or other Acts of God,
improper telephone or electrical power or surges thereof, interconnection with or use of
non-compatible equipment or supplies (including paper), or placement of the product
in an area which does not conform to Muratec space, electrical and/or environmental
requirements.

4. Muratec will not be required to make adjustments, repairs or replacements if the prod-
uct is installed or used at a location deemed by Muratec to be hazardous to health or
safety, or if Muratec is not provided with free and reasonable access to the product and
a telephone during service availability hours, or if the product location is not acces-
sible by an authorized Muratec service vehicle.
EXCEPT AS EXPRESSLY SET FORTH ABOVE, AND EXCEPT TO THE EXTENT PROHIBITED BY APPLICABLE
LAW, MURATEC MAKES NO OTHER WARRANTIES, EXPRESS OR IMPLIED (INCLUDING, BUT NOT LIMITED
TO, ANY IMPLIED WARRANTIES OF MERCHANTABILITY OR FITNESS FOR A PARTICULAR PURPOSE, AND
ANY WARRANTY ARISING FROM COURSE OF DEALING OR USAGE OF TRADE), AND MURATEC EXPRESSLY
DISCLAIMS ALL WARRANTIES NOT STATED HEREIN. IN THE EVENT THE PRODUCT IS NOT FREE FROM
DEFECTS AS WARRANTED ABOVE, THE CUSTOMER’S SOLE REMEDY SHALL BE REPAIR OR REPLACEMENT
AS PROVIDED ABOVE. UNDER NO CIRCUMSTANCES SHALL MURATEC BE LIABLE TO THE CUSTOMER, OR TO
ANY USER, FOR ANY DAMAGES, INCLUDING ANY INCIDENTAL OR CONSEQUENTIAL DAMAGES, EXPENSES,
LOST PROFITS, LOST SAVINGS OR ANY OTHER DAMAGES ARISING OUT OF THE USE OR INABILITY TO USE
THE MURATEC PRODUCT, EVEN IF MURATEC OR ITS REPRESENTATIVES HAVE BEEN ADVISED OF THE POS-
SIBILITY OF SUCH DAMAGES.
Some States do not allow the exclusion or limitation of incidental or consequential dam-
ages, and some States do not allow limitations on how long an implied warranty lasts,
so the above limitations or exclusions may not apply to you. This warranty gives you
specific legal rights, and you may also have other rights which vary from State to State.

1.1 <
Introduction>
1 Introduction
Thank you for purchasing this Muratec multifunctional product. Your
machine provides printing, copying, scanning, and faxing
functions.
This chapter includes:
• Special features
• Printer overview
• Understanding the Status LED
• Finding more information
• Selecting a location
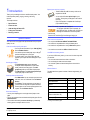
Special features
Your new machine is equipped with special features that improve print
quality. You can:
Print with excellent quality and speed
• You can print with a resolution of up to 1200 dpi [Best].
See the Software Section.
• Your machine prints A4-sized paper at up to 28 ppm
a
and letter-sized paper at up to 30 ppm.
• For duplex printing, your machine prints A4-sized
paper at up to 19 ipm
b
and letter-sized paper at up to
21 ipm.
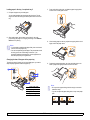
Handle paper flexibly
•The multi-purpose tray supports letterhead,
envelopes, labels, transparencies, custom-sized
media, postcards, and heavy paper. The multi-
purpose tray holds up to 50 sheets of plain paper.
•The 250-sheet tray 1 and 250-sheet optional tray 2
support plain paper in various sizes.
Create professional documents
•Print Watermarks. You can customize your documents
with words, such as “Confidential”. See the Software
Section.
•Print Posters. The text and pictures of each page of
your document are magnified and printed across the
sheet of paper and can then be taped together to form
a poster. See the Software Section.
Save time and money
• You can print multiple pages on one single sheet of paper to save
paper.
• You can use preprinted forms and letterhead with plain paper. See the
Software Section.
• This machine automatically conserves electricity by substantially
reducing power consumption when not in use.
250
250
Expand your machine’s capacity
* Zoran IPS Emulation compatible with PostScript 3
• © Copyright 1995-2005, Zoran Corporation. All
rights reserved. Zoran, the Zoran logo, IPS/PS3, and
OneImage are trademarks of Zoran Corporation.
* 136 PS3 fonts
Contains UFST and MicroType from Monotype Imaging Inc.
Print in various environments
• You can print with Windows 98/Me/NT 4.0/2000/XP/2003.
• Your machine is compatible with a variety of Linux systems.
• Your machine is compatible with a variety of Macintosh systems.
• Your machine comes with both USB and Parallel interfaces.
Use USB flash memory devices
If you have a USB memory device, you can use it in various ways with
your machine.
• You can scan documents and save them to the device.
• You can directly print data stored to the device.
• You can back up data and restore backup files to the machine’s
memory.
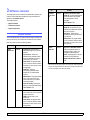
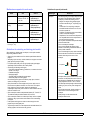
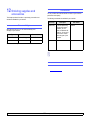
Machine features
The table below lists a general overview of features supported by your
machine.
• TheMFX-3050 has 96 MB of memory which can be
expanded to 320 MB.
• You can add a 250-sheet optional tray 2 to your
machine. This tray lets you add paper to the machine
less often.
• Zoran IPS Emulation* compatible with PostScript 3
(PS) enables PS printing.
MFX-3050 Features
IEEE 1284 Parallel
USB 2.0
USB Memory
PostScript Emulation
Network Interface
(Ethernet 10/100 Base TX)
Duplex printing
1
1. Printing on both sides of paper.
a. pages per minute
b. images per minute

1.2 <
Introduction>
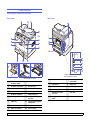
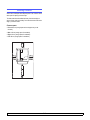
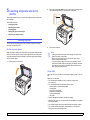
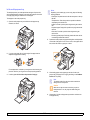
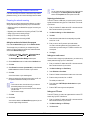
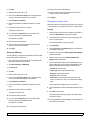
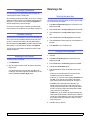
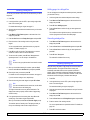
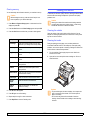
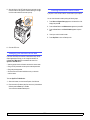
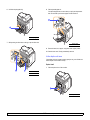
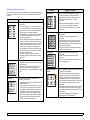
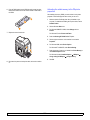
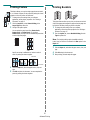
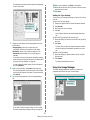
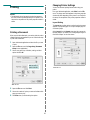
Printer overview
These are the main components of your machine:
Front view
1
ADF (automatic
document feeder)
1
1. Automatic document feeder is used as ADF in this user’s guide.
10
tray 1
2
document width guides
11
optional tray 2
3
document input tray
12
multi-purpose tray
4
scanner lid
13
output support
5
document output tray
14
USB memory port
6
control panel
15
multi-purpose tray
extension
7
output tray
16
multi-purpose tray paper
width guides
8
front cover
17
scanner glass
9
paper level indicator
18
toner cartridge
* The figure above shows an SCX-5530FN
with all available accessories.
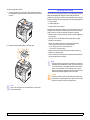
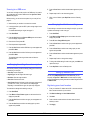
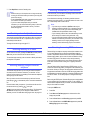
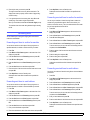
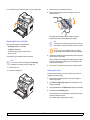
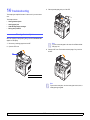
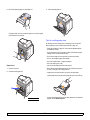
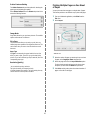
Rear view
1
control board cover
7
extension telephone
socket
(EXT)
2
network port
8
duplex unit
a
3
USB port
9
power receptacle
4
parallel port
10
power switch
5
optional tray 2 cable
connector
11
rear cover
6
telephone line socket
(LINE)
a
* The figure above shows an SCX-5530FN
with all available accessories.

1.3 <
Introduction>
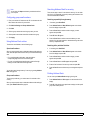
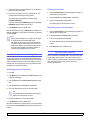
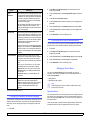
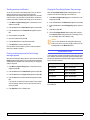
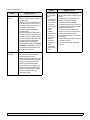
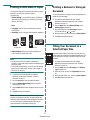
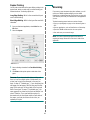
Control panel overview
MFX-3050
1
Speed buttons
: Allows you to store frequently-dialed fax numbers
and email addresses and enter them with the touch of a few
buttons.
13
Back
: Sends you back to the upper menu level.
2
Shift
: Allows you to shift the speed buttons to access numbers 16
through 30.
14
Status
: Shows the status of your machine. See page 1.5.
3
Address Book
: Allows you to store frequently used fax numbers in
memory or search for stored fax numbers or email addresses. Also
allows you to print an
Address Book
/
Phone Book
list.
15
Darkness
: Adjusts the document brightness for the current copy
job.
4
Resolution
: Adjusts the document resolution for the current fax job.
16
Original Type
: Selects the document type for the current copy job.
5
Redial/Pause
: In Standby mode, redials the last number, or in Edit
mode, inserts a pause into a fax number.
17
Reduce/Enlarge
: Makes a copy smaller or larger than the original.
6
Fax
: Activates Fax mode.
18
USB Print
: Allows you to directly print files stored on a USB
Memory device when it is inserted into the USB memory port on
the front of your machine.
7
Copy
: Activates Copy mode.
19
Duplex
: Allows you to print documents on both sides of the paper.
8
Scan/Email
: Activates Scan mode.
20
Toner Save
: Allows you to save on toner by using less toner in
printing.
9
Display
: Shows the current status and prompts during an operation.
21
Number keypad
: dials a number or enters alphanumeric characters.
10
Menu
: Enters Menu mode and scrolls through the available menus.
22
On Hook Dial
: Engages the telephone line.
11
Scroll buttons: Scroll through the options available in the selected
menu, and increase or decrease values.
23
Stop/Clear
: Stops an operation at any time. In Standby mode,
clears/cancels the copy options, such as the darkness, the
document type setting, the copy size, and the number of copies.
12
OK
: Confirms the selection on the screen.
24
Start
: Starts a job.

1.5 <
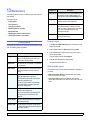
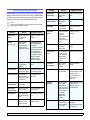
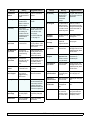
Introduction>
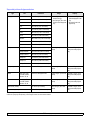
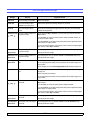
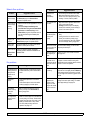
Understanding the Status LED
The Status LED on the control panel shows the status of your machine.
See the table below to know your machine’s status.
Status Description
Off • The machine is off-line.
• The machine is in Power Save mode. When
data is received, or any button is pressed, it
switches to on-line automatically.
Green On The machine is on-line and can be used.
Blinking • When the backlight slowly blinks, the machine
is receiving data from the computer.
• When the backlight fast blinks, the machine is
printing data.
Red On • The toner cartridge is totally exhausted.
Remove the old toner cartridge and install a
new one. See page 13.5.
• A paper jam has occurred. To solve the
problem, see page 14.2.
• The front cover is open. Close the front cover.
• There is no paper in the tray. Load paper in
the tray.
• The toner cartridge installed is not a genuine
cartridge, and you selected Stop at the
NonGenuine Toner prompt. See page 14.10.
• The lifespan of the toner cartridge is reached,
and you selected Stop at the Toner
Exhausted prompt. See page 14.10.
• The machine has stopped due to a major
error. Check the display message. See
page 14.7 for details on the meaning of the
error message.
Blinking • A minor error occurs and the machine is
waiting an error to be cleared. Check the
display message. When the problem is
cleared, the machine resumes.
• The toner cartridge installed is not a genuine
cartridge, and you selected Continue at the
NonGenuine Toner prompt. See page 14.10.
• The lifespan of the toner cartridge is reached,
and you selected Continue at the Toner
Exhausted prompt. See page 14.10.
• The toner cartridge is low. Order a new toner
cartridge. You can temporarily improve print
quality by redistributing the toner. See
page 13.4.
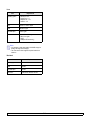
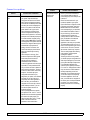
Finding more information
You can find information for setting up and using your machine from the
following resources, either printed or onscreen.
Quick Install
Guide
Provides information on setting up your
machine and, therefore, be sure to follow
the instructions in the guide to get the
machine ready.
Online User’s
Guide
Provides you with step-by-step
instructions for using your machine’s full
features, and contains information for
maintaining your machine,
troubleshooting, and installing
accessories.
This user’s guide also contains the
Software Section
providing you with
information on how to print documents
with your machine on various operating
systems, and how to use the supplied
software utilities.
Note
You can access the user’s guides
in other languages from the
Manual folder on the printer
software CD.
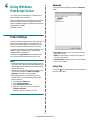
Network Printer
User’s Guide
Contained on the
network utilities CD
,
provides you with information on setting
up and connecting your machine to a
network.
Printer Driver
Help
Provides you with help information on
printer driver properties and instructions
for setting up the properties for printing. To
access a printer driver help screen, click
Help
from the printer properties dialog
box.
.

1.6 <
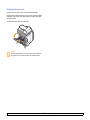
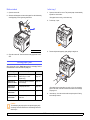
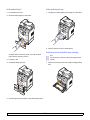
Introduction>
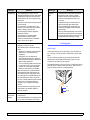
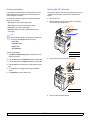
Selecting a location
Select a level, stable place with adequate space for air circulation. Allow
extra space for opening covers and trays.
The area should be well-ventilated and away from direct sunlight or
sources of heat, cold, and humidity. Do not set the machine close to the
edge of your desk or table.
Clearance space
• Front: 482,6 mm (enough space so that the paper tray can be
removed)
• Back: 100 mm (enough space for ventilation)
• Right: 100 mm (enough space for ventilation)
• Left: 100 mm (enough space for ventilation)

2.1 <
System setup>
2 System setup
This chapter gives you an overview of menus available on your machine
and step-by-step instructions for setting up the machine’s systems.
This chapter includes:
• Menu overview
• Changing the display language
• Setting the date and time
• Changing the default mode
• Setting sounds
• Entering characters using the number keypad
• Using the save modes
• Setting print job timeout
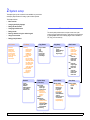
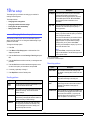
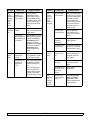
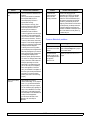
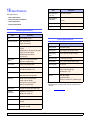
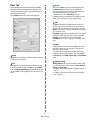
Menu overview
The control panel provides access to various menus to set up the
machine or use the machine’s functions. These menus can be accessed
by pressing Menu. Refer to the following diagram. Menus available in
Fax, Copy, or Scan mode vary.
Fax Feature
Darkness
Multi Send
Delay Send
Priority Send
Send Forward
Rcv. Forward
Secure Receive
Add Page
Cancel Job
Fax Setup
Sending
Redial Times
Redial Term
Prefix Dial
ECM Mode
Sent Report
Image TCR
Receiving
Receive Mode
Ring to Answer
Stamp Rcv Name
Rcv Start Code
Auto Reduction
Discard Size
Junk Fax Setup
DRPD Mode
Change Default
Resolution
Darkness
Auto Report
Copy Feature
Copy Collation
2-Up
4-Up
ID Copy
Poster Copy
Clone Copy
Erase Bkgd.
Copy Setup
Change Default
Copies
Reduce/Enlarge
Darkness
Original Type
Scan Feature
USB Memory
Scan Size
Original Type
Resolution
Scan Color
Scan Format
E-mail
Scan Size
Original Type
Resolution
Scan Color
FTP
Scan Size
Original Type
Resolution
Scan Color
SMB
Scan Size
Original Type
Resolution
Scan Color
Scan Setup
Change Default
USB Memory
E-mail
FTP
SMB
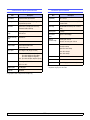
System Setup
Machine Setup
Machine ID
Machine Fax No.
Date & Time
Clock Mode
Language
Default Mode
Power Save
Scan PWR Save
Timeout
NetScanTimeout
Job Timeout
Import Setting
Export Setting
System Setup
(continued)
Paper Setup
Paper Size
Paper Type
Paper Source
Sound/Volume
Key Sound
Alarm Sound
Speaker
Ringer
Report
Maintenance
Clean Drum
Remote Service
Ignore Toner
CLR Empty Msg.
Supplies Life
Serial Number
Clear Setting
Network
TCP/IP
EtherTalk
NetWare
Ethernet Speed
Clear Setting
Network Info.

2.2 <
System setup>
Changing the display language
To change the language that appears on the control panel, follow these
steps:
1 Press Menu until System Setup appears on the bottom line of the
display and press OK.
2 Press OK when Machine Setup appears.
3 Press the Scroll buttons until Language appears and press OK.
4 Press the Scroll buttons until the language you want appears and
press OK.
5 Press Stop/Clear to return to Standby mode.
Setting the date and time
The current date and time are shown on the display when your machine
is on and ready to work. All faxes will have the date and time printed on them.
Note
If power to the machine is cut off, you need to reset the correct
time and date once the power has been restored.
1 Press Menu until System Setup appears on the bottom line of the
display and press OK.
2 Press OK when Machine Setup appears.
3 Press the Scroll buttons until Date & Time appears and press OK.
4 Enter the correct time and date using the number keypad.
Month = 01 to 12
Day = 01 to 31
Year = requires four digits
Hour = 01 to 12 (12-hour mode)
00 to 23 (24-hour mode)
Minute = 00 to 59
Note
The date format may differ from country to country.
You can also use the Scroll buttons to move the cursor under the
digit you want to correct and enter a new number.
5 To s ele c t AM or PM for 12-hour format, press the or button or
any number button.
When the cursor is not under the AM or PM indicator, pressing the
or button immediately moves the cursor to the indicator.
You can change the clock mode to 24-hour format (e.g. 01:00 PM as
13:00). For details, see the next section.
6 Press OK to save the time and date.
When you enter a wrong number, Out of Range appears and the
machine does not proceed to the next step. If this happens, simply
reenter the correct number.
7 Press Stop/Clear to return to Standby mode.
Changing the clock mode
You can set your machine to display the current time using either a
12-hour or 24-hour format.
1 Press Menu until System Setup appears on the bottom line of the
display and press OK.
2 Press OK when Machine Setup appears.
3 Press the Scroll buttons until Clock Mode appears and press OK.
4 Press the Scroll buttons to select the other mode and press OK.
5 Press Stop/Clear to return to Standby mode.
Changing the default mode
Your machine is preset to Fax mode. You can switch this default mode
between Fax mode and Copy mode.
1 Press Menu until System Setup appears on the bottom line of the
display and press OK.
2 Press OK when Machine Setup appears.
3 Press the Scroll buttons until Default Mode appears and press OK.
4 Press the Scroll buttons until the default mode you want appears
and press OK.
5 Press Stop/Clear to return to Standby mode.

2.3 <
System setup>
Setting sounds
You can control the following sounds:
• Key Sound: Turns the key sound on or off. With this option set to On
,
a tone sounds each time a key is pressed.
• Alarm Sound: Turns the alarm sound on or off. With this option set to
On
, an alarm tone sounds when an error occurs or fax communication
ends.
• Speaker: Turns on or off the sounds from the telephone line through
the speaker, such as a dial tone or a fax tone. With this option set to
Comm. which means “Common,” the speaker is on until the remote
machine answers.
You can adjust the volume level using On Hook Dial.
• Ringer: Adjusts the ringer volume. For the ringer volume, you can
select Off, Low, Mid, and High.
Speaker, ringer, key sound, and alarm sound
1 Press Menu until System Setup appears on the bottom line of the
display and press OK.
2 Press the Scroll buttons until Sound/Volume appears and press
OK.
3 Press the Scroll buttons until the sound option you want appears
and press OK.
4 Press the Scroll buttons until the desired status or volume for the
sound you have selected appears and press OK.
5 If necessary, repeat steps 3 through 5 to set other sounds.
6 Press Stop/Clear to return to Standby mode.
Speaker volume
1 Press On Hook Dial. A dial tone sounds from the speaker.
2 Press the Scroll buttons until you hear the volume you want.
3 Press On Hook Dial to save the change and return to Standby
mode.
Note
You can adjust the speaker volume only when the telephone
line is connected.
Entering characters using the number keypad
As you perform various tasks, you may need to enter names and
numbers. For example, when you set up your machine, you enter your
name or your company’s name, and the fax number. When you store fax
numbers or email addresses in memory, you may also enter the
corresponding names.
Entering alphanumeric characters
1 When you are prompted to enter a letter, locate the button labeled
with the character you want. Press the button until the correct letter
appears on the display.
For example, to enter the letter O, press 6, labeled with MNO.
Each time you press 6, the display shows a different letter, M, N, O,
and finally 6.
You can enter special characters, such as space, plus sign, and etc.
For details, see the below section.
2 To enter additional letters, repeat step 1.
If the next letter is printed on the same button, move the cursor by
pressing the
right Scroll button and then press the button labeled
with the letter you want. The cursor will move to the right and the
next letter will appear on the display.
You can enter a space by pressing 1 twice.
3 When you have finished entering letters, press OK.
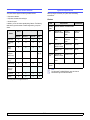
Keypad letters and numbers
Key Assigned numbers, letters, or characters
1
1Space
2
ABC2
3
DEF3
4
GHI4
5
JKL5
6
MNO6
7
PQRS7
8
TUV8
9
WXYZ9
0
+ -,.‘/*#&@0

2.4 <
System setup>
Correcting numbers or names
If you make a mistake while entering a number or name, press the left
Scroll button to delete the last digit or character. Then enter the correct
number or character.
Inserting a pause
With some telephone systems, you must dial an access code (9, for
example) and listen for a second dial tone. In such cases, you must insert
a pause in the telephone number. You can insert a pause while you are
setting up speed buttons or speed dial numbers.
To insert a pause, press Redial/Pause at the appropriate place while
entering the telephone number. A - appears on the display at the
corresponding location.
Using the save modes
Toner Save mode
Toner Save mode allows your machine to use less toner on each page.
Activating this mode extends the life of the toner cartridge beyond what
one would experience in the normal mode, but it reduces print quality.
To turn this mode on or off, press Toner Save.
Note
When PC-printing, you can also turn on or off Toner Save mode
in the printer properties. See the Software Section.
Power Save mode
Power Save mode allows your machine to reduce power consumption
when it is not in actual use. You can turn this mode on and select a length
of time for which the machine waits after a job is printed before it switches
to a reduced power state.
1 Press Menu until System Setup appears on the bottom line of the
display and press OK.
2 Press OK when Machine Setup appears.
3 Press the Scroll buttons until Power Save appears and press OK.
4 Press the Scroll buttons until
On
appears and press OK.
5 Press the Scroll buttons until the time setting you want appears and
press OK.
6 Press Stop/Clear to return to Standby mode.
Scan Power Save mode
Scan Power Save mode allows you to save power by turning off the scan
lamp. The scan lamp under the scanner glass automatically turns off
when it is not in actual use to reduce power consumption and extend the
life of the lamp. The lamp automatically wakes up after some warm-up
time when you start scanning.
You can set the length of time for which the scan lamp waits after a scan
job is completed before it switches to the power save mode.
1 Press Menu until System Setup appears on the bottom line of the
display and press OK.
2 Press OK when Machine Setup appears.
3 Press the Scroll buttons until Scan PWR Save appears and press
OK.
4 Press the Scroll buttons until the time setting you want appears and
press OK.
5 Press
Stop/Clear
to return to Standby mode.
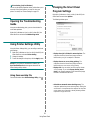
Setting print job timeout
You can set the amount of time a single print job is active before it must
print.
The machine handles incoming data as a single job if it comes in within
the specified time. When an error occurs while processing data from the
computer and the data flow stops, the machine waits the specified time
and then cancels printing if data flow does not resume.
1 Press Menu until System Setup appears on the bottom line of the
display and press OK.
2 Press OK when Machine Setup appears.
3 Press the Scroll buttons until Job Timeout appears and press OK.
4 Press the Scroll buttons until the time setting you want appears and
press OK.
5 Press Stop/Clear to return to Standby mode.

3.1 <
Software overview>
3 Software overview
This chapter gives you an overview of the software that comes with your
machine. Further details about installing and using the software are
explained in the Software Section.
This chapter includes:
• Supplied software
• Printer driver features
• System requirements
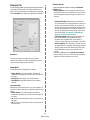
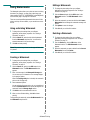
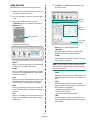
Supplied software
You must install the printer and scanner software using the supplied CDs
after you have set up your machine and connected it to your computer.
Each CD provides you with the following software:
CD Contents
Printer
software CD
Windows • Printer driver: Use this driver to
take full advantage of your printer’s
features.
• Scanner driver: TWAIN and
Windows Image Acquisition (WIA)
drivers are available for scanning
documents on your machine.
• Smart Panel: This program allows
you to monitor the machine’s status
and alerts you when an error occurs
during printing.
• SmarThru
1
: This is the
accompanying Windows-based
software for your multifunctional
machine.
• Network Scan: This program allows
you to scan a document on your
machine and save it to a network-
connected computer.
• Direct Print Utility: This program
allows you to print PDF files directly.
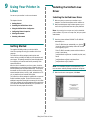
• User’s Guide in PDF
Linux • Printer driver: Use this driver to run
your machine from a Linux computer
and print documents.
• SANE: Use this driver to scan
documents.
• Smart Panel: This program allows
you to monitor the machine’s status
and alerts you when an error occurs
during printing.
PostScript
printer driver
CD
Windows • Postscript Printer Description
(PPD) file: Use the PostScript driver
to print documents with complex
fonts and graphics in the PS
language.
• User’s Guide in PDF
Macintosh • Postscript Printer Description
(PPD) file: Use this file to run your
machine from a Macintosh computer
and print documents.
• Scan driver: TWAIN driver is
available for scanning documents on
your machine.
• Smart Panel: This program allows
you to monitor the machine’s status
and alerts you when an error occurs
during printing.
Network
utilities CD
Windows • SyncThru™ Web Admin Service:
Use this web-based program to
remotely manage, monitor, and
troubleshoot network printers.
• Set IP: Use this program to set your
machine’s TCP/IP addresses.
• Network Printer User’s Guide in
PDF
1. Allows you to edit a scanned image in many ways using a powerful image
editor and to send the image by email. You can also open another image editor
program, like Adobe Photoshop, from SmarThru. For details, please refer to the
onscreen help supplied on the SmarThru program.
CD Contents
Page is loading ...
Page is loading ...
Page is loading ...
Page is loading ...
Page is loading ...
Page is loading ...
Page is loading ...
Page is loading ...
Page is loading ...
Page is loading ...
Page is loading ...
Page is loading ...
Page is loading ...
Page is loading ...
Page is loading ...
Page is loading ...
Page is loading ...
Page is loading ...
Page is loading ...
Page is loading ...
Page is loading ...
Page is loading ...
Page is loading ...
Page is loading ...
Page is loading ...
Page is loading ...
Page is loading ...
Page is loading ...
Page is loading ...
Page is loading ...
Page is loading ...
Page is loading ...
Page is loading ...
Page is loading ...
Page is loading ...
Page is loading ...
Page is loading ...
Page is loading ...
Page is loading ...
Page is loading ...
Page is loading ...
Page is loading ...
Page is loading ...
Page is loading ...
Page is loading ...
Page is loading ...
Page is loading ...
Page is loading ...
Page is loading ...
Page is loading ...
Page is loading ...
Page is loading ...
Page is loading ...
Page is loading ...
Page is loading ...
Page is loading ...
Page is loading ...
Page is loading ...
Page is loading ...
Page is loading ...
Page is loading ...
Page is loading ...
Page is loading ...
Page is loading ...
Page is loading ...
Page is loading ...
Page is loading ...
Page is loading ...
Page is loading ...
Page is loading ...
Page is loading ...
Page is loading ...
Page is loading ...
Page is loading ...
Page is loading ...
Page is loading ...
Page is loading ...
Page is loading ...
Page is loading ...
Page is loading ...
Page is loading ...
Page is loading ...
Page is loading ...
Page is loading ...
Page is loading ...
Page is loading ...
Page is loading ...
Page is loading ...
Page is loading ...
Page is loading ...
Page is loading ...
Page is loading ...
Page is loading ...
Page is loading ...
Page is loading ...
Page is loading ...
Page is loading ...
Page is loading ...
Page is loading ...
Page is loading ...
Page is loading ...
Page is loading ...
Page is loading ...
Page is loading ...
Page is loading ...
Page is loading ...
Page is loading ...
Page is loading ...
Page is loading ...
Page is loading ...
Page is loading ...
Page is loading ...
Page is loading ...
Page is loading ...
Page is loading ...
Page is loading ...
Page is loading ...
Page is loading ...
Page is loading ...
Page is loading ...
Page is loading ...
Page is loading ...
-
 1
1
-
 2
2
-
 3
3
-
 4
4
-
 5
5
-
 6
6
-
 7
7
-
 8
8
-
 9
9
-
 10
10
-
 11
11
-
 12
12
-
 13
13
-
 14
14
-
 15
15
-
 16
16
-
 17
17
-
 18
18
-
 19
19
-
 20
20
-
 21
21
-
 22
22
-
 23
23
-
 24
24
-
 25
25
-
 26
26
-
 27
27
-
 28
28
-
 29
29
-
 30
30
-
 31
31
-
 32
32
-
 33
33
-
 34
34
-
 35
35
-
 36
36
-
 37
37
-
 38
38
-
 39
39
-
 40
40
-
 41
41
-
 42
42
-
 43
43
-
 44
44
-
 45
45
-
 46
46
-
 47
47
-
 48
48
-
 49
49
-
 50
50
-
 51
51
-
 52
52
-
 53
53
-
 54
54
-
 55
55
-
 56
56
-
 57
57
-
 58
58
-
 59
59
-
 60
60
-
 61
61
-
 62
62
-
 63
63
-
 64
64
-
 65
65
-
 66
66
-
 67
67
-
 68
68
-
 69
69
-
 70
70
-
 71
71
-
 72
72
-
 73
73
-
 74
74
-
 75
75
-
 76
76
-
 77
77
-
 78
78
-
 79
79
-
 80
80
-
 81
81
-
 82
82
-
 83
83
-
 84
84
-
 85
85
-
 86
86
-
 87
87
-
 88
88
-
 89
89
-
 90
90
-
 91
91
-
 92
92
-
 93
93
-
 94
94
-
 95
95
-
 96
96
-
 97
97
-
 98
98
-
 99
99
-
 100
100
-
 101
101
-
 102
102
-
 103
103
-
 104
104
-
 105
105
-
 106
106
-
 107
107
-
 108
108
-
 109
109
-
 110
110
-
 111
111
-
 112
112
-
 113
113
-
 114
114
-
 115
115
-
 116
116
-
 117
117
-
 118
118
-
 119
119
-
 120
120
-
 121
121
-
 122
122
-
 123
123
-
 124
124
-
 125
125
-
 126
126
-
 127
127
-
 128
128
-
 129
129
-
 130
130
-
 131
131
-
 132
132
-
 133
133
-
 134
134
-
 135
135
-
 136
136
-
 137
137
-
 138
138
-
 139
139
-
 140
140
-
 141
141
-
 142
142


Muratec Printer MFX-3050 User manual
- Category
- Laser/LED printers
- Type
- User manual
- This manual is also suitable for
Ask a question and I''ll find the answer in the document
Finding information in a document is now easier with AI
Related papers
-
Muratec Fax Machine F-320 User manual
-
-
Muratec F-305 User manual
-
-
-
-
-
-
-
Other documents
-
Dell 2145cn User manual
-
-
Olivetti d-Color MF450 - d-Color MF550 Owner's manual
-
Ricoh Printer User manual
-
-
Murata M-1750 Operating Instructions Manual
-
-
Samsung SCX-5315F User manual
-
OKI MC860 1-Tray User guide
-
HP M3027x User manual