Page is loading ...

1
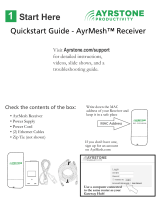
Start Here
Visit Ayrstone.com/support
for detailed instructions,
videos, slide shows, and a
troubleshooting guide.
Quickstart Guide - AyrMesh™ Hub2n
Check the contents of the box:
• Hub2n
• Antenna
• Power Supply
• Power Cord
• (2) Ethernet Cables
• Zip Tie and (2) mounting screws
(not shown)
MAC Address
Write down the MAC
address of your Hub and
keep it in a safe place
If you don't have one,
sign up for an account
on AyrMesh.com
Use a computer connected
to the same router to which
you're connecting the Hub!
MAC: 00:11:22:33:44:55
AyrMesh™ Hub2n
MAC: 00:11:22:33:44:55
AyrMesh™ Hub2n
POE
LAN

2
Assemble the Hub
and attach to
router
Screw the
antenna gently
onto the end of
the Hub
Using your thumb, slide open the door
on the bottom of the Hub
Plug an Ethernet cable into the port on the
hub - slide in until it clicks in place
Slide the cover back
onto the Hub
NOTE: All Hubs must be "initialized" by
connecting them to your Router until only
the top signal light remains lit and the Hub
has checked into AyrMesh.com.
Click the other end of the Ethernet cable
into the port on the power supply
marked "POE"
Use another Ethernet cable to connect the
LAN port of the power supply to one of
the LAN ports on your router.
Connect the power cable to the
power supply
Plug in the power
supply. This is how
the whole thing
should look:
The bottom two lights
on the Hub should be
lit up:
Make sure you have an account on AyrMesh.com
DO NOT FORCE CABLES
INTO OR OUT OF PORTS!

3
Hub is Checking In
Make sure the
Hub is working
It usually takes about 3 minutes for the Hub
to check in and show up on AyrMesh.com,
but sometimes it can take up to 20 minutes.
The Hub will check in to AyrMesh.com
The signal lights (4 top lights) will start out
"running" from bottom to top. When the
Hub has checked in to AyrMesh.com, just
the top signal light will be on.
4
Finish the Installation
All Hubs should be mounted outside, up as
high as possible, with the antenna pointing
straight up.
Maximum range for the Hub depends on
having clear line-of-sight.
The Hubs can be mounted to a flat surface
with the attached bracket; removing the bracket
allows the Hub to be easily mounted on a pole
The Gateway Hub remains connected to your
router with an Ethernet cable; Remote Hubs
are connected only to the Power Supply
5
Signal Lights on
the Hub
Top Signal light - green
Third Signal light - green
Second Signal light - yellow
First Signal light - red
Ethernet activity light - green
Power light - green
Gateway Hubs have the following lights on:
Top Signal light
Ethernet activity light
Power light
Remote Hubs use the signal lights to show the
signal strength to the nearest Hub. The signal
strength is exhibited as follows:
- Just the first (red) signal light - very low signal
- First and second (yellow) light - good signal
- First, second, third (green) light - excellent
- All 4 signal lights - Hubs may be too close
The signal lights on a Remote Hub are refreshed
approximately once per second.
NOTE: To prevent water damage,
make sure the Hub is mounted with its
antenna pointing straight up and that
the Ethernet cable has a "drip loop"
where it enters any building.

6
Select AyrMesh
Enter Ayrmesh1
Using the AyrMesh
Hub
To access the Hub's WiFi Access Point:
- Click on the Wireless icon on your
computer, or select the WiFi settings on
your tablet or smartphone
- Select the AyrMesh network from the list
of available WiFi Access Points (default
"AyrMesh" unless changed in AyrMesh.com)
- Enter the Encryption Passkey when
prompted - default is "Ayrmesh1" (note
the capital "A")
NOTE: Once you have tested the Hub,
MAKE SURE you CHANGE THE
ENCRYPTION PASSKEY (and SSID if
desired) on AyrMesh.com to ensure the
security of your network.
Note that changes on AyrMesh.com may take
half an hour or more to take effect.
Wireless network selection in Windows 7
See http://ayrstone.com/support
for additional information, hints,
and troubleshooting tips.
7
Troubleshooting
Gateway Hub:
- Ethernet Light does not come on, or Hub
does not appear in router's DHCP table, or
Hub never checks in to AyrMesh.com
- Check all cables between router and Hub
- Ethernet Light comes on, Hub appears in
router's DHCP table, but Hub does not
check in to AyrMesh.com
- Add Hub's MAC address to your
AyrMesh.com account manually
Remote Hub:
- Signal lights do not not come on
- Make sure Hub was initialized by plugging
into router
- Ethernet Light comes on, Hub appears in
router's DHCP table, but Hub does not
check in to AyrMesh.com
- Add Hub's MAC address to your
AyrMesh.com account manually
/