Etac NEXT User manual

Category
Strollers
Type
User manual
74466F 2015-11- 0 6
Next
Manual English
2
Heading Page
1. General ...................................................................................................... 3
2. Handling/Transport....................................................................................... 4-6
3. Product Description ...................................................................................... 7
4. Model ...................................................................................................... 8
5. Accessories/Options ..................................................................................... 9-12
6. Quick guide ................................................................................................. 13-14
Settings
7. Seat ............................................................................................... 15-16
Legrests .......................................................................................... 17-18
9. Backrest ......................................................................................... 19-21
10. Centre of balance/Brake ................................................................. 22-23
11. Driving technique/Manoeuvring ...................................................... 24-27
12. Changing castors/Handrims ............................................................ 28
13. Assembly instructions Accessories ................................................................ 29-33
14. Care and maintenance/Fault-finding chart .................................................... 35-36
15. Tests and Guarantees ................................................................................... 37
16. Alternative Seat heights/Angles .................................................................... 38
17. Weights and Measurements/Standard models .............................................. 39
Contents
2 3
1 General
The manual must be read thoroughly to avoid damage when handling and using the Next chair.
is a warning triangle to indicate that special care should be taken.
(!) provides advice and tips worth considering
Anti-tips available as an accessory. These prevent the wheelchair from tipping backwards.
We recommend all users to use the anti-tip devices,
unless you are an experienced user with absolute control over your wheelchair.
The tool kit contains: 1 Allen key 5 mm. Settable= Adjusted using tools
1 Ring spanner 24 mm. Adjustable= Adjusted without tools
Next is a manual, cross-folded, allround wheelchair with multiple functions that is intended for use both outdoors
and indoors.
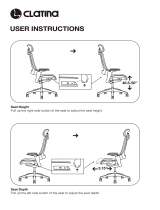
The seat is adjustable in height, angle and depth. The backrest is adjustable in height, angle and shape. The foot-
rests are adjustable in height, angle and depth.
Next can be supplemented and adjusted if needs change. A large range of options and accessories are available:
Various types of backrest and legrest, fixing points for transport in mobility service buses, anti-tips, and various
types of handrims and brakes etc.
Next has the best prerequisites to create comfort, functionality and good manoeuvrability.
Crash test
Etac’s wheelchairs are tested and approved in accordance with ISO 7176-19 and ISO 10542. These ISO stand-
ards specify requirements for the design of the wheelchair’s restraint points, how the wheelchair and the user
are secured in the vehicle, and also describe how tests should be carried out and how the test results should be
interpreted.
Etac’s wheelchairs are crash tested at the Technical Research Institute of Sweden.
The test was performed with normal settings on the wheelchair and with the transport attachment accessory
(see manual). An UNWIN_WWR/ATF/K/R restraining device and an UNWIN_WWR/HD/ATF/K/R 3-point belt were
used in the test.
Etac’s positioning belt and headrest should be used when travelling in vehicles.
Seat widths: From 35 cm to 57.5 cm.
Seat depth: Short frame 36-42 cm. Long frame 42-48 cm.
Functional seat depth : Short frame 42-48 cm. Long frame 48-54 cm.
Max. user weight: 135 kg.
Next with short frame is delivered with the rear wheels mounted. With long frame models the rear wheels are
unmounted.
Service life: The product is tested and fulfils the demands stated in EN 12183. The main product’s durability
and lifetime is at least five years when used in accordance with intended use, the safety instructions, the recon-
ditioning manual and instructions for use in the user manual. The main product consists of the chassis for seat
and back support. Additional parts/accessories are handled in accordance with the manual and reconditioning
manual. The actual lifetime can vary, depending on how much and how intensively the product is being used, but
a maximum of 10 years. If the product is intended for use after the service life period specified by Etac, it is the
responsibility of the product owner to ensure product functionality in accordance with the manual and recondi-
tioning instructions. If this cannot be ensured then the product should be taken out of use.
The following methods of surface treatment have been used:
Lacquered surfaces=Polyester powder coating
Non-lacquered aluminium parts=Anodized coating
Non-lacquered steel surfaces=Galvanized
4
2:1 Folding
If a bow handle and/or backrest brace is mounted they should be removed.
Flip up the footrests.
Lift the seat upwards.
2:2 Unfolding
Push down on one side of the seat frame, using the whole of the flat of the hand.
Do not hold the seat frame while unfolding as there is a risk of pinching your fingers.
Flip down the footrests.
2:3 Lifting the wheelchair
Lift using the push handles and legrests.
Before lifting, ensure that the height adjustable push handles are securely
fastened.
2:4 Transportation in vehicles
Private car/taxi: The wheelchair should be placed in the car boot.
If this is not possible, ensure that the wheelchair is placed safely in the back seat, so
that it is not able to overturn or roll. If possible secure the wheelchair with the car’s
safety belt.
2 Handling/Transport
4 5
2 Handling/Transport
2:5 Securing
Mobility service bus or similar:
The wheelchair must be secured in the transport attachment (accessory) as shown in
the diagram.
The straps must not be passed through the wheels or around the back tubes.
The back should be vertical and the seat should be horizontal for transport by vehicle.
2:6 Seat belt
It is essential for the 3-point belt to be fitted as shown in the illustrations. There
should not be any part of the wheelchair between body and seat belt.
2:7 General recommendations for travelling in vehicles (!)
Etac recommends in the following order:
1) The user transfers to one of the seats in the vehicle and uses the vehicle’s 3-point
belt while travelling. The wheelchair is then placed in the boot or safely in the back
seat so that it cannot overturn or roll.
2) The wheelchair is secured facing forwards in the vehicle as per point 2:5, the user
uses a separate 3-point belt that is secured in the vehicle. This is the way in which
the wheelchair is tested and approved according to the ISO-standard for crash test-
ing of wheelchairs in vehicles.
3) According to directive 2001/85/EC, appendix VII, point 3.8.3. there are specially
marked wheelchair locations in vehicles that permit transport with a wheelchair
facing in the opposite direction of travel. If this means of travel is used, the user/care
giver must be aware while travelling, prepared for sudden movements and have the
capacity to maintain a safe sitting position throughout the entire journey. The user’s
disabilities must not be of such an extent that he/she is not able to hold onto the
handles fitted in the vehicle when there are changes of speed or direction.
In conjunction with points 2 and 3:
a positioning belt is recommended
a correctly adjusted headrest should be used
the backrest should be level with or above the user’s shoulders
the parking brake should be used
the anti-tips should be lowered
a heel strap should be used
300mm
25°
25°
10°
10°
300mm
6
2:8 Warning
During transport the headrest and heel strap must be used.
The wheelchair positioning belt is inadequate to prevent the user from being
thrown out of the wheelchair in the event of sudden braking.
The restraining device must not be passed through the wheels or around the
back tubes.
Options/accessories that can be removed without tools, such as trays, must be
removed and secured or placed where they cannot fly around inside the vehicle
in the event of a collision.
If the wheelchair has been involved in a collision in a motor vehicle, it should be
inspected at a Technical Aids Centre or by Etac before being used again.
2 Handling/Transport
6 7
3 Product description
Next is constructed around a seat unit and a propulsion unit.
A height adjustment of 10 cm is possible without changing the rear wheels, front forks or castor wheels.
The seat height is not affected by the castor size, and the front fork attachments need never be angle-adjusted.
Nor do the brakes need to be adjusted when the rear wheel position is changed.
Item Description
1 Push handles
2 Backrest cover
3 Backrest upholstery
4 Seat upholstery including cushion
5 Brake
6 Footrest
7 Footrest locking knob
8 Legrest
9 Castor wheel
10 Front fork
11 Bar incl. front fork attachment
12 Protective stopper
Item Description
13 Shock absorber
14 Brace
15 Side frame
16 Armrest, lockable
17 Armrest attachment
18 Quick release hub
19 Handrim
20 Rear wheel
21 Back tube
22 Locking knob, push handles
1
2
3
4
5
15
6
7
8
12
11
13
9
10
14
18
17
19
20
21
22
16
8
4 Model
Standard model
Alternative model
(option)
Seat settable in height and angle
Front seat height set at 49 cm
Rear seat height set at 46 cm
The seat height can be adjusted by 10 cm without
changing rear wheels, fork or castor wheels
Cloth upholstery with adjustable seat depth 6 cm
Castor wheels: 6" 150 mm allround
24" rear wheel, quick release hub
1" high pressure tyre (with inner tube)
Handrims: Aluminium
Camber angle 2°
Backrest settable in height, angle and shape
Backrest height installed at 35 cm
continuously settable 30-45 cm
Backrest angle set at +2°
(=+92° between backrest and seat)
Adjustable backrest upholstery in plush
Height adjustable push handles, detachable
Legrests - lockable, detachable, swing-away
Legrests with standard knee angle
Footrests, flip-up, adjustable in height, settable in
depth and angle
Seat settable in height and angle
Front seat height 37-55 cm
Hard seat/flat seat
Castor wheels: 5" 125 mm, 7" 175 mm allround
(7" only with 24" rear wheels)
20" or 22" rear wheels, quick release hubs
22": 1" high-pressure tyres
20": 1 x 3/8" low-pressure tyre
Solid tyres: 20", 22" and 24"
Handrims: 22" and 24" stainless or plastic coated
Handrims: 20" stainless
Camber angle 0°
Backrest settable in height, angle and shape
High back continuously settable 45-55 cm
Tapered backrest continuously settable 37-42 cm
(from seat width 40 cm)
Biangular backrest settable 38-47 cm
Backrest angle continuously settable between -5°-+15°
Bow handle, detachable
Legrests - lockable, detachable, swing-away
Legrest with narrow knee angle
Legrest with narrow/short angle
Legrests, continuously angle-variable
Amputee legrest
Footrests as standard with extended attachment tube
(+10 cm height adjustment) or short attachment tube
(-8 cm)
One-piece footrest.
Given measurements can vary +/- 2%
8 9
5 Options
Settable= Adjusted using tools.
Adjustable= Adjusted without tools.
High back continuously settable in height 45-55 cm
Tapered back continuously settable in height 37-42 cm Available from seat width 40 cm.
Biangular backrest settable in height 38-47 cm
Comfort cover padded backrest cover in plush for enhanced seating comfort
Bow handle height adjustable, detachable
Hard seat seat height 2 cm lower than cloth upholstery. Easy to take off when folding.
Single hand brake for installation on right or left side
Knee brake can be supplemented with brake lever extension and angled brake handle
Legrest with narrow knee angle
Legrest short, with narrow knee angle
Angle adjustable legrest with flip-up calf support from 40 cm seat width
Angle adjustable legrest with calf support adjustable in height, depth and angle
Amputee legrest settable in height, adjustable in length, angle and sideways.
Detachable cover in Plush or black Dartex.
Amputee weight fitted on legrest attachment on right and/or left side.
Can be combined with amputee legrest
Plaster cast legrest settable vertically and laterally, adjustable in angle
10
Armrest lockable, height-adjustable 25 cm long, solid top, black
Armrest, lockable, height-adjustable 38 cm long, solid top, black
Armrest, lockable, low, height-adjustable, 25 or 38 cm long, solid top, black
Armrest cover detachable, 25 or 38 cm long
padded or gel, dark grey plush or black Dartex
Armrest cushion wide and soft, fits onto armrest, 8x40 cm
Armrest cushion Hemi swing-away for mounting on long armrests
5 Accessories
5 Options
One-piece footrest flip-up, adjustable in height and settable angle
One-piece footrest complete for 35-37.5 seat width, adjustable in angle,
settable in height and depth
Handrims stainless or plastic coated
Rear wheel alternative model available
Single hand drive for right or left side. Telescoping axle, easy to remove when folding.
Drum brake
10 11
5 Accessories
Settable= Adjusted using tools.
Adjustable= Adjusted without tools.
Tray transparent, fits onto long armrest
Hemiplegia tray transparent, for positioning of hemiplegic arm. Width 35-50 cm
Can be fitted onto both short and long armrests.
Anti-slip device for the Hemiplegia tray
Seat cushion dark grey plush and black velour, 56 cm, cut according to seat depth set,
washable
Comfort wedge for the cushion, evens out the front part of the seat
Seat and backrest cushions ECS in PE or memory foam, cover in dark-grey plush or
black Dartex
Cover for calf support on angle adjustable legrest, black Dartex
Calf strap detachable, black nylon, settable in length
Padding for calf strap
Heel straps black nylon, adjustable length
Extended footrest fits onto the existing footrest
Positioning belt two pieces, with snap-lock, fixing points on the wheelchair frame
Headrest mounts with an attachment on bow handle, adjustable in height, depth and angle
Available in several models
12
5 Accessories
Backrest brace with snap lock
Back wedge length 15 and 30 cm, attached with Velcro
Trunk support settable in depth and angle, black Dartex, foldable, incl. attachment
Anti-tips foldable, height settable
Anti-tips telescopic, foldable, settable height, adjustable in length and angle
Cane holder two parts, one of which is an elasticated section which is fastened
around the cane
Spoke guard with grey or yellow print.
Transport attachment
Tool kit
Bags
front bag
backpack
mobile holder
Rain cape Proof
Weather protector Proof
Leg warmer Proof
Gloves
Bags Case Logic
Information about bags, gloves and clothes is available at www.etac.com
12 13
-3
0
+3
+5
6 Quick guide
This section is intended for anyone with experience of adjusting wheelchairs who
only requires brief instructions.
More detailed instructions can be found after the Quick Guide.
6:1 Seat height
The seat height is settable by 10 cm without changing rear wheels, front forks or
castors.
Undo the nuts holding each side bar. Pull out the bar by grasping it in the middle (A).
Select new height position and secure the side bars.
Tools: 24 mm ring spanner
For further seat height adjustments, see 7.3.
6:2 Seat angle
The seat angle can be adjusted to the fixed positions; +5, +3, 0, -3°.
Standard position -3°
Loosen both the screws that hold each seat angle bracket (A).
Grasp a push handle and move the seat unit up/down so that the seat angle is altered.
Select the desired position and tighten the seat angle bracket.
Tools: 5 mm Allen key
The front seat height is altered when the seat angle is adjusted. Starting from a flat
seat:
-3° (seat tipped forward) produces a 15 mm lower seat at the front edge.
+3° (seat tipped backward) produces a 15 mm higher seat at the front edge.
+5° (seat tipped backward) produces a 30 mm higher seat at the front edge.
A
A
Inside
Outside
+3
0
-3
-5
14
6:3 Backrest height
The backrest height is infinitely settable.
Loosen the screws on the inside of the back tubes by 2-3 turns.
Adjust the height by pulling/pushing the backrest upwards/downwards.
Tools: Allen key 5 mm
6:4 Backrest angle
The backrest angle is infinitely settable.
Adjust one back tube at a time.
Loosen the screw on the inside of the backrest joint.
Adjust to the required angle and tighten.
Tools: Allen key 5 mm
6 Quick guide
6:5 The rear wheels’ centre of balance
The rear wheels have 3 alternative positions for balance adjustment.
Undo the nut on the inside of the chassis. The brake cable can be angled down-
wards for better access.
Pull out the attachment and select new position. Secure the attachment with
washers as shown in the diagram.
NB: The lower section of the attachment must fit into the notch on the chassis.
The brakes need no readjustment.
Tools: 24 mm ring spanner
Many of the settings affect the wheelchair’s propensity to tip.
Ascertain whether there is a risk of tipping and adjust the anti-tips.
For more detailed instructions and other setting options, see chapter 9 and
forward.
14 15
A
7 Settings seat
7:1 Seat height
The seat height is settable without changing rear wheels, front forks or castors.
For further height adjustment the rear wheel and front fork have to be changed.
The castor wheels do not affect the seat height, and are selected solely based on
application.
7:2 Adjustment of seat height using existing rear wheels and front forks
Remove the rear wheels by depressing the button in the centre of the hub while
pulling the wheel out.
Undo the nuts holding each side bar.
Pull out the bar by grasping it in the middle (A).
Select new height position and secure the side bar.
Tools: 24 mm ring spanner
7:3 For further adjustment of seat height
For further adjustment of the seat height, rear wheels and front forks must be
changed.
Each rear wheel size has a specific accompanying fork size. See table in section 16,
Alternative seat heights/angles.
Remove the rear wheels (see point 7.2).
Changing front fork:
Begin by undoing the castor wheels and attaching them to the new forks
(see section 12, Changing castor wheel/handrim).
Remove the cover cap from the front fork assembly so that the locking nut is accessible.
Undo it and pull out the front fork. Take the washer from around the fork axle and
put it on the new fork (the bevelled side (A) towards the fork). Insert the new fork
into the attachment. It is also important to ensure that the washers in the attachment
(under the retaining nut) are placed in the right order, with the spring washer on top.
Tighten the retaining nut until it cannot be turned any more. Loosen ½-1 turn. The
spring washer then has the correct tension and reduces the risk of the castor start-
ing to “wobble”.
Tools: 5 mm Allen key, 19 mm socket spanner
Do not change the castor wheel to change the seat height, see section 12
Changing castor wheel/handrim.
Ball bearings
A
16
-3
0
+3
+5
A
Inside
Outside
+3
0
-3
-5
7 Settings seat
7:4 Seat angle
The seat angle setting affects the front seat height.
See seat height table, page 33.
The front fork attachments are fixed and must never be adjusted.
Do not change the castor wheel to change the seat angle! (See point 12.1)
7:5 Adjusting seat angle
The seat angle can be adjusted to the fixed positions; +5, +3, 0, -3
°
Loosen both the screws that hold each seat angle bracket (A):
Grasp a push handle and move the seat unit up/down so that the seat angle is altered.
Select the desired position and tighten the seat angle bracket. The square nut
should be on the outside.
Tools: 5 mm Allen key
(!) The seat angle can be set while a person is sitting in the wheelchair.
The person must not lean against the backrest.
The front seat height is altered when the seat angle is adjusted.
Starting from a flat seat:
-3° (seat tipped forward) produces a 15 mm lower seat at the front edge.
+3° (seat tipped backward) produces a 15 mm higher seat at the front edge.
+5° (seat tipped backward) produces a 30 mm higher seat at the front edge.
7:6 Adjusting seat depth
The seat depth can be adjusted 0-6 cm at the front by lifting the front seat upholstery
and sliding it backwards or forwards (A).
Short frame: 36 - 42 cm (Measured from the back tube) (B)
Long frame: 42 - 48 cm (Measured from the back tube) (B)
The functional seat depth (C) is affected by the position of the backrest upholstery.
B
A
C
16 17
8 Settings legrests
8:1 Legrests
The legrests are lockable, detachable and can be swung to the side or under the seat.
They are available in two different knee angles: standard and narrow.
A continuously angle adjustable legrest with calf support is also available.
Amputee legrests are also available as alternatives to legrests.
8:2 Legrests standard or with a narrow angle or a short/narrow angle
With a narrow angle the feet are 5 cm closer to the seat than with the standard angle.
The narrow legrests can be
used
with both 125 mm and 150 mm castors.
With the narrow/short legrest, the feet are 7 cm higher.
8:3 Legrests, locking
The legrest is removed by pressing the locking mechanism upwards.
The legrest locks automatically when it enters the correct position.
8:4 Continuously angle-adjustable legrest (option)
The legrest can be adapted for either the left or right side.
Directions for use are supplied with the legrest.
The calf support is adjustable in height and foldable.
As the angle adjustable legrest is not lockable, it must not be used to lift
the wheelchair.
Remove the legrests and lift using the frame.
8:5 Amputee legrest (option)
The amputee legrest fits the left and right sides of the chair.
The amputee legrest is settable in height, angle and can also be adjusted forward
and sideways.
Angle and sideways: Loosen the lever under the plate.
Forwards/backwards: Loosen the knob under the plate.
Height: Use the Allen key provided.
Tools: 4 mm Allen key (provided with the amputee legrest)
18
8 Settings legrests
8:6 Footrests
Next
is supplied with divided, flip-up footrests that are adjustable in height, angle
and depth.
To make the footrests lower than standard there are footrests with 10 cm longer
attachment tubes.
For outdoor use the footrests should be raised 4-5 cm above the ground.
Never stand on the footrests as there is a risk of tipping!
8:7 Footrests, height adjustment
The footrests can be set at intervals of 2 cm.
Loosen the locking handle (A) on the legrest fully. Remove the screw (B). Set the height.
Replace the screw and handle. Tighten securely.
With standard attachment tube: Max. length: 51 cm. Min. length: 33 cm
With extended attachment tube: Max. length: 61 cm. Min. length: 46 cm
With short attachment tube: Max. length: 41 cm. Min. length: 31 cm
A
B
C
D
8:8 Footrests, angle and depth adjustment
The footrests are continuously angle-adjustable and have two alternative depth
settings.
Angle: Loosen the screws (C) ½-3/4 a turn. Angle the footrest to the required
position and tighten the screws.
Tools: 5 mm Allen key
Depth: The attachment tube (D) is secured to the footrest 1/3 from the front edge.
By changing the left side for the right they will extend further forwards.
Pull out the footrest and attachment tube, turn it 180° and secure it to the
other legrest tube. Adjust the footrest’s angle.
Tools: 5 mm Allen key (to adjust the footrest angle)
18 19
9 Backrest settings
9:1 Backrest
The backrest is settable in height and angle and has adjustable backrest upholstery.
The push handle is height adjustable.
Risk of tipping! Always check the position of the anti-tips after adjusting
the backrest.
9:2 Backrest height
The backrest is infinitely settable.
Loosen the screws on the inside of the back tubes by 2-3 turns.
Adjust the height by pulling/pushing the backrest upwards/downwards.
Ensure that both back tubes are adjusted equally by checking the height against the
straight edge on the rear of the backrest.
Tighten the screws securely.
Tools: Allen key 5 mm
9:3 Backrest angle
The backrest angle is infinitely settable.
Adjust one back tube at a time. Loosen the screw on the inside of the backrest joint.
The brake cable can be angled down for better access.
Adjust to the required angle and tighten.
Repeat the procedure on the other side.
Tools: Allen key 5 mm
Risk of tipping! Always check the positioning of the anti-tips when chang-
ing the backrest angle.
20
9 Backrest settings
9:4 Backrest upholstery
The contour of the backrest upholstery is individually adjustable by using the five
Velcro straps and the backrest cover.
Allow the cover plenty of room between seat and backrest, so that it is possible to
“sit in” against the backrest.
Loosen all the straps and ensure that the user is sitting as far back in the seat as possible.
Tighten the straps so that they follow the contours of the back and give support to
the lumbar region.
(!) If the upper straps are too tight it has a negative effect on the way the
wheelchair unfolds.
Risk of tipping! Always check the positioning of the anti-tips after adjusting
the backrest upholstery.
9:6 Height adjustable push handles
The push handles can be set at intervals of 2 cm.
Loosen the knob (A) and press the plastic washer. Install desired height.
Ensure that the push handles are locked in the correct position. Tighten the knobs.
Ensure that the knobs are properly tightened. This is especially important if
the chair is to be lifted with the user sitting in it.
9:7 Bow handle (option)
The bow handle is height adjustable and detachable.
It is mounted in the push handle attachment, and is adjusted in the same way as the
height-adjustable push handles.
It is also possible to mount a headrest on the bow handle.
Ensure that the knobs are properly tightened. This is especially important if
the chair is to be lifted with the user sitting in it.
The bow handle must be removed before the chair can be folded.
9:5 Comfort cover (option)
The comfort cover increases the padding in the backrest and is used instead of a
standard backrest cover.
  • Page 1 1
  • Page 2 2
  • Page 3 3
  • Page 4 4
  • Page 5 5
  • Page 6 6
  • Page 7 7
  • Page 8 8
  • Page 9 9
  • Page 10 10
  • Page 11 11
  • Page 12 12
  • Page 13 13
  • Page 14 14
  • Page 15 15
  • Page 16 16
  • Page 17 17
  • Page 18 18
  • Page 19 19
  • Page 20 20
  • Page 21 21
  • Page 22 22
  • Page 23 23
  • Page 24 24
  • Page 25 25
  • Page 26 26
  • Page 27 27
  • Page 28 28
  • Page 29 29
  • Page 30 30
  • Page 31 31
  • Page 32 32
  • Page 33 33
  • Page 34 34
  • Page 35 35
  • Page 36 36
  • Page 37 37
  • Page 38 38
  • Page 39 39
  • Page 40 40

Etac NEXT User manual

Category
Strollers
Type
User manual

Ask a question and I''ll find the answer in the document

Finding information in a document is now easier with AI