PRESONUS AudioBox iOne Owner's manual

Category
DJ controllers
Type
Owner's manual

This manual is also suitable for

AudioBox
iOne and iTwo
USB/iPad Recording Systems
Owners Manual
www.presonus.com
®
English
Table of Contents
1.0 Overview1
1.1 Introduction1
1.2 Summary of Hardware Features1
1.3 Summary of Included Software Features2
1.3.1 Studio One Artist2
1.3.2 Capture for iPad2
1.4 What’s in the Box2
2.0 Hookup4
2.1 Front-Panel Controls and Connections4
2.2 Rear-Panel Connections6
2.3 Basic Hookup Diagrams8
2.3.1 iOne computer hookup diagram8
2.3.2 iOne iPad hookup diagram8
2.3.3 iTwo computer hookup diagram9
2.3.4 iTwo iPad hookup diagram9
3.0 Connecting to a Computer
or iOS Device10
3.1 Minimum System Requirements10
3.2 Installation for Mac OS X and iOS10
3.3 Installation for Windows11
3.4 Windows PreSonus Driver Control Panel14
3.5 Using the AudioBox with Popular Audio
Applications16
4.0 Studio One Artist Quick Start18
4.1 Installation and Authorization18
4.2 Enabling the Audio Driver19
4.3 Configuring MIDI Devices (AudioBox iTwo)20
4.4 Creating a New Song23
4.5 Creating Audio Tracks26
4.6 Anatomy of an Audio Track27
4.7 Adding Virtual Instruments and Plug-in Effects to
Your Song27
4.7.1 Drag-and-Drop Virtual
Instruments28
4.7.2 Drag-and-Drop Effects28
5.0 Tutorials29
5.1 Microphone Types29
5.1.1 Condenser29
5.1.2 Dynamic29
5.1.3 USB Microphones and Other Types29
5.1.4 Stereo Microphone Placement29
5.2 A Brief Tutorial on Dynamics Processing32
5.2.1 Common Questions Regarding Dynamics
Processing32
5.2.2 Types of Dynamic Processing33
5.2.3 Compression Setting Suggestions37
5.3 Equalizers39
5.3.1 What is an EQ?39
5.3.2 Equalization Settings: How to Find the Best
and Leave the Rest41
5.4 EQ Frequency Guides42
5.5 EQ Setting Suggestions43
6.0 Technical Information46
6.1 iOne and iTwo Technical Specifications46
7.0 Troubleshooting
and Warranty47
7.1 Troubleshooting47
7.2 Warranty48
1.0 Overview
1.1 Introduction
AudioBox
iOne and iTwo
Owners Manual
1
1.0 Overview
1.1 Introduction
Thank you for purchasing a PreSonus AudioBox
interface. PreSonus Audio
Electronics, Inc., has designed the AudioBox iOne and AudioBox iTwo utilizing
high-grade components to ensure long-lasting, optimum performance. Loaded
with high-headroom, Class A microphone preamplifiers; a built-in 2x2 USB 2.0
and iPad recording and playback engine; MIDI I/O (AudioBox iTwo); and more, the
iOne and iTwo extend the boundaries for musical performance and production.
All you need is a computer with a USB connection, a few microphones and cables,
a pair of headphones or powered speakers, and your instruments, and youre ready
to record in the studio or perform in front of a live audience! Both interfaces are MFi
(Made For iOS) -compliant, so you can connect them to your iPad™ using the Device
connection on the back panel. See iOS Devices for minimum system requirements.
PreSonus Audio Electronics, Inc., is committed to constant product improvement,
and we value your suggestions highly. We believe the best way to achieve our
goal of constant product improvement is by listening to the real experts: our
valued customers. We appreciate the support you have shown us through the
purchase of this product and are confident that you will enjoy your AudioBox!
1.2 Summary of Hardware Features
2x2 USB 2.0/iPad audio interface
24-bit/96 kHz sampling rate
Class A microphone preamplifiers
48V phantom power
Instrument inputs
2 line inputs (AudioBox iTwo)
MIDI I/O (AudioBox iTwo)
Headphone output with independent level control
Zero-latency direct analog monitoring
Rugged construction
Complete mobile and studio solution with Studio
One® Artist and Capture
Duo for iPad
Compatible with most Mac, Windows, and iOS audio software
Mac® OS X, iOS, and Windows®-compatible (See Section
3.1 - Minimum System Requirements.)
1.0 Overview
1.3 Summary of Included Software Features
AudioBox
iOne and iTwo
Owners Manual
2
1.3 Summary of Included Software Features
1.3.1 Studio One Artist
The AudioBox iOne and iTwo interfaces include PreSonus Studio One Artist recording
software (available for download), which comes with loads of plug-ins, loops, and
samples, giving you everything you need for music recording and production.
The Studio One Artist Quick Start Guide and User Manual can be found
in the help section of the software or in your My PreSonus account.
Wirelessly transfer and import Sessions created in Capture for iPad®
Unlimited track count, inserts, and sends
20 high-quality Native Effects
plug-ins: amp modeling (Ampire), delay (Analog
Delay, Beat Delay), distortion (RedlightDist
), dynamics processing (Channel Strip,
Compressor, Gate, Expander, Limiter, Tricomp
), equalizer (Channel Strip, Pro EQ),
modulation (Autofilter, Chorus, Flange, Phaser, X-Trem), reverb (MixVerb
, Room
Reverb), and utility (Binaural Pan, Mixtool, Phase Meter, Spectrum Meter, Tuner)
More than 6 GB of loops, samples, and instruments, featuring: Presence
virtual sample player, Impact
virtual drum machine, SampleOne
virtual
sampler, Mojito virtual analog-modeled subtractive synthesizer
Project templates specifically for AudioBox interfaces
Innovative MIDI mapping
Powerful drag-and-drop functionality for faster workflow
Mac OS X- and Windows-compatible (See Section
3.1 - Minimum System Requirements.)
1.3.2 Capture for iPad
PreSonus Capture for iPad is a new mobile-recording
application that is available from the Apple App Store.
Capture Duo is a free 2-channel app; Capture for iPad is a paid app that can record
and play up to 32 channels. Other than the track count, all features are the same.
See iOS Devices for minimum system requirements.
Simple, intuitive, mobile solution for easily capturing multitrack audio on your iPad
Direct wireless transfer of sessions to Studio One Artist
Built-in metronome
Editing functions including cut, copy, paste, split, and duplicate
Level and Pan controls for balancing your tracks
1.4 What’s in the Box
Your AudioBox Package Contains the Following:
An AudioBox iOne or AudioBox iTwo, depending on which you’ve purchased
5’ (1.5m) USB cable
1.0 Overview
1.4 What’s in the Box
AudioBox
iOne and iTwo
Owners Manual
3
AudioBox Hookup Guide
Product registration card
A complete software bundle is included to help you
get the most from your AudioBox interface.
Software and services that complete your AudioBox
iOne or iTwo solution include the following:
Studio One Artist – Available for download from your My PreSonus
account as soon as you register your AudioBox interface
Capture Duo for iPad – A free download from the Apple App Store
Nimbit® – A free account that’s set up with your My PreSonus account so you can
directly upload your recordings from Studio One Artist to sell or share with fans
2.0 Hookup
2.1 Front-Panel Controls and Connections
AudioBox
iOne and iTwo
Owners Manual
4
2.0 Hookup
2.1 Front-Panel Controls and Connections
Microphone/Instrument/Line Inputs. Both channels of the AudioBox iTwo have
Mic-Line/Instrument combo jacks that accept a ¼-inch TRS or XLR plug.
On the AudioBox iOne, Channel 1 offers an XLR jack, and Channel 2 has a ¼-inch
Instrument jack.
Please Note: As with any audio input device, plugging in a microphone or
instrument, or turning phantom power on or off, will create a momentary spike in the
audio output of your AudioBox. Because of this, we highly recommend that you turn
the input level all the way down before changing connections or turning phantom
power on or off. This simple step will add years to the life of your audio equipment.
Microphone Inputs. These XLR inputs are equipped with high-headroom
PreSonus microphone preamplifiers. These preamps work great with all types
of microphones including dynamic, ribbon, and condenser microphones.
Power User Tip: Dynamic microphones and ribbon microphones (which are a special
type of dynamic mic) are generally lower-output devices that, with few exceptions,
require no external power source. Sending phantom power to a ribbon mic that
doesn’t require it can cause severe damage to the mic—usually beyond repair.
Condenser microphones are generally more sensitive than dynamic and ribbon
microphones and typically require external +48V phantom power. Always review your
microphone’s documentation and follow its recommended operating practices.
Instrument Inputs. These ¼-inch connectors are for use with instruments that don’t
have internal preamps (guitar, bass, etc.). See Input Source Button for more
information.
Power User Tip: Active instruments are those that have an internal preamp and a
line-level output. This type of instrument should be plugged into a line input, rather than
an instrument input. Plugging a line-level source into the instrument inputs not only risks
damage to these inputs but also results in a very loud and often distorted audio signal.
Line Inputs. The ¼-inch connectors on the AudioBox iTwo can
also accept line-level inputs such as keyboards and samplers.
See Input Source Button for more information.
2.0 Hookup
2.1 Front-Panel Controls and Connections
AudioBox
iOne and iTwo
Owners Manual
5
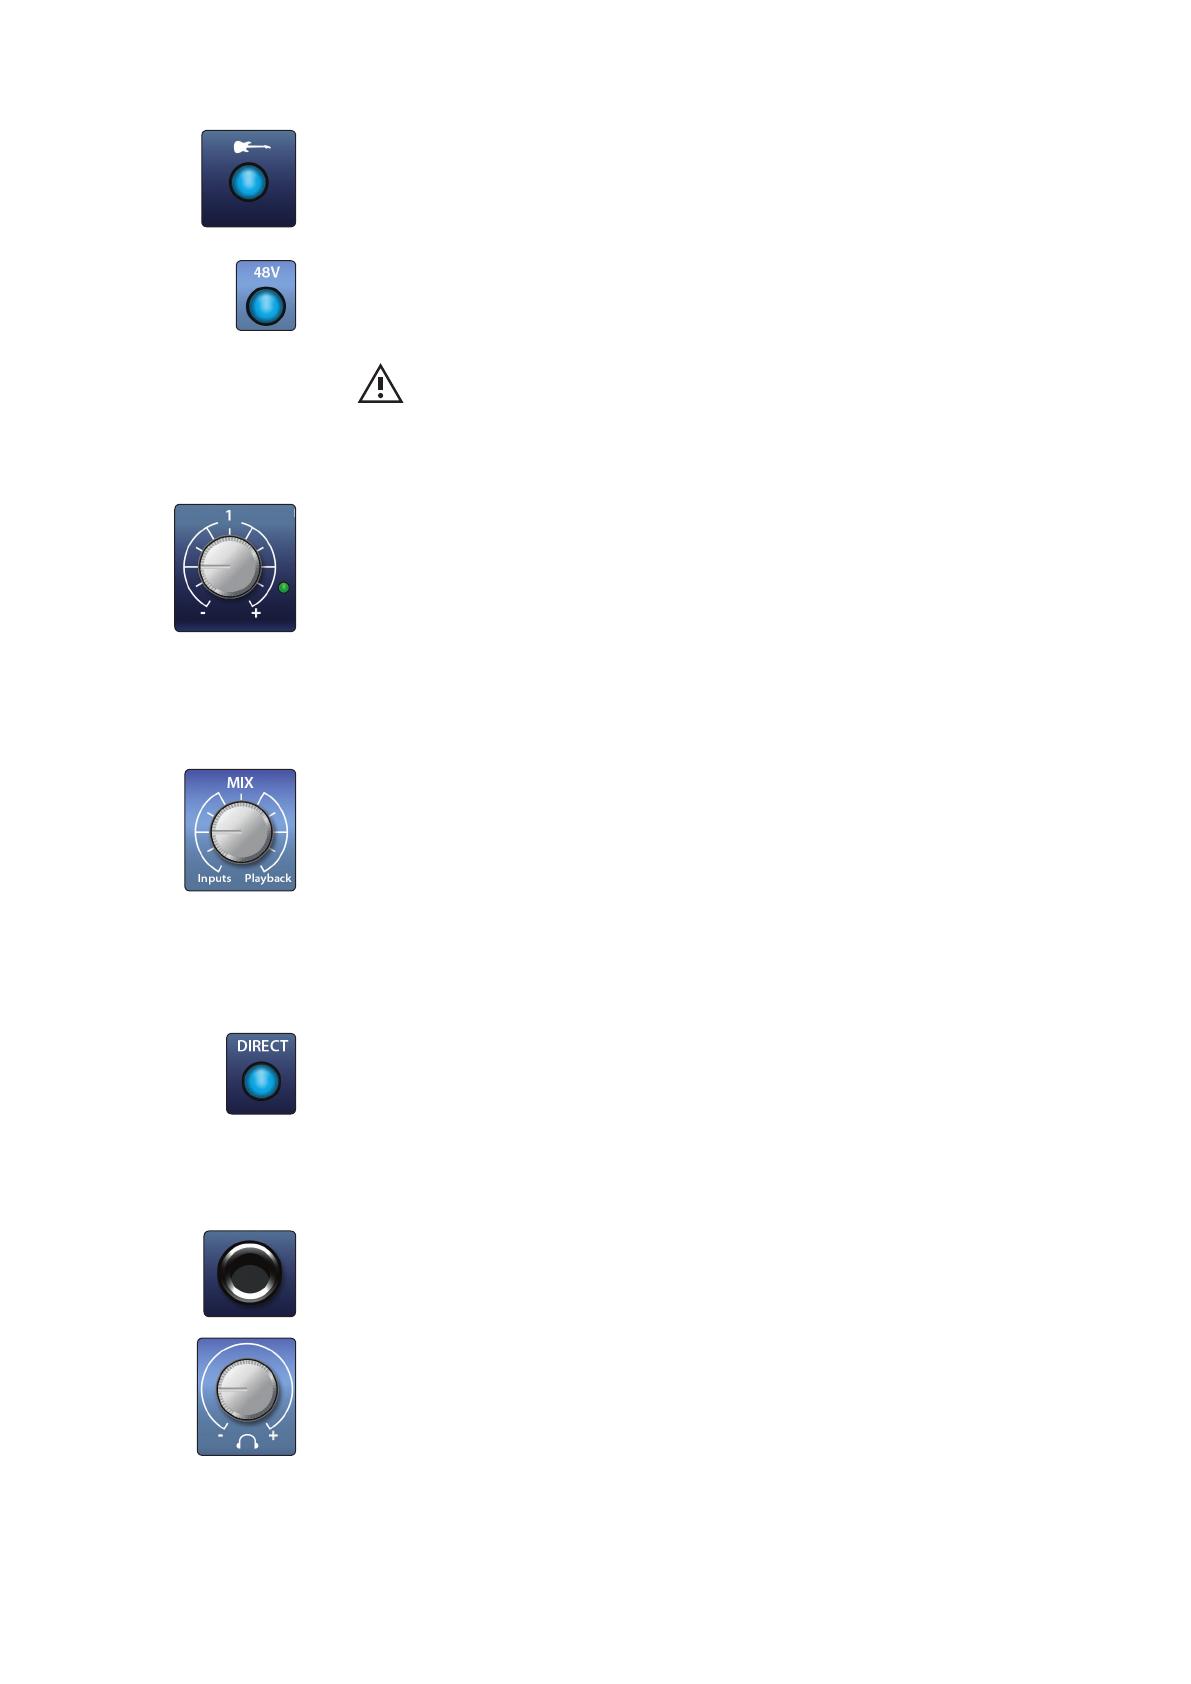
Input Source Button (AudioBox iTwo). Each AudioBox iTwo input channel offers an
Input Source button that lets you select instrument or line level for the ¼-inch inputs.
When the button is not illuminated, the input will accept a line-level source, like a
synthesizer or guitar amp modeler. Press this button to engage the instrument
preamp when connecting guitars or a passive bass.
48-volt Phantom Power. The AudioBox iOne, and iTwo provide 48V phantom power
for the microphone inputs. Pressing the 48V button switches phantom power on and
off for the microphone inputs, and it will illuminate in blue whenever this function is
switched on.
WARNING: Phantom power is only required for condenser microphones and
can severely damage some dynamic mics, especially ribbon mics. Therefore,
switch phantom power off when it is not required.
XLR connector wiring for phantom power:
Pin 1 = GND Pin 2 = +48V Pin 3 = +48V
Input Gain Control. These knobs provide 52 dB of variable gain (-10 to +42 dB) on
the microphone inputs and 51 dB of variable gain (-24 to +27 dB) on the
instrument inputs.
Input Signal Indicators. Each channel features an LED next to the trim control
that illuminates in green whenever an input signal is present. The color of the
LEDs will change to red when the channel’s input signal reaches -0.5 dBFS. At 0
dBFS your mic preamp/line signal will exhibit signs of clipping (distortion).
Power User Tip: Never run your input levels higher than the channel
inputs can handle. If you overdrive the analog-to-digital converters, it will
cause digital distortion (digital clipping), which sounds terrible.
Direct Monitor Mix Control (AudioBox iTwo). The Mix knob allows you to blend
your input signals with the playback streams from your computer. This allows you to
monitor your input with zero latency. If the knob is positioned at 12 oclock, the input
and playback will be equally balanced.
Turning the knob to the left increases the level of the input relative to the playback;
turning it to the right increases the level of the playback relative to the input.
Please Note: When creating monitor mixes using Studio One or
another DAW, its important that you turn the Mix knob all the way to
the Playback position. Monitoring both the input and the playback
will create a doubling effect that makes monitoring difficult.
Direct Monitor Mix Control (AudioBox iOne). The Direct button blends the source
of what is heard through the Headphone and Main outputs in the following manner:
In the O, or “up, position (default), you’ll only hear
the playback from your computer.
When the button is in the On, or down, position, the button will
illuminate in blue, and you’ll hear a 50/50 blend of the playback from
your computer and the input signal going into the interface.
Headphone Output. This ¼-inch TRS connector is where you connect headphones
to your AudioBox interface.
Headphone Knob. This knob controls the volume of the headphone. The
headphone amplifier is quite powerful, and the volume goes to 11, so use the
maximum setting with extreme caution.
2.0 Hookup
2.2 Rear-Panel Connections
AudioBox
iOne and iTwo
Owners Manual
6
Main Output Knob. This knob controls the signal level for the Main outputs on the
back of the interface.
Power LED. This LED illuminates in blue when the interface is properly powered and
synced to a connection on you computer or iPad.
Please Note: If your AudioBox interface isn’t properly synced, the LED
will continue flashing blue until proper synchronization is achieved.
2.2 Rear-Panel Connections
Kensington Security Slot. This connector can be used with a Kensington®-style
security lock to protect your AudioBox iOne or iTwo from possible theft.
USB 2.0/Power Port. This is for connecting your interface to an available USB port on
your computer with the included USB cable. Because the AudioBox iOne and iTwo
are bus-powered via this connection, they don’t require an external power supply.
This port also provides power to the interface when used with an iPad.
Simply use the included USB cable connected to a compatible 5V, 2.1A
(2,100 mA) USB power supply, such as the one from an iPad.
Power User Tip: AudioBox iOne and iTwo are compatible with all USB 2.0 and 3.0 ports.
Device Port. This lets you use an Apple-compatible 30-pin or Lightning-to-USB cable
to connect your AudioBox to an iPad when recording and playing back from audio
applications. (We recommend using the cable included with the iPad, as results may
vary with non-Apple cables.) See iOS Devices for minimum system requirements.
2.0 Hookup
2.2 Rear-Panel Connections
AudioBox
iOne and iTwo
Owners Manual
7
MIDI I/O (AudioBox iTwo). MIDI stands for “Musical Instrument Digital Interface.
MIDI inputs and outputs allow connection to, and communication with, external
MIDI equipment. One function of these ports is MIDI sequencing but the MIDI
protocol can be used for much more than instruments and sequencing.
Power User Tip: MIDI is not audio but is frequently used to trigger or control an audio
source (such as synthesizer, keyboard, or sound module). It’s important to ensure that your
MIDI data is correctly sent and received by the appropriate hardware or software devices.
If you want to record the audio from the device your MIDI Out is controlling,
you’ll need to return the audio to an AudioBox input channel. Please refer to the
documentation provided for your MIDI devices for help with MIDI setup and usage.
Main Outputs. These are the main outputs for your AudioBox interface. The Main
Output knob on the front of the unit controls the volume level of these outputs.
Power User Tip: You must connect speakers or headphones directly to your AudioBox
interface in order to monitor playback from your computer.
2.0 Hookup
2.3 Basic Hookup Diagrams
AudioBox
iOne and iTwo
Owners Manual
8
2.3 Basic Hookup Diagrams
2.3.1 iOne computer hookup diagram
2.3.2 iOne iPad hookup diagram
iPad PSU
2.0 Hookup
2.3 Basic Hookup Diagrams
AudioBox
iOne and iTwo
Owners Manual
9
2.3.3 iTwo computer hookup diagram
2.3.4 iTwo iPad hookup diagram
PC/MAC
POWER
IN OUT
Mic • Line / Inst
1 2
2
48V
MIX
PWR
1
- +
Inputs Playback
- +
- +
AudioBox iTwo
PC/MAC
POWER
IN OUT
Mic • Line / Inst
1 2
2
48V
MIX
PWR
1
- +
Inputs Playback
- +
- +
AudioBox iTwo
iPad PSU
3.0 Connecting to a Computer or iOS Device
3.1 Minimum System Requirements
AudioBox
iOne and iTwo
Owners Manual
10
3.0 Connecting to a Computer or iOS Device
This chapter covers the minimum system requirements and
instructions for connecting your AudioBox iOne or iTwo
interface to your computer or compatible iOS device.
3.1 Minimum System Requirements
Mac
Mac OS X 10.8 or later
Intel Core 2 Duo (Intel Core i3 or better recommended)
4 GB of RAM (8 GB or more recommended)
iOS Devices
iOS 7.03 or later
iPad Air
iPad mini with Retina display
iPad (4th generation)
iPad mini
iPad (3rd generation)
iPad 2
Windows
Windows 7 x64/x86 SP1 or Windows 8 x64/x86 or later
Intel Core 2 Duo (Intel Core i3 or better recommended)
4 GB of RAM (8 GB or more recommended)
Please Note: Minimum System Requirements are subject to change.
Please visit www.presonus.com for the latest system requirements.
3.2 Installation for Mac OS X and iOS
Basic Installation
Because AudioBox iOne and iTwo are class-compliant Core Audio devices,
theres nothing to install. Simply connect your interface to your Mac or
iOS device to begin using it. A firmware update application is available
but it is only required in the event a firmware update is released.
Optional Configuration for Mac OS X System Sound Playback and/or Recording
You can also set up your AudioBox interface as the default Input and
Output device in OS X by following the steps listed below:
1. Open System Preferences by clicking the Apple menu. (System Preferences
may also be located in Launch Pad, the Applications folder, and the Dock.)
2. Click “Sound” to open the Sound configuration.
3. On the Output tab, select “PreSonus AudioBox iOne or “iTwo.
4. On the Input tab, select the “PreSonus AudioBox iOne or “iTwo.
5. On the Sound Effects tab, select the “PreSonus AudioBox iOne or “iTwo.
6. Close System Preferences.
Power User Tip: If you change the default sound settings on your computer,
the sound will come through the speakers or headphones connected to the
AudioBox iOne or iTwo interface instead of the internal computer speakers.
3.0 Connecting to a Computer or iOS Device
3.3 Installation for Windows
AudioBox
iOne and iTwo
Owners Manual
11
3.3 Installation for Windows
Basic Installation
The AudioBox installer requires that your interface be connected to an
available USB port on your PC. Once you’ve downloaded the installer,
double-click the icon to launch the installer, which will take you through
each step of the process. Please read each message carefully.
Please Note: Its recommended that you quit all applications and
disable your anti-virus software, before starting the installation.
If you see a Windows Account Security alert asking if you want to allow
the installer to make changes to your computer, click Yes.
1. The installer will open to the Welcome screen. Click “Next.
2. You will be asked if you would like the installer to automatically
create an icon on your desktop for the AudioBox control panel.
This control panel allows you to adjust the buffer size and
sample rate of your AudioBox. Creating a desktop icon will
provide you with quick access to these controls.
Click “Next.
3.0 Connecting to a Computer or iOS Device
3.3 Installation for Windows
AudioBox
iOne and iTwo
Owners Manual
12
3. The installer will now scan your computer, and you’ll
be prompted to begin the installation.
You’ll be prompted to connect your interface if the installer doesn’t detect it.
However, you may need to wait a few seconds for the interface to appear.
Click “Install Driver.
4. Once the installation has successfully completed, you’ll
be prompted to restart the computer.
Click “Finish” to automatically restart your computer
or
Click “Later” to close the installer and restart later.
Please Note: The driver will not function correctly
unless your computer has been restarted.
3.0 Connecting to a Computer or iOS Device
3.3 Installation for Windows
AudioBox
iOne and iTwo
Owners Manual
13
Optional Configuration for Windows System Sound Playback and/or Recording
If your recording application doesn’t support ASIO or WDM interfaces,
you can set up your AudioBox interface as the Windows Default Playback
and Recording device by following the steps listed below:
1. Open Control Panel.
In Windows 7, click Start>Control Panel.
For Windows 8+: From the Start Page, begin typing Control
Panel and click the Control Panel icon when it appears.
2. Click “Sound” to open the Sound-configuration dialog.
3.0 Connecting to a Computer or iOS Device
3.4 Windows PreSonus Driver Control Panel
AudioBox
iOne and iTwo
Owners Manual
14
3. On the Playback tab, select “Speakers - PreSonus
AudioBox iOne or “iTwo and click “Set Default.
4. On the Recording tab, select the “PreSonus AudioBox
iOne” or “iTwo and click “Set Default.
5. Click “OK.
Power User Tip: If you change the default sound settings on your computer,
the sound will come through the speakers or headphones connected to the
AudioBox iOne or iTwo interface instead of the internal computer speakers.
3.4 Windows PreSonus Driver Control Panel
When used with Windows systems, AudioBox iOne and AudioBox
iTwo offer a separate control panel with the following settings:
Run at Startup. When this is enabled, the AudioBox Control Panel
will automatically launch each time your computer starts up.
3.0 Connecting to a Computer or iOS Device
3.4 Windows PreSonus Driver Control Panel
AudioBox
iOne and iTwo
Owners Manual
15
Sample Rate Selector. Lets you set the sample rate to 44.1, 48, 88.2, or 96 kHz.
Although a higher sample rate results in better recording quality, it does increase
the file size and the amount of system resources needed to process the audio.
Power User Tip: Changing the sample rate will produce a momentary popping
noise. Because of this, it is recommended that you turn the Main and Phones
volumes down on your AudioBox prior to changing the sample rate.
ASIO Buffer Size. Allows you set the buffer size from 64 to 2,048 samples.
Power User Tip: You should set your buffer size prior to launching your host application.
Setting your buffer size to 64 or 128 may have a performance effect on your computer.
The buffer size determines the roundtrip time it takes audio data to
be converted from analog to digital and back to analog. As a general
rule, the higher the buffer size, the better the system performance, but
the less playable virtual instruments and the like become.
In general, 512 samples (11 to 12 milliseconds) will provide you
with a large enough buffer for optimum system performance but
small enough to minimize latency and be unobtrusive.
3.0 Connecting to a Computer or iOS Device
3.5 Using the AudioBox with Popular Audio Applications
AudioBox
iOne and iTwo
Owners Manual
16
3.5 Using the AudioBox with Popular Audio Applications
Complete setup instructions for Studio One Artist and a brief tutorial on its
features can be found in chapter 4 of this manual. However, you can use
your AudioBox iOne or iTwo with almost any audio-recording application
that supports Core Audio (Mac OS X or iOS) or ASIO (Windows).
Although this chapter covers basic driver-setup instructions for four
popular audio applications, please consult the documentation provided
with your software for specific instructions on how to select the correct
AudioBox driver as the audio-device driver for your software.
Apple Logic Pro/Express 7+
1. Launch Logic Pro/Express.
2. Go to Logic | Preferences | Audio.
3. Click the Devices tab.
4. On the Core Audio tab, check Enabled.
Logic Pro X doesn’t have a Core Audio tab, but make sure Core Audio is
enabled. The checkbox will be blue with a white checkmark in it.
5. Depending on which interface you have, select PreSonus AudioBox iOne or
PreSonus AudioBox iTwo from the Output Device and Input Device menus.
6. Click the Apply Changes button.
In Logic Pro X, Logics Core Audio functionality will reinitialize on
its own as soon as you click the Apply Changes button.
7. You will be asked if youd like to relaunch Logic. Click “try (re) launch.
8. Close the Preferences window.
9. Your AudioBox features custom I/O labels for faster workflow.
To enable these labels for use in Logic:
Go to Options | Audio | I/O Labels.
In Logic Pro X, open a session file and go to Mix | I/O Labels, or
from within the Mixer window go to Options | I/O Labels.
The second column in the window is named “Provided by Driver. Activate each
of these labels for your AudioBox. When you are done, close this window.
10. You’re now ready to use your AudioBox interface.
Steinberg Cubase 6+
1. Launch Cubase.
2. Go to Devices | Device Setup.
3. Select VST Audio System from the Devices column in the Device Setup.
4. Depending on which interface you have, select PreSonus AudioBox iOne
or PreSonus AudioBox iTwo from the ASIO Driver drop-down list.
5. Click “Switch to begin using the AudioBox driver.
6. Once you’ve successfully changed the driver, go to Devices | VST
Connections to enable your input and output buses.
7. You’re now ready to use your AudioBox interface.
3.0 Connecting to a Computer or iOS Device
3.5 Using the AudioBox with Popular Audio Applications
AudioBox
iOne and iTwo
Owners Manual
17
Cakewalk Sonar 8.5+
1. Launch Sonar.
2. Go to Options | Audio... and click on the Advanced tab.
3. Change the Driver Mode to ASIO. (Using WDM, rather than
ASIO, for pro-audio applications is not recommended.)
4. Click the “OK” button.
5. Restart Sonar.
6. Go to Options | Audio... and click on the Drivers tab.
7. Depending on which interface you have, highlight all input and output
drivers for “PreSonus AudioBox iOne or “PreSonus AudioBox iTwo.
8. Go to Options | Audio... and click on the General tab.
9. Based on the interface you have, set the Playback Timing
Master to “PreSonus AudioBox ... DAW Out 1.
10. Based on the interface you have, set the Recording Timing
Master to “PreSonus AudioBox ... Mic/Inst 1.
11. You’re now ready to use your AudioBox interface.
Ableton Live 8+
1. Launch Ableton Live
2. Go to Options | Preferences | Audio
3. Choose Driver Type: ASIO | Audio Device: ASIO PreSonus
AudioBox iOne or iTwo based on the interface you have.
4. Go to Input Config. Enable and select the desired Input channels.
5. Go to Output Config. Enable and select the desired Output channels.
6. You may now select the AudioBox inputs and outputs for each track created in Live.
7. You’re now ready to use your AudioBox interface.
4.0 Studio One Artist Quick Start
4.1 Installation and Authorization
AudioBox
iOne and iTwo
Owners Manual
18
4.0 Studio One Artist Quick Start
When Studio One Artist is launched, by default, you will be taken to the Start page.
Here you’ll find document-management and device-configuration controls, as
well as a customizable artist profile, a newsfeed, and links to demos and tutorials
from PreSonus. If you have an Internet connection on your computer, these links
will be updated as new tutorials become available on the PreSonus Web site.
Complete information on all aspects of Studio One Artist can be found
in the Help menu, or as a download from your My PreSonus account. The
information in this tutorial covers only the basic aspects of Studio One Artist
and is intended to get you set up and recording as quickly as possible.
4.1 Installation and Authorization
Installing Studio One Artist
To install Studio One Artist, download the Studio One
Artist installer from your My PreSonus account.
Windows users: Launch the Studio One Artist installer
and follow the onscreen instructions.
Mac users: Drag the Studio One Artist application into
the Applications folder on your Mac hard drive.
Activating Studio One Artist Online
After installing Studio One Artist, launch the program, and the Activate Studio
One menu will appear. Click on the Activate or Upgrade link to begin.
1. Click on the Activate Online link and enter the username and
password you created during registration, along with the
product key found in your My PreSonus account.
2. Click on the Activate button to finish the activation process.
Activating Studio One Artist Offline
1. If your computer is not connected to the Internet, visit http://my.presonus.
com on an Internet-connected computer to create your account.
2. Log in and click the “My Software link.
  • Page 1 1
  • Page 2 2
  • Page 3 3
  • Page 4 4
  • Page 5 5
  • Page 6 6
  • Page 7 7
  • Page 8 8
  • Page 9 9
  • Page 10 10
  • Page 11 11
  • Page 12 12
  • Page 13 13
  • Page 14 14
  • Page 15 15
  • Page 16 16
  • Page 17 17
  • Page 18 18
  • Page 19 19
  • Page 20 20
  • Page 21 21
  • Page 22 22
  • Page 23 23
  • Page 24 24
  • Page 25 25
  • Page 26 26
  • Page 27 27
  • Page 28 28
  • Page 29 29
  • Page 30 30
  • Page 31 31
  • Page 32 32
  • Page 33 33
  • Page 34 34
  • Page 35 35
  • Page 36 36
  • Page 37 37
  • Page 38 38
  • Page 39 39
  • Page 40 40
  • Page 41 41
  • Page 42 42
  • Page 43 43
  • Page 44 44
  • Page 45 45
  • Page 46 46
  • Page 47 47
  • Page 48 48
  • Page 49 49
  • Page 50 50
  • Page 51 51
  • Page 52 52
  • Page 53 53
  • Page 54 54
  • Page 55 55
  • Page 56 56

PRESONUS AudioBox iOne Owner's manual

Category
DJ controllers
Type
Owner's manual
This manual is also suitable for

Ask a question and I''ll find the answer in the document

Finding information in a document is now easier with AI