Page is loading ...

* Instructions differ depending on the devices you have.
For troubleshooting related to the smart computers or to Cateye Cycling™, see "Frequently
Asked Questions".
* For explanatory purposes, in this manual red text/icons on the smart computer screen
represent flashing items.
* The display screens and illustrations used in this manual are provided for instructional
purposes only. Actual screens and illustrations may differ depending on devices used.
* The online manual and YouTube videos for this product are subject to change without
notice.
Usage Instructions
Select the devices you have.
See Cateye Cycling Recommended Devices for the latest information about
smartphones recommended for use with Cateye Cycling™.


Setup with smartphone
Setup method
If you have purchased smart computer
Checking package contents
Setup (first time only)
Mounting the bracket
If you have not yet purchased smart computer
Setup (first time only)
Optional accessories
Mounting the speed (cadence) sensor (ISC-12)
Wearing the heart rate sensor (HR-12)
* Mount non-CatEye sensors as directed in relevant instruction manuals.

Setup with smartphone
Checking package contents
Smart computer unit
Bracket band
Bracket
Bracket rubber pad
Dial
* The Speed + Cadence Kit includes an integrated speed (cadence) sensor (ISC-12) in
addition to the items above.
* The Triple Wireless Kit includes an integrated speed (cadence) sensor (ISC-12) and a heart
rate sensor (HR-12).
Mounting the bracket
Setup

Checking package contents
Setup
Setup with smartphone
Setup uses the Cateye Cycling™ smartphone app (free).
1. Install Cateye Cycling™.
If using an iPhone
If using an Android smartphone
Smartphone
Pull free the smart computer's insulation sheet.
After you pull free the insulation sheet, return the battery cover to its previous location.
* If characters are lit on the LCD screen, you can use the product as is.
Insulation
sheet
Padrone Smart
Close
Open
Insulation
sheet
Strada Smart
Press
Slide
Waterproof
inner cap
Smart computer
When you use this device for the first time, follow the procedure below to set the smartphone
and smart computer.

* See Cateye Cycling Recommended Devices for the latest information about
smartphones recommended for use with Cateye Cycling™.
2. Launch Cateye Cycling™.
Follow the on-screen instructions and allow the use of GPS and Bluetooth® devices.
Once basic settings are complete the Trip screen appears.
3. Pair smart computer with sensors.
When the smartphone's Bluetooth settings are turned on, it will search for devices, but
do not configure settings at this stage. Switch to Cateye Cycling™ and follow the
procedure below.
Important
• Pairing (sensor ID synchronization) must be performed in order to use smart computer
and sensors.
• Do not pair sensors at a race venue or in similar locations where there are many other
users. Doing so may cause smart computer to be paired with another device.
Important
From
(MENU) at the top left of the screen, turn on [Connect], and then tap [Device].
Tap [Pair to Device] to start pairing.
For instructions on using devices, refer to the following:
Pairing with smart computer
Smart computer
1. Format (initialize) smart computer.
All data will be deleted and smart computer will be reset to factory default settings.
Caution
While holding down the MENU button on smart computer, press the AC button.

When Cateye Cycling™ detects smart computer, a message is displayed on the
smartphone.
Tap [Pairing] to complete pairing.
* If you are using Padrone Smart with an iPhone, the following message may be
displayed.
If this message is displayed, tap [Pair] again.
After pairing is completed, from
(MENU) at the top left of the screen, tap [Trip] to
switch to the Trip screen.
Smartphone
Smart computer
The whole display turns on and then switches to the smartphone search screen.
Whole display
turns on
Smartphone search
screen
* If smart computer switches to the measurement screen without the whole screen
turning on, it has not been formatted. Redo the procedure.
* The appearance of the smart computer screen depends on the state of Cateye
Cycling™.

Pairing with a sensor
1. Activate the sensor.
Activating the sensor
When Cateye Cycling™ detects the sensor signal, a message is displayed on the
smartphone.
Tap [Pair]. The synchronized sensor is displayed on the [Device] screen and pairing is
completed.
* When pairing a sensor with Cateye Cycling™, an "A" is displayed after the sensor
name.
* If you have paired a sensor capable of speed measurement, proceed to step 2.
2. Enter the tire circumference.
From the [Device] screen, tap the added sensor and select a tire circumference (the
length of the outer circumference of the tire).
Determining tire circumference
* Default value: 2096 mm (700x23c)
* Set tire circumference for each sensor.
* You can also change sensor names and cancel pairing from this screen.
Sensor pairing is now complete.
* Pair all sensors that you intend to use.
If you want to pair another sensor, repeat the same procedure again.
Smartphone
• Pair all sensors that you intend to use. If you want to pair another sensor, repeat the
same procedure again.
• When using an iPhone, you cannot sync settings of commercial sensors.
When measuring in Sensor Direct Mode, it is necessary to configure sensor settings
separately via smart computer.
1. Switching to Sensor Direct Mode
2. Pairing (Sensor ID synchronization)
3. Tire circumference setting
Important
Smart computer can be used with sensors compatible with Bluetooth SMART. Pair it with
optional accessories or commercial sensors as required.
When pairing is complete, smart computer switches from the smartphone search screen
to the [ready] (measurement standby) display.
Smart computer pairing is now complete.
* If you have other sensors, continue pairing them.
Smartphone search
screen
Measurement
standby
Mounting the bracket

Switching to Sensor Direct Mode
Smartphone
Smart computer
1. Close Cateye Cycling™ or from (MENU), turn off [Connect].
2. Switch smart computer to Sensor Direct Mode.
Measurement screen
(Sensor Direct Mode)
Smartphone search
screen
(1 second)
* Smart computer will search for a sensor instead of your smartphone. In this mode, the
sensor icon flashes to indicate sensor reception status.
• S (Flash): When the speed signal is received
• C (Flash): When the cadence signal is received
• S/C (S and C flash simultaneously): When the speed/cadence (ISC) sensor signal is
received
• H (Flash): When the heart rate signal is received
• P (Flash): When the power signal is received
Sensor Direct Mode and Mirror Mode measure independently and data has no continuity.
Important
Pairing (Sensor ID synchronization)
Setup
Tire circumference setting

Switching to Sensor Direct Mode
Pairing (Sensor ID synchronization)
Pair a sensor that you want to use with smart computer.
• Pairing (sensor ID synchronization) must be performed in order to use a sensor.
• Do not pair sensors at a race venue or in similar locations where there are many other
users. Doing so may cause smart computer to be paired with another sensor.
• Pair all sensors that you intend to use.
• During pairing or when connected to a smartphone, if sensor information is stored in
Cateye Cycling™, this information is written to the smart computer.
Smartphone : Pairing with a sensor
Important
1. From the measurement screen, press MENU to switch to the menu
screen.
* When the menu screen is left on for 1 minute, smart computer returns to the
measurement screen.
2. Press MODE to display the screen shown below, and then press MODE
for 2 seconds.
3. Activate the sensor that you want to pair.
Activating the sensor
Measurement
screen
Menu screen
(Clock setting)
(2 seconds)
Ready for Sensor Synchronization
Setup
synchronization activated

4. Press MENU to confirm pairing.
If you want to continue pairing another sensor, repeat the same operations again.
Pressing MENU again returns to the measurement screen.
* If you have changed settings, always press MENU to confirm changes.
When smart computer displays [FULL] on the screen and returns to the menu:
Up to 9 separate sensor IDs can be paired with smart computer. If the maximum number
of sensors have been paired, with the computer in pairing standby state, press MENU
for 4 seconds to clear all pairings.
Important
Tire circumference setting
complete
The synchronized sensor is displayed on the top of the screen and pairing is completed.
• SP : Speed sensor
• ISC : Speed/cadence sensor
• CD : Cadence sensor
• HR : Heart rate sensor
• PW : Power sensor
* When pairing a sensor with a smart computer, a "C" is displayed after the sensor name.
* Pairing standby time is 5 minutes. Activate the sensor within this time.

Switching to Sensor Direct Mode
Pairing (Sensor ID synchronization)
Tire circumference setting
Setup
Set the tire circumference for a sensor capable of speed measurement.
• Pairing (sensor ID synchronization) must be performed first.
Pairing (Sensor ID synchronization)
• Set tire circumference for each sensor. The default value is 2,096 mm (700x23c).
Important
1. From the measurement screen, press MENU to switch to the menu
screen.
* When the menu screen is left on for 1 minute, smart computer returns to the
measurement screen.
2. Press MODE to display (tire icon) and then press MODE for 2
seconds.
3. Select the sensor you want to set, and enter the tire circumference.
Enter the circumference in mm of the tire (the length of the outer circumference of the tire)
on which the sensor is installed.
(Setting range: 0100 – 3999 mm)
Determining tire circumference
Measurement
screen
Menu screen
(Clock setting)
(2 seconds)

* Sensors that can be selected are those that have been paired with Cateye Cycling™ or
a smart computer. The letter that appears after the sensor name indicates how the
sensor was paired.
• A : Sensor paired with Cateye Cycling™
• C : Sensor paired with a smart computer
* Error is displayed if values outside the setting range are entered.
4. Press MENU to confirm settings.
Pressing MENU again returns to the measurement screen.
* If you have changed settings, always press MENU to confirm changes.
Sensor selection
(2 seconds)(2 seconds)
(2 seconds)
Increase numbers
Tire circumference value
Move to next digit

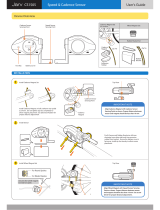
See illustrations
Bracket
band
Bracket
• When mounting on the stem
• When mounting on the handlebar
• Mounting and removing the smart computer unit
!When mounting on the stem
1. Check bracket orientation and attach it to the bracket band.
2. Remove the seal from the bracket rubber pad and stick the bracket
rubber pad onto the bracket band.
Bracket
rubber pad
3. Loop the bracket band around the stem and tighten the dial to secure
it.
Mounting the bracket
Setup
Checking package contents
The bracket can be mounted on either the stem or the handlebar.
Setup with smartphone
Watch video

• Always tighten the dial by hand.
Using a tool or other object to tighten the dial may crush the screw thread.
• Trim bracket band carefully so the cut end will not cause injury (see step 3 above).
Caution
Dial
Cut
Cut
• Always tighten the dial by hand.
Using a tool or other object to tighten the dial may crush the screw thread.
• Trim bracket band carefully so the cut end will not cause injury (see step 3 above).
Caution
!When mounting on the handlebar
1. Check bracket orientation and attach it to the bracket band.
Bracket
band
Bracket
2. Remove the seal from the bracket rubber pad and stick the bracket
rubber pad onto the bracket band.
Bracket
rubber pad
3. Loop the bracket band around the handlebar and tighten the dial to
secure it.
Dial
!Mounting and removing the smart computer unit

To remove smart computer, push out while holding the unit with the other hand to
ensure that it does not fall.
Caution
Removing
Click
While holding smart computer
Push out
Mounting

Setup
Setup with smartphone
Cateye Cycling™, Cateye's free smartphone app, records trip data using your smartphone's
GPS.
By combining the app with a Bluetooth sensor, it is also possible to reliably measure heart
rate, cadence, and other data as well as current speed.
1. Install Cateye Cycling™.
If using an iPhone
If using an Android smartphone
* See Cateye Cycling Recommended Devices for the latest information about
smartphones recommended for use with Cateye Cycling™.
2. Launch Cateye Cycling™.
Follow the on-screen instructions and allow the use of GPS and Bluetooth devices.
Once basic settings are complete the Trip screen appears.
* If you are not planning to use a sensor, setup is now complete.
If you are planning to use a sensor, follow the procedure below.
When the smartphone's Bluetooth settings are turned on, it will search for devices, but
do not configure settings at this stage. Switch to Cateye Cycling™ and follow the
procedure below.
Important
Pairing with a sensor
• Pairing (ID synchronization) must be performed in order to use a sensor.
• Do not pair sensors at a race venue or in similar locations where there are many other
users. Doing so may cause smart computer to be paired with another device.
Important
Cateye Cycling™ can be used with sensors compatible with Bluetooth SMART. Pair it with
optional accessories or commercial sensors as required.

• Pair all sensors that you intend to use. If you want to pair another sensor, repeat the
same procedure again.
1. Pair with a sensor.
From (MENU) at the top left of the screen, turn on [Connect], and then tap
[Device].
Tap [Pair to Device] to start pairing.
2. Activate the sensor.
Activating the sensor
When Cateye Cycling™ detects the sensor signal, a message is displayed on the
smartphone.
Tap [Pair]. The verified sensor is displayed on the [Device] screen and pairing is
completed.
* When pairing a sensor with Cateye Cycling™, an "A" is displayed after the sensor
name.
* If you have paired a sensor capable of speed measurement, proceed to step 3.
3. Enter the tire circumference.
From the [Device] screen, tap the added sensor and select a tire circumference (the
length of the outer circumference of the tire).
Determining tire circumference
* Default value: 2096 mm (700x23c)
* Set tire circumference for each sensor.
* You can also change sensor names and cancel pairing from this screen.
Sensor pairing is now complete.
* Pair all sensors that you intend to use.
If you want to pair another sensor, repeat the same procedure again.

Mounting the speed (cadence) sensor (ISC-12)
Setup with smartphone
The speed (cadence) sensor can be mounted either on the top or bottom of the chain stay.
See illustrations
Mounting on top of chain stay
Mounting on bottom of chain stay
* Mounting procedures give instructions for mounting on the top of the chain stay.
1. Temporarily attach the sensor to the left chain stay.
(1) Loosen the sensor screw using a Phillips screwdriver and check that the sensor
arm moves.
Cadence magnet
Wheel
magnet
Speed (cadence)
sensor
Cadence
magnet
Wheel magnet
Speed (cadence) sensor
If the speed (cadence) sensor is mounted on the bottom of the chain stay rather than
on the top, the adjustment range between the sensor and the magnet will be
narrower.
Caution
Watch video
If the speed (cadence) sensor is mounted on the bottom of the chain stay rather than on the
top, the adjustment range between the sensor and the magnet will be narrower.
Caution

(2) Attach the sensor rubber pad to the sensor.
Sensor screw
Sensor arm
Sensor
rubber pad
(3) Refer to the illustration and temporarily attach the sensor to the left chain stay with
nylon ties.
2. Temporarily attach the magnet.
Nylon tie
left chain stay
Cadence
magnet
Inside of the crank
Spoke
Nylon tie
Sensor
zone
Wheel magnet
(1) Using a nylon tie, temporarily attach the cadence magnet to the inside of the left
crank arm so that it faces the cadence sensor zone.
(2) Rotate the sensor arm and temporarily attach the wheel magnet to a spoke facing
Do not fully tighten the nylon ties. Once the nylon ties are fully tightened they cannot
be removed.
Caution
the speed sensor zone.
/