Page is loading ...

MIG WELDER /
PLASMA CUTTER CART
INSTRUCTIONS
Part #20232

2 Eastwood Technical Assistance: 800.544.5118 >> techelp@eastwood.com
The Eastwood 4 Wheel Welding Cart is constructed of heavy-gauge, powder-coated steel to provide years of rugged and reliable service. It is designed to
hold the Eastwood MIG175 or 135 Welders, the Eastwood TIG 200DC Welder, or the Eastwood Versa-Cut 40 Plasma Cutter, along with a gas bottle. Includes
a gas bottle retaining chain for safety, large 7-1/2" rubber-tired wheels for stability and ball-bearing swivel casters for easy mobility.
WARNINGS
• This cart is intended for use with one 7" diameter cylinder. Use caution when handling compressed gas cylinders and always keep in the upright position.
Always use supplied chains to secure the cylinder to the cart as tightly as possible at top and bottom.
• Never push or pull cart by the cylinder as it could tip over.
• Use cart on level surfaces only. Do not use on sloped surfaces.
• Always push, pull and steer the cart by the top shelf only and be aware that the weight of a welder will cause it to be top heavy.
• Do not push or pull by the welder case as it could tip over.
• Do not pull cart by the welder’s gun or ground cable as it could cause tip over.
• Never clamp ground clamp to cart as it could complete the welding circuit and cause unexpected arcing.
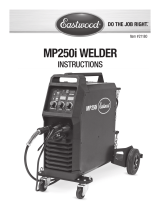
INCLUDES
A. (1) Lower Shelf E. (1) Rear Vertical Panel H. (2) Shelf Side Support Rails L. (1) Top Shelf Bracket
B. (1) Axle F. (1) Center Shelf I. (2) Cable/Hose Brackets M. (32) Nuts, Bolts, Washers
C. (2) 7-1/2" Wheels G. (1) Top Shelf J. (2) Tank Retaining Chains
D. (2) Swivel Casters (2) Wheel Retaining Washers & Cotter Pins K. (1) Lower Shelf Edge
REQUIRED TOOLS
• 2, 10mm wrenches
• Pliers
A
B
C
D
E
F
G
I
J
H
K
L
(underneath)

To order parts and supplies: 800.345.1178 >> eastwood.com 3
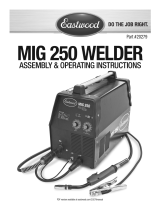
ASSEMBLY
REAR WHEELS TO LOWER SHELF (C TO A)
1. Place Lower Shelf (A) with welded tube downward and open side facing up.
2. Slide Axle (B) through welded tube and place 2 large washers over Axle (B).
3. Place Wheels (C) onto Axle (B).
4. Insert cotter pins into holes in either end of Axle (B) and bend legs backward over wheel hubs.
FRONT SWIVEL CASTERS TO LOWER SHELF (D TO A)
1. Arrange Swivel Casters (D) with fl ange facing upward, place against the underside of the Lower Shelf (A) and align the 4 mounting holes.
2.
From the underside of each Swivel Castor (D), insert a bolt and attach a washer and nut over the threads protruding upward through the Lower Shelf (A).
3. Repeat for the remaining 7 bolt, washer and nut sets making them fi nger-tight.
4. Using the two 10mm wrenches, tighten all 8 bolt, washer and nut sets securely.
INSTALLING REAR VERTICAL PANEL (E)
1.
Place the Rear Vertical Panel (E) over the Lower Shelf (A) with the angled fl ange against it and facing forward then align the one bottom and two side holes.
2. Insert a bolt in both sides (from the outside in) and another downward through the Rear Vertical Panel (E) and the Lower Shelf (A). Attach washers and
nuts over the threads protruding through.
3. Using the two 10mm wrenches, tighten all 3 bolt, washer and nut sets securely.
SHELF SIDE SUPPORT RAILS TO LOWER SHELF (A) & SHELF EDGE (K) TO (A)
NOTE: The bottom end of the Shelf Side Support Rails have only 2 holes while the top end has 5 holes and the bent fl anges face outward.
1. Place the Shelf Side Support Rails (H) with the 2 holes at the bottom aligned with the holes in the Lower Shelf (A).
2. Place the lower shelf edge in position aligning the holes with the lower shelf and shelf side support rails.
3. Place Lower Shelf Edge (K) onto (A) with holes aligned.
4. Insert 4 bolts bolt in both sides (from the outside in). Attach washers and nuts over the threads protruding through.
5. Tighten nuts only “fi nger-tight” to allow for alignment in following steps.
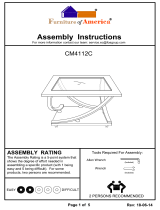
INSTALLING CENTER SHELF (F)
NOTE: The 4 edges of the Center Shelf (F) have bent fl anges. Install with fl anges facing upward
1. Align the Center Shelf (F) holes with 4 holes in the Shelf Side Support Rails (H).
2. Insert 4 bolts bolt in both sides (from the outside in). Attach washers and nuts over the threads protruding through.
3. Align the Center Shelf (F) holes with 2 holes in the Rear Vertical Panel (E).
4. Insert 2 bolts bolt in both sides (from the rear of the panel inward). Attach washers and nuts over the threads protruding through.
5. Tighten nuts only “fi nger-tight” to allow for alignment in following steps.
INSTALLING TOP SHELF (G) & TOP SHELF BRACKET (L) TO (G) & (E)
NOTE: Top Shelf (G) has 3 fl anges bent in one direction and 1 in the opposite direction. Install with opposite fl ange facing forward and downward.
1. Align the Top Shelf (G) holes with 4 holes in the Shelf Side Support Rails (H).
2. Insert 4 bolts bolt in both sides (from the outside in). Attach washers and nuts over the threads protruding through.
3. Align the Top Shelf holes with 2 holes in the Rear Vertical Panel (E) .
4. Insert 2 bolts in both sides (from the rear of the panel inward). Attach washers and nuts over the threads protruding through.
5. Insert 1 bolt into center of Rear Vertical Panel (E) through center hole of Top Shelf (G) fl ange (from the rear of the panel inward). Attach washer and nut
over the threads protruding through.
6. Insert bolts through Top Shelf Bracket (L) and holes in upper end of Rear Vertical Panel (E) and rear of Top Shelf (G).
7. Using the two 10mm wrenches, tighten all previously installed bolt, washer and nut sets securely.
ATTACHING CABLE/HOSE STORAGE BRACKETS (I TO H)
1. Locate the 2 Cable/Hose Storage Brackets (I) over the holes in both Shelf Side Support Rails (H) .
2. Insert 2 bolts bolt in both sides (from the outside in). Attach washers and nuts over the threads protruding through.
3. Using the two 10mm wrenches, tighten all 4 bolt, washer and nut sets securely.
INSTALLING CYLINDER RETAINING CHAINS (J TO E)
1. Determine a proper chain length to securely hold the gas cylinder in place, turn appropriate chain links to a vertical position and slide Cylinder Retaining
Chains (J) into keyhole slots in the Rear Vertical Panel (E).
2. Allow adjoining chain links to rest in a horizontal position against the forward, inside facing surface of the Rear Vertical Panel (E). Secure the cylinder to
the cart as tightly as possible at top and bottom.

© Copyright 2014 Easthill Group, Inc. Instruction part #20232Q Rev. 7/14
If you have any questions about the use of this product, please contact
The Eastwood Technical Assistance Service Department: 800.544.5118 >> email: techelp@eastwood.com
PDF version of this manual is available online >> eastwood.com/20232manual
The Eastwood Company 263 Shoemaker Road, Pottstown, PA 19464, USA
US and Canada: 800.345.1178 Outside US: 610.718.8335
Fax: 610.323.6268 eastwood.com
OPERATION
Once your Eastwood Welding Cart has been set up you can begin storing your welder/cutter on the cart. The cart was designed so that your MIG135, MIG175,
TIG200DC, or Versa-Cut 40 can sit on the top shelf. Your Gas Bottle mounts to the rear of the cart and is chained for safety.
TROUBLESHOOTING
• The bolt holes do not seem to align
- Make sure that all of the bolts are only fi nger tight and once the entire cart is assembled go back and tighten each of the bolts
• The Caster Wheels do not swivel 360°
- Make sure the bolts for the Caster Wheels are inserted so that the head of the bolt is on the caster side and the nut is on the Base Shelf Side.
ACCESSORIES
#13203 Auto Darkening Welding Helmet
#13212 Large View Auto Darkening Welding Helmet
#19015 MIG Welder Pliers
#12562 4' x 5' Welding Blanket
#20181 MIG Welder/Plasma Cutter 4 Drawer Cabinet
/