GE SmartWater GXRM10 User manual
- Category
- Sanitary ware
- Type
- User manual

INSTALLATION INSTRUCTIONS
For use with models GXRV10, GXRM10, PNRQ15, PNRQ20,
PNRV12 (beginning on page 1) and PNRV18 (beginning on page 4)
INSTALLATION NOTES
• Use pipe thread_ealing rope (provided) on threaded
COIlnefiliOIlS.
• Tubing may be cot 1o desired length.
• When connecting Ihe kit to a refligerator water dispenser,
a slightly lower dispenser water pressure may be noticed.
This is llormal.
• It is normal for tile GREEN light to flash on tile faucet monitor
when tile icemaker or dispenser calls for water (on some
models).
• Before installing the icemaker ki_ install the Reverse Osmosis
Filtration System according tothe installation instructions,
KIT CONTENTS
• Storage tank
• Tank adapter
• 6 ft. 3/8" orange robing
• 2 "lee fit/ings with
push-to-connect ends
• Brass tubing adapter, nut and
washer asseInhly
• 33 IL 3/8" blue robing
• Pipe lhread tape
• 1 ft. 3/8" orange robing
TOOLS AND MATERIALS REQUIRED
• Ufilily knife
• Pliers and adjuslablejaw wrench
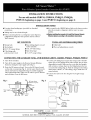
CONNECTING THE AUXILIARY TANK FOR MODELS GXRV10, GXRM10, PNRQ15, PNRQ20, PNRV12
I, Turn off file iceInaker.
2 Turn off the water supply m tile Reverse Osmosis Fihra/ion
System by closing the water supply valve (Fig. 1).
3, Dr'ain the RO system and tank. Ttlrn Oil file RO faucet located
on Ihe sink or counterlop (Fig. 1). Let tile water drain fkom tile
s_teIn until water has stopped flowing. On models equipped
wifll a tank shomffvalve, make sure tile valve is open _) that tile
tank will drain. (lose tile RO fauceL
5.
Cut the 3/8" tubing that coIlnefils the storage tank to Ihe RO
s_teIn (Fig. 2); this robing will be either orange, gray or while,
depending on model Make sure the cot is clean and straight
widl IlO burrs or crimps. Insert on "lee titling between tile two
cut ends of tile robing (Fig. 2). Push Ihe tobing into lhe fitting
until it slops--about 1/2". Give robing a lug m Inake sure it is
seated securely.
ConIlect tile tank to file Tee osiIlg file 6 ft. lengfll orange
robing.
Fig. 1 _)_ _ RO watt'r faucet
(lift lever to open)
H H
H H
H H
H H
!! ,,
*_lveWatersuppl_To drain
Fig. 2
Smrage tmik
Reverse Osmosis
_in
Iut
Tce fitdng
Auxilim T
storagetm_k
(induded
with R'_NIT)
215C1044P031 (II-04JR) 49-50138
www.GEAppliances.com
GENEtb\L ELECTRIC COMPANY, Appliance Park, Louisville, KY 40225

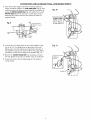
CONNECTING TO THE ICEMAKER FORMODELS GXRV10, GXRM10, PNRV12
L Locate the 3/8" robing that supplies file product water to ltle
RID fauco. It will be bhm, gray or white, depending on tile
model. DOnotconfuse the product water tubing with the drain
water tubing that also goes to the faucet (black or white onmost
models), At a convenient point between tile faucel and the
eleclronics box (oil mine models), cut tile robing and install
tile second Tee filling. Connect one end of the 33-foot lenffih
of blue robing a_sshown in Fig. 4.
2. Turoofficemakerwatersuppl_Disconnectdmwatersource
tubing from dm reffigeralor.
3. Connect lhe brass tubing adapter to tile flee end of the
3Nfoot length of bhm tubing. Shorten tubing to desired lengfll.
Attach the other end of file adapter to the icemaker water
valve. Be sure lo install tile plastic washer into tile tubing
adapter as shown in Fig. 5.
SANITIZING THE SYSTEM FOR MODELS GXRV10, GXRM10, PNRV12
See your Reverse Osmosis System Owner's Manual for complete 8, Remove sumps. Inert fillers. Lubricate o-ring with food-grade
Sanitization Instructions.
L Remove lhe sumps. ReInove the filters and place in a clean
plastic bag. flit has been six months since y_u last replaced
fillers, go ahead and discard dram and replace wilh new fillers.
2 Thoroughly wash sumps with dish soap. Thoroughly wipe
inside of head wifll a paper towel moistened wifll dish soap.
Rinse well.
3. Remove cap froIn RID cartridge housing. ReInove the RID
cartridge mid place in a cleml plastic tyag. Thoroughly wipe
inside the housing and cap with a gaper towel or dish brash
moistened wiflldish map. Rin_ well.
4, Replace empty poslfilter suInp and RO housing cap.
5, Fill prefilter sunlp with water to wilhfil 1ppof o-ring. Add 2 oz.
(4 Tbsp.) of ordinary household bleach. Replace prefilter
sump.
6. Make sure t_th tanks are sitting al tile _me elevation.
Olherwi_, Ihe higher tank may not be _nitized properly. Turn
oil water supply. Open RO faucet until water begins m flow,
then close. Allow system to fill fbr one minute.
Z Open Ihe faucet and allow water to flow for 10 minutes. Clo_
f_tucet fi)r one minute more, Ihen open mid allow water lo flow
for anolher 10 minutes, or until tile bleach odor is gone. "Ibm
offwater supply again. Drain RO system.
9.
10.
11.
12.
silicone g-tease, if necessa_. DO not use petroleum jellg Tighten
sumps securely.
Remove cap from RO cartridge housing, lnslall RID carlridge,
o-ring end first. Lubricate cover o-ring wilh fbod%rrade silicone
grease, if necessary. DOnot use petroleum ]ellg Tighten cap
securely.
TurIl oil water supply. Allow m fill. It may lake 4-8 hours m fill
boil, ranks. Check forleaks,
If y_u replace die prefiher and postfiher, allow faucet m run a
few lninules |O reInove harmless carbon panicles.
Once storage tanks are filll, turn Oil icemaker, lfyou have a
concern that some oflhe bleach water may have badkwashed
inlo the iceInaker iIflet lines, discard Ihe first two balches of
ice. Or, dr'din your dispenser tank until water IlO longer runs
cold, and check for bleach taste and odor.
Br,tss robing
adap_r
Hg. 3
This tubing adapter can be nsed
On ill(k_t icvmakcrs. Obtain iwed¢.d
tilting for otheix.
Product
_atcr tubv
4
Tee
titting ,,_1
Plastic
w&she r
(on some medals)
Storage rank
To drain
point
supply _-alve
J
Secondal'y storage tank
(included w5th R'_]glT)

SANITIZING THE SYSTEM FOR MODELS PNRQ15, PNRQ20
See your Reverse Osmosis System Owner's Manual for complete
Sanitization Instructions.
I. Turn off' the icemaker (if attached to the system).
2. Turn off' the water supply to dm systeIn.
3. Turn on tile RO f_mcet to drmn that tank (it may take several
minutes). Tunl OFF the faucet when tile tank is emp/y.
A
--CAUTION:Failuretoclosethewetersuppl valveortodra,.
the tank will causewater to sprayor run when canistersareremoved.
4. Remove the prefilter, posltilter and RO canister by relating to
lhe left about 1/3 turn.
5. Fill tile empty canister labeled "Sanifiz2ttion Canister" with
water to widfin 1" of ltle tipper opening. Add 1 oz. (2 Tbsp.)
of ordinary household [)leach. Install canister into the prefilter
canister position hy mining Io dm right about 1/3 turn until
lhe Mignment marks line up mid lhe cmfister stops.
6. Install by-lra_ss plugs into file RO canister and posit[her opening
in tile manifbld hy mining to tile right about 1/3 turn until file
alignment marks fine tip mid tile cmfister stops.
Z Turn on tile water supply. Turn oil the _hucet until water begdns
lo flow from file faucet, then turn tile faucet ore Allow ltle
sysleIll tO fill ff)r 10 minutes.
9.
10.
11.
12.
13.
Once tile system is drained, lure the l_ucel offand remove the
canister and plugs by turifing to the left about 1/3 turn. Keep
lhese in a safe place until needed tile next time.
If y_m are replacing the cmfisters, remove dm foil oil the mp
of tile new replacement filler canisters or RO cmfister. Install
cmfislers into the Inmfifi)ld by turning to tile right about 1/3
lure until dm alignment marks line up mid ltle canisters stop.
DO NOT OVERTIGHTEN.
Turn on tile water supply to fill lhe system (it may take up to
4 hours). Check for leaks.
PNRQ15:Remove the battery tray and replace lhe battery to
reset timer iI1[_ucel base.
PNRQ2_. Remove tile batteries from dm battery holder and
replace batteries to reset timer and 900 gallon monitor
fimctions.
If the prefilmr and poslfiher are replaced, turn the faucet
on and empty tile filled storage rzalk.
Once lhe storage tank is flail, turn on ltle icemaker.
Turn tile fimcet on and allow water to flow fbr 20 minutes,
or until bleach odor is gone. Turn off' tile water supply again.
Turn on dm faucet to drain dm systeIn.
Fig. 6
3/8" drain
Disposer
RO product water faucet mounted through sink
/
Tee
, TO icemaker
hflet
Tee
_utlet
Reservoir

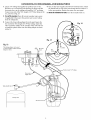
CONNECTING THE AUXILIARY TANK FOR MODEL PNRV18
I, Turn off tile water supply m 1tie Reverse Osmosis system by
closing (clockwise rotation) tile water supply valve (Hg. 9). Shut
off the waler from the Reverse Osmosis tank of tile posttiher hy
closing Ihe RED tank shutoff valve (Fig. 10). Lift tile lever oil Ihe
RO water faucet located oil Ihe sink or counlertop. Let water
drain from the s_tem. (lose file faucet when file water has
stopped flowing.
H H
H H
H H
H H
!! H
valveWatcrsuppl)_
To drain
Fig. 10
2 Unscrew the 3/8" tubing from the mp of the postfilter. Using
one of the 3/8" tee fillings from the parts hag, connect the
filling m the end of the tube that was atlached m the inlet of
lhe poslfilten Using/tie 12" section of the 3/8" orange robing
(provided), connect the lee tilting m the posffilter (Fig. 11).
3. Remove the icemakerstoragetankfkom its packing. Cormect
ltze tank adapler to lhe tank. Use Teflon" tape on the threads.
4. Connect tile tank m dm lee tilting using the 6 ft. length of
orange robing.
Fig. 11
Installation
with tee

CONNECTING TO THE ICEMAKER FOR MODEL PNRV18
I. Locate 3/8" robing I}lat suppfies file product water 1(7dm
RO fsuco. At a couveuieut point hel_veen lhe fhucet mid tile
electronics box, cut tile robing aud iustall the 3/8" tee fitting.
Conuect one end of tile 33 fi. leugth of 3/8" blue robing to tile
lee, as showu ill Fig. 13.
:2. Tom off the icemaker. Tum off current iceInaker water _mrce
(if applicable). Discolmect the present water _mrce tubing
froln tile refi_igeraUm
3, Connect lhe brass tubing adapter from tile parts bag to tile
free end of the 33 ft. length of 3/8" bhte tubing. Attach the
o/her end of the adapter to the icemaker water valve. Be sure
1(7 install the plastic wa_sher in|o file robing adapter as shown
in Fig. 14.
4. Turn on file water supply to tile Reverse Osmosis systeIll. Check
lhe shumffvalve on top of the extra storage tank m ensure it is
in tile open position. Smfifize the system (see next page).
5. Check the installation for leaks. Turn tile icelnaker back on.
Fig. 14
tubing
adapu r_ Plastic
., ,a_as lie F
Icemak_ r
Fig. 13
Fig. 12
This tubing adapter can Ix used
on m(_t icemak_ rs. ObU_in Iw_d¢_d
fitting for othei_.
RO _'at er
faucet
icemaker
II
II
II
II
lnser_
To drain
point
I/8" mbing
Tank s
Storage tank

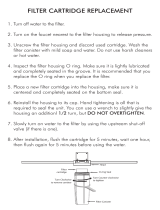
SANITIZING THE SYSTEM FOR MODEL PNRV18
Sanitize upon installation of the Reverse Osmosis system and after
servicing inner parts of the Reverse Osmosis system, including
replacement of prefilter, posffilter and Reverse Osmosis cartridge.
It is important to wash hands with anti-bacterial soap before handling
inner parts of the system.
A CAUTION:ffiustallingunitinNewCoustruction,eusure
houseplumbingis flushed thoroughlybefore openingthe water supply
valve.Also, before sanitizing, be sure toremoveall cartridgesus follows.
Chlorinewill destroythe ROcartridge.
I. Be sure lhe water supply valve to tile Reverse (-_mosis systeIll is
turned offand the RO water faucet is open. ,allow the system
to drain completely (this takes several minutes).
2. Place a dry towel under unit. ReInove lhe clmnp retainers and
clamp sections frol]l top of unit.
3. Lift the Rever_ Osmosis cap slraJght tip (a slight resistance
is normal) froIn the Reverse Osmosis housing (no need to
discormect lubing) and move aside.
NOTE:If the cap o-dog seal remained in the ROhousing,replace it
onthe cap.
4. Remove the ROcartridge and outer prefilter cartridge from 1he
RO housing and place in a clean plastic bag. Disix)se of water
froln lhe RO housing.
Fill the RO housing wilh flesh cold water, to about 1" from the
rap. Add one ounce (2 Tbsp.) of ordinary 5.25% household
chlorine hleach and mix into tile waten DOnot add chlorine first.
Concentrated chlorine llaay damage plastics.
6. Replace RO cap, widl the o-ring, and install the clamp
retainers.
Z (:lose the red taa_kshumffvalve mid disconnect postfiher a/
dm lailk shutoff *_alve.Connect tim RO product water robing
(discormect at electronics box) directly m tile tank shutoff
valve, isolating the carbon postfilter as shown in Fig. 15B.
8. Open the red tank shulv)ffvalve and dm water supply valve m
the Reverse Osmosis system. LMlowsystem m fill fi,)rone minute.
Now open lhe RO water faucet, locking the lever upw,,rd against
lhe slxmt.
9. Allow water to flow through the Reverse Osmosis system unlll
all the bleach odor is gone (approxiInately 20 Ininutes).
IO. Turn off'the water supply valve to the Reverse Osmosis system.
(:lose the RO water faucet _Mq_ER the water flow slops.
11. (:lose the red tank shumffvalve. Disconnect the water product
line from the red tank shumffv'alve and connect m the
electronics box. Reconnect posttiher line m red tank shutoff
valve. Open red rank shumffx_ve.
12. a.Repeat steps two and three. Be carefial of water in tim
RO housing. Disix)se ofwamr.
b. Replace the RO cartridge with tim o-ring seal downward
mid tim prefilter cartridge wifll "this side up" facing upward.
Be sure hands have been cleaned with an anti-bacterial soap.
C.Repeat step 6.
Vacullm
relief valve -
end
Posdilter line _ RO housing
retainers (2)
Clamp
•sections (2)
shutoff _'alve
_&te F
tubing
Automatic shutotf
i d)ly Tank shutotf valve
Fig. 15B
Connect RO water robing
to tank shutoIt valve
Disconnect
postfilter
*Electronic_ box
-
 1
1
-
 2
2
-
 3
3
-
 4
4
-
 5
5
-
 6
6


GE SmartWater GXRM10 User manual
- Category
- Sanitary ware
- Type
- User manual
Ask a question and I''ll find the answer in the document
Finding information in a document is now easier with AI
Related papers
Other documents
-
 APEC Water Systems WRENCH-HB-ALL User manual
-
vitapur VPS1140-1 User guide
-
Unbranded N88413B3 Installation guide
-
Alpha Battery Heater Mats Owner's manual
-
-
GE Profile PSS25MGMABB Owner's manual
-
Hotpoint HTS22GBPDRCC Owner's manual
-
AMERICANA A3316ABSBRWW Owner's manual
-
-
