Page is loading ...

Water Filtration System
49-50306 09-15 GE
GXK285JBL
Owner’s Manual and
Installation Instructions
Safety Instructions
..................2
System Overview ..................3–4
Installation Instructions ..........5-8
Cold Water Connection ..................4
Control Valve Installation .................5
Mounting the System ....................7
Filter Change Light .......................8
Filter Replacement .......................8
Flush Procedure ..........................8
Troubleshooting Tips ................9
Consumer Support .................12
Manual del propietario
y instalación
Sistema de
filtración de agua
System tested and certified by NSF
international against NSF/ANSI Standards
42, 53, and 401 for the reduction of claims
specified on the Performance Data Sheet and
at www.nsf.org.

2
IMPORTANT SAFETY INFORMATION.
GE Appliances website
For more information on operation, visit www.GEAppliances.com or call 800.452.5039 in US or 866.779.7627 in Canada.
This is the safety alert symbol. This symbol alerts you to potential hazards that can kill or hurt you and others. All safety mes-
sages will follow the safety alert symbol and the word “DANGER”, “WARNING”, or “CAUTION”. These words are defined as:
Indicates a hazardous situation which, if not avoided, will result in death or serious injury.
Indicates a hazardous situation which, if not avoided, could result in death or serious injury.
Indicates a hazardous situation which, if not avoided, could result in minor or moderate injury.
SAFETY INFORMATION
WARNING
DANGER
CAUTION
IMPORTANT SAFETY INSTRUCTIONS
To reduce the risk of fire, explosion, electric shock, or injury when using your system follow
these basic safety precautions:
WARNING
To reduce the risk of physical injury, depressurize system as
shown in manual prior to cartridge removal.
To reduce the risk of injury when using your system follow these basic safety precautions.
To reduce the risk associated with choking, do not allow children
under 3 years of age to have access to small parts during the
installation of this product.
To reduce the risk associated with the ingestion of
contaminants, do not use with water that is microbiologically
unsafe or of unknown quality without adequate disinfection
before or after the system.
To reduce the risk associated with hazardous voltage due to an
installer drilling through existing electric wiring or water pipes
in the area of installation, do not install near electric wiring or
piping which may be in path of a drilling tool when selecting the
position to mount the system bracket.
If this device is not maintained and operated as specified in the
owner’s manual, there is a risk of exposure to contaminants. For
more information, visit the manufacturer’s internet website at
www.geappliances.com or the California State Water Resources
Control Boards’ internet website at www.waterboards.ca.gov.
CAUTION
NOTICE:
Read and follow Use Instructions before installation and use of
this system.
Installation and use MUST comply with all state and local
plumbing codes.
Do not use on a hot water supply (100°F max.). Install on a cold
water line only.
Protect from freezing, remove filter cartridge when temperatures
are expected to drop below 35° F (1.7° C).
Do not install if water pressure exceeds 125psi (8.8 Kg/cm
2
).
If your water pressure exceeds 80 psi (5.6 Kg/cm
2
), you must
install a pressure limiting valve. Contact a plumbing professional
if you are uncertain how to check your water pressure.
Do not install systems in areas where ambient temperatures
may go above 110° F (43.3° C).
The disposable filter cartridge should be replaced every 6
months, at the rated capacity or sooner if a noticeable reduction
in flow rate occurs.
Where a backflow prevention device is installed on a water
system, a device for controlling pressure due to thermal
expansion must be installed.
Do not install where water hammer conditions may occur.
If water hammer conditions exist you must install a water
hammer arrester. Contact a plumbing professional if you are
uncertain how to check for this condition.
Ensure all tubing and fittings are secure and free of leaks.
On plastic fittings, never use pipe sealant or pipe dope. Use PTFE
thread tape only as pipe dope may deteriorate the plastic.
Do not use a torch or other high temperature sources near
system, cartridges, plastic fittings or plastic plumbing.
Do not install in direct sunlight or outdoors.
Do not install near water pipes which will be in path of a drilling
tool when selecting the position to mount the bracket.
Mount system in such a position as to prevent it from being
struck by other items used in the area of installation.
Ensure that the location and fasteners will support the weight of
the system when installed and full of water.
READ AND FOLLOW THIS SAFETY INFORMATION CAREFULLY.
SAVE THESE INSTRUCTIONS

3
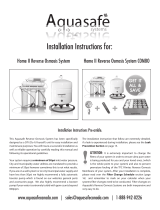
How it works.
This system allows you to choose between filtered and unfiltered water from your existing kitchen faucet. The system
consists of a control valve, timer, and filters. The existing water line is split into two lines. One line passes through the
filtration system to the control valve. The other line connects directly to the control valve.
When the control valve is pointing away from your kitchen faucet, normal unfiltered water is dispensed.
When the control valve is pointing toward your kitchen faucet, filtered water is dispensed.
You will notice a slightly slower flow of water when filtered water is being dispensed.
The base of the control valve will flash red when its time to change filters and batteries. When it double flashes, 6
months have passed and its time to replace the filters. When it flashes a single fading flash, 1 year has passed and it is
time to replace the filters and the timer batteries.
Right Hand Installation:
Left Hand Installation:
Specifications Guidelines.
Many bad tastes and/or odors are reduced in water using activated carbon filter canisters. They are most often used to
reduce chlorine taste and odor. They can also reduce other undesirable elements from drinking water supplies.
NOTE: Small amounts of hydrogen sulfide (noticeable as “rotten egg” odor) may be reduced by taste and odor filters for
a short time, but the carbon media is quickly exhausted. Other water conditioning equipment is usually required for the
continuous treatment of hydrogen sulfide.
T-Fitting
Angle Stop
Valve Adapter
Filter System
Timer
Wire
Control Valve
Cold Water Line
Adapter
Existing Faucet
Cold Water line
3’ Yellow Tube
Yellow Tube
3’ Orange Tube
4’ Yellow Tube
4’ Blue Tube
NOTE: Make sure “F” faces toward you during installation
Control Valve
NOTE: Make sure “F” faces toward you during installation
Wire
Timer
3’ Yellow Tube
Yellow Tube
4’ Yellow Tube
Filter
System
Cold Water Line
Adapter
Existing Faucet Cold
Water line
T-Fitting
Angle Stop
Valve Adapter
3’ Orange
Tube
Outlet
Inlet
Outlet
Inlet
4’ Blue
Tube

4
Installation
Kitchen Faucet Filtration System –
Instructions
GXK285JBL
WARNING ³
Read “Important Safety
Information” on page 2 before beginning installation.
TOOLS AND MATERIALS REQUIRED
FOR INSTALLATION
• Phillips screwdriver
• Two (2) adjustable wrenches
• Electric drill and drill bit to drill 1.25” hole (type as
required) if mounting hole is needed for control valve
• Tape measure
•
If your main water line is a rigid pipe, you will require
a compression fitting and possibly other plumbing
hardware to complete the installation (sold separately).
127,&(³
To avoid damaging the sink or countertop,
consult a qualified plumber or installer for drilling
procedures. Special drill bits may be needed for granite,
stone, porcelain or stainless steel.
CONTENTS INCLUDED
WITH THE PRODUCT
COLD WATER CONNECTION
A typical connection using the included water
supply fitting is shown in the illustration below.
1. Close the water shut-off valve that is immediately
in front of the supply tube and open the faucets
to drain water from the sink cold water pipe.
2. Remove line that connects the cold water from
faucet line to the supply valve. Some water may
spill out.
3. Hand tighten the angle stop valve adapter onto
the cold water valve. NOTE: A minimum of
approximately 8 threads is required on valve
stem. Finish tightening 1/2 turn with adjustable
wrench. Be careful not to overtighten or cross-
thread as damage to threads can occur.
Some valve threads may be exposed when adapter
is fully seated.
4. Insert one foot long yellow tube fully into angle stop
valve adapter. Pull firmly on tube to make sure it is
secure.
5. Insert one foot long yellow tube into bottom of
T-fitting (see Figure 1). Insert 3 foot long yellow tube
into one side of T-fitting. Insert 4 foot long yellow
tube into other side of T-fitting. Pull firmly on tubes
to make sure they are secure.
1 foot Yellow
3/8” Tube
Cold Water Shutoff
Fig. 1
Angle Stop
Valve Adapter
Existing Cold
Water Valve
(Approximately 8
threads minimum)
T-Fitting
BEFORE YOU BEGIN
Read these instructions completely and carefully.
•
IMPORTANT – Save these instructions
for local inspector’s use.
•
IMPORTANT – Check with your local
public works department for plumbing codes. You
must follow their guides as you install the Water
Filtration system.
•
Note to Installer – Be sure to leave these
instructions with the Consumer.
• Note to Consumer – Keep these instructions
for future reference.
• Skill level – Installation of this appliance requires
basic mechanical and electrical skills.
• Completion time – 60-90 minutes
• Proper installation is the responsibility of the
installer.
• Product failure due to improper installation is not
covered under the Warranty.
• Water filter system
assembly, including
mounting screws
• Water line adapters
and tubing
• Control Valve with LED
Lights
• Decorative Knob and Nut
• Timer Box
• Batteries

Installation Instructions
5
6. Hand tighten the cold water line adapter into the
cold water line from the faucet.
Finish tightening with two adjustable wrenches.
Be careful not to overtighten or cross thread as
damage to threads can occur. Some threads may
be exposed when adatper is fully seated.
7. Insert 3 foot orange tubing fully into cold water
line adapter. Pull firmly on tube to make sure it is
secure.
INSTALL THE CONTROL VALVE
(continues)
CAUTION: When drilling in Stainless Steel,
edges may be sharp and could damage wire. Be
careful to not cut yourself or damage the wire.
2. To have filtered water dispensed from kitchen
faucet when control valve is pointed toward
faucet connect tubes as follows:
NOTE: Refer to diagram on page 3 for tube
routing.
IF CONTROL VALVE IS ON RIGHT SIDE OF FAUCET:
- Connect 4 foot long blue tube to port number “2”.
- Connect 3 foot long yellow tube from T-fitting to
port number “1”.
- Connect 3 foot long orange tube to port “F”
(bottom port)
Pull firmly on all tubes to make sure they are secure.
IF CONTROL VALVE IS ON LEFT SIDE OF FAUCET:
- Connect 4 foot long blue tube to port number “1”.
- Connect 3 foot long yellow tube from T-fitting to
port number “2”.
- Connect 3 foot long orange tube to port “F”
(bottom port)
Pull firmly on all tubes to make sure they are secure.
Existing Cold
Water Line
from Kitchen
Faucet
Fig. 2
Cold Water
Line Adapter
3 foot Orange
Tubing
INSTALL THE CONTROL VALVE
Be sure there is room underneath and above the
sink to make the needed connections. Before
starting, make sure there is sufficient room for the
valve base. Select one of the following places to
install the valve (1.25” diameter hole required):
A. In an existing sink spray attachment or soap
dispenser hole.
B. In a hole to be drilled in the sink top.
C. In a hole to be drilled in the countertop, next
to the sink.
NOTES:
• Be sure the valve base will fit flat against the
surface at the selected location.
Installation Steps (refer to illustration below
for clarification)
1. If drilling is needed, make a 1.25s diameter hole.
Be sure to use the proper procedure for drilling
granite, stone, porcelain or stainless steel.
Special drill bits may be needed. Consult a
qualified plumber for the proper procedure.
Blue or Yellow
Tube (see above)
Blue or Yellow
Tube (see above)
Orange Tube

Installation Instructions
INSTALL THE CONTROL VALVE
(continues)
3. With wire routed under rubber gasket and
locking nut (as shown below) thread nut at least
3/4 toward bottom.
4. With “F” port label facing toward you (wire
groove facing back of cabinet) insert control
valve up through hole in sink/countertop.
5. Install 2nd rubber gasket on the control valve.
Insert decorative nut on top of control valve
turning fully until it stops, approximately two
turns of nut. Do not overtighten.
6. Turn locking nut clockwise to tighten until
it is firmly secure against underside of sink/
countertop. Do not allow control valve body
to rotate, “F” port label should face toward you
after locking nut is tight.
6
Rubber Gasket
Locking Nut
Wire
INSTALL THE CONTROL VALVE
(continues)
7. Insert control knob into valve body.
NOTE: Knob only inserts in one position, rotate
slowly until you feel it drop slightly into place.
Then push down firmly to snap in place.
8. Check knob rotation. Knob should rotate 180
degrees and point towards you as it rotates left/
right. If point of knob rotates towards wall, then
unit is installed backwards. Please review step 2.
9. Connect wire to timer box.
10. Find suitable location for timer box and battery
access. Mount timer box to side of wall or
cabinet with two screws (and drywall anchor)
provided. NOTE: Be careful not to pinch or
screw through the wire.
11. Install two AA, 1.5 volt, batteries into timer box.
Control Knob
Decorative Nut
Wire
Rubber Gasket
Locking Nut
NOTE:
“F” facing toward you.
Rubber Gasket

Installation Instructions
7
MOUNTING SYSTEM INSTALLATION
Pick a location under the sink to mount the system. Location should be easily accessible, with 4” of clearance
between the bottom of the filter canisters and the floor or bottom of the cabinet; any less will result in difficulty of
removing filter canisters (see Fig. 5). Allow enough space on either side of the system for the tubing connections.
System should be mounted at least 7” from front of cabinet to allow proper routing of tubing.
SCREW INSTALLATION
1. Remove the top cover of system.
2. Screws should be placed a minimum of 15 inches above the bottom
of the cabinet or floor where the system is to be mounted (Fig. 5).
NOTE: Any distance lower may result in filter canisters interfering
with the floor when removed.
3. Use the system as a template to mark screw hole locations where
the screws are to be installed. Install screws into the wall, leaving
3/16 inch clearance between the head of the screw and wall (drill
pilot holes if needed) (Fig. 6). Use anchors if mounting to drywall.
Anchors require a 1/4” hole.
4. Hang system on screws and tighten until system is held firmly.
5. Install top cover onto system.
6. Install 4 foot long yellow tube into inlet (left side) of system (inlet and outlet are labeled on top of the system).
7. Install 4 foot long blue tube into outlet (right side) of system. Pull firmly on tubes to make sure they are secure.
8. Remove shrink wrap from filters and install in system by turning approximately 1/3 turn until locked into place.
Filter will raise up as it is turned. Filter label will be centered and facing forward when fully installed.
NOTE: System may exhibit low flow or no flow at all if the filter is not fully installed.
9. Turn on water supply valve and check for leaks.
10.
Perform Flush Procedure as described on page 8, steps 3-7.
15 inches
Screws
Screw
3/16 inch
Fig. 6
Fig. 5
Wall
System
Top Cover

Installation Instructions
8
FILTER CHANGE LIGHT
The clear ring at the bottom of the control knob will
flash red to indicate it is time to change the filter and
the battery.
The ring will double flash at six months to indicate it is
time to replace the filter.
The ring will have a single fading flash at one year
to indicate it is time to replace the filters and the
batteries.
INSTALLING OR REPLACING THE FILTER
CANISTERS
TO PROPERLY MAINTAIN SYSTEM AND REDUCE
THE RISK OF PROPERTY DAMAGE DUE TO WATER
LEAKAGE, CHANGING FILTER AS REQUIRED.
If installing the system for the first time skip to step 3.
1. Remove the filter canisters from the manifold by
rotating the canisters to the left about 1/3 turn.
NOTE: A small amount of water from the tubing
between the filter and the faucet may come out. A
small towel should be able to catch it.
2. Remove shrink wrap on the new replacement filter
canisters. Install the new canisters into the manifold
by turning to the right about 1/3 turn until the filter
stops. The filter will rise up as it is turned.
FLUSH PROCEDURE
3. Turn on cold side of kitchen faucet. Turn control
valve so it is pointing towards kitchen faucet (water
will flow slower when passing through filters).
NOTE: System may make noise during this procedure.
4. Check for water leaks around the system.
5. Allow the system to run for 11 gallons (or 10
minutes) to flush out any harmless carbon fines that
may be present.
6. Turn off faucet and check around system for leaks.
7. Reset timer by holding reset button on timer box for
5 seconds. Ring in base of control valve will light
for 5 seconds. If single fading flash was occurring,
replace batteries before resetting the timer.
Replacement Filter Canisters/
Estimated Replacement Costs
)4.-³5HSODFHPHQWILOWHUFDQLVWHU²
For replacement parts, call toll-free 800.626.2002
(U.S.) or 800.663.6060 (Canada–English).
EMERGENCY REPLACEMENT
PROCEDURE
Whenever water of unknown quality is passed through
the GE Water Filtration system, the filter canisters
should be discarded and the filtration system flushed.
WARNING: To reduce risk of ingestion
of contaminants, do not use with water that is
microbiologically unsafe or of unknown quality without
adequate disinfection before or after the system.
Circumstances that may require replacing the filters
are:
• Boil water advisory
• Flooding of the GE Water Filtration system
• Long-term non-use
The procedure for flushing the GE Water Filtration
system is:
1. See Replacing the Filter Canisters section and follow
steps 1–7.

Troubleshooting Tips
Problem Possible Causes What To Do
Water contains tiny black particles New filter canisters contain
activated carbon.
• Turn on the filtered water faucet and allow to run for 11 gallons
(or 10 minutes) to flush out any harmless carbon fines that may
be present.
Water has air bubbles and is cloudy Air in system after installation. • Will go away after water runs for a while.
Indicator light on the control valve is
flashing
Six months usage has
occurred. This is the maximum
life of the filter canisters.
• If double flash, replace filters.
• If single fading flash, replace filters and batteries.
Indicator light on the control valve is
not blinking
Normal operation. • Does not blink until 6 months of operation has passed.
• Normally the light is not on. The light blinks every 20 seconds
to indicate a filter change is needed. This occurs about every 6
months.
Battery may need to be
replaced.
• Replace battery and press reset button for 5 seconds. Indicator
will light to indicate proper installation and operation. Timer is
reset for 6 months.
Indicator light on the control valve
is not working
when new battery is
installed
Battery may have been
installed incorrectly or wire
not connected.
• Observe battery orientation markings on the holder.
• Ensure wire is connected from control valve to timer box.
•
Press reset button for 5 seconds to reset timer, indicator will light
and timer is reset for 6 months..
Chlorine taste and odor in the product
water
The filter canisters are no
longer reducing chlorine taste
and odor from the water
supply.
•
Replace the filter canisters.
Water dispenses
very slowly
The filters have been installed
for too long.
• A six-month change-out period is recommended. Replace both
filter canisters.
The filter canisters have
become clogged.
• High sediment levels can cause premature clogging. Replace
both filter canisters.
Filter not installed fully • Ensure filter is fully installed, label should be centered and facing
forward.
Fittings are leaking Tubing may not be installed
properly.
• Fully follow the installation instructions and be sure the tubing is
free of nicks, burrs, etc., and is installed to the proper depth.
No water dispensing
from system
Filter canisters not fully
installed.
• Fully follow the filter replacement instructions.
9
If you are still having trouble, please call us at 800.952.5039 in the USA or 866.777.7627 in Canada.

Parts List.
10
004
005
001
002
999
003
Ref. No. Part No. Part Description
001 WS22X21084 Install Kit 1
002 WS15X21085 Timer 1
003 WS10X21083 Control Valve Assembly (Chrome) 1
004 WS19X21082 Filtration Manifold 1
005 FQK2J Filter Set 1
999 49-50306 Owner’s Manual 1
To obtain replacement parts, call toll-free 800.626.2002 (U.S.),
800.663.6060 (Canada–English).

11
Warranty.
LIMITED ONE-YEAR WARRANTY
• What does this warranty cover?
³$Q\GHIHFWLQPDWHULDOVRUZRUNPDQVKLSLQWKH
manufactured product.
• What does this warranty not cover?
³)LOWHUFDQLVWHUVDQGEDWWHULHVDIWHUGD\VIURPGDWHRI
purchase.
³6HUYLFHWULSVWR\RXUKRPHWRWHDFK\RXKRZWRXVHWKH
product.
³,PSURSHULQVWDOODWLRQGHOLYHU\RUPDLQWHQDQFH
³)DLOXUHRIWKHSURGXFWLILWLVDEXVHGPLVXVHGDOWHUHGXVHG
commercially or used for other than the intended purpose.
³8VHRIWKLVSURGXFWZKHUHZDWHULVPLFURELRORJLFDOO\XQVDIH
or of unknown quality, without adequate disinfection
before or after the system.
³'DPDJHWRWKHSURGXFWFDXVHGE\DFFLGHQWILUHIORRGVRU
acts of God.
³ Incidental or consequential damage caused by possible
defects with this appliance, its installation or repair.
• For how long after the original purchase?
³2QH\HDU
• How do I make a warranty claim?
³5HWXUQWRWKHUHWDLOHUIURPZKLFKLWZDVSXUFKDVHG
along with a copy of the “Proof of Purchase.” A new or
reconditioned unit will be provided. This warranty excludes
the cost of shipping or service calls to your home.
This warranty is extended to the original purchaser and any
succeeding owner for products purchased for home or office
use within the USA. In Alaska, the warranty excludes the cost
of shipping or service to your home or office.
Some states do not allow the exclusion or limitation of
incidental or consequential damages. This warranty gives
you specific legal rights, and you may also have other rights,
which vary from state to state. To know what your legal rights
are, consult your local or state consumer affairs office or your
state’s Attorney General.
Contact us at GEAppliances.com, or call toll-free at
800.952.5039 in the U.S., or 866.777.7627 in Canada.
(;&/86,212),03/,(':$55$17,(6³<RXUVROHDQG
exclusive remedy is product exchange as provided in this
Limited Warranty. Any implied warranties, including the
implied warranties of merchantability or fitness for a
particular purpose, are limited to one year or the shortest
period allowed by law.

Consumer Support.
GE Appliances Website
GEAppliances.com
Have a question or need assistance with your appliance? Try the GE Appliances Website 24 hours a day, any day of the year!
For greater convenience and faster service, you can now download Owner’s Manuals or order parts on-line.
Real Life Design Studio GEAppliances.com
*(VXSSRUWVWKH8QLYHUVDO'HVLJQFRQFHSW³SURGXFWVVHUYLFHVDQGHQYLURQPHQWVWKDWFDQEHXVHGE\SHRSOHRIDOODJHVVL]HV
and capabilities. We recognize the need to design for a wide range of physical and mental abilities and impairments. For details
of GE’s Universal Design applications, including kitchen design ideas for people with disabilities, check out our Website today.
For the hearing impaired, please call 800.TDD.GEAC (800.833.4322).
Parts and Accessories GEAppliances.com
Individuals qualified to service their own appliances can have parts or accessories sent directly to their homes (VISA, MasterCard and
Discover cards are accepted). Order on-line today, 24 hours every day or by phone at 800.626.2002 during normal business hours.
Instructions contained in this manual cover procedures to be performed by any user. Other servicing generally should be
referred to qualified service personnel. Caution must be exercised, since improper servicing may cause unsafe operation.
Contact Us GEAppliances.com
If you are not satisfied with the service you receive from GE, contact us on our Website with all the details including your phone
number, or write to: General Manager, Customer Relations
GE Appliances, Appliance Park
Louisville, KY 40225
Register Your Appliance GEAppliances.com
5HJLVWHU\RXUQHZDSSOLDQFHRQOLQH³DW\RXUFRQYHQLHQFH7LPHO\SURGXFWUHJLVWUDWLRQZLOODOORZIRUHQKDQFHGFRPPXQLFDWLRQDQG
prompt service under the terms of your warranty, should the need arise.
Printed in Taiwan
/