Page is loading ...

A01
UNIVERSAL “KEY” FOR A FAST
AND RELIABLE ASCON TECNOLOGIC
INSTRUMENTS CONFIGURATION
QUICK GUIDE
20/03 - COD.: ISTR_Q_A01-_E_05_--
ASCON TECNOLOGIC S.r.l.
Viale Indipendenza 56, 27029 VIGEVANO (PV) ITALY
TEL.: +39 0381 69871 - FAX: +39 0381 698730
http:\\www.ascontecnologic.com
e-mail: [email protected]
INTRODUCTION
The new key is able to operate with 4 different “objects”:
- An instrument;
- A second A01 key;
- A Personal computer;
- A Personal computer and one instrument.
The key is subject to different “rules” according to the different con-
nected object and to the action to be made.
The key is able to store all the configuration parameters of one
instrument at a time.
Dialogue between Keys and Instruments
It is possible to perform two different actions:
- Copy parameter values from an instrument memory to the key memory.
- Copy parameter values from the key memory to an instrument memory.
No specific rules must be enabled when copying the instrument
memory to the key memory (is always possible); this action copies
all parameters (when present, also the program parameters). On the
other side, to copy the key memory data to an instrument, prior to
perform the transfer to the controller, the conditions that guarantee
the configuration integrity are tested. These conditions ensure that
the configuration that we are sending to the controller:
1. Has been created for the same instrument type;
2. Uses the resources built in the instrument itself.
Dialogue between two A01 keys
This action is subject to no specific rules (is always possible) this
action copies all parameters (when present, also the program param-
eters [thermal profiles]).
The dialogue between two keys of different type is not allowed (a
new key with an old one).
Dialogue between a key and a PC
This action is subject to no specific rules (is always possible) this
action copies all parameters (when present, also the program param-
eters [thermal profiles] and, if available, the logging data).
The key does not verify the congruence of the data coming
from a PC. The software in the PC must be able to perform
all tests necessary to ensure the integrity and congruence of
the configuration that is to be transferred to the key.
Note: If the configuration in the PC has been copied from a controller,
the data are certainly congruent.
For this kind of dialogue, the key can be set to perform (or not)
a special service related to the protocol used by Ascon Tecnologic
instruments to transfer data through TTL interface.
All Ascon Tecnologic instruments (exception made for TLZ) use
ModBus protocol for all interfaces but on the TTL interface they put 3
(FF) character before the standard string. These characters are used
by the instrument to recognize the “silence” between two strings and
identify the beginning of a new string.
By setting properly the dip switches, it is possible to obtain a dia-
logue with or without the 3 additional characters (FF).
Dialogue between an instrument and a PC through the key
In this action the key is used as a smart converter. The key is able to
perform two different conversions:
- TTL <-> USB allows the dialogue between ALL Ascon Tecnologic
instruments and a PC;
- RS485 <-> USB allows the dialogue between a PC and an instru-
ment [Ascon Tecnologic or not] equipped with an RS485.
Also in this case the key can be set to filter or not the 3 (FF) characters.
The “smart” definition not only shows the ability to add/filter the ad-
ditional FF characters but also the capability to automatically manage
the direction of the RS485 line.
Note:
Also in this case, the key does not verify the congruence of the
data coming from a PC. The software in the PC must be able
to perform all tests necessary to ensure the integrity and con-
gruence of the configuration that is to be transferred to the key.
CONNECTIONS
Note: This device is designed for the temporary connection to the
instruments.
Connection to an instrument using an external power supply (instru-
ment not powered).
Power supply
VAC9... 12 VDC
Start
PWS
12 V
A B C TTL
+-
USB
to PC
Connection to an instrument without external power supply (the
instrument must be powered).
Power supply
Start
PWS
12 V
A B C TTL
+-
USB
to PC
RS485 connection.
A
B
C
A
B
C
Controller
A
B
C
Controller
HOW TO OPERATE
INSTRUMENT BEHAVIOUR AT POWER ON
Power ON the instrument. After 1.5 seconds the LED can be:
LED OFF = Device not programmed.
Send the instrument back to the supplier;
Green LED, flashing fast = The device is properly programmed but
no data are present in memory;
Red LED, flashing fast = The device is properly programmed but a
checksum error has been detected. The error will be corrected
automatically:
• Power OFF the instrument;
• Power ON it again. If the error persists, send the device back
to the supplier.
Green LED, steady ON = The device is properly programmed (a
correct configuration is stored);
Red LED, steady ON = The device is set in order to operate with a PC.
HOW TO ACCESS TO THE DIP SWITCHES
1. Raise the cover (A).
2. The DIP switches are easily identifiable (Microswitches).
Start
A B C TTL
ON
DIP Switches
A
ON
OFF
WHERE TO FIND THE WINDOWS DRIVERS FOR A01 KEY
The drivers to ensure that Windows Operating System (from XP
onwards) can recognize the A01 Key can be downloaded, free of
charge, from Ascon Tecnologic website.
1. Open your internet browser and go to the address:
www.ascontecnologic.com
2. With the mouse select Download;
3. Then A01-Driver;
4. Click on the latest version of the drivers file;
5. Then click on the file:
AscontecnologicA01.zip
the system asks if you want to Open or Save the selected file;
6. Choose Open and, unless a specific program is installed in the
system, through the “Browse” button to select “Explorer”;
7. At this point the two driver files can be copied in a directory pre-
pared for this purpose (keep track of its location for future use).
LOADING THE A01 DRIVER ON A WINDOWS BASED PC
1. Power ON the key by the external power supply;
2. Set the dip switches as shown below:
ON
3. Connect the key to the PC using the USB cable. The Operating
System detects the key and warns “Found New hardware”;
4. When the system shows the message “Allow to connect
Windows Update to search for software”, select “Not yet” and
click on “Next”;
5. Select “Display a list of the known drivers...”;
6. Select “Include this location in the search”;
7. Access to the directory in which you previously extracted the
driver and select it by clicking on it;
8. Push “Next”;
9. Push “Finish”;
10. Disconnect the key and connect it again.
HOW TO SET THE SERIAL COMMUNICATIONS PARAMETERS
1. Enter in “Control panel”;
2. Run “System”;
3. Select “Hardware”;
4. Click on “Device manager”;
5. With the mouse left button double click on “Ports”;
6. Double click on Tecnologic USB_Key_A01;
7. Select “Port setting”;
8. Click on “Advanced”;
9. Set the COM port number necessary to communicate with the
configuration software (AT_UniversalConf).
OPERATIVE MODE SELECTION
Mode 1 - Firmware version detection
To detect the version of the Firmware loaded in the key, proceed as
follows:
1. Set the DIP switches as shown below:
ON
2. Power the device via the USB or an external power supply;
3. Push the “Start” button;
4. The double colour LED present in the key, repeatedly lights up
with green colour; the number of flashes indicates the firmware
revision number.
5. After reporting the version, the LED will light up with red colour
to indicate that the process has ended.
6. After about 1 s, the LED returns to the steady green colour.
Mode 2 - Copying all parameters from an instrument to a key (Upload)
1. Set the DIP switches as shown below;
ON
2. Make sure that the instrument and/or the key are powered;
3. Connect the key to the instrument;
4. Make sure the LED is lighted in green (steady or flashing);
5. Push the “Start” button;
6. The LED shows the steady red colour to indicate that the com-
mand is in progress;
7. Wait for a few seconds. At the end of the copy procedure the
LED can be:
• Steady green: Operation properly terminated.
- The key can be removed.
- The key has stored a valid configuration.
• RED, slow frequency flashing: Copy failed. One of the fol-
lowing conditions occurred:
- The key has been withdrawn before the operation has ended;
- A communication error occurred;
- The device contains no valid data.
The action must be repeated.
Mode 3 - How to copy all data from a key to an instrument (Download)
1. Set the DIP switches as shown below:
ON
2. Make sure that the instrument and/or the key are powered;
3. Connect the key to the instrument;
4. Make sure the LED is lighted in green (steady or flashing);
5. Push the “Start” button;
6. The LED shows the steady red colour to indicate that the com-
mand is in progress;
7. Wait for a few seconds. At the end of the copy procedure the
LED can be:
• Steady green: Operation properly terminated.
- The key can be removed.
- The key has stored a valid configuration.
• RED, slow frequency flashing: Copy failed. One of the fol-
lowing conditions occurred:
- The key has been withdrawn before the operation has ended;
- A communication error occurred;
- “PACS” parameter (enables/disables the instrument
remote configuration) is set to disable the remote instru-
ment configuration.
- The instrument has retained the data it had before the
transfer attempt.
• RED, fast frequency flashing: Copy failed. One of the follow-
ing conditions occurred:
- The configuration stored in the key is not compatible with
the connected instrument.
- An attempt was made to transfer the configuration for a
new instrument to an old controller.
In any case, both the key and the instrument maintain the
previously stored configuration.
Mode 5 - Copying the configuration only from a key to an instrument
1. Set the DIP switches as shown below:
ON
2. Make sure that the instrument and/or the key are powered;
3. Connect the key to the instrument;
4. Make sure the LED is lighted in green (steady or flashing);
5. Push the “Start” button;
6. The LED shows the steady red colour to indicate that the com-
mand is in progress;
7. Wait for a few seconds. At the end of the copy procedure the
LED can be:
• Steady green: Operation properly terminated.
- The key can be removed.
- The key has stored a valid configuration.
• RED, slow frequency flashing: Copy failed. One of the fol-
lowing conditions occurred:
- The key has been withdrawn before the operation has ended;
- A communication error occurred;
- “PACS” parameter (enables/disables the instrument
remote configuration) is set to disable the remote instru-
ment configuration.
- The instrument has retained the data it had before the
transfer attempt.
• RED, fast frequency flashing: Copy failed. One of the follow-
ing conditions occurred:
- The configuration stored in the key is not compatible with
the connected instrument.
- An attempt was made to transfer the configuration for a
new instrument to an old controller.
In any case, both the key and the instrument maintain the
previously stored configuration.
Mode 7 - Copying the program area only from a key to an instrument
This action is possible if programmer functions are present.
1. Set the DIP switches as shown below:
ON
2. Make sure that the instrument and/or the key are powered;
3. Connect the key to the instrument;
4. Make sure the LED is lighted in green (steady or flashing);
5. Push the “Start” button;
6. The LED shows the steady red colour to indicate that the com-
mand is in progress;
7. Wait for a few seconds. At the end of the copy procedure the
LED can be:
• Steady green: Operation properly terminated.
- The key can be removed.
- The key has stored a valid configuration.
• RED, slow frequency flashing: Copy failed. One of the fol-
lowing conditions occurred:
- The key has been withdrawn before the operation has ended;
- A communication error occurred;
- “PACS” parameter (enables/disables the instrument
remote configuration) is set to disable the remote instru-
ment configuration.
- The instrument has retained the data it had before the
transfer attempt.
• RED, fast frequency flashing: Copy failed. One of the follow-
ing conditions occurred:
- The configuration stored in the key is not compatible with
the connected instrument.
- An attempt was made to transfer the configuration for a
new instrument to an old controller.
In any case, both the key and the instrument maintain the
previously stored configuration.
Mode 9 - Copying all parameters from Source (A) to Target key (B)
1. Set the DIP switches as shown below:
Source Key Target Key
ON
ON
2. Make sure that at least one of the keys is powered with an
external power supply;
3. Connect the two keys through the TTL port as illustrated:
Start
PWS
12 V
A B C TTL
+-
USB
to PC
Start
PWS
12 V
A B C TTL
+-
USB
to PC
4. Control that the LED of the SOURCE key is lighted in green col-
our, the LED of the DESTINATION key must be lighted in green
colour, but can be steady or flashing;
5. Push the “Start” button on one of the 2 keys;
6. The LED of the key on which has been pressed the “Start” but-
ton shows the steady red colour to indicate that the command
is in progress;
7. Wait for a few seconds. The LED of the key on which has been
pressed the “Start” button can be:
• Steady green: Operation properly terminated.
- The key can be removed.
- The two keys contain the same configuration.
• RED, slow frequency flashing: Copy failed. One of the fol-
lowing conditions occurred:
- The key has been withdrawn before the operation has ended;
- A communication error occurred;
- The Slave key contains no valid data;
In any case, the Master key contains the original configuration.
Repeat the whole sequence.
Mode 10 - Using the key as a smart USB <-> RS485 converter
1. Set the DIP switches as shown below:
ON
2. Make sure that the instrument and/or the key are powered;
3. Connect the key to the instrument using the RS485 terminals;
4. Connect the key to the PC using the USB cable;
5. Make sure that the key LED is steady red.
6. Verify the setting of the interface stored by the PC;
7. During serial communications, the LED flashes all the times the
Master sends a request.
Mode 11 - Using the key as a smart
USB <-> TTL converter without FF filter
1. Set the DIP switches as shown below:
ON
2. Make sure that the instrument and/or the key are powered;
3. Connect the key to the instrument using the 5 pin connector;
4. Connect the key to the PC using the USB cable;
5. Make sure that the key LED is steady red.
6. Verify the setting of the interface stored by the PC;
7. During serial communications, the LED flashes all the times the
Master sends a request.
Mode 12 - Using the key as a smart
USB <-> TTL converter with FF filter
1. Set the DIP switches as shown below:
ON
2. Make sure that the instrument and/or the key are powered;
3. Connect the key to the instrument using the 5 pin connector;
4. Connect the key to the PC using the USB cable;
5. Make sure that the key LED is steady red.
6. Verify the setting of the interface stored by the PC;
7. During serial communications, the LED flashes all the times the
Master sends a request.
Mode 13 - Dialogue between the key and a PC without FF filter
1. Set the DIP switches as shown below:
ON
2. Make sure that the instrument and/or the key are powered;
3. Connect the key to the instrument using the 5 pin connector;
4. Connect the key to the PC using the USB cable;
5. Make sure that the key LED is steady red.
6. Verify the setting of the interface stored by the PC;
7. During serial communications, the LED flashes all the times the
Master sends a request.
Mode 14 - Dialogue between the key and a PC with FF filter
1. Set the DIP switches as shown below:
ON
2. Make sure that the instrument and/or the key are powered;
3. Connect the key to the instrument using the 5 pin connector;
4. Connect the key to the PC using the USB cable;
5. Make sure that the key LED is steady red.
6. Verify the setting of the interface stored by the PC;
7. During serial communications, the LED flashes all the times the
Master (PC) sends a request.

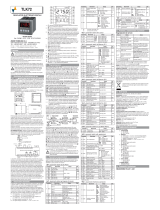
Summary table of the DIP Switches position
DIP Switch position
Mode SW1 SW2 SW3 SW4 Function
1 OFF ON ON ON Firmware version detection
2 OFF OFF ON ON Copying all parameters from an instrument to a key (Upload)
3 ON ON ON ON Copying all data from a key to an instrument
4 ON OFF ON ON Reserved
5 OFF OFF OFF ON Copying the configuration only from a key to an instrument
6 ON OFF OFF ON Reserved
7 ON ON OFF ON Copying the program area only from a key to an instrument
8 OFF ON OFF ON Reserved
9ON ON ON ON Copying from a key to another - A (Source) key
OFF OFF ON ON Copying from a key to another - B (Target) key
10 ON ON ON OFF USB <–> RS 485 converter
11 OFF ON ON OFF USB <–> TTL converter without FF filter
12 ON OFF ON OFF USB <–> TTL converter with FF filter
13 OFF ON OFF OFF Dialogue between the key and a PC without FF filter
14 OFF OFF ON OFF Dialogue between the key and a PC with FF filter
Error messages
Function LED Reason Action
UPLOAD Flashing RED The transfer has been stopped and the key stored no
the new configurations Verify the compatibility of the configuration
stored in the key with the connected instru-
ment. Repeat the action
DOWNLOAD Low frequency
flashing RED
The transfer has been stopped and the key stored no
the new configurations
DOWNLOAD Flashing GREEN No configuration is stored in the key Load a configuration prior to try the transfer
DOWNLOAD High frequency
flashing RED
The configuration stored in the key is not compatible
with the instrument connected Verify the configuration compatibility
CHARACTERISTICS
TECHNICAL DATA
Case: Self-estinguishing plastic degree V0 according to UL94;
Dimensions:
43
Start
PWS
12 V
A B C TTL
18 73 25
+-
USB
to PC
Connector TTL: JST S 5B-PH-KL - 2 mm;
Connector TTL female: SAMTEC SQT-105-02-L-S - 2 mm;
Connector RS485: Phoenix MC 1.5/3-G-3.5;
Connector USB: Mini-USB;
Push buttons: 1;
LED: 1 two colour LED (red/green);
Power supply: VDC, 1.3 mm jack;
DIP switches: 4 microswitches;
Operating temperature: 0... 50°C (32... 122°F).
Storage temperature: -20... +70°C (-4... +158°F).
Relative Humidity: 20... 80% RH without condensation;
Pollution degree: II.
ELECTRICAL DATA
External Power Supply
Voltage: 9... 12 VDC;
Consumption: 150 mA max. at 9 VDC
(the A01 key only, no instrument connected).
RS485 Interface
Type: Not isolated;
Cable length:
3 m max.;
Electrical levels: According with RS485 standard;
Line speed: 1200... 38400 baud;
Parity: None;
Format: 8 bit;
Start Bit: 1;
Stop Bit 1.
TTL Interface
Type: Not isolated;
Cable length:
3 m max.;
Electrical levels: 5 V according with TTL standard;
Line speed: 1200... 38400 baud;
Parity: None;
Format: 8 bit;
Start Bit: 1;
Stop Bit: 1.
USB Interface
Type: 2.0.
Memory dimension
Memory: The key memory is divided in 2 areas:
- Memory area for configuration parameters;
- Memory area for programs (or logging);
Both areas can store 500 parameters maximum.
Power supply
The key can be powered in two different ways according to the connected instrument type and of the action you desire. The following table
defines the necessary supply type in the various conditions.
Instrument family PIN Function External power supply Instrument power supply
TLK 43
TLK 48 3
Copy from a key to an instrument Yes Yes
Copy from an instrument to a key Yes Yes
Copy from PC to instrument with a key (TTL) Yes Yes
Copy from PC to instrument with a key (485) Yes Yes
Others and futures 5
Copy from a key to an instrument Only one must be supplied
Copy from an instrument to a key Only one must be supplied
Copy from PC to instrument with a key (TTL) Yes Yes
Copy from PC to instrument with a key (485) Yes Yes
From a key to a
key or to a PC 5
From an A01 key to another A01 key At least one key must be supplied
Copy from a key to a PC Yes --s
Copy from a PC to a key Yes --
In all cases both power supplies are allowed.
GENERAL NOTES
PROPER USAGE
Every possible use not described in this manual must be considered
as a improper use.
Ascon Tecnologic S.r.l. and its legal representatives do
not assume any responsibility for any damage to people,
things or animals deriving from violation, wrong or
improper use or in any case not in compliance with the
instrument features.
MAINTENANCE
1. Remove the Power supply from the key;
2. Using a vacuum cleaner or a compressed air jet (max. 3 kg/cm2)
remove all deposits of dust and dirt which may be present on the
louvers of the connectors.
3. Remove the cover of the dip switches and, using an air jet,
remove all deposit of dust and dirt which may be present on the
internal circuits trying to be careful to not damage the electronic
components.
4. Clean external plastic or rubber parts use only a cloth moistened
with:
• Ethyl Alcohol (pure or denatured) [C2H5OH];
• Isopropyl Alcohol (pure or denatured) [(CH3)2CHOH];
• Water (H2O);
5. Before using the key, be sure that it is perfectly dry;
6. Re-connect the Power supply to Power.
DISPOSAL
The appliance (or the product) must be
disposed of separately in compliance
with the local standards in force on
waste disposal.
WARRANTY AND REPAIRS
This product is under warranty against manufacturing flaws or faulty
materials that are found within 18 months from delivery date. The
warranty is limited to repairs or to the replacement of the instrument.
The tampering of the instrument or an improper use of the product
will bring about the immediate withdrawal of the warranty effects.
In the event of a faulty instrument, either within the period of war-
rantee, or further to its expiry, please contact our sales department
to obtain authorisation for sending the instrument to our company.
The faulty product must be shipped to Ascon Tecnologic with a
detailed description of the fault found, without any fees or charge for
Ascon Tecnologic, except in the event of alternative agreements.
ORDER CODE
A01 - UNIVERSAL KEY
Model
A01- = Universal Key
TTL Connector
3 = 3 PIN
5 = 5 PIN
AC Adapter
E = 230 VAC
- = None
Accessories
S = Cable USB + Connector 485
- = None
Package
- = Standard
N = Neutral
A01-
/