
1
user manual
ENG

2
Specications 3
Package includes 3
Main interface 4
Charging 5
Main screen 5
Screen lock 6
Capacitive touch panel 7
Camera 8
Ebooks 9
Video player 10
Music player 11
Connect to the PC 12
Storage 12
Android interface 13
Automatic updates 13
Initial setup 14
1. Language 15
2. Set Time & Date 16
3. Set WiFi 17
4. Set parental account 18
5. Create a Children Account 19
6. Apps Filter 20
7. Online content 21
8. Time Limit 22
Parent Area 24
How to access Parent Area 24
Create a new kid account 25
Modify an account 25
Download applications 26
Information and support 29
Update IngoKids software 29
FAQ / Troubleshooting 29
Support 31
Warning 31

3
Specications
Tablet
Charger
microUSB cable
Rubber case (only Super Pack edition)
Headphones (only Super Pack edition)
Stylus pen (only Super Pack edition)
Earphones
1.
2.
3.
4.
5.
6.
7.
Package includes:

4
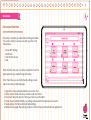
Main interface

5
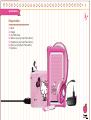
Charging
Your tablet can only be charged with the supplied Power Adaptor. Plug the adaptor to the mains socket and the adaptor cable connector to the
Tablet plug.
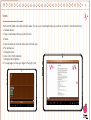
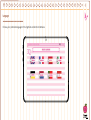
Main screen
These are the main icons you will find in the
main screen of your Hello Kitty tablet:
1. Home button
2. Battery indicator
3. WiFi signal indicator
4. Browser
5. Ebook reader
6. Video and photo gallery
7. Camera
8. Music player
9. Approved apps
10. Page navigator

6
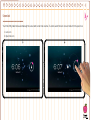
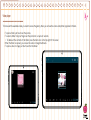
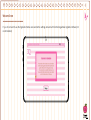
Screen lock
Your Hello Kitty tablet locks automatically the screen after some time inactive. To unlock select the lock icon and slide it to the open lock.
1. Lock icon
2. Open lock icon

7
Capacitive touch panel
The Hello Kitty tablet has a multi touch capacitive screen. You only need your fingers to control it. Touch the screen to open applications, videos
and files.
•Slide up and down to scroll and swipe left and right to navigate in the menus
•Use two fingers to zoom in or out while viewing pictures, webpages or other documents
Note: The response of the capacitive touch panel varies between persons, this is linked to the nature of the technology.

8
Camera
The Hello Kitty Tablet comes with 2 digital cameras to take pictures and make videos, one in the front to take pictures of you and use it for vi-
deocalls and another one in the back to take pictures of your family and friends.
1. Digital Zoom (Enlarge)
2. Choose between front and back cameras
3. Take a picture / Start recording video / Stop recording video
4. Digital zoom (Reduce)
5. Camera settings
6. Photo mode
7. Video mode
All the pictures and videos you take will be stored in the
internal memory and you can see them in the gallery.

9
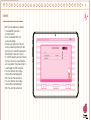
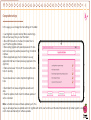
Ebooks
The Hello Kitty Tablet comes with an Ebook reader. You can use it to read digital books you purchase or transfer to the internal memory.
1. Available ebooks
2. Swap views between library view and list view
3. Delete
To open an ebook just touch the book cover and it will open.
4. Full window view
5. Change font size
6. View / Add / Edit bookmarks
7. Change screen brightness
8. To swap pages just slide your finger to the right or left

10
Video player
To browse all the available videos you need to access the gallery, there you will see the videos and photos organized in folders.
• To open a folder just touch over the picture,
• To select a folder hold your finger over the picture for a couple of seconds
• To delete all the contents of the folder press the trash icon on the top right of the screen
• When the folder is opened, you can see the video or image thumbnails
• To open a video or image just touch over the thumbnail

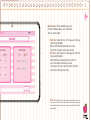
11
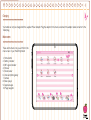
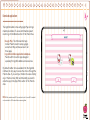
Music player
To play music on your tablet press the music icon on the Kids main screen
You will be able to select the music sorted by artists, albums, songs and playlists
1. Play / Pause
2. Back
3. Forward
4. Shuffle
5. Repeat
6. Song information
To create a new playlist choose playlist and select add new.
Follow the instructions on how to connect the tablet to the
computer to add more music to your tablet.
Hello Kitty
Hello Kitty songs
Hello Kitty opening song

12
Connect to the PC
Your Hello Kitty Tablet comes with a microUSB cable
so you can connect it to your computer and transfer
files, pictures, videos and ebooks. You need to plug the
microUSB cable to the Tablet and the USB connector
to the computer USB plug. Once connected a window
asking if you want to transfer files will appear on your
tablet, touch over the button to activate the USB storage
function. You must first enable USB connection within
Area Settings parental tablet.
Storage
Your tablet comes with 4Gb of Flash memory, but not all
of it is available as user storage. Some is used to sto-
re Android system information, applications and tablet
data. In order to increase the available memory you can
add a microSD card into the slot. Once it’s recognised
you will be able to see the videos in the gallery and the
music in the music player. If you want to transfer files
between the internal storage and the microSD card (Up
to 32Gb) you can use the file explorer available in the
Android interface.
The Hello Kitty tablet will be recognised as removable storage on your computer. On the computer open the file explorer to transfer
the data.
Note: While the tablet is connected to the PC you will not be able to access the data on your tablet.

13
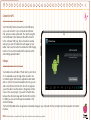
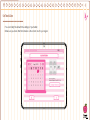
Android interface
If you not wish to use Ingokids interface can override the settings and go
straight to Android default interface. In Android, parental control is disabled
and you will not have all the functions available within Ingokids so we recom-
mend use Ingokids interface. The Hello Kitty tablet uses Android 4.1 operating
system. In order to access the Android interface please follow the following
steps:
1.Exit to the login window by pressing the home button
2.Go to the parental area by pressing the lock icon
3.Press the Android icon to exit to Android interface, you may be required to
enter the parental password and confirm
The android interface looks like this:
1. Back
2. Home
3. Recently opened applications
4. App menu: You can see all the installed apps
5. Date / Time / Battery level / WiFi signal / Access settings and notifica-
tions
To go back to IngoKids interface you need to press the IngoKids icon
Android interface should only be used by parents. All the parental controls are not enabled while you are in Android main interface
Automatic updates
When WiFi is enabled the system will perform regular checks for software updates. If an update is available we recommend that you
accept it as it will contain important upgrades to your system that will enhance performance and functionality.

14
INITIAL SETUP
We recommend that you fully charge your tablet before starting it. Connect the charger to the AC power socket and the charger plug
to the tablet. Tablet will charge completely in some hours.
When you turn on your tablet for the first time you will be prompted to follow the initial setup. During this initial configuration you will
set up the following items:
• Language
• Time & date
• Enable and configure WiFi connection
• Set a parental account
• Set a kids account. For this account you will set up the following:
• Appsfilter: Choose what applications can use your child
• Onlinecontent: Define how can your child access the internet
• Timelimit: Setup the amount of time your child can use the tablet

15
Language
Choose your preferred language for the IngoKids and Android interfaces

16
Welcome Screen
If you do not want to use the Ingokids interface can override the settings and work with Android regardless Ingokids interface (not
recommended).

17
Set Time & Date
• You can modify the default time settings of your tablet;
• Make sure you check that the timezone is the correct one for your region.

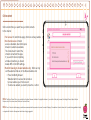
18
Set WiFi
• WiFi comes disabled by default.
• To enable WiFi press the
Connect button
• A list of available WiFi net-
works will appear
• Choose your network, if the net-
work is password protected it will
prompt you to insert the password
(Remember to have it in hand)
• If no WiFi networks are found check
that your router is on and that the
wifi is enabled. Then press Scan to
search again for WiFi networks
• You can continue the configu-
ration without activating the
Wifi. You can then activate it.
• You can continue the configu-
ration without activating the
Wifi. You can then activate it.

19
Set parental account
• Enter your email
• Enter password: This password helps protect the Parents Area, this way your child can not modify any important setting.
• Enter your name
NOTE:
The parental password is very important as it will be always requested to access the parents area. We strongly suggest that you don’t share this passwords with your children as
they may use it to access parents area and change important tablet settings.
If you forget the parental password you can request to reset it by sending an email to the provided email address. So it’s very important that you have regular access to the email address supplied.

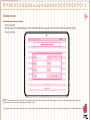
20
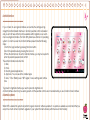
Create a Children Account
• Name: Insert your child’s name
• Birthday: Insert your child’s birthday
• Gender: Select your child’s gender
• Select: Choose your child’s ava-
tar from the preloaded images
• Photo: Take a picture and use
it as your child’s avatar
• Password: You can choose if you want to protect
your children account with a password, it’s good if
the tablet will be shared between
different children with different settings.
By default “No password” is selected.
If Password is selected you will be promp-
ted to enter the kid password when
you confirm the new account.
The password can be from 1 to 14 characters long, with
only letters and numbers.
You can also let children use a pattern password instead
of characters and numbers. If you want children to have
a pattern password select “Pattern”. When the child to
use your account first prompted to set the password. Then you will be prompted to create a pattern sliding your fingers that links at
least 5 dots. In order to make the password easier to remember you can’t use the same dot two times.
Page is loading ...
Page is loading ...
Page is loading ...
Page is loading ...
Page is loading ...
Page is loading ...
Page is loading ...
Page is loading ...
Page is loading ...
Page is loading ...
Page is loading ...
Page is loading ...
Page is loading ...
Page is loading ...
Page is loading ...
-
 1
1
-
 2
2
-
 3
3
-
 4
4
-
 5
5
-
 6
6
-
 7
7
-
 8
8
-
 9
9
-
 10
10
-
 11
11
-
 12
12
-
 13
13
-
 14
14
-
 15
15
-
 16
16
-
 17
17
-
 18
18
-
 19
19
-
 20
20
-
 21
21
-
 22
22
-
 23
23
-
 24
24
-
 25
25
-
 26
26
-
 27
27
-
 28
28
-
 29
29
-
 30
30
-
 31
31
-
 32
32
-
 33
33
-
 34
34
-
 35
35


Ask a question and I''ll find the answer in the document
Finding information in a document is now easier with AI
Related papers
-
Ingo Tablet Pro INU007D User manual
-
Ingo Tablet Premium Super Pack 7 User manual
-
-
-
Ingo INU019D User manual
-
-
-
Ingo MHU014D User manual
-
Ingo MP3 Clip Speaker Owner's manual
-
Other documents
-
Sungale ID712WTA Quick start guide
-
JET Kid Star User manual
-
Sagem Hello Kitty Hard reset manual
-
Verizon Ellipsis Kids User guide
-
Akai ATAB701 User manual
-
Cellular Line HELLOKNLACE3 Datasheet
-
-
Shenzhen V7 Vatenick kids Tablet User manual
-
Colorovo 7" User guide
-
Pebble Gear PG915420E User manual