Page is loading ...

CDHF and CDHG Water-Cooled Cen-
TraVac™ Chillers
With Tracer® AdaptiView™ Control
Installation, Operation, and Maintenance
March 2020
CDHF-SVX01N-EN
Models:
CDHF, CDHG
X39641076130
SAFETY WARNING
Only qualified personnel should install and service the equipment. The installation, starting up, and servicing of
heating, ventilating, and air-conditioning equipment can be hazardous and requires specific knowledge and training.
Improperly installed, adjusted or altered equipment by an unqualified person could result in death or serious injury.
When working on the equipment, observe all precautions in the literature and on the tags, stickers, and labels that are
attached to the equipment.

CDHF-SVX01N-EN
Introduction
Read this manual thoroughly before operating or
servicing this unit.
Warnings, Cautions, and Notices
Safety advisories appear throughout this manual as
required. Your personal safety and the proper
operation of this machine depend upon the strict
observance of these precautions.
The three types of advisories are defined as follows:
WARNING
Indicates a potentially hazardous situation
which, if not avoided, could result in death or
serious injury.
CAU
TION
Indicates a potentially hazardous situation
which, if not avoided, could result in minor or
moderate injury. It could also be used to alert
against unsafe practices.
NOTICE
Indicates a situation that could result in
equipment or property-damage only
accidents.
Important Environmental Concerns
Scientific research has shown that certain man-made
chemicals can affect the earth’s naturally occurring
stratospheric ozone layer when released to the
atmosphere. In particular, several of the identified
chemicals that may affect the ozone layer are
refrigerants that contain Chlorine, Fluorine and Carbon
(CFCs) and those containing Hydrogen, Chlorine,
Fluorine and Carbon (HCFCs). Not all refrigerants
containing these compounds have the same potential
impact to the environment. Trane advocates the
responsible handling of all refrigerants-including
industry replacements for CFCs and HCFCs such as
saturated or unsaturated HFCs and HCFCs.
Important Responsible Refrigerant
Practices
Trane believes that responsible refrigerant practices
are important to the environment, our customers, and
the air conditioning industry. All technicians who
handle refrigerants must be certified according to local
rules. For the USA, the Federal Clean Air Act (Section
608) sets forth the requirements for handling,
reclaiming, recovering and recycling of certain
refrigerants and the equipment that is used in these
service procedures. In addition, some states or
municipalities may have additional requirements that
must also be adhered to for responsible management
of refrigerants. Know the applicable laws and follow
them.
©2020 Trane
WWAARRNNIINNGG
PPrrooppeerr FFiieelldd WWiirriinngg aanndd GGrroouunnddiinngg
RReeqquuiirreedd!!
FFaaiilluurree ttoo ffoollllooww ccooddee ccoouulldd rreessuulltt iinn ddeeaatthh oorr
sseerriioouuss iinnjjuurryy..
AAllll ffiieelldd wwiirriinngg MMUUSSTT bbee ppeerrffoorrmmeedd bbyy qquuaalliiffiieedd
ppeerrssoonnnneell.. IImmpprrooppeerrllyy iinnssttaalllleedd aanndd ggrroouunnddeedd
ffiieelldd wwiirriinngg ppoosseess FFIIRREE aanndd EELLEECCTTRROOCCUUTTIIOONN
hhaazzaarrddss.. TToo aavvooiidd tthheessee hhaazzaarrddss,, yyoouu MMUUSSTT ffoollllooww
rreeqquuiirreemmeennttss ffoorr ffiieelldd wwiirriinngg iinnssttaallllaattiioonn aanndd
ggrroouunnddiinngg aass ddeessccrriibbeedd iinn NNEECC aanndd yyoouurr llooccaall//
ssttaattee//nnaattiioonnaall eelleeccttrriiccaall ccooddeess..
WWAARRNNIINNGG
PPeerrssoonnaall PPrrootteeccttiivvee EEqquuiippmmeenntt ((PPPPEE))
RReeqquuiirreedd!!
FFaaiilluurree ttoo wweeaarr pprrooppeerr PPPPEE ffoorr tthhee jjoobb bbeeiinngg
uunnddeerrttaakkeenn ccoouulldd rreessuulltt iinn ddeeaatthh oorr sseerriioouuss iinnjjuurryy..
TTeecchhnniicciiaannss,, iinn oorrddeerr ttoo pprrootteecctt tthheemmsseellvveess ffrroomm
ppootteennttiiaall eelleeccttrriiccaall,, mmeecchhaanniiccaall,, aanndd cchheemmiiccaall
hhaazzaarrddss,, MMUUSSTT ffoollllooww pprreeccaauuttiioonnss iinn tthhiiss mmaannuuaall
aanndd oonn tthhee ttaaggss,, ssttiicckkeerrss,, aanndd llaabbeellss,, aass wweellll aass tthhee
iinnssttrruuccttiioonnss bbeellooww::
•• BBeeffoorree iinnssttaalllliinngg//sseerrvviicciinngg tthhiiss uunniitt,,
tteecchhnniicciiaannss MMUUSSTT ppuutt oonn aallll PPPPEE rreeqquuiirreedd ffoorr
tthhee wwoorrkk bbeeiinngg uunnddeerrttaakkeenn ((EExxaammpplleess;; ccuutt
rreessiissttaanntt gglloovveess//sslleeeevveess,, bbuuttyyll gglloovveess,, ssaaffeettyy
ggllaasssseess,, hhaarrdd hhaatt//bbuummpp ccaapp,, ffaallll pprrootteeccttiioonn,,
eelleeccttrriiccaall PPPPEE aanndd aarrcc ffllaasshh ccllootthhiinngg))..
AALLWWAAYYSS rreeffeerr ttoo aapppprroopprriiaattee SSaaffeettyy DDaattaa
SShheeeettss ((SSDDSS)) aanndd OOSSHHAA gguuiiddeelliinneess ffoorr
pprrooppeerr PPPPEE..
•• WWhheenn wwoorrkkiinngg wwiitthh oorr aarroouunndd hhaazzaarrddoouuss
cchheemmiiccaallss,, AALLWWAAYYSS rreeffeerr ttoo tthhee aapppprroopprriiaattee
SSDDSS aanndd OOSSHHAA//GGHHSS ((GGlloobbaall HHaarrmmoonniizzeedd
SSyysstteemm ooff CCllaassssiiffiiccaattiioonn aanndd LLaabbeelllliinngg ooff
CChheemmiiccaallss)) gguuiiddeelliinneess ffoorr iinnffoorrmmaattiioonn oonn
aalllloowwaabbllee ppeerrssoonnaall eexxppoossuurree lleevveellss,, pprrooppeerr
rreessppiirraattoorryy pprrootteeccttiioonn aanndd hhaannddlliinngg
iinnssttrruuccttiioonnss..
•• IIff tthheerree iiss aa rriisskk ooff eenneerrggiizzeedd eelleeccttrriiccaall
ccoonnttaacctt,, aarrcc,, oorr ffllaasshh,, tteecchhnniicciiaannss MMUUSSTT ppuutt
oonn aallll PPPPEE iinn aaccccoorrddaannccee wwiitthh OOSSHHAA,, NNFFPPAA
7700EE,, oorr ootthheerr ccoouunnttrryy--ssppeecciiffiicc rreeqquuiirreemmeennttss
ffoorr aarrcc ffllaasshh pprrootteeccttiioonn,, PPRRIIOORR ttoo sseerrvviicciinngg
tthhee uunniitt.. NNEEVVEERR PPEERRFFOORRMM AANNYY SSWWIITTCCHHIINNGG,,
DDIISSCCOONNNNEECCTTIINNGG,, OORR VVOOLLTTAAGGEE TTEESSTTIINNGG
WWIITTHHOOUUTT PPRROOPPEERR EELLEECCTTRRIICCAALL PPPPEE AANNDD
AARRCC FFLLAASSHH CCLLOOTTHHIINNGG.. EENNSSUURREE
EELLEECCTTRRIICCAALL MMEETTEERRSS AANNDD EEQQUUIIPPMMEENNTT AARREE
PPRROOPPEERRLLYY RRAATTEEDD FFOORR IINNTTEENNDDEEDD
VVOOLLTTAAGGEE..

CDHF-SVX01N-EN
3
WWAARRNNIINNGG
FFoollllooww EEHHSS PPoolliicciieess!!
FFaaiilluurree ttoo ffoollllooww iinnssttrruuccttiioonnss bbeellooww ccoouulldd rreessuulltt iinn
ddeeaatthh oorr sseerriioouuss iinnjjuurryy..
•• AAllll TTrraannee ppeerrssoonnnneell mmuusstt ffoollllooww tthhee
ccoommppaannyy’’ss EEnnvviirroonnmmeennttaall,, HHeeaalltthh aanndd SSaaffeettyy
((EEHHSS)) ppoolliicciieess wwhheenn ppeerrffoorrmmiinngg wwoorrkk ssuucchh aass
hhoott wwoorrkk,, eelleeccttrriiccaall,, ffaallll pprrootteeccttiioonn,, lloocckkoouutt//
ttaaggoouutt,, rreeffrriiggeerraanntt hhaannddlliinngg,, eettcc.. WWhheerree llooccaall
rreegguullaattiioonnss aarree mmoorree ssttrriinnggeenntt tthhaann tthheessee
ppoolliicciieess,, tthhoossee rreegguullaattiioonnss ssuuppeerrsseeddee tthheessee
ppoolliicciieess..
•• NNoonn--TTrraannee ppeerrssoonnnneell sshhoouulldd aallwwaayyss ffoollllooww
llooccaall rreegguullaattiioonnss..
WWAARRNNIINNGG
RReeffrriiggeerraanntt MMaayy BBee UUnnddeerr PPoossiittiivvee
PPrreessssuurree!!
FFaaiilluurree ttoo ffoollllooww iinnssttrruuccttiioonnss bbeellooww ccoouulldd rreessuulltt iinn
aann eexxpplloossiioonn wwhhiicchh ccoouulldd rreessuulltt iinn ddeeaatthh oorr
sseerriioouuss iinnjjuurryy oorr eeqquuiippmmeenntt ddaammaaggee..
SSyysstteemm ccoonnttaaiinnss rreeffrriiggeerraanntt aanndd mmaayy bbee uunnddeerr
ppoossiittiivvee pprreessssuurree;; ssyysstteemm mmaayy aallssoo ccoonnttaaiinn ooiill..
RReeccoovveerr rreeffrriiggeerraanntt ttoo rreelliieevvee pprreessssuurree bbeeffoorree
ooppeenniinngg tthhee ssyysstteemm.. SSeeee uunniitt nnaammeeppllaattee ffoorr
rreeffrriiggeerraanntt ttyyppee.. DDoo nnoott uussee nnoonn--aapppprroovveedd
rreeffrriiggeerraannttss,, rreeffrriiggeerraanntt ssuubbssttiittuutteess,, oorr nnoonn--
aapppprroovveedd rreeffrriiggeerraanntt aaddddiittiivveess..
NNOOTTIICCEE
EEqquuiippmmeenntt DDaammaaggee!!
MMiixxiinngg rreeffrriiggeerraannttss oorr ooiillss ccoouulldd rreessuulltt iinn
eeqquuiippmmeenntt ddaammaaggee iinncclluuddiinngg bbeeaarriinngg ddaammaaggee,,
iinnttrroodduuccttiioonn ooff aacciiddss iinnttoo tthhee cchhiilllleerr,, oorr ccoonnttiinnuuoouuss
ppuurrggee ppuummpp--oouutt iinn hhiigghh--hheeaadd//hhiigghh aammbbiieenntt
aapppplliiccaattiioonnss..
CCeennTTrraaVVaacc cchhiilllleerrss aarree mmaannuuffaaccttuurreedd wwiitthh
ddiiffffeerreenntt rreeffrriiggeerraanntt//ooiill ssyysstteemmss:: 11)) cchhiilllleerrss uussiinngg
RR--112233 rreeffrriiggeerraanntt aanndd OOIILL0000002222 ccoommpprreessssoorr ooiill,,
aanndd 22)) cchhiilllleerrss uussiinngg RR--551144AA rreeffrriiggeerraanntt aanndd
OOIILL0000333344//OOIILL0000333355 ccoommpprreessssoorr ooiill..
VVeerriiffyy pprrooppeerr rreeffrriiggeerraanntt aanndd ooiill ffoorr yyoouurr cchhiilllleerr
aanndd ddoo NNOOTT mmiixx rreeffrriiggeerraannttss oorr ooiillss!!
This Installation, Operation, and Maintenance manual
applies to CenTraVac™ chillers with two different
refrigerant and compressor oil systems:
• R-123 refrigerant and OIL00022 compressor oil
• R-514A refrigerant and OIL00334/OIL00335
compressor oil
IImmppoorrttaanntt:: Verify proper refrigerant and compressor
oil for your chiller before proceeding!
NNOOTTIICCEE
DDoo NNoott UUssee NNoonn--CCoommppaattiibbllee PPaarrttss oorr
MMaatteerriiaallss!!
UUssee ooff nnoonn--ccoommppaattiibbllee ppaarrttss oorr mmaatteerriiaallss ccoouulldd
rreessuulltt iinn eeqquuiippmmeenntt ddaammaaggee..
OOnnllyy ggeennuuiinnee TTrraannee®® rreeppllaacceemmeenntt ccoommppoonneennttss
wwiitthh iiddeennttiiccaall TTrraannee ppaarrtt nnuummbbeerrss sshhoouulldd bbee uusseedd
iinn TTrraannee CCeennTTrraaVVaacc cchhiilllleerrss.. TTrraannee aassssuummeess nnoo
rreessppoonnssiibbiilliittyy ffoorr ddaammaaggeess rreessuullttiinngg ffrroomm tthhee uussee
ooff nnoonn--ccoommppaattiibbllee ppaarrttss oorr mmaatteerriiaallss..
Factory Warranty Information
Compliance with the following is required to preserve
the factory warranty:
AAllll UUnniitt IInnssttaallllaattiioonnss
Startup MUST be performed by Trane, or an authorized
agent of Trane, to VALIDATE this WARRANTY.
Contractor must provide a two-week startup
notification to Trane (or an agent of Trane specifically
authorized to perform startup).
AAddddiittiioonnaall RReeqquuiirreemmeennttss ffoorr UUnniittss RReeqquuiirriinngg
DDiissaasssseemmbbllyy aanndd RReeaasssseemmbbllyy
When a new chiller is shipped and received from our
Trane manufacturing location and, for any reason, it
requires disassembly or partial disassembly, and
reassembly— which could include but is not limited to
the evaporator, condenser, control panel, compressor/
motor, economizer, purge, factory-mounted starter or
any other components originally attached to the fully
assembled unit— compliance with the following is
required to preserve the factory warranty:
• Trane, or an agent of Trane specifically authorized
to perform start-up and warranty of Trane®
products, will perform or have direct on-site
technical supervision of the disassembly and
reassembly work.
• The installing contractor must notify Trane—or an
agent of Trane specifically authorized to perform
startup and warranty of Trane® products—two
weeks in advance of the scheduled disassembly
work to coordinate the disassembly and
reassembly work.
• Start-up must be performed by Trane or an agent of
Trane specifically authorized to perform startup and
warranty of Trane® products.
Trane, or an agent of Trane specifically authorized to
perform start-up and warranty of Trane® products, will
provide qualified personnel and standard hand tools to
perform the disassembly and reassembly work at a
location specified by the contractor. The contractor
shall provide the rigging equipment such as chain falls,
gantries, cranes, forklifts, etc. necessary for the
disassembly and reassembly work and the required
qualified personnel to operate the necessary rigging
equipment.
IInnttrroodduuccttiioonn

4
CDHF-SVX01N-EN
Copyright
This document and the information in it are the
property of Trane, and may not be used or reproduced
in whole or in part without written permission. Trane
reserves the right to revise this publication at any time,
and to make changes to its content without obligation
to notify any person of such revision or change.
Trademarks
All trademarks referenced in this document are the
trademarks of their respective owners.
Factory Training
Factory training is available through Trane University™
to help you learn more about the operation and
maintenance of your equipment. To learn about
available training opportunities contact Trane
University™.
Online: www.trane.com/traneuniversity
Phone: 855-803-3563
Email: [email protected]
Revision History
• Updated the Water weights table and Waterbox
rigging and lifting figure in the Waterbox Removal
and Installation chapter.
IInnttrroodduuccttiioonn

CDHF-SVX01N-EN
5
Unit Nameplate. . . . . . . . . . . . . . . . . . . . . . . . . . . . . 8
Model Number Descriptions. . . . . . . . . . . . . . . . 9
Pre-Installation . . . . . . . . . . . . . . . . . . . . . . . . . . . . 10
ASHRAE Standard 15 Compliance . . . . . . . . 10
Unit Shipment. . . . . . . . . . . . . . . . . . . . . . . . . . . 10
Installation Requirements and
Contractor Responsibilities . . . . . . . . . . . . . . . 10
Storage Requirements . . . . . . . . . . . . . . . . . . . 12
Unit Components. . . . . . . . . . . . . . . . . . . . . . . . 14
Unit Clearances and Weights . . . . . . . . . . . . . . 15
Recommended Unit Clearances. . . . . . . . . . . 15
General Weights. . . . . . . . . . . . . . . . . . . . . . . . . 16
Weights (lb) . . . . . . . . . . . . . . . . . . . . . . . . . 16
Weights (kg) . . . . . . . . . . . . . . . . . . . . . . . . . 16
Installation: Mechanical . . . . . . . . . . . . . . . . . . . 18
Operating Environment . . . . . . . . . . . . . . . . . . 18
Foundation Requirements . . . . . . . . . . . . . . . . 18
Rigging . . . . . . . . . . . . . . . . . . . . . . . . . . . . . . . . . 18
Standard Chiller Lift . . . . . . . . . . . . . . . . . . 18
Special Lift Requirements. . . . . . . . . . . . . 20
Unit Isolation. . . . . . . . . . . . . . . . . . . . . . . . . . . . 20
Isolation Pads . . . . . . . . . . . . . . . . . . . . . . . . . . . 21
Spring Isolators . . . . . . . . . . . . . . . . . . . . . . . . . 21
Leveling the Unit . . . . . . . . . . . . . . . . . . . . . . . . 22
Installation: Water Piping . . . . . . . . . . . . . . . . . . 24
Overview . . . . . . . . . . . . . . . . . . . . . . . . . . . . . . . 24
Water Treatment . . . . . . . . . . . . . . . . . . . . . . . . 24
Water Pressure Gauges . . . . . . . . . . . . . . . . . . 24
Valves—Drains and Vents . . . . . . . . . . . . . . . . 24
Strainers . . . . . . . . . . . . . . . . . . . . . . . . . . . . . . . . 25
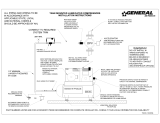
Required Flow-Sensing Devices. . . . . . . . . . . 25
Paddle Switches . . . . . . . . . . . . . . . . . . . . . 25
Water Flow Detection Controller and
Sensor . . . . . . . . . . . . . . . . . . . . . . . . . . . . . . 25
Evaporator and Condenser Water
Piping . . . . . . . . . . . . . . . . . . . . . . . . . . . . . . . . . . 27
Water Piping Connections . . . . . . . . . . . . . . . . 28
Waterbox Locations . . . . . . . . . . . . . . . . . . . . . 29
Grooved Pipe Coupling . . . . . . . . . . . . . . . . . . 29
Flange-connection Adapters . . . . . . . . . . . . . . 29
Victaulic Gasket Installation . . . . . . . . . . . . . . 30
Screw-Tightening Sequence for Water
Piping Connections . . . . . . . . . . . . . . . . . . . . . . 31
Flanges with 4, 8, or 12 Screws . . . . . . . . 31
Flanges with 16, 20, or 24
Screws . . . . . . . . . . . . . . . . . . . . . . . . . . . . . . 31
Flanges with More than 24
Screws . . . . . . . . . . . . . . . . . . . . . . . . . . . . . . 32
Evaporator Waterbox Covers . . . . . . . . . 32
Pressure Testing Waterside Piping . . . . . . . . 32
Eddy Current Testing . . . . . . . . . . . . . . . . . . . . 32
Vent Piping . . . . . . . . . . . . . . . . . . . . . . . . . . . . . . . . 34
Refrigerant Vent Line . . . . . . . . . . . . . . . . . . . . 34
General Requirements. . . . . . . . . . . . . . . . 34
Purge Discharge . . . . . . . . . . . . . . . . . . . . . 34
Vent Line Materials. . . . . . . . . . . . . . . . . . . 34
Vent Line Sizing. . . . . . . . . . . . . . . . . . . . . . 34
Vent Line Installation. . . . . . . . . . . . . . . . . . . . . 35
Vent Line Sizing Reference . . . . . . . . . . . . . . . 38
Insulation. . . . . . . . . . . . . . . . . . . . . . . . . . . . . . . . . . 41
Unit Insulation Requirements . . . . . . . . . . . . . 41
Insulation Thickness Requirements . . . . . . . 41
Factory-applied Insulation . . . . . . . . . . . . 41
Installation: Controls . . . . . . . . . . . . . . . . . . . . . . 43
UC800 Specifications . . . . . . . . . . . . . . . . . . . . 43
Power Supply. . . . . . . . . . . . . . . . . . . . . . . . 43
Wiring and Port Descriptions. . . . . . . . . . 43
Communication Interfaces . . . . . . . . . . . . 44
Rotary Switches . . . . . . . . . . . . . . . . . . . . . 44
LED Description and Operation. . . . . . . . 44
Installing the Tracer AdaptiView
Display . . . . . . . . . . . . . . . . . . . . . . . . . . . . . . . . . 50
Adjusting the Tracer AdaptiView Display
Arm . . . . . . . . . . . . . . . . . . . . . . . . . . . . . . . . . . . . 51
Electrical Requirements . . . . . . . . . . . . . . . . . . . 52
Installation Requirements . . . . . . . . . . . . . . . . 52
Electrical Requirements . . . . . . . . . . . . . . . . . . 52
Table of Contents

6
CDHF-SVX01N-EN
Trane-supplied Starter Wiring . . . . . . . . . . . . 53
Customer-supplied Remote Starter
Wiring . . . . . . . . . . . . . . . . . . . . . . . . . . . . . . . . . . . . . 54
Current Transformer and Potential
Transformer Wire Sizing . . . . . . . . . . . . . . . . . 54
Power Supply Wiring . . . . . . . . . . . . . . . . . . . . . . 56
Three-Phase Power . . . . . . . . . . . . . . . . . . . . . . 56
Circuit Breakers and Fused
Disconnects . . . . . . . . . . . . . . . . . . . . . . . . . . . . . 56
Power Factor Correction Capacitors
(Optional) . . . . . . . . . . . . . . . . . . . . . . . . . . . . . . . 57
Interconnecting Wiring. . . . . . . . . . . . . . . . . . . 58
Starter to Motor Wiring (Remote-
Mounted Starters Only) . . . . . . . . . . . . . . . . . . 58
Ground Wire Terminal Lugs. . . . . . . . . . . 58
Terminal Clamps. . . . . . . . . . . . . . . . . . . . . 58
Wire Terminal Lugs . . . . . . . . . . . . . . . . . . 59
Bus Bars . . . . . . . . . . . . . . . . . . . . . . . . . . . . 59
Starter to Control Panel Wiring . . . . . . . . . . . 60
10 to 13.8kV Medium Voltage Motor . . . . . . . 61
Motor Terminal Box . . . . . . . . . . . . . . . . . . . . . 61
Motor Supply Wiring. . . . . . . . . . . . . . . . . . . . . 62
Motor Terminals . . . . . . . . . . . . . . . . . . . . . 62
Ground Wire Terminal Lug. . . . . . . . . . . . 62
System Control Circuit Wiring (Field
Wiring) . . . . . . . . . . . . . . . . . . . . . . . . . . . . . . . . . . . . 63
Water Pump Interlock Circuits and Flow
Switch Input . . . . . . . . . . . . . . . . . . . . . . . . . . . . 64
Chilled Water Pump . . . . . . . . . . . . . . . . . . 64
Chilled Water Proof of Flow . . . . . . . . . . . 64
Condenser Water Pump . . . . . . . . . . . . . . 65
Condenser Water Proof of Flow . . . . . . . 65
Temperature Sensor Circuits . . . . . . . . . . . . . 65
CWR—Outdoor Option . . . . . . . . . . . . . . . 65
Optional Control and Output
Circuits. . . . . . . . . . . . . . . . . . . . . . . . . . . . . . 65
Optional Tracer Communication
Interface . . . . . . . . . . . . . . . . . . . . . . . . . . . . 65
Starter Module Configuration. . . . . . . . . . . . . 66
Schematic Wiring Drawings . . . . . . . . . . . . . . 66
Operating Principles . . . . . . . . . . . . . . . . . . . . . . . 67
General Requirements . . . . . . . . . . . . . . . . . . . 67
Cooling Cycle . . . . . . . . . . . . . . . . . . . . . . . . . . . 67
CDHG 3-Stage Compressor 1 or
2. . . . . . . . . . . . . . . . . . . . . . . . . . . . . . . . . . . . 67
CDHF 2-Stage Compressor 1 or
2. . . . . . . . . . . . . . . . . . . . . . . . . . . . . . . . . . . . 67
Duplex Compressor Sequencing . . . . . . . . . . 68
Fixed Sequence—Compressor 1 /
Compressor 2 (Default Mode) . . . . . . . . . 68
Fixed Sequence—Compressor 2 /
Compressor 1. . . . . . . . . . . . . . . . . . . . . . . . 69
Sequencing—Balanced Starts and
Hours . . . . . . . . . . . . . . . . . . . . . . . . . . . . . . . 69
Chiller Start Initial Capacity
Command . . . . . . . . . . . . . . . . . . . . . . . . . . . 69
Simultaneous Compressor Start/
Stop . . . . . . . . . . . . . . . . . . . . . . . . . . . . . . . . 70
Compressor Load Balancing . . . . . . . . . . 70
Oil and Refrigerant Pump . . . . . . . . . . . . . . . . 71
Compressor Lubrication
System. . . . . . . . . . . . . . . . . . . . . . . . . . . . . . 71
Motor Cooling System . . . . . . . . . . . . . . . . . . . 73
Tracer AdaptiView Display . . . . . . . . . . . . . . . 73
Start-up and Shut-down . . . . . . . . . . . . . . . . . . . 74
Sequence of Operation. . . . . . . . . . . . . . . . . . . 74
Software Operation Overview
Diagram. . . . . . . . . . . . . . . . . . . . . . . . . . . . . 74
Start-up Sequence of Operation—
Wye-delta . . . . . . . . . . . . . . . . . . . . . . . . . . . 75
Power Up . . . . . . . . . . . . . . . . . . . . . . . . . . . 79
Ice Machine Control. . . . . . . . . . . . . . . . . . . . . . 79
Hot Water Control . . . . . . . . . . . . . . . . . . . . . . . 81
Control Panel Devices and Unit-Mounted
Devices . . . . . . . . . . . . . . . . . . . . . . . . . . . . . . . . . 82
Unit Control Panel . . . . . . . . . . . . . . . . . . . 82
User-defined Language Support . . . . . . 82
Unit Start-up and Shut-down
Procedures. . . . . . . . . . . . . . . . . . . . . . . . . . . . . . 82
Daily Unit Start-up . . . . . . . . . . . . . . . . . . . 83
Seasonal Unit Start-up . . . . . . . . . . . . . . . 83
Daily Unit Shut-down . . . . . . . . . . . . . . . . 84
Seasonal Unit Shut-down. . . . . . . . . . . . . 84
TTaabbllee ooff CCoonntteennttss

CDHF-SVX01N-EN
7
Recommended Maintenance . . . . . . . . . . . . . . 85
Record Keeping Forms . . . . . . . . . . . . . . . . . . . 85
Normal Operation . . . . . . . . . . . . . . . . . . . . . . . 85
Recommended Compressor Oil
Change . . . . . . . . . . . . . . . . . . . . . . . . . . . . . . . . . 87
Purge System . . . . . . . . . . . . . . . . . . . . . . . . . . . 88
Leak Checking Based on Purge Pump
Out Time . . . . . . . . . . . . . . . . . . . . . . . . . . . . 88
Long Term Unit Storage. . . . . . . . . . . . . . . . . . 88
Refrigerant Charge . . . . . . . . . . . . . . . . . . . . . . 89
Leak Testing . . . . . . . . . . . . . . . . . . . . . . . . . . . . 89
Recommended System
Maintenance . . . . . . . . . . . . . . . . . . . . . . . . . . . . 89
Condenser . . . . . . . . . . . . . . . . . . . . . . . . . . 89
Evaporator . . . . . . . . . . . . . . . . . . . . . . . . . . 90
Waterbox and Tubesheet Protective
Coatings . . . . . . . . . . . . . . . . . . . . . . . . . . . . 90
Sacrificial Anodes . . . . . . . . . . . . . . . . . . . . 90
Waterbox Removal and Installation . . . . . . . 92
Discussion . . . . . . . . . . . . . . . . . . . . . . . . . . . . . . 92
Procedure. . . . . . . . . . . . . . . . . . . . . . . . . . . . . . . 92
Reassembly . . . . . . . . . . . . . . . . . . . . . . . . . 93
Torque Requirements and Waterbox
Weights . . . . . . . . . . . . . . . . . . . . . . . . . . . . . 93
Connection Devices Information . . . . . . . . . . 94
Appendix A: Forms and Check
Sheets . . . . . . . . . . . . . . . . . . . . . . . . . . . . . . . . . . . . . 95
Unit Start-up/Commissioning. . . . . . . . . . . . . 95
Appendix B: CenTraVac™ Chiller
Installation Completion and Request for
Trane Service. . . . . . . . . . . . . . . . . . . . . . . . . . . . . . 96
Appendix C: CDHF and CDHG
CenTraVac™ Chiller Start-up Tasks to be
Performed by Trane . . . . . . . . . . . . . . . . . . . . . . . 98
Appendix D: CDHF and CDHG
CenTraVac™ Chiller Annual Inspection
List . . . . . . . . . . . . . . . . . . . . . . . . . . . . . . . . . . . . . . . 100
Appendix E: CDHF and CDHG
CenTraVac™ Chiller Operator Log . . . . . . . . 101
TTaabbllee ooff CCoonntteennttss

8
CDHF-SVX01N-EN
Unit Nameplate
The unit nameplate is located on the left side of the left
hand control panel. A typical unit nameplate is
illustrated in the following figure and contains the
following information:
• Unit model and size descriptor
• Unit electrical requirements
• Correct operating charge and refrigerant type
• Unit test pressures and maximum operating
pressures
• Unit literature
SSeerriiaall NNuummbbeerr.. The unit serial number provides the
specific chiller identity. Always provide this serial
number when calling for service or during parts
identification.
SSeerrvviiccee MMooddeell NNuummbbeerr.. The service model represents
the unit as built for service purposes. It identifies the
selections of variable unit features required when
ordering replacements parts or requesting service.
NNoottee:: Unit-mounted starters are identified by a
separate number found on the starter.
PPrroodduucctt DDeessccrriippttiioonn BBlloocckk.. The CenTraVac™ chiller
models are defined and built using the Product
Definition and Selection (PDS) system. This system
describes the product offerings using a product coding
block which is made up of feature categories and codes
that identify all characteristics of a unit.
Figure 1. Typical unit nameplate

CDHF-SVX01N-EN
9
Model Number Descriptions
Digit 1, 2, 3 — Unit Function
Digit 4 — Development Sequence
Digit 5, 6, 7, 8 — Nominal Tonnage
Digit 9 — Unit Voltage
Digit 10, 11 — Design Sequence
Digit 12 — Compressor Motor Power
Left-Hand Circuit
Digit 13 — Compressor Motor Power
Right-Hand Circuit
Digit 14, 15, 16 — Compressor Impeller
Diameter Left-Hand Circuit
Digit 17, 18, 19 — Compressor Impeller
Diameter Right-Hand Circuit
Digit 20 — Evaporator Tube Bundle
(Nominal Tons)
Digit 21 — Evaporator Tubes
Digit 22 — Control Power Transformer
Digit 23 — Evaporator Waterbox
Digit 24 — Evaporator Waterbox
Connection
Digit 25 — Unit Type
Digit 26 — Condenser Tube Bundle Size
Digit 27 — Condenser Tubes
Digit 28 — RuptureGuard™
Digit 29 — Condenser Waterbox
Digit 30 — Condenser Waterbox
Connection
Digit 31 — Control Enclosure
Digit 32 — Orifice Size Left-Hand Circuit
Digit 33 — Orifice Size Right-Hand Circuit
Digit 34 — Starter Type Left-Hand
Digit 35 — Starter Type Right-Hand
Digit 36 — Enhanced Protection
Digit 37 — Generic BAS
Digit 38 — Water Flow Control
Digit 39 — Tracer® Communication
Interface
Digit 40 — Condenser Refrigerant
Control
Digit 41 — Extended Operation
Digit 42 — Chilled Water Reset: Outdoor
Air Temperature Sensor
Digit 43 — Operating Status
Digit 44 — Gas Powered Chiller
Digit 45 — Compressor Motor Frame Size
Left-Hand Circuit
Digit 46 — Compressor Motor Frame Size
Right-Hand Circuit
Digit 47 — Unit Insulation
Digit 48 — Spring Isolators
Digit 49 — Manufacturing Location
Digit 50 — Evaporator and Condenser
Size
Digit 51 — Special Option

10
CDHF-SVX01N-EN
Pre-Installation
ASHRAE Standard 15
Compliance
Trane recommends that indoor CenTraVac™ chiller
installations fully meet or exceed the guidelines of the
current version of ASHRAE Standard 15, in addition to
any applicable national, state, or local requirements.
This typically includes:
• A refrigerant monitor or detector that is capable of
monitoring and alarming within the acceptable
exposure level of the refrigerant, and that can
actuate mechanical ventilation.
• Audible and visual alarms, activated by the
refrigerant monitor, inside the equipment room and
outside of every entrance.
• The equipment room should be properly vented to
the outdoors, using mechanical ventilation that can
be activated by the refrigerant monitor.
• The purge discharge and the rupture disk must be
properly piped to the outdoors.
• If required by local or other codes, a self-contained
breathing apparatus should be available in close
proximity to the equipment room.
Refer to the latest copy of ASHRAE Standard 15 for
specific guidelines. Trane assumes no responsibility for
any economic, health, or environmental issues that
may result from an equipment room’s design or
function.
Unit Shipment
Inspect unit while it is still on the truck for any shipping
damage. The chiller ships shrink-wrapped in a 0.010-in.
(0.254 mm) recyclable film protective covering. Do NOT
remove shrink-wrap for inspection! Inspect for damage
to the shrink-wrap and determine if physical damage
has occurred.
Each chiller ships from the factory as a hermetically
assembled package; it is factory-assembled, -wired,
and -tested. All openings except for the waterbox vent
and drain holes are covered or plugged to prevent
contamination during shipment and handling.“Unit
Components,” p. 14 shows an illustration of a typical
unit and its components. As soon as the unit arrives at
the job site, inspect it thoroughly for damage and
material shortages. In addition:
1. Verify the hermetic integrity of the unit by checking
the chiller pressure for an indication of holding
charge pressure.
NNoottee:: Since there are two refrigerant circuits in
Duplex™ CenTraVac™ chillers, both must be
checked.
2. To prevent damaging moisture from entering the
unit and causing corrosion, each chiller is
pressurized with 3 to 5 psig (20.7 to 34.5 kPaG) of
dry nitrogen before shipment.
NNoottee:: The holding charge should register
approximately 5 psig (34.5 kPaG) at 72°F (22.2°C).
Place a gauge on the access valve provided
(indicated by arrow and circle in the following
figure) on the refrigerant pump discharge line to
verify the holding charge. If the charge has
escaped, contact your local Trane sales office for
instructions. For Duplex™, verify charge on both
units.
3. The loose parts box and isolator pads ship on top of
the control panel box.
4. Check the oil sump sight glasses to verify that the
sump was factory-charged with 9 gallons (34.1 L) of
oil. If no oil level is visible, contact your local Trane
sales office.
IImmppoorrttaanntt:: If isolation springs are installed, do NOT
block oil tank serviceability.
Figure 2. Refrigerant pump discharge line access
valve
Installation Requirements and
Contractor Responsibilities
A list of the contractor responsibilities typically
associated with the unit installation process is provided
in the following table.

CDHF-SVX01N-EN
11
WWAARRNNIINNGG
CCoommbbuussttiibbllee MMaatteerriiaall!!
FFaaiilluurree ttoo ffoollllooww iinnssttrruuccttiioonnss bbeellooww ccoouulldd rreessuulltt iinn
ddeeaatthh oorr sseerriioouuss iinnjjuurryy oorr eeqquuiippmmeenntt ddaammaaggee..
SShhrriinnkk--wwrraapp iiss aa ccoommbbuussttiibbllee mmaatteerriiaall.. AAvvooiidd ooppeenn
ffllaammeess aanndd hhoott ssppaarrkkss..
NNoottee:: The chiller should remain within its protective
shrink-wrap covering during storage.
Type of Requirement
Trane Supplied
Trane Installed
Trane Supplied
Field Installed
Field Supplied
Field Installed
Foundation
• Meet foundation requirements
Rigging
• Safety chains
• Rigging shackles
• Lifting beam
Disassembly/Reassembly
(as required)
• Trane will perform or have
direct on-site supervision
of the disassembly and
reassembly work (contact
your local Trane office for
pricing)
Isolation
• Isolation pads or spring
isolators
• Isolation pads or spring isolators
• Optional spring isolators, when required, are
installed by others; do NOT overload springs and do
NOT install isolation springs if they block serviceable
parts such as the oil tank system, service valves,
etc.
Electrical
• Circuit breakers or fusible
disconnects (optional)
• Unit-mounted starter
(optional)
• Power factor correction
capacitors (PFCCs)
(optional)
• Jumper bars
• Temperature sensor
(optional outdoor air)
• Flow switches (may be
field supplied); for
installation instructions
for the ifm efector®
flow detection controller
and sensor, refer to
“Water Flow Detection
Controller and
Sensor,” p. 25 or Trane
literature that shipped
with the device
• Remote-mounted
starter (optional)
• Circuit breakers or fusible disconnects (optional)
• Electrical connections to unit-mounted starter
(optional)
• Electrical connections to remote-mounted starter
(optional)
• Wiring sizes per submittal and National Electric Code
(NEC)
• PFCCs (remote mounted starter optional only)
• Terminal lugs
• Ground connection(s)
• Jumper bars
• BAS wiring (optional)
• Inter-processor communication (IPC) wiring (AFD
and remote-mounted starters only)
• Control voltage wiring (AFD and remote-mounted
starters only)
• Oil pump interlock wiring (AFD and remote mounted
starters only)
• High condenser pressure interlock wiring (AFD and
remote-mounted starters only)
• Chilled water pump contactor and wiring including
interlock
• Condenser water pump contactor and wiring
including interlock
• Option relays and wiring
• Tracer® SC communication wiring (optional)
PPrree--IInnssttaallllaattiioonn

12
CDHF-SVX01N-EN
Type of Requirement
Trane Supplied
Trane Installed
Trane Supplied
Field Installed
Field Supplied
Field Installed
Water piping
• Flow sensing devices
(may be field supplied)
• Taps for flow sensing devices
• Taps for thermometers and gauges
• Thermometers
• Strainers (as required)
• Water flow pressure gauges
• Isolation and balancing valves in water piping
• Vents and drain on waterbox valves (one each per
pass)
• Pressure relief valves (for waterboxes as required)
Relief
• Rupture disk assembly
• RuptureGuard™
(optional); refer to
Installation, Operation,
and Maintenance:
RuptureGuard Pressure
Relief System Option
(CTV-SVX06*-EN)
• Vent line and flexible connector and vent line from
rupture disk to atmosphere
Insulation
• Insulation (optional)
• Insulation
• Chiller feet insulation
Water Piping Connection
Components
Flanged (optional)
• Welded on flange for
300 psig (2068.4 kPaG)
waterboxes
Flanged (optional)
• Victaulic® to flange
adapter for 150 psig
(1034.2 kPaG)
waterboxes
Victaulic®
• Victaulic® coupling for 150 psig (1034.2 kPaG) and
300 psig (2068.4 kPaG) waterboxes
• Fasteners for flanged-type connections (optional)
Other Materials
• Trace gas (1 lb [0.45 kg] maximum per machine as
needed to perform leak testing)
• Material and equipment to perform leak testing
• Dry nitrogen (8 psig [55.2 kPaG] maximum per
machine as needed)
“Appendix B: CenTraVac™
Chiller Installation
Completion and Request
for Trane Service,” p. 96
(CTV-ADF001*-EN; refer
to “Appendix A: Forms and
Check Sheets,” p. 95)
• To be completed by installing contractor prior to
contacting Trane for start-up
Chiller start-up
commissioning
(a)
• Trane, or an agent of
Trane specifically
authorized to perform
start-up of Trane®
products
Post-commissioning
transport of empty
refrigerant containers for
return or recycling
• Move empty refrigerant containers to an easily
accessible point of loading
(a)
Start-up must be performed by Trane or an agent of Trane specifically authorized to perform start-up and warranty of Trane® products. Contractor shall
provide Trane (or an agent of Trane specifically authorized to perform start-up) with notice of the scheduled start-up at least two weeks prior to the
scheduled start-up.
Storage Requirements
NNoottee:: If the chiller is stored outdoors for any amount of
time, ddoo NNOOTT rreemmoovvee AANNYY sshhiippppiinngg
ccoovveerriinnggss.. PPrrootteecctt tthhee cchhiilllleerr ffrroomm tthhee
eelleemmeennttss aanndd pprrootteecctt aaggaaiinnsstt ffrreeeezziinngg,,
especially if any shipping materials have been
removed.
NNOOTTIICCEE
EEqquuiippmmeenntt DDaammaaggee!!
FFaaiilluurree ttoo pprrootteecctt tthhee uunniitt ffrroomm ffrreeeezziinngg ccoouulldd
rreessuulltt iinn eeqquuiippmmeenntt ddaammaaggee..
IIff fflluuiidd hhaass bbeeeenn aaddddeedd ttoo tthhee ppiippiinngg,, tthhee uunniitt mmuusstt
bbee pprrootteecctteedd ffrroomm ffrreeeezziinngg.. FFrreeeezzee ddaammaaggee ffrroomm
aann uunnhheeaatteedd eeqquuiippmmeenntt rroooomm iiss nnoott tthhee TTrraannee
ccoommppaannyy''ss rreessppoonnssiibbiilliittyy.. TThheessee aarree iinnddoooorr uunniittss..
PPrree--IInnssttaallllaattiioonn

CDHF-SVX01N-EN
13
NNOOTTIICCEE
IInnssuullaattiioonn DDaammaaggee!!
FFaaiilluurree ttoo ffoollllooww tthheessee iinnssttrruuccttiioonnss ccoouulldd rreessuulltt iinn
iinnssuullaattiioonn ddaammaaggee..
TToo pprreevveenntt ddaammaaggee ttoo ffaaccttoorryy iinnssttaalllleedd iinnssuullaattiioonn::
•• DDoo nnoott aallllooww tthhee iinnssuullaattiioonn ttoo bbee eexxppoosseedd ttoo
eexxcceessssiivvee ssuunnlliigghhtt.. SSttoorree iinnddoooorrss oorr ccoovveerr wwiitthh
ccaannvvaass ttoo pprreevveenntt eexxppoossuurree..
•• DDoo nnoott uussee tthhiinnnneerrss aanndd ssoollvveennttss oorr ootthheerr ttyyppeess
ooff ppaaiinntt.. UUssee oonnllyy wwaatteerr bbaassee llaatteexx..
Less than 1 month 1–6 months Greater than 6 months
Location requirements:
• Solid foundation
• Vibration free
• Dry
• Temperature range -40°F to 158°F
(-40°C to 70°C)
Location requirements:
• Solid foundation
• Vibration free
• Dry
• Temperature range -40°F to 158°F
(-40°C to 70°C)
Location requirements:
• Solid foundation
• Vibration free
• Dry
• Temperature range -40°F to 158°F
(-40°C to 70°C)
• Do not remove any plastic coverings • Do not remove any plastic coverings • Do not remove any plastic coverings
• Do not charge the chiller with refrigerant
• If additional refrigerant is on site, follow
manufacturer’s storage requirements
• Do not charge the chiller with refrigerant
• If additional refrigerant is on site, follow
manufacturer’s storage requirements
• Do not charge the chiller with refrigerant
• If additional refrigerant is on site, follow
manufacturer’s storage requirements
• Verify dry nitrogen pressure using gauge
located on the evaporator shell reads
3 to 5 psig (20.7 to 34.5 kPaG)
• Notify the local Trane office if charge has
escaped
• Verify dry nitrogen pressure using gauge
located on the evaporator shell reads
3 to 5 psig (20.7 to 34.5 kPaG)
• Notify the local Trane office if charge has
escaped
• Verify dry nitrogen pressure using gauge
located on the evaporator shell reads 3 to 5 psig
(20.7 to 34.5 kPaG)
• Notify the local Trane office if charge has
escaped
• Do not operate purge unit • Do not operate purge unit • Do not operate purge unit
• Verify waterbox and tube bundles are
clean and dry
• Verify waterbox and tube bundles are clean and
dry
• Conduct an oil analysis and verify no oil
breakdown
(a)
• Repeat yearly
• Replace oil if breakdown has occurred
• If no oil analysis program has been followed,
replace oil prior to start-up
• Every six months, check unit pressure or
vacuum and take note of changes that could
indicate a leak; contact your local Trane office if
any leaks occur
• Every six months, start the oil pump and rotate
compressor shaft about 450° to prevent
potential bearing issues
(a)
; contact your local
Trane Service Agency to perform this task
• If the chiller will be stored for more than
six months after production, contact your local
Trane Service Agency for required extended
storage actions to minimize impact to the chiller
and preserve the warranty.
• Chillers stored five years or longer should be
inspected for leaks every five years by a
qualified service organization
(a)
If the chiller will be stored for more than six months after production, contact your local Trane Service Agency for required extended storage actions to
minimize impact to the chiller and preserve the warranty.
PPrree--IInnssttaallllaattiioonn

14
CDHF-SVX01N-EN
Unit Components
NNoottee:: The control panel side of the unit is always
designated as the front side of the unit. The left
side of the unit is referred to as referred to as
Side 1 and the right side of the unit is referred to
as Side 2.
Figure 3. Typical Duplex™ CenTraVac™ chiller
1
2
3
4
5
6
7
8
9
0
-
0
1
3
4
2
7
6
1. Suction Elbow
2. Compressor
3. Terminal Box
4. Control Panel
5. Condenser
6. Motor Housing
7. Economizer
8. Oil Tank Assembly
9. Purge
10. Evaporator
11. Display Panel
PPrree--IInnssttaallllaattiioonn

CDHF-SVX01N-EN
15
Unit Clearances and Weights
Recommended Unit Clearances
Adequate clearances around and above the chiller are
required to allow sufficient access for service and
maintenance operations. Specific unit clearance
requirements are indicated in the submittal package
provided for your unit.
• Do NOT install piping or conduit above the
compressor motor assembly or behind the suction
elbow of the unit.
• Minimum vertical clearance above the unit is 3 ft
(92 cm).
• Use a housekeeping pad to provide better service
clearances; refer to submittal for more information.
Per National Electric Code (NEC) Article 110: Unit
mounted starters from 0 to 600V require a 42 inch
(107 cm) clearance, 601 to 2500V require a 48 inch
(122 cm) clearance, and 2501 to 9000V require a 60 inch
(152 cm) clearance. Refer to NEC and local electrical
codes for starter and control panel clearance
requirements.
Figure 4. Clearance requirements
C
3 ft. (92 cm)
A
18 in. (46 cm)
Economizer
Cooling
condenser
Evaporator
Motor
Right-hand tube pull shown, apply
tube pull clearance dimension to
left end for left-hand tube pull.
Optional
unit-mounted starter
These dimensions per NEC Article
110
B
D
E
Table 1. Clearance requirements
Shell Combo
A B C D E
in.
cm
in.
cm
in.
cm
in.
cm
in.
cm
210DD 62.375 158.43 264 670.56 585 1485.9 37 93.98 106 269.24
250DD 62.375 158.43 264 670.56 585 1485.9 36 91.44 121 307.34
250MM 69 175.26 318 807.72 699 1775.46 33 83.82 121 307.34
250XX 69 175.26 366 929.64 795 2019.3 33 83.82 121 307.34
Note: All dimensions are approximate; refer to the unit submittal package for exact dimensions for your unit.

16
CDHF-SVX01N-EN
General Weights
Weights (lb)
IImmppoorrttaanntt:: The weight information provided here
should be used for general information
only. Trane does not recommend using this
weight information for considerations
relative to chiller handling, rigging, or
placement. The large number of variances
between chiller selections drives variances
in chiller weights that are not recognized in
these tables. For specific weights for your
chiller, refer to your submittal package.
Table 2. Representative weights, 60 Hz chillers (lb)
Model
Comp Size
CPKW
Evap Size
Cond Size
Weights without Starters Weights with Starters
NTON EVSZ CDSZ
Operating Shipping Operating Shipping
CDHF
1500–2000 745 210D 210D 95319 80069 101319 86069
2170–2550 1062 250D 250D 110325 91405 116325 97405
3000 1062 250M 250M 125690 103670 131690 109670
3500
957
250X 250X
— — 133835 109305
1229 138730 114199 — —
Notes:
1. TECU tubes, 0.028 in. tube wall thickness.
2. 300 psig marine waterboxes.
3. Heaviest possible bundle and motor combination.
4. Operating weights assume the largest possible refrigerant charge.
5. Weights with starters assume the heaviest possible starter (AFD when it’s an allowed option).
6. Industrial Control Panel (INDP) option, add 50 lb.
7. Control Power Transformer (CPTR) option, add 130 lb.
8. Supplemental Motor Protection (SMP) option, add 500 lb.
Table 3. Representative weights, 50 Hz chillers (lb)
Model
Comp Size
CPKW
Evap Size
Cond Size
Weights without Starters Weights with Starters
NTON EVSZ CDSZ
Operating Shipping Operating Shipping
CDHG
1250 621 210D 210D 99463 84013 100577 85127
1750 621 210D 210D 99463 84013 100577 85127
2150 892 210D 210D 103720 88298 104834 89412
2250 892 210D 210D 102408 86953 103522 88067
Notes:
1. TECU tubes, 0.028 in. tube wall thickness.
2. 300 psig marine waterboxes.
3. Heaviest possible bundle and motor combination.
4. Operating weights assume the largest possible refrigerant charge.
5. Weights with starters assume the heaviest possible starter (AFD when it’s an allowed option).
6. Industrial Control Panel (INDP) option, add 50 lb.
7. Control Power Transformer (CPTR) option, add 130 lb.
8. Supplemental Motor Protection (SMP) option, add 500 lb.
Weights (kg)
IImmppoorrttaanntt:: The weight information provided here
should be used for general information
only. Trane does not recommend using this
weight information for considerations
relative to chiller handling, rigging, or
placement. The large number of variances
between chiller selections drives variances
in chiller weights that are not recognized in
these tables. For specific weights for your
chiller, refer to your submittal package.
UUnniitt CClleeaarraanncceess aanndd WWeeiigghhttss

CDHF-SVX01N-EN
17
Table 4. Representative weights, 60 Hz chillers (kg)
Model
Comp Size
CPKW
Evap Size
Cond Size
Weights without Starters Weights with Starters
NTON EVSZ CDSZ
Operating Shipping Operating Shipping
CDHF
1500–2000 745 210D 210D 43236 36319 45958 39040
2170–2550 1062 250D 250D 50043 41461 52764 44182
3000 1062 250M 250M 57012 47024 59734 49745
3500
957
250X 250X
— — 60707 49580
1229 62927 51800 — —
Notes:
1. TECU tubes, 0.71 mm tube wall thickness.
2. 2068.4 kPaG non-marine waterboxes.
3. Heaviest possible bundle and motor combination.
4. Operating weights assume the largest possible refrigerant charge.
5. Weights with starters assume the heaviest possible starter (AFD when it’s an allowed option).
6. Industrial Control Panel (INDP) option, add 23 kg.
7. Control Power Transformer (CPTR) option, add 59 kg.
8. Supplemental Motor Protection (SMP) option, add 227 kg.
Table 5. Weights, 50 Hz chillers (kg)
Model
Comp Size
CPKW
Evap Size
Cond Size
Weights without Starters Weights with Starters
NTON EVSZ CDSZ
Operating Shipping Operating Shipping
CDHG
1250 621 210D 210D 45116 38108 45621 38613
1750 621 210D 210D 45116 38108 45621 38613
2150 892 210D 210D 47047 40051 47552 40557
2250 892 210D 210D 46451 39441 46957 39947
Notes:
1. TECU tubes, 0.71 mm tube wall thickness.
2. 2068.4 kPaG non-marine waterboxes.
3. Heaviest possible bundle and motor combination.
4. Operating weights assume the largest possible refrigerant charge.
5. Weights with starters assume the heaviest possible starter (AFD when it’s an allowed option).
6. Industrial Control Panel (INDP) option, add 23 kg.
7. Control Power Transformer (CPTR) option, add 59 kg.
8. Supplemental Motor Protection (SMP) option, add 227 kg.
UUnniitt CClleeaarraanncceess aanndd WWeeiigghhttss

18
CDHF-SVX01N-EN
Installation: Mechanical
Operating Environment
IImmppoorrttaanntt::
• The standard chiller is designed for
INDOOR USE ONLY and as such has
NEMA Type 1 enclosures.
• For chillers in unheated equipment
rooms, contact your local Trane Service
Agency for methods to ensure that the
oil temperature is maintained suitable
for proper operation of the chiller.
NNOOTTIICCEE
EEqquuiippmmeenntt DDaammaaggee!!
FFaaiilluurree ttoo pprrootteecctt tthhee uunniitt ffrroomm ffrreeeezziinngg ccoouulldd
rreessuulltt iinn eeqquuiippmmeenntt ddaammaaggee..
IIff fflluuiidd hhaass bbeeeenn aaddddeedd ttoo tthhee ppiippiinngg,, tthhee uunniitt mmuusstt
bbee pprrootteecctteedd ffrroomm ffrreeeezziinngg.. FFrreeeezzee ddaammaaggee ffrroomm
aann uunnhheeaatteedd eeqquuiippmmeenntt rroooomm iiss nnoott tthhee TTrraannee
ccoommppaannyy''ss rreessppoonnssiibbiilliittyy.. TThheessee aarree iinnddoooorr uunniittss..
NNOOTTIICCEE
EEqquuiippmmeenntt FFaaiilluurree!!
UUnniitt ooppeerraattiinngg aatt aammbbiieenntt tteemmppeerraattuurreess eexxcceeeeddiinngg
110044°°FF ((4400°°CC)) ccoouulldd rreessuulltt iinn AAFFDD//ssttaarrtteerr
ccoommppoonneenntt ddaammaaggee dduuee ttoo tthhee ppaanneell’’ss iinnaabbiilliittyy ttoo
ddiissssiippaattee hheeaatt aaddeeqquuaatteellyy.. FFoorr CCDDHHFF,, CCDDHHGG,, CCVVHHEE,,
CCVVHHFF,, CCVVHHGG,, CCVVHHLL,, CCVVHHMM,, aanndd CCVVHHSS CCeennTTrraaVVaacc
cchhiilllleerrss,, uunniittss ooppeerraattiinngg aatt tthheessee tteemmppeerraattuurreess
ccoouulldd aallssoo ffaattiigguuee tthhee uunniitt’’ss rruuppttuurree ddiisskk,, ccaauussiinngg
iitt ttoo bbrreeaakk aatt aa rreedduucceedd rreeffrriiggeerraanntt pprreessssuurree ((<<1155
ppssiigg [[<<110033..44 kkPPaaGG]]))..
IIff aannyy ooff tthheessee aaddvveerrssee ooppeerraattiinngg ccoonnddiittiioonnss aarree
pprreesseenntt,, ttaakkee nneecceessssaarryy aaccttiioonn ttoo iimmpprroovvee tthhee
eeqquuiippmmeenntt rroooomm eennvviirroonnmmeenntt..
To ensure that electrical components operate properly,
do NOT locate the chiller in an area exposed to dust,
dirt, corrosive fumes, or excessive heat and humidity.
The maximum ambient temperature for chiller
operation is 104°F (40°C).
Foundation Requirements
Chiller mounting surface must be:
• rigid non-warping mounting pads or a concrete
foundation, and
• able to support the chiller at its full operating
weight (including completed piping and full
operating charges of refrigerant, oil, and water).
For proper unit operation, the chiller must be level
within 1/16 in. (1.6 mm) over its length and width when
set into place on the mounting surface. Refer to
“Leveling the Unit,” p. 22 for more information. For
approximate weights for various chiller sizes and
options in pounds and kilograms, refer to “Weights
(lb),” p. 16 and “Weights (kg),” p. 16, respectively.
NNoottee:: For specific weight information, refer to the unit
submittal package.
IImmppoorrttaanntt:: Trane will not assume responsibility for
equipment problems resulting from an
improperly designed or constructed
foundation.
Rigging
Lifting is the recommended method for moving
chillers. Suggested lifting arrangements for standard
units are described in “Standard Chiller Lift,” p. 18.
NNoottee:: The lifting beam used for CDHF and CDHG
CenTraVac™ chillers must be at least 23 ft
(7.0 m) long.
WWAARRNNIINNGG
HHeeaavvyy OObbjjeecctt!!
FFaaiilluurree ttoo ffoollllooww iinnssttrruuccttiioonnss bbeellooww ccoouulldd rreessuulltt iinn
uunniitt ddrrooppppiinngg wwhhiicchh ccoouulldd rreessuulltt iinn ddeeaatthh oorr
sseerriioouuss iinnjjuurryy,, aanndd eeqquuiippmmeenntt oorr pprrooppeerrttyy--oonnllyy
ddaammaaggee..
EEnnssuurree tthhaatt aallll tthhee lliiffttiinngg eeqquuiippmmeenntt uusseedd iiss
pprrooppeerrllyy rraatteedd ffoorr tthhee wweeiigghhtt ooff tthhee uunniitt bbeeiinngg
lliifftteedd.. EEaacchh ooff tthhee ccaabblleess ((cchhaaiinnss oorr sslliinnggss)),, hhooookkss,,
aanndd sshhaacckklleess uusseedd ttoo lliifftt tthhee uunniitt mmuusstt bbee ccaappaabbllee
ooff ssuuppppoorrttiinngg tthhee eennttiirree wweeiigghhtt ooff tthhee uunniitt.. LLiiffttiinngg
ccaabblleess ((cchhaaiinnss oorr sslliinnggss)) mmaayy nnoott bbee ooff tthhee ssaammee
lleennggtthh.. AAddjjuusstt aass nneecceessssaarryy ffoorr eevveenn uunniitt lliifftt..
WWAARRNNIINNGG
IImmpprrooppeerr UUnniitt LLiifftt!!
FFaaiilluurree ttoo pprrooppeerrllyy lliifftt uunniitt iinn aa LLEEVVEELL ppoossiittiioonn
ccoouulldd rreessuulltt iinn uunniitt ddrrooppppiinngg aanndd ppoossssiibbllyy
ccrruusshhiinngg ooppeerraattoorr//tteecchhnniicciiaann wwhhiicchh ccoouulldd rreessuulltt iinn
ddeeaatthh oorr sseerriioouuss iinnjjuurryy,, aanndd eeqquuiippmmeenntt oorr
pprrooppeerrttyy--oonnllyy ddaammaaggee..
TTeesstt lliifftt uunniitt aapppprrooxxiimmaatteellyy 2244 iinncchheess ((6611 ccmm)) ttoo
vveerriiffyy pprrooppeerr cceenntteerr ooff ggrraavviittyy lliifftt ppooiinntt.. TToo aavvooiidd
ddrrooppppiinngg ooff uunniitt,, rreeppoossiittiioonn lliiffttiinngg ppooiinntt iiff uunniitt iiss
nnoott lleevveell..
NNOOTTIICCEE
WWiirriinngg DDaammaaggee!!
DDaammaaggee ttoo uunniitt wwiirriinngg ccoouulldd rreessuulltt iinn eeqquuiippmmeenntt
ffaaiilluurree..
CCaarree mmuusstt bbee ttaakkeenn dduurriinngg rriiggggiinngg,, aasssseemmbbllyy aanndd
ddiissaasssseemmbbllyy ttoo aavvooiidd ddaammaaggiinngg uunniitt wwiirriinngg..
Standard Chiller Lift
1. Insert rigging shackles at the points indicated in the
following figure. A 2.5 in. (63.5 mm)1.25 in. (31.8

CDHF-SVX01N-EN
19
mm) diameter lifting hole is provided at each of
these points.
2. Attach the lifting chains or cables.
3. After the lifting cables are in place, attach a safety
chain or cable between the first-stage casing of the
compressor and the lifting beam.
IImmppoorrttaanntt:: There should NOT be tension on this
safety cable; the cable is used only to
prevent the unit from rolling during the
lift.
4. Position isolator pads or spring isolators beneath
the chiller feet (refer to “Unit Isolation,” p. 20 for
instructions).
NNoottee:: Follow instructions provided by the spring
isolator manufacturer, being careful to not
damage isolator adjustment screw.
5. Once the isolators are in place, lower the chiller—
working from end to end—in small increments to
maintain stability.
6. When lift is complete, detach the rigging shackles
and safety chain.
Figure 5. Typical rigging arrangements for CDHF and CDHG CenTraVac chillers
Y
X
Lifting
beam
Safety
chain
H
A
Safety
chain
Jacking
points
IInnssttaallllaattiioonn:: MMeecchhaanniiccaall

20
CDHF-SVX01N-EN
Table 6. Rigging arrangements
Type
NTON EVSZ CDSZ
X Y H
in.
cm
ft
m
in.
cm
CDHF 1500–2000 210D 210D 117 297.18 22 6.7056
24.75 62.865
CDHF 2100–2500 250D 250D 117 297.18 22 6.7056
CDHF 2170–2550 250D 250D 143 363.22 23 7.0104
CDHG 1250–1750 210D 210D 117 297.18 22 6.7056
CDHG 2150 210D 210D 117 297.18 22 6.7056
CDHG 2150 250D 250D 117 297.18 22 6.7056
CDHG 2250 210D 210D 143 363.22 23 7.0104
CDHG 2250 250D 250D 143 363.22 23 7.0104
CDHF 3000 250M 250M 142 360.68 26.5 8.0772
CDHF 3500 250X 250X 164 416.56 30.5 9.2964
Notes:
1. Lifting chains (or cables) are not the same length between point A and B, or between points A and C. Adjust as necessary for an even lift.
2. Lifting holes provided on chillers to attach chains are 2-1/2 in. (63.5 mm) in diameter.
3. Attach safety chain (or cable) as shown, and without tension. The safety chain is not used for lifting, but is there to prevent the unit from rolling.
4. Do NOT fork-lift the unit.
Special Lift Requirements
NNOOTTIICCEE
OOiill LLoossss!!
FFaaiilluurree ttoo pprreevveenntt ooiill mmiiggrraattiioonn oouutt ooff tthhee ooiill ttaannkk
ccoouulldd rreessuulltt iinn eeqquuiippmmeenntt ffaaiilluurree oorr pprrooppeerrttyy--oonnllyy
ddaammaaggee..
TToo pprreevveenntt ooiill mmiiggrraattiioonn oouutt ooff tthhee ooiill ttaannkk dduurriinngg
lliiffttiinngg pprroocceedduurreess,, rreemmoovvee tthhee ooiill ffrroomm tthhee ooiill ttaannkk
iiff tthhee uunniitt wwiillll bbee lliifftteedd aatt aannyy aannggllee ggrreeaatteerr tthhaann
1155°° ffrroomm hhoorriizzoonnttaall eenndd--ttoo--eenndd.. IIff ooiill iiss aalllloowweedd ttoo
rruunn oouutt ooff tthhee ooiill ttaannkk iinnttoo ootthheerr aarreeaass ooff tthhee
cchhiilllleerr,, iitt wwiillll bbee eexxttrreemmeellyy ddiiffffiiccuulltt ttoo rreettuurrnn tthhee ooiill
ttoo tthhee ooiill ttaannkk eevveenn dduurriinngg ooppeerraattiioonn..
NNOOTTIICCEE
EEqquuiippmmeenntt DDaammaaggee!!
MMoovviinngg tthhee cchhiilllleerr uussiinngg aa ffoorrkk lliifftt ccoouulldd rreessuulltt iinn
eeqquuiippmmeenntt oorr pprrooppeerrttyy--oonnllyy ddaammaaggee..
DDoo nnoott uussee aa ffoorrkk lliifftt ttoo mmoovvee tthhee cchhiilllleerr!!
NNOOTTIICCEE
CCoommpprreessssoorr AAlliiggnnmmeenntt!!
FFaaiilluurree ttoo pprreesseerrvvee ccoommpprreessssoorr aalliiggnnmmeenntt ccoouulldd
rreessuulltt iinn eeqquuiippmmeenntt oorr pprrooppeerrttyy--oonnllyy ddaammaaggee..
LLiiffttiinngg tthhee ccoommpprreessssoorr//mmoottoorr aasssseemmbbllyy ffrroomm tthhee
sshheellllss wwiitthhoouutt ffaaccttoorryy--iinnssttaalllleedd ddoowweelliinngg iinn tthhee
ccoommpprreessssoorr ccaassttiinngg ffllaannggeess ccoouulldd rreessuulltt iinn
mmiissaalliiggnnmmeenntt ooff tthhee ccoommpprreessssoorr ccaassttiinnggss..
If the chiller cannot be moved using a standard chiller
lift, consider the following:
• When job site conditions require rigging of the
chiller at an angle greater than 45° from horizontal
(end-to-end), the unit may require removal of the
compressor. Contact Trane or an agent of Trane
specifically authorized to perform start-up and
warranty of Trane® products regarding the
disassembly and reassembly work. For more
information, refer to “Factory Warranty
Information,” p. 3.
NNoottee:: Disassembly and reassembly work includes
dowel-pinning the compressor and removing
it from the unit. Contact Trane or an agent of
Trane specifically authorized to perform start-
up and warranty of Trane® products for
specific rigging instructions. Do NOT attempt
to rotate the chiller onto its side.
• When lifting the chiller is either impractical or
undesirable, attach cables or chains to the jacking
slots shown in the figure in “Standard Chiller
Lift,” p. 18; then push or pull the unit across a
smooth surface. Should the chiller be on a shipping
skid, it is not necessary to remove the skid from the
chiller before moving it into place.
• If removal of the compressor or economizer
assembly is necessary to move the chiller to the
operating location, contact Trane. Also refer to
“Factory Warranty Information,” p. 3.
Unit Isolation
To minimize sound and vibration transmission through
the building structure and to ensure proper weight
distribution over the mounting surface, always install
isolation pads or spring isolators under the chiller feet.
IInnssttaallllaattiioonn:: MMeecchhaanniiccaall
/