Page is loading ...

Precision Router Lift
™
Owner’s Manual
GUIDE D’UTILISATION
MANUAL DEL PROPIETARIO
ITEM# PRS5000
ARTICLE # PRS5000
ARTÍCULO# PRS5000
NK9273
Version 1 - 12/2017
www.kregtool.com • 800.447.8638

General Safety Guidelines
!
WARNING When using electric tools, always follow the safety precautions below to reduce the risk of re, electric shock, and personal injury.
Read all these instructions before attempting to operate this product. SAVE THESE INSTRUCTIONS.
1) Work area safety
a) Keep work area clean and well lit. Cluttered or dark areas invite accidents.
b) Don’t use power tools in a dangerous environment. Don’t use power tools in damp or wet locations, or expose them to rain.
c) Do not operate power tools in explosive atmospheres, such as in the presence of ammable liquids, gases or dust. Power tools create sparks that can ignite the fumes or dust.
d) Keep children and bystanders away while operating a power tool. Distractions can cause you to lose control.
e) Make your workshop child proof. Use padlocks, master switches, or remove starter keys.
2) Electrical safety
a) Ground electric tools. If the tool is equipped with a three-prong plug, it must be plugged into a grounded three-hole electrical outlet. If the proper outlet is not available, have
one installed by a qualied electrician. Never remove the third prong or modify the provided plug in any way.
b) Do not expose power tools to rain or wet conditions. Water entering a power tool increases the risk of electric shock.
c) Do not abuse the cord. Never use the cord for carrying, pulling or unplugging the power tool. Keep cord away from heat, oil, sharp edges or moving parts. Damaged or
entangled cords increase the risk of electric shock.
d) Use a proper extension cord and make sure it is in good condition. When using an extension cord, be sure to use one heavy enough to carry the current your power tool
draws. An undersized cord causes a drop in line voltage resulting in loss of power and overheating. Table 1 shows the correct cord gauge to use depending on cord length
and tool nameplate ampere rating. If in doubt, use the next heavier gage. The smaller the number, the heavier the cord.
e) When operating electric tools, avoid body contact with grounded or earthed surfaces such as pipes, radiators, kitchen ranges, and refrigerators. Contact with a grounded
surface increases the risk of electric shock.
3) Personal safety
a) Stay alert, watch what you are doing and use common sense when operating a power tool. Do not use a power tool while you are tired or under the inuence of drugs,
alcohol or medication. A moment of inattention while operating power tools can result in serious personal injury.
b) Always wear safety glasses. Everyday eyeglasses are not safety glasses. Safety glasses have specially constructed lenses, frames, and side shields.
c) Use safety equipment. Use a face or dust mask when the cutting operation is dusty. Safety equipment such as a dust mask, non-skid safety shoes, hard hat, or hearing
protection used for appropriate conditions reduces personal injuries.
d) Avoid accidental starting. Make sure the switch is in the off-position before plugging in.
Carrying power tools with your nger on the switch or plugging in power tools that have the switch on invites accidents.
e) Remove any adjusting key or wrench before turning the power tool on. A wrench or a key left attached to a rotating part of the power tool can result in personal injury.
f) Do not overreach. Keep proper footing and balance at all times. This enables better control of the power tool in unexpected situations.
g) Secure workpieces. Use clamps or a vise to hold work when practical. This is safer than using your hand and it frees both hands to operate the tool.
h) Never stand on the machine. Serious injury can occur if the tool tips or if the cutting tool is unintentionally contacted.
i) Dress properly. Do not wear loose clothing or jewelry. Keep your hair, clothing and gloves away from moving parts.
Loose clothes, jewelry or long hair can be caught in moving parts. Roll up long sleeves to the elbow. Wear protective hair covering to contain long hair.
j) If devices are provided for the connection of dust extraction and collection equipment, ensure these are connected and properly used.
Use of these devices reduces dust-related hazards.
4) Power tool use and care
a) Keep guards in place and in working order.
b) Do not force the power tool. Use the correct power tool for your application. The correct power tool will do the job better and safer at the rate for which it was designed.
c) Use the right tool. Don’t force a tool or attachment to do a job for which it was not designed.
d) Do not use the power tool if the switch does not turn it on and off. Any power tool that cannot be controlled with the switch is dangerous and must be repaired.
e) Disconnect the plug from the power source and/or the battery pack from the power tool before making any adjustments, changing accessories, or storing power tools.
Such preventive safety measures reduce the risk of starting the power tool accidentally.
f) Never leave a tool running unattended. Turn power off. Do not leave the tool until it comes to a complete stop.
g) Store idle power tools out of the reach of children and do not allow persons unfamiliar with the power tool and these instructions to operate the power tool.
Power tools are dangerous in the hands of untrained users.
h) Maintain power tools. Check for misalignment or binding of moving parts, broken parts, and any other condition that can affect power tool operation.
If damaged, have the power tool repaired before use. Many accidents are caused by poorly maintained power tools.
i) Keep cutting tools sharp and clean. Properly maintained cutting tools with sharp cutting edges are less likely to bind and are easier to control.
j) Use the recommended speed for the cutting tool or accessory and workpiece material.
k) Only use parts and accessories recommended by the manufacturer. Consult the owner’s manual for recommended accessories.
Using improper accessories can cause personal injury.
l) Use the power tool, accessories, and tool bits in accordance with these instructions and in the manner intended for the particular type of power tool, taking into
account the working conditions and the work to be performed. Use of the power tool for operations different from those intended can result in a hazardous situation.
5) Service
a) Have your power tool serviced by a qualied repair person using only identical replacement parts. This ensures that the safety of the power tool is maintained.
6
)
SAFETY INSTRUCTIONS SPECIFIC TO USING THE PRECISION ROUTER LIFT INSTALLED IN A ROUTER TABLE
a) Read, understand, and follow your router manufacturer’s safety warnings and instructions.
b) Disconnect the router from power before making adjustments. Never adjust the fence, plate, reducing rings, or any part of the router or router table while the router is running.
c) Place the router table on a at surface to prevent tipping or sliding. Never stand on the router table.
d) Do not attempt to rout warped, twisted, or bowed workpieces. All workpieces must have at faces and square edges.
e) Do not attempt to rout very large workpieces on a router table. Very large workpieces can be difcult to control and can cause the router table to tip over.
f) Only use router bits in your router. Never use tools such as carving burrs, mounted abrasives, wire wheels, or drill bits, even if the shanks match the diameter of the router collet.
g) Wear gloves when handling router bits. Cutting edges are sharp.
h) Never use dirty, dull, or damaged router bits. Remove wood-resin build-up with a cleaner specically formulated for cutting tools.
Have dull bits sharpened by a qualied person. Discard damaged bits.
i) Make sure at least 75% of the router-bit shank length is securely held in the router collet.
To ensure a secure hold, leave
1
⁄16″ to ⅛″ (2mm-3mm) between the end of the bit shank and the bottom of the collet.
j) Use the insert ring with the smallest opening that allows the bit to pass through it. A large gap around the bit can allow the workpiece to tip into the bit and kick back.
k) Position the fence faces as close as possible to the bit. Turn the bit by hand to check for interference. Firmly tighten the fence-face T-knobs before routing.
l) Adjust router speed to match the diameter of the bit. Reduce router speed when using large-diameter bits. See Table 2 for recommended router speeds.
m) Make sure the router motor is securely clamped in the base before starting the router.

General Safety Guidelines
n) Always support the workpiece with the fence or starter pin. Only use the starter pin with router bits that have a guide bearing.
o) When using the fence, always position the bit guard over the router bit and as close to the workpiece surface as possible.
p) Never remove a large quantity of stock in one cut. Make several progressively deeper cuts, adjusting the router bit or fence position between cuts.
q) Keep hands away from the rotating bit and your body out of the path of the cut. Always use the bit guard. Use push sticks, push blocks, and feather boards whenever
possible, especially when routing narrow workpieces. Turn off the router before clearing parts or scrap.
r) Avoid awkward hand positions, where a sudden slip could cause contact with the rotating bit. Never overreach.
s) Avoid routing small parts. Rout the prole on a large workpiece and then cut the part to nal size from the large workpiece.
If you must rout a small part, build an appropriate jig or hold the part with a wood handscrew clamp.
t) Make sure the workpiece is clear of the bit and the bit comes to a complete stop before adjusting the workpiece position.
Never start the router with the workpiece in contact with the bit.
u) Avoid kickbacks. Kickbacks occur when the workpiece binds or lifts off the table while being routed, causing it to be thrown back toward the operator.
To avoid kickbacks and potential injury, use sharp bits, keep the machine aligned and properly maintained, and adequately support the workpiece.
Do not attempt to rout workpieces that are twisted, warped, or bowed, or that have loose knots.
v) Feed the workpiece against (not with) the bit rotation.
The bit can grab a workpiece fed with the rotation of the bit, violently eject it from the router table, and can cause your hand to contact the bit.
w) Never trap a workpiece between the bit and the fence. When forming a prole on the straight edge of a workpiece, always rout with
the bit housed in the fence and the edge of the workpiece against the fence.
x) Whenever routing a prole in which material is not being removed below a protruding portion of the bit, or a part of the prole is trapped between cutters above and below,
take extra precautions to prevent the workpiece from lifting off the table surface during routing. A workpiece lifting off the table can kick back and cause serious personal injury.
When routing these proles, it is especially important to use straight, at stock and avoid warped, bowed, or twisted stock.
y) Periodically check the tightness of fasteners and adjustment and locking knobs and the alignment of the fence.
Loose fasteners and knobs and a misaligned fence may cause personal injury.
z) This router lift is designed for a specic application. Do not modify and/or use it for any other application.
If you have questions relative to the application of the lift, DO NOT use it until you have contacted Kreg Tool Company and have been advised accordingly.
Guidelines for extension cord use
Extension cords are only to be used for temporary purposes. They do not replace the need for installation of outlets and proper wiring where necessary.
In the shop and on construction sites:
1. Extension cords with an equipment grounding conductor must be used at all times.
2. Extension cords must be protected from damage, and not run through doorways or windows where the doors or windows can close, causing damage to the cord.
3. Extension cords must be a minimum of 16 AWG and be rated for the equipment in use.
4. Extension cords must be periodically inspected to ensure that the insulation and conductivity of the wires are not compromised.
5. Extension cords should not be run through water or allowed to have connections that may be exposed to accumulated water.
TABLE 1
Nameplate
Amperes
@120 V
Extension Cord Length
25′ 50′ 75′ 100′ 150′ 200′
Recommended Wire Gauge
0 - 5 16 16 16 14 12 12
5.1 - 8 16 16 14 12 10 NR
8.1 - 12 14 14 12 10 NR NR
12.1 - 16 12 12 NR NR NR NR
NR – Not Recommended
!
WARNING This product can expose you to chemicals including acrylonitrile and others, which are known to the State of California to cause cancer and birth defects.
For more information go to www.P65Warnings.ca.gov.
!
WARNING Dust created by sanding, sawing, grinding, drilling, and other construction activities may contain chemicals known to the State of California to cause cancer
and birth defect or other reproductive harm. Examples of these chemicals are:
•Lead from lead-based paints
•Crystalline silica from bricks, cement, and other masonry products
•Arsenic and chromium from chemically treated lumber
Your risk from exposure to these chemicals depends on how often you do this type of work. To reduce exposure, work in a well-ventilated
area with approved safety equipment, such as a dust mask specically designed to lter out microscopic particles.
TABLE 2
Recommended Router Bit Speeds
Bit Diameter Maximum Speed (RPM)
Up to 1″ (25mm) 24,000
1 ¼″ to 2″ (32mm-51mm) 18,000
2 ¼″ to 2 ½″ (57mm-64mm) 16,000
3″ to 3 ½″ (76mm-89mm) 12,000
Always follow bit manufacturer’s speed recommendations.
Some bit designs require specic speeds for safety or performance.

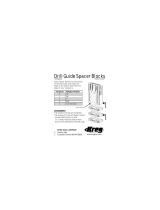
Parts
Parts
1
Carriage
1
Crank
1
Carriage Lock
1
Starting Pin
1
Micro-adjustment dial
1
Hex Wrench
3
Insert Rings
4
Shoulder Bolts
1
Ring Wrench
4
Clamp Blocks
A
E
B
C
D
F
G
H
I
J
A
E
B
D
F
G
H
I
J
C

Setup
Install the Router Motor
STEP 1: Install the insert ring with the 2
5
⁄8″ opening in the router plate.
(See Insert rings in the USING THE LIFT section.)
STEP 3: Turn the lift right side up and install it in your router table.
STEP 2: Place the lift upside down on scrapwood blocks tall enough to allow the
router collet to extend through the insert ring. Use the crank to loosen the motor-clamp
screw and slightly spread the carriage. Slide the router motor into the carriage until it
rests on the insert ring. Orient the motor to provide convenient access to the controls
when the lift is installed in the router table with the Kreg logo on the lift plate toward
the front. Raise the motor
1
⁄16″ off the insert ring and tighten the motor-clamp screw.
Position the Clamp Blocks
STEP 1: With the lift right side up, insert the crank shaft into the LOCK bushing and
turn it counterclockwise to unlock the carriage. Insert the crank shaft into the bushing
at the center of the micro-adjustment dial. Raise the motor carriage until it contacts
the O-rings at the tops of the carriage shafts.
!
ATTENTION The Kreg Precision Router Lift can be installed in a router table with a
straight-sided opening equipped with Kreg Precision Router Table Insert Plate Levelers or in a
rabbeted opening sized to support the edges of the router lift plate.
!
ATTENTION The carriage lock rotates approximately ½ turn.
STEP 2: Turn the lift upside down. Use the hex wrench to remove the shoulder bolts
securing the clamp blocks to the carriage. Referring to Table 3, reinstall the clamp
blocks in the numbered-hole pattern indicated for your router.
!
ATTENTION If your router is not listed, measure the diameter of the motor and install
the clamp blocks in the number pattern that matches that diameter.
TABLE 3
Clamp Block Locations
Hole Pattern Router Motor Diameter
1 Porter-Cable 7518 4.2″
2 Milwaukee 5626 4.143″
3 Hitachi M12VC, KM12VC 3.267″
4 Milwaukee 5615, 5616, 5619 3.32″
5
Porter-Cable 690, 890
Craftsman 17543, 17540, 28190
Bosch 1617, 1618
DeWalt 610, 616, 618
3.5″
6 Ridgid R29302 3.625″
7 Felisatti RF62 3.675″
8 Makita 1101 3.218″

Using the Lift
General Routing
1: Use the insert-plate reducing ring with the smallest opening that allows the bit to
pass through it.
2: Position the fence faces as close as possible to the bit. Turn the bit by hand to check
for interference. Firmly tighten the fence-face T-knobs before routing.
3: Position the bit guard over the router bit and as close to the workpiece
surface as possible.
4: Feed the workpiece against (not with) the bit rotation.
Fine Adjustment
STEP 1: With the bit at the desired height and the carriage locked, use your ngers
to turn the micro-adjustment dial until the zero mark aligns with the indexing line on the
router-lift plate. Test the setup on a scrap workpiece and shut off the router.
STEP 2: Unlock the carriage and raise or lower the carriage as needed. One full turn
of the crank equals
1
⁄16″ difference in bit height.
Indexing Line
Indexing Ring
Insert Rings
STEP 1: To install an insert ring, place it into the lift-plate opening and turn it by
hand until it drops ush with the plate surface. Turn the ring counterclockwise with
the ring wrench.
STEP 2: To remove an insert ring, turn it clockwise with the ring wrench.
Lift the ring out of the opening.
LockUnlock
!
ATTENTION The lift includes three insert rings for exibility in matching the size of the
opening to the diameter of the router bit in use. The ring with the rabbeted opening accepts
universal-style guide bushings, allowing you to use your router table for pattern routing.
!
WARNING Always use the insert ring with the opening size closest to the diameter
of the router bit in use.
Bit Installation
STEP 1: Remove the insert ring and raise the carriage to the full-up position.
Use the wrenches supplied with your router to install the bit.
STEP 2: Lower the carriage and replace the insert ring. Raise or lower the carriage to
position the bit and turn the LOCK bushing clockwise.
!
WARNING Always tighten the carriage lock before routing.

Using the Lift
Kreg Precision Beaded Face-Frame System
With the lift installed in a router table in the normal orientation (Kreg logo toward the front), the sliding base of the Beaded Face-Frame System covers
the carriage height-adjustment and lock mechanisms. To provide access to these features, rotate the router lift 180° in the router-table opening.
!
WARNING When rotating the lift in the router-table opening, you must equip your
router table with a table-mounted power switch or rotate the router motor in the lift to maintain
access to the switch on the motor.
Maintenance
● Periodically check the posts and adjustment screw for debris buildup and rust.
● Clean the posts with a clean cloth. Dissolve built-up wood resins with penetrating oil.
● Remove rust from the posts with a very ne non-woven abrasive pad. Do not use sandpaper, les, or liquid rust remover;
using these will permanently damage the lift.
● After removing loose debris, apply penetrating oil to the adjustment screw, clean the threads with a toothbrush, and wipe the screw with a rag.
● After cleaning the posts and lift screw, lubricate them with light machine oil.
!
ATTENTION Vibration can be caused by rust on a router-bit shank, a worn or
damaged collet or collet nut, a scored collet taper, a worn router bearing, or a damaged
or out-of-balance router bit. Repair or replace worn or damaged router parts and replace
damaged or out-of-balance router bits.
Starting Pin
STEP 1: Install the starting pin in the threaded hole adjacent to the insert-ring opening.
STEP 2: Turn on the router. With your workpiece touching the pin, but not in contact
with the router bit, slowly pivot the workpiece into the bit until the workpiece makes
contact with the bit guide bearing.
!
WARNING Use the starting pin when routing along curved edges and only with router
bits that have a guide bearing. When routing along straight edges, always use the fence.
STEP 3: With the workpiece in solid contact with the guide bearing, ease the
workpiece off of the starting pin and feed the workpiece along the guide bearing.
Always feed the workpiece so the router bit rotates against (not with) the feed direction.
/