Page is loading ...

Registering your model with PHILIPSmakes you eligible for all of the valuable benefits
listed below,so don't miss out, Complete and return your Product Registration Card at
once to ensure:
PHILIPS
Congratulations on your purchase, and welcome to the
"family!"
Dear PHILIPS product owner:
Thank you for your confidence in PHILIPS.You've selected one
of the best-bOlt, best-backed products available today.We'll do
everything in our power to keep you happy with your
purchase for many years to come.
As a member of the PHILIPS "family," you're entitled to
protection by one of the most comprehensive warranties and
outstanding service networks in the industry.
What's more, your purchase guarantees you'll receive all the
information and special offers for which you qualify, plus easy
access to accessories from our convenient home shopping
network.
Most importantly, you can count on our uncompromising
commitment to your total satisfaction.
All of this is our way of saying welcome - and thanks for
investing in a PHILIPS product.
P.S. To get the most from your PHILIPS purchase, be
sure to complete and return your Product
Registration Card at once.
Know these
safety symbols
This "bolt of lightning" indicates
uninsulated material within your unit
may cause an electrical shock. For the safety
of everyone in your household, please do not
remove product covering.
The "exclamation point" calls attention
to features for which you should read
the enclosed literature closely to prevent
operating and maintenance problems.
WARNING:To reduce the risk of fire or
electric shock, this apparatus should not be
exposed to rain or moisture and objects
filled with liquids, such as vases, should not
be placed on this apparatus.
CAUTION: To prevent electric shock,
match wide blade of plug to wide slot, fully
insert.
ATTENTION : Pour 6viter les chocs
6[ectriques, introduire la lame la plus large de
[a fiche dans [a borne correspondante de [a
prise et pousser jusqu'au fond.
For Customer Use
Enter below the Serial No., which is
located on the rear of the cabinet. Retain
this information for future reference.
Model No.
Serial No.

iMPORTANT SAFETY iNSTRUCTiONS
Read before operating equipment
1. Read these instructions.
2. Keep these instructions.
3. Heed all warnings.
4. Follow all instructions.
5. Do not use this apparatus near water.
6. Clean only with a dry cloth.
7. Do not block any of the ventilation openings. Install in
accordance with the manufacturers instructions.
8. Do not install near any heat sources such as radiators, heat
registers, stoves, or other apparatus (including amplifiers) that
produce heat.
9. Do not defeat the safety purpose of the polarized or
grounding-type plug. A polarized plug has two blades with one
wider than the other. A grounding type plug has two blades
and third grounding prong.The wide blade or third prong are
provided for your safety.When the provided plug does not fit
into your outlet, consult an electrician for replacement of the
obsolete outlet.
10.Protect the power cord from being walked on or pinched
particularly at plugs, convenience receptacles, and the point
where they exit from the apparatus.
11 .Only use attachments/accessories specified by the
manufacturer.
12. Use only with a cart, stand, tripod, bracket, or table
specified by the manufacturer, or sold with the
apparatus.When a cart is used, use caution when moving the
cart/apparatus combination to avoid injury from tip-over.
13.Unplug this apparatus during lightning storms or when unused
for long periods of time.
14.Refer all servicing to qualified service personnel. Servicing is
required when the apparatus has been damaged in any way,
such as power-supply cord or plug is damaged, liquid has been
spilled or objects have fallen into apparatus, the apparatus has
been exposed to rain or moisture, does not operate normally,
or has been dropped.
15.This product may contain lead or mercury. Disposal of these
materials may be regulated due to environmental
considerations. For disposal or recycling information, please
contact your local authorities or the Electronic Industries
Alliance: www.eiae.org.
1 &Damage Requiring Service - The appliance should be
serviced by qualified service personnel when:
A. The power supply cord or the plug has been damaged; or
B. Objects have fallen, or liquid has been spilled into the
appliance; or
C. The appliance has been exposed to rain; or
D. The appliance does not appear to operate normally or
exhibits a marked change in performance; or
E. The appliance has been dropped, or the enclosure damaged.
17.Tilt/Stability - All televisions must comply with
recommended international global safety standards for tilt and
stability properties of its cabinets design.
. Do not compromise these design standards by applying
excessive pull force to the front, or top, of the cabinet
which could ultimately overturn the product.
. Also, do not endanger yourself, or children, by placing
electronic equipment/toys on the top of the cabinet. Such
items could unsuspectingly fall from the top of the set and
cause product damage and/or personal injury.
18.Wall or Ceiling Mounting -The appliance should be
mounted to a wall or ceiling only as recommended by the
manufacturer.
19.Power Lines -An outdoor antenna should be located away
from power lines.
20.Outdoor Antenna Grounding - if an outside antenna is
connected to the receiver, be sure the antenna system is
grounded so as to provide some protection against voltage
surges and built up static charges.
Section 810 of the National Electric Code, ANS[/NFPA No.
70-! 984, provides information with respect to proper
grounding of the mats and supporting structure grounding of
the lead-in wire to an antenna-discharge unit, size of grounding
connectors, location of antenna-discharge unit, connection to
grounding electrodes and requirements for the grounding
electrode. See Figure below.
21.Objects and Liquid Entry - Care should be taken so that
objects do not fall and liquids are not spilled into the
enclosure through openings.
a) Warning:To reduce the risk of fire or electric shock, this
apparatus should not be exposed to rain or moisture and
objects filled with liquids, such as vases should not be placed
on this apparatus.
22.Battery Usage CAUTION -To prevent battery leakage that
may result in bodily injury, property damage, or damage to the
unit:
Install all batteries correctly, with + and - alignment as
marked on the unit.
Do not mix batteries (old and new or carbon and alkaline,
etc.)
. Remove batteries when the unit is not used for a long time.
EXANPLE OF ANTENNA GROUNDING AS PER NATIONAL ELECTRICAL CODE (NEC)
GROUND CLAMP
4TENNA LEAD IN WIRE
FENNA DISCHARGE UNIT
810-20)
GROUNDING CONDUCTORS
SECTION 810-21 )
ELECTRIC SERVICE EQUIPMENT
GROUNDING ELECTRODE SYSTEM
(NEC ART 250, PARTH)
pNOte to the CATV system installer:this reminder is provided to call the CATV system installer's attention to Article 820-40 of the NEC that provides guidelines for
roper grounding and, in particular', specifies that the cable ground shall be connected to the grounding system of the building, as close to the point of cable entry as practical.

_ End of life directives
Philips is paying a lot of attention to producing
environmentally friendly in green focal areas.
YournewTV contains materials which can be
recycled and reused.At the end of its life
specialized companies can dismantle the
discar_tedTVto concentn;te the reusable
materials and to minimize the amount of
materials to be disposed of
Please ensure you dispose of your old TV
accor_iingto local regulations.
Contents
Digital Cable TV ............................................ 2
Preparation ................................................ 2
Buttons on the right of the TV ................................. 5
My Content ................................................ 5
Use of the remote control RC4318 ............................. 6
To use the menus ........................................... 9
Introduction 9
How to navigate through the Settings menus 9
Demo ..................................................... 9
Installation ................................................ 10
Select the menu language 10
Store TV channels 10
Weal< channel installation 11
Software upgrade 11
Setup menu ............................................... 12
Preferences 12
Sou rce 16
Clock 17
CabJeCARD applications ..................................... J 8
TV menu ................................................. 19
Picture menu 19
Sound menu 2!
Features menu 22
Ambilight menu 23
Channels menu 24
Hultimedia browser ........................................ 27
Viewing content from a Memory card / USB device 27
Multimedia Browser menu 28
Connect Accessory Devices .................................. 29
Recorder (vcr-dvd+rw) 30
Recorder and other A/V devices 31
Recorder and cable box with RF output 32
Recorder and Satellite Receiver / cable box with AV outputs 33
Satellite Receiver / cable box with AV outputs 33
DVD Player or other accessory digital source devices 34
Digital Surround receiver 35
HDHI (High Definition Multimedia interface) connectors 35
Side connections ........................................... 36
To select connected devices .................................. 37
Record with your recorder ................................... 37
Record a TV program 37
Record a program from monitor out 37
Audio- and video equipment buttons ........................... 38
Setting the remote control to work accessory devices ............. 39
Code setup 39
To cancel the selected mode 39
Learnable remote control .................................... 41
To put the remote control function buttons back to the factory mode 42
Before Calling Service ....................................... 43
Tips ..................................................... 44
Glossary .................................................. 45
Annex 1 - Philips TV software upgrade with portable memory ....... 46
Annex 2 - PhJiips TM Slideshow Format with background music ...... 48
Annex 3 - PhilipsTV - Portable Memory and USB ................ 50
[q#]IZ{h'l_11f'.!;

Your newTV is provided with a special slot called a CableCARD TM which
means that you do not need a separate set top box to receive digital cable
SDTV and HDTV programs. However it is still possible to connect a set top
box to your TV.
The CableCARD, which will be available from your cable system operator, is
designed only for that particular digital cable TV system. If you need to get
digital cable TV from a different system, simple swap your old CableCARD for a
new one.
Cable systems can provide a wide range of digital TV programs and even
specialized digital audio channels.
Cable TV systems can offer many local-interest channels you won't see off-air
or from a satellite broadcast. Examples include local school and community
access channels.
* CableCARD TM is a trademark of Cable Television
Laboratories, Inc.
CableCARD TM *
A CableCARD is a removable card distributed by cable companies, that is
inserted into the CableCARD slot at the bottom of your television.
CableCARD allows you to tune digital and high definition scrambled or
encrypted cable channels through the cable antenna. Consult your cable
company on the availability of CableCARD.The CableCARD is required to
receive premium digital TV channels and services (where available) through the
cable.
A CableCARD functionality includes conditional access and copy protection.
See settings menu, CableCARD applications, p. 18.
Note: Do not insert a PCMCIA card into the CableCARD slot.
Do not insert the power plug in a wall socket or hang theTV to the wall
before aH connections are made.
O Place theTV on a solid surface or place theTV on the supplied stand.
For the mounting instructions of the stand, see the separate leaflet
supplied.
For ventilation, leave at least 4" to 6" free all around the TV.
Do not place the TV on a carpet.To prevent any unsafe situations, no naked
flame sources, such as lighted candles, should be placed in the vicinity.
Avoid heat, direct sunlight and exposure to rain or water.
The equipment shall not be exposed to dripping or splashing.
Mounting theTV on the wall
This TV provides theVESA mounting interface (not supplied) and isVESA
compatible with the 4 suppliedVESA studs to be inserted in the back of the
TV.
Caution: Installing the TV requires special skill that should only be
performed by qualified personnel.You should not attempt to do the work
yourself. Philips bears no responsibility for improper mounting or mounting
that results in accident or injury.
Make sure that the wall mount is being fixed securely enough so that it
meets safety standards.

CABLE
-I
CABLE/ANTENNA
"T"
TO TV
OUTPUT
OUT
STB
CABLE / ANTENNA
"11"
®
J
STB
0
Basic connections to the TV
Your integrated digital TV automatically decodes and displays the four basic
DTV picture resolution standards.
- SDTV (Standard Definition TV) are broadcast as 480i (480-line interlaced)
or 480p (480-line progressive scan) video.
- HDTV (High-Definition TV) are broadcast either in the 1080i or 720p
formats, always with a widescreen picture.
Note: Progressive scan video (p) is more like that you see in a movie theater:
Images am much rnom distinct and free of flicker; and motion is smoothen
Next to analog NTSC broadcast reception, your TV has an integrated High
Definition TV tuner which receives, decodes and displays terrestrial ATSC
and unscrambled cable (QAM) signals. HDTV quality is only reproduced
when a broadcaster or cable provider broadcasts HDTV signals.
Note:Ask your broadcaster or cable box provider to transmit/enable HD content
to your home, and possibly upgrade, to a CableCard for the decription of HD
signals
There are 2 ways to get HDTV content:
- via cable,
- via antenna.
Note:This drawing is used wherever you can connect cable or antenna.
- Cable TV
Connect the cable TV signal to the CABLE/ANTENNA 7S £-2"11_jack at
the bottom of the TV. See page 10 for details on using Autoprogram to
store channels in the TV's memory.
Note: this connection will supply stereo sound to the TV if it is being broadcast by
the station you am watching.
- Cable box with RF IN/OUT
. Connect the incoming cable TV signal to the cable IN jack (_) on the
back of the cable box.
. Connect a coaxial cable (not supplied) from the TOTV jack on the
back of the cable box to the CABLE/ANTENNA 75 _-2-li- jack (_ at
the bottom of the iV.
Note:Your cable box may have a different label for the TO TV jack, such as
OUTPUT or OUT,
. Set the OUTPUT CH switch (_) of the cable box to CH 3 or 4
(whichever is correct for your cable box), then tune the TV to the
corresponding channel.
Once tuned, change channels at the cable box, not the iV.
Note: This connection will not supply sterna sound to the 7V The mason is that
the RF output on a cable box - labeled TO TV, OUT or OUTPUT for example -
will not send a stereo signal to the tuner (VHF/UHF) input on a 7V
- Cable box with A/V outputs
. Connect the incoming cable TV signal (_) to a signal splitter (not
supplied).The signal splitter enables you to avoid having to use theTO
TV jack on the back of the cable box.This jack will not supply stereo
sound to the TV.
Note:Your cable box may have a diffbrent label for the TO TV jack, such as
OUTPUT or OUT,
. Connect a coaxial cable (not supplied) to a connector on the signal
splitter and to the CABLE/ANTENNA 75 £-2-li- jack (_ on the TV.
. Connect another coaxial cable (not supplied) to a connector on the
signal splitter and to the cable IN jack (_) on the back of the cable
box.
" ConnectA/V cables (not supplied) to the VIDEO and AUDIO L and R
outputs on the back of the cable box and to the AV2 video (labeled
VIDEO) and AUDIO (labeled L and R) jacks (_ on the back of the TV.
. To view programs from your cable box, first press the AV+ button on
the remote control.
. Press the cursor clown or up buttons until the AV2 signal source is
selected.
. Press the OK button to confirm your selection.The AV2 input source
becomes current for the viewing of cable iV programs through your
cable box.
Note: If your cable box Audio/Video outputs will not supply video and stereo
audio to the TV,,you will need to make the connection shown above in the
example "Cable box with RF INIOUT".

CABLE
*-o
CABLE/ANTENNA
= Cable box with S=Video, component video (YPbPr) or FtDMI
connectors
See Connect Accessory Devices, p. 32-33.
= Antenna
Via antenna you can watch whatever DTV programs being broadcast in
your area for free.
If you're not sure what HDTV programming is available in your area,
contact your local content provider or your local electronics store
retailer.
Broadcasters are in the middle of a transition from analog to digital TV.
This means that a given broadcaster will have two channels on the air, one
analog and one digital.
Connect the incoming antenna signal to the CABLE/ANTENNA 75 _2-lr"
jack at the bottom of theTV. See page 10 for details on using
Autoprogram to store channels in the TV's memory.
Note: This connection will supply stereo sound to the TV if it is being broadcast
by the station you are watching.
Direct Broadcast Satellite (DBS)
Satellite systems offer many of the same premium channels as cable
systems, and often at a lower price.To get these channels, you'll need to
install a small dish antenna outside.
There are 2 main DBS systems: DirecTV & DishNetwork.These systems
require separate, proprietary set top receiver boxes to decode their
signals and send them to your digital TV set.These boxes may include a
digital TV tuner for off-air DTV broadcasts.
Satellite broadcasters also provide major local channels, depending on the
market in which you live.
DBS also provides service in areas not covered by cable because they are
in rural areas or other areas not passed by a cable line.
DBS also allows you to watch pay-per-view events.
Before installing your TV or before hanging it on the wall, first connect your
accessory devices, see p. 29.
O Refer to the bottom of the set for the correct operation voltage, insert the
power cord in the wall socket.
Consult your local dealer if your mains supply is different.To prevent
damaging the mains (AC) cord which could cause a fire or electric shock,
do not place the TV on the cord.
Remote control:
insert the 2 batteries supplied (Type R6-1,SV).
The batteries supplied do not contain the heavy metals mercury and cadmium.
Please check on how to dispose of exhausted batteries according to local
regulations.
O Turn their on:
Press the power switch (_ at the right side of the TV.
An indicator on the front of the TV lights up.
Press the +CH/PAGE= buttons or the POWER button on the remote
control.

+ - MENU + _OGRAM/CHANNEL - O POWER
Should your remote be lost or broken you can still change some of the basic
settings with the buttons on the right side of your TV.
Press the power switch O to switch the TV on.
Press:
, the +VOLUME - buttons to adjust the volume;
, the + PROGRAM/CHANNEL- buttons to select theTV channels or sources.
The MENU button can be used to summon the Settings menu without the
remote control.
Use:
, the +VOLUME - buttons and the + PROGRAM/CHANNEL - buttons to
select menu items in the directions as shown;
, the MENU button to confirm your selection.
Note:
When activated via the MENU button on the right side of the TV, only Exit lets you
dismiss the menu.
Navigate to Exit and press the MENU button
The My Content menu (and the underlying Multimedia content browser) is
intended to contain all content, services, applications you are interested to
consume.
O Press the _4 button to activate.
O Press the cursor up/down to move the highlight up and clown in the list of
menu items.
Press the cursor right to go deeper into the structure.
• Television:
TV channels leading to the list of TV channels; the left panel will contain
the analog channel numbers, the one-part channel numbers and the major
channel numbers in case of two-part digital channels.The right panel will
contain the available subchannels associated with the major channel that is
currently highlighted on the left panel. If there are no subchannels
associated with the currently selected channel in the left panel, the right
panel will remain empty.
• Multimedia:
Contains the locally connected devices on which content (pictures, audio
files) is stored. See Multimedia browser, p. 27.

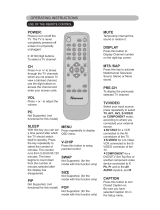
Use of the remote control RC4318
Note: For most buttons pressing a button once will activate the function. Pressing a second time will de-activate it,
When a button enables multiple options, a small list will be shown. Press repeatedly to select the next item in the list. Tl-_elist will be removed
automatically after 6 seconds or press OK to remove irnmediatel;4
/ .............. %
,/RCBLTVVCRAUX "POWER
Press the SELECT button repeatedly Press to turn on/off the iV from or to
to select one of the system modes in _ standby mode.
which the remote control can be used. i The TV is never P_oweredoft combletelv
If no action is being undertaken within i,.,,, _---':x unless i'tis-physicallyunplugged.- -
60 seconds, the remote control iI _ _ '"...............
returns to TV mode. iI __ .....................................................................................................................................................................................................................
After an action in the selected system '!.....................,f_% X............
mode the remote control will remain \_ iIGUIDE no function
in this mode for 60 seconds and will _ ...............
then return to TV mode. INFO
BEM0 CLOCK _ . _ --
......... , .............. _,_,_ @_: uIsplay intormatlon: ffress to display
:: (when available) information about the
................. "_ I _ _, ii selected TV channel and program or
A/CN :: _T_"_t._J/.._--...:_._ _.................. iI accessory device.
Press to alternate between the l /_-_X ii
currently viewed channel and the iI J /// _ _\ iICursor buttons
previously viewed channel. .............. II £_ [[[, {{ n_ _ ./// .................. Press the cursor buttons up/down,
DEMO Demoon/off _' _// menus.
See p. 9. l _ __. :: Note: Ir necessary, you can acljust the
_i_'_'6 @_ ................... ! picture position to the center or the screen
CLOCK on/off _ _ with the cursor keys.
Timedisplay(formax. 10minutes) I A @
...................... _, _+_........... PIP HDHI Dual screen/PIP See p. 12.
' V0
Color buttons /I _"(_)_ I _ 1 To watch a broadcast and a HDHI
When functions are attached to the _ _ source simultaneously.
color buttons, the color buttons are
shown on screen.
OJ MY CONTENT
Pressto displaythe My Content menu
on or off, see p. S.
SWIVEL no function
OK - to activate a setting
- to display the list of channels stored
(according to the selection made in
the Installation mode -Antenna or
Cable, p. 10.)
- starts playing content in the Home
Network Browser application, p. 28.
HENU Settings menu on/off. See p. 9.
VOL Volume
Press + or - to adjust the volume.
MUTE
Interrupt the sound or restore it.
A00
@e ..........
®,@®,
PQRS TUV wxYz
©@@
© @o
CH/PAGE Channel selection
- To browse through theTV channels or
sources stored in the preferred
channel list (see p. 26).
- To select between Antenna or Cable
TV channels, first make your selection
in the Settings menu, see p. 10.
Note:You don't have to start the
installation again once you have searched
rot and stored the available TV channels.
AV+ Press repeatedly to select AVJ,AV2,
AV3, HDMII, HDHI2, Side or TV
channels when in TV mode, according
to where you connected the accessory
devices (p. 37).
Alphanumeric buttons
To select a TV channel. See p. 8.
Type the dash (-) for digital channels.

;r r!
C
0'©
,,o.
Q @ ©
Press this button to summon a list of available display formats (depending on
the receiving signal).This lets you choose the display format of your
preference.
Press this button repeatedly to select another picture format:Automatic,
Super zoom, 4:3, Movie expand 14:9, Movie expand 16:9, 16:9 subtitle or
Wide screen.
Automatic Superzoom
Movieexpand 16:9 16:9subtitle
4:3
Wide screen
Movie expand 14:9
Automatic makes the picture fill the screen as much as possible.
Super zoom removes the black bars on the sides of 4:3 programs with
minimal distortion.
When in Movie expand 14:9, Movie expand 16:9 or Super zoom picture
format, you can make subtitles visible with the cursor up/down.
Note: With HD sources not all screen formats will be available.
i FAVORITES
i . VIEW To display a list of all channels marked as favorite (incl. subchannels).
. / To add or remove a channel in the favorite list of TV channels.
iAMBILIGNT
. ON/OFF
Press to switch Ambilight On or Off.
For the Ambilight settings, see TV menus, Ambilight, p. 23.
• MODE
Pressthisbutton repeatedlyto togglethrough the Ambilightmodes.
O 44 [] I_ || I_
. Audio andVideo equipment buttons. See p. 38.
* Multimedia browser functional buttons. See p. 28.
O no function

f ....
@
DEMO ,t0CK
MYCONTE.T
® ®
60
....
J_L MNO
®@®
wxYz
®Go
Alphanumeric buttons on the remote control
The alphanumeric buttons on the remote control can be used to enter
digits and text.
Multi-tap entry can be used to enter alphanumeric information when
necessary.
The characters displayed are dependent on the language selected in the
Installation menu. See p.8.
Text is entered similar to the method used for entering text messages on a
cellular phone.
When a letter or number has been entered, the cursor automatically
advances to the next character position after the specified time out or by
pressing the cursor right.
1
2
3
4
5
6
7
8
9
0
<space> _ - 1 <space> _ - 1 (etc.)
a
d
J
m
P
t
w
b c A B C 2 a b c (etc.)
e f D E F 3 d e f (etc.)
h i G H I 4 _ h i (etc.)
k I ! K L 5 j k I (etc.)
n o M N O 6 rn n o (etc.)
q r s P QR S 7 p q r s
u v T U V 8 t u v (etc.)
x y z WX Y Z 9 w x y z
@ o. @ 0(etc.)
(etc.)
(etc.)
Also the cursor up/down can be used to enter alphanumeric information.
When finished, press the OK button to confirm the entry.
Move to the left panel.
RC CURSOR UP a b c d ...A B C D ... 1 2 3 ... 0 <space> _ -. @
RC CURSOR DOWN @ . - _ <space> 0 9 8 7 ...ZYX ...z y x ...c b a

To use the menus
TV
How to navigate through the Settings menus
The Settings menu allows you to access and change settings and preferences.
Press the MENU button on the remote control to summon the Settings
menu.
- On the left panel the highlight can be set on a menu item with the cursor
up/down.
The right panel shows the content of the highlighted menu item in the left
panel.
Note: %metimes not all the menu items are visible on the screen. Use the cursor
down to reveal all items.
- Use the cursor right to enter the right panel.
The content of the right panel is moved to the left panel and the right
panel shows the content of the newly highlighted item in the left panel.
Note: In some cases it is important that the picture can be watched while
adjusting the settings. This means that when the highlight is on the right side
pane/, the other menu items hide avva)4When the cursor left is pressed again,
the hidden menu items m-appear and the highlight moves to the left panel.
* Press the cursor left to go one menu level up again.
- Press the OK button on the highlighted item to activate and to dismiss
the menu.
- Press the MENU button again to exit the Settings menu.
Note: The menu is also dismissed by pressing one of the color buttons Of
present) referring to certain actions which may be executed.
i ii
DeITlO 3
Se!ttilts
The Demo menu allows the user to get an idea of the features that are part of
the television.
O Select Demo in the Settings menu and press the cursor right.
O Highlight a desired demo with the cursor up/down.
Press OK to start playing the highlighted demo.
Press the red color button to exit the demo and to return to iV mode.
Note:The selected demo is played once.
The demos require no user interaction except for starting the demo.

Select the menu language
O Press the MENU button on the remote control.
O Use the cursor down to select Installation in the Settings menu.
Use the cursor right to enter the Installation menu.
O Select Language and enter the list of available languages with the cursor
right.
O Select your language with the cursor up/down and press the OK button to
confirm you selection.
Proceed with the Installation menu.
Store TV channels
Select Autoprogram in the installation menu.
Use the cursor right to enter the Autoprogram menu.
O Press the OK button.
O Select Cable or Antenna in the Installation mode.
O
O
When Antenna is selected, the TV will detect antenna signals and will
search for antennaTV (NTSC and ATSC) channels available in your local
area.
When Cable is selected, the iV will detect cable company supplied signals
and will search for cable TV (NTSC,ATSC, QAM modulated) channels
available in your area.
fflake sure that registration with your cable iV provider and connection of
equipment are completed.
Press the green button "Next" on the remote control.
Note:All channels must be unlocl<ed in order to autoproFjram. If requested, enter
your PIN code to unlock all channels. SeeMenu preferences in the Settings, TV
menu, p. 15.
Press the green button "Start" to start autoprogramming.The menu screen
disappears and the progress of autoprogramming is displayed.
The progress bar indicates the number of analog and digital TV channels
found. (Also digital channels via CableCARD are being programmed. First
refer to the CableCARD settings, see p. 18).
When Autoprogramming is complete, a message appears confirming the
completion and the TV switches to the first installed TV channel.
10

Channel tuning
Available channels:
- Cable (analog NTSC or digital QAM): max. from 1 to 13S
- Terrestrial (analog NTSC or digital ATSC): max. from 2 to 69
If a tuned channel is not yet in the master channel map, the TV will attempt
to tune the channel and it will be added to the map.
If the channel is not acquired, a message will appear that the channel is not
available.
When you tune an audio-only digital subchannel, a display appears with the
message Audio only.
Note: Subchannel selections
The new standards employed with digital broadcasting make it possible to receive
multiple program channels under a single major channel number which can be
selected by pressing the digit remote control direct-acces channel number entry.
Important:
After the installation of the TV channels has been done, always make a selection in
the Installation menu between Antenna or Cable whether you want to watch
Antenna TV channels or Cable TV channels.
If you make use of a signal splitter do not far,get to put the switch in the
corresponding position.
Weak channel installation
This enables you to do a weakATSC digital channel installation.This is only
available forTY channels installed via an antenna connection (see p. 4).
O Select a channel in the channel list (in the antenna mode).
The signal strength is displayed and updated continuously as you rotate the
antenna.
Software upgrade
This menu allows you to upgrade your TV software using a USB/Portable
Memory device.
USB/Portable Hemory upgrade
It is possible to initiate an upgrade procedure from a USB or Portable
Memory device.The memory device must be filled with the appropriate
upgrade image (and structure) which can be found on the
www.philips.com/support website.
How to upload a new software version on your portable memory device,
see Annex 1, p. 46.
11

This menu is used to control the settings of special TV functions, features and
accessory devices.
The Preferences menu allows you to change settings that will typically be
accessed only occasionally.
The Source menu allows you to select a source.
The Clock menu allows you to use yourTV as a clock.This setup is necessary
for the correct working of the Lock after feature.
Preferences
_[_ Press the MENU button.
O Select Setup with the cursor down and press the cursor right to select the
Preferences menu.
O Press the cursor right again to select Picture/sound preferences.
O Press the cursor right once more to enter the Picture/sound preferences
menu.
Picture/sound preferences
PIP format
This menu allows you to select the preferred format (PIP or Dual screen)
which can then be displayed toggling the PIP button on the remote control
On or Off.
_[_ Select PIP format.
Press the cursor right.
O Select PIP or Dual screen with the cursor up/down.
Now, when the P|P button on the remote control is pressed and when
- PIP is selected, theTV shows a full screen of video with a pip window of
video on top of it.
- Dual screen is selected, the TV splits the screen into two equally sized
screens.
i ii:_
0
0
Press the cursor left/right to highlight the PIP window or the left/right
screen in Dual screen.
Press the -Cl4/PAGE+ button to change the broadcast channel or the AV+
button to change the HDMI source in the highlighted screen.
Note:Audio only plays from the main, when PiP has been selected, or the left
screen, when Dual screen has been selected.
Define the position of the PIP screen
O Press the cursor right to highlight the PiP screen.
Press the red color button on the remote control to select Position.
Note: If no action has been undertaken, the function buttons at the bottom of the
screen will disappear after a few seconds,
Use the cursor keys to define the position of the PIP screen,
Auto surround
Sometimes the broadcaster transmits special signals for Surround sound
encoded programs.The TV automatically switches to the best surround
sound mode when Auto surround is switched On.
12

Feature5 p_e_eler_ceS
Features preferences
caption service
This allows you to select the Closed Captions service levels of analog
broadcasting to be displayed.
Closed CaPtioning allows you to read the voice content of television
Programs on the TV screen. Designed to help the hearing impaired, this
feature uses on-screen 'text boxes' to show dialogue and conversations
while the TV program is in progress. Captions will appear on the screen
during captioned broadcasts.
O Select Captions service.
O Press the cursor right.
Select the desired Caption service:
.CO 1,2,3 or4
Dialogue (and descriptions) for the action on the captioned TV program
shows on screen.
Usually CC 1 is the most used. CC 2 may be used for alternate languages
if they are being transmitted.
.T 1,2,3 or4
Often used for channel guide, schedules, bulletin board information for
Closed Captions programs, news, weather informations or stock market
reports.
Not all Caption services are necessarily being used by aTV channel during
the transmission of a Closed Caption program.
O See Closed Caption in the TV_Features menu, see p. 22, to turn the Caption
service On or Off.
Note: This television provides display of television closed captioning conforming with
the £1A-608 standard and in accordance with Sections _5. _19 of the FCCrules.
Digital caption service
This allows you to configure the way you choose to view the digital
captioning.
Select one of the digital service channels made available by the caption
provider.
There are 6 standard services. Service 1 is designated as the Primary
Caption Service.This service contains the verbatim, or near-verbatim
captions for the primary language being spoken in the accompanying
program audio.
Service 2 is designated as the Secondary Language Service.This service
contains captions in a secondary language which are translations of the
captions in the primary Caption Service.The other service subchannels are
not pre-assigned. It is up to the discretion of the individual caption provider
to utilize the remaining service channels.
13

Dig t_/c@t r _,_l_to__s
f
Digital caption options
This allows you to modify how digital captions are displayed on your TV.
Select from the following options to change the visual characteristics of
your TV's digital captioning.
Reset to default
Select this option to reset the digital caption options back to the
captions provider default settings.
Press the OK button to confirm.
Size
Select this option to select the size of caption display according to your
own preference.
Select Default (Automatic), Small, Standard or Large and press the
OK button to confirm.
Style
Select this option to select the font style of caption display according to
your own preference.
Select Default, Monospaced serif, Serif, Monospaced sans serif, Sans
serif, Casual, Cursive or Small caps.
Text
Select this option to select the text color or the opacity of the text
box of caption display according to your own preference.
Select a color and one of the opacity options.
Background
Select this option to select the character background color or one of
the background opacity options of caption display according to your
own preference.
Select a color and one of the opacity options.
14

_'@ FI @fSiU_tCefS
Rese AVs{_ {_gs
iiiiiiiiiiiiiiiiiiiii
ii!!i[iii i i,i i,Wllii
Menu preferences
OSD
0 Select OSD.
_) Press the cursor right to select Normal or Minimum.
Normal to activate the continuous display of the channel number (for max.
10 minutes) and extended display of TV channel and program information
on screen. E.g. information on the main or auxiliary program, input signal
quality of connected accessory devices, the display format, sound mode,
availability of Closed Caption service, the audio language, the rating,
sleeptimer setup.
Minimum to activate the display of reduced channel information.
Note: When Closed Captions is switched on, continuous display of the channel
number and clock is not possible.
Show emergency alerts (EAS)
This allows you to select the alert priority level of the information
disseminated by the cable operator.The standard SCTE18 defines an
Emergency Alert signalling method for use by cable TV systems to signal
emergencies to digital devices such as digital set-top boxes, digital TVs and
digital VCRs.
The Emergency alert signalling scheme defined in the standard allows a
cable operator to disseminate emergency alert information related to state
and local-level emergencies and warnings in a cost-effective and efficient
way, while minimizing disruption of programming.
An Emergency alert message will have one of the following priorities: Low,
Medium, High or Maximum.
The Emergency alert message with priority High or Maximum will always
be presented. Low or Medium will be present or ignored depending on
the selected setting.
}mportant: When the 7Y clock is uncleaned (See Setup menu, Clock, p. _7), the
£mer_ency Alerts will be ignored.
0
0
The Emergency Alert message display will contain following information:
- The Emergency Alert text
-The start time + date
-The end time + date.
Select Show Emergency Alerts in the Menu preferences menu.
Press the cursor right and select one of the Emergency alerts options:
- Always, when you always want the Emergency alert messages to be
displayed when available;
- Skip low priority, when you want the messages with low level to be
ignored;
- Skip low/medium priority, when you only want the messages with high
priority to be displayed.
Set/Change PIN
O Select Set or Change PIN with the cursor down.
[f no PIN-code exists yet, the menu item is set to Set PIN. Follow the
instructions on screen.
If a PIN-code has previously been entered, the menu item is set to Change
PIN. Follow the instructions on screen.
All number combinations from 0000 tot 9999 are valid numbers.
The Features preferences menu reappears with a message confirming
that the PIN has been created.
Reset AV settings
This function allows you to reset most of the picture and sound settings to
their predefined factory states.
O Select Reset AV settings with the cursor down.
Press the cursor right.
Press the OK button to erase settings and reset them to their default
values.
15

Source
This menu allows you to identify the accessory devices you have connected to
the external inputs/outputs.
O Select Source in the Setup menu.
O Press the cursor right.
_! Select the input to which the accessory device is connected.
O Press the cursor right again to enter the list of types of devices connected
to the selected input.
O Select the accessory device with the cursor up/down.
When you select AV1, AV2, AV3, FIDMI1, FIDMI2, Side or Digital Audio
In, a list appears allowing you to identify which type of accessory device is
attached to this input.The TV detects the presence of the connected device
and the signal is routed appropriately.
Once you have selected the source type, e.g. DVD, this source will
automatically be selected when your remote control is in DVD mode, see
p. 6, and when you press the AV+ button on the remote control.
Digital Audio
Select Digital Audio In when the TV expects digital audio for a connected
device to come from a Digital audio input.
Make your selection of the source to which the device with digital audio
input has been connected.
In addition to accepting audio input via Digital Audio In, the TV can output
Digital audio via the DIGITAEAUDIO OUT connector to an external
amplifier or receiver.
If your amplifier or receiver has a matching connector for Digital Audio In,
you can connect it with a single cable to the TV's DiGiTAL AUDIO OUT.
See Connect Accessory Devices, Digital Surround Receiver, p. 35.
16

Cl0ck
Clock
This allows you to use your TV as a clock.
Note:Adjusting the clock is necessary for the correct working of Instant record (See
use of the remote control, p. 7) and Loci<after (See TV settings, Channels, p. 24)
features,
Auto clock mode
O Select Clock in the Setup menu.
O Press the cursor right to select the Auto clock mode.
Press the cursor right to instruct the TV to get the time automatically or
manually.
Auto clock channel (only ow;iloble when Auto clock mode is set to Automatic)
With the cursor buttons, select the channel number where time can be
found by the iV. Typically time can be found on PBS as well as some other
channels.
Time = Day (onlyavailablewhenAuto clockmode is set to Manual)
With the cursor buttons, select and enter the correct time and day.
If Auto clock mode Manual has been selected, and no clock search has
been done, the system will keep the entered time and day.
Ti me zone (onlyow;iloblewhenAuto clockmode isset toAutomatic)
This function allows you to select your local time zone. Broadcasted time
information will correct the clock display for your local time.
Select Time zone with the cursor down.
Press the cursor right to select your local time zone.
Daylight saving (onlyow;iloblewhenAuto clockmode isset toAutomodc)
Daylight saving time is automatically set by specially broadcasted signals.
This menu item allows you to disable the automatic setting of daylight
saving time.This is useful if you live in an area or state where daylight saving
is not applied, but you receive channels from other areas where daylight
saving signals are broadcasted.
Select Daylight saving with the cursor down.
Press the cursor right to select Automatic for automatic clock correction
for daylight saving time, based on specially broadcasted signals.
O Select Off to disable automatic clock correction based on the specially
broadcasted signals.
17

CableCARD applications
A CableCARD is a removable card distributed by cable companies, that is
inserted into the CableCARD slot at the bottom of your television. See
CableCARD, p. 2.
It enables you to decode digitally encrypted, or scrambled content delivered
from the cable system.
CableCARD functionality includes conditional access and copy protection.
To receive the features/applications offered by your cable company, you may
have to subscribe to those services. Contact your cable company regarding
availability of the CableCARD.
You may also be able to order call-ahead pay per view events.
Note: do not insert a PCMCIA card into the CableCARD interface slot.
O Insert your CableCARD.
O Select CableCARD applications in the Settings menu.
Press the cursor right to enter the list of available CableCARD applications
offered by the cable provider.
A CableCARD application is initiated when you select an application item
and when you press the OK button to activate it.
q!_ Follow the messages displayed on screen.
The messages will remain on screen until the OK button or the
corresponding color button is pressed.
Conditional access
When having selected Conditional access, the TV will display messages
related to the conditional access functionality of CableCARD.They will
indicate the status (possible or not) of descrambling of the selected
program.
Copy protection
The displayed messages will be related to Copy control information.
Remar!< When a CobleCARD is inserted, the channel list might be different.
18
/