Page is loading ...

2
#61-702
#61-704
700 Series
200 Amp Clamp Meters
1
2
3
6
7
8
4
5
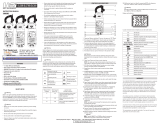
1. Non-contact voltage (NCV) (#61-702)
With the NCV tab on the tip of the clamp close to an AC
voltage, press the NCV button. The NCV LED will light and
the beeper will beep. The closer the NCV tab is to AC volt-
age, the louder the beep.
To differentiate between hot and neutral in an outlet, insert
the NCV tab into each slot in the outlet. The beeper will be
much louder on the hot side of the outlet than the neutral.

7. Max button
Press Max prior to a measurement to capture the maximum
reading displayed during the measurement. To clear the
max value, press the max button again, or press the reset
button.
8. Rotary switch
Turn the rotary switch to the appropriate function and range
for the measurement.
9. COM port and + port
Plug the black lead into the com port and the red lead into
the + port for VAC, VDC, Frequency, Resistance, and
Capacitance measurements and Diode and Continuity
checks.
WARNING!
1. DO NOT UNDER ANY CIRCUMSTANCES EXCEED THESE
RATINGS:
• Voltageisnottoexceed750VACor1000VDC
• Resistance,functionisnottobeperformedoncircuits
capableofdeliveringgreaterthan600Volts.
• Frequency,CapacitanceandContinuityfunctions
are not to be performed on circuits capable of delivering
greaterthan500Volts.
2. To avoid electrical shock hazards and/or damage to the
meter:
• TestNCVfunctiononknownlivewirebeforeusing.
• Donotexceedthevoltageratingsforthemeter.Use
caution when measuring voltage.
• Donotuseduringelectricalstorms.ACpowersources
with inductive loads or electrical storms may result in
high voltage. High energy transients can damage meter
and present a dangerous shock hazard.
• Turnoffpowertothecircuitordevicebeingmeasured
before taking resistance and capacitance measurements.
Fully discharge all capacitors before measuring.
3. Ensure meter is in proper working order before using.
Visually inspect meter for damage. Performing a continuity
check can verify proper operation. If the meter reading goes
from overload to zero, this typically means the meter is in
proper working order.
The test lead can also be used to differentiate between the
hot and neutral. Insert the rod test lead into the + port and
snap it into the test probe holder. Press the NCV button
and insert the probe into each slot of the outlet. The beeper
will only beep on the hot side of the outlet.
2. Test probe holder
Use the single test probe holder to make voltage testing easy.
3. Indicator lights
HI-V High voltage indicator
InanyVAC/VDCrangewhenavoltagegreaterthan30V
is touched, the beeper will beep, and the red Hi-V LED
will blink.
In addition to the LED and beeper, the meter will shake
when connected to high voltage. Even if the LED can’t be
seen, or the beeper can’t be heard the shake can be felt.
NCV Non-contact voltage indicator
Continuity indicator
CP Clean power indicator
Whenthe60HzACpowerisclean,thegreenLEDwillbe
on. If the meter is connected to AC power, and the green
LED is not on, the circuit has more than 5% (±2%) total
harmonic distortion (nominal). Investigation with special-
izedequipmentmaybenecessary.Sensitivity:20VACon
200VACrange;90Von750VACrange.
4. Hold button (#61-702)
Press hold button during measurement to capture the value.
To clear the held value, press the hold button again, or
press the reset button.
5. NCV button
Press the NCV button to test for non-contact voltage.
6. Backlight (#61-704)
Backlightauto-offapproximately60sec.
3 4

6
Lead Storage
Silicone test leads are provided with the meter. These test
leads stay flexible in very cold weather and can withstand high
temperatures without melting. For convenient lead storage,
wrap the leads as shown.
5
4. Visually inspect leads for damage before using. Replace if
insulation is damaged or leads appear suspect.
5. Never ground yourself when taking electrical measurements.
Do not touch exposed metal pipes, outlets, fixtures etc.
Keep your body isolated from ground by using dry cloth-
ing, rubber shoes, mats, or any other approved insulating
material. Keep your fingers behind the finger guards on the
probes. Work with others.
6. Before beginning all unknown measurements, set meter to
highest possible range.
7. Disconnect the meter from the circuit before turning off any
inductor, including motors, transformers, and solenoids.
8. Clean the exterior with clean dry cloth. Do not use liquid.
General Operation
Auto power off
To extend the life of your battery, the meter automatically turns
offafterapproximately60minutes.
Selecting Ranges
For all ranges and functions choose a range just above the
expected value. If display reads “OL” (overrange), select a
higher range. If display shows less than three numbers, select
a lower range for better resolution.
Accuracy Specifications
Accuracy specifications are based on nominal operating tem-
perature of 74°F ±8°, and a relative humidity less than 75%.
Accuracy is specified as ± (% of reading + number of least
significant digits).
AC Current
Range Resolution Max Accuracy
Display
200A 0.1A 199.9 ±(3%+5)
Frequencyresponse:50Hz-60Hz;±(5%+5)60Hz-400Hz.
TrueRMSSensing:(61-704only)

87
AC Voltage
Range Resolution Max Accuracy
Display
2000mV 1mV 1999 ±(1.2%+3)
200V 0.1V 199.9 ±(1.2%+3)
750V 1V 750 ±(2%+5)
Frequencyresponse:50Hz-500Hz;±(2%+5)500Hz-1KHz;
50Hz-500Hzon600Vand750Vranges.
TrueRMSSensing:(61-704only)
To Measure AC Current:
1. Set the rotary switch to the appropriate AAC range.
2. With the jaws closed, separate one wire from a bundle using
the long fixed jaw.
3. Slide the wire to the corner where the two jaws meet, then
open the jaws to let it in.
4. Measure the current in only one wire at a time.
AC & DC Volts
DC Voltage
Range Resolution Max Accuracy
Display
2000mV 1mV 1999 ±(0.5%+1)
200V 0.1V 199.9 ±(0.5%+1)
1000V 1V 1000 ±(0.5%+1)
To Measure Voltage:
5. Plug the black test lead into the COM port and the red test
lead into the + port.
6. Set the rotary switch to appropriate VAC or VDC range.
7. Connect the meter in parallel with the load or circuit.
8. Measure the voltage
Frequency
To Measure Frequency:
1. Plug the black test lead into the COM port and the red test
lead into the + port.
2. Set the rotary switch to the HZ position.
3. Connect the meter in parallel with the load or circuit.
4. Meterisauto-ranging,andwillselect2k20kor40krange.
5. Measure the frequency.

109
Resistance (Ohms)
Range Resolution Max Accuracy
Display
200Ω 0.1Ω 200.0 ±(1%+3)
200kΩ 0.1kΩ 200.0 ±(1%+3)
To Measure Resistance:
1. Turn the power off to the circuit or device that is to be
measured and discharge all capacitors before attempting a
measurement.
2. Plug the black test lead into the COM port and the red test
lead into the + port.
3. Set the rotary switch to the appropriate Ohms range.
4. For correct reading, ensure that the device being tested
contains no voltage.
5. Measure the resistance.
Capacitance Testing
Range Resolution Max Accuracy
Display
200MFD 0.1MFD 199.9 ±(3%+5)
To Measure Capacitance:
1. Disconnect the capacitor from power.
2. Short the terminals to discharge the capacitor.
3. Disconnect any resistors that might be between the termi-
nals of the capacitor.
4. Plug the black test lead into the COM port and the red test
lead into the + port.
5. Set the rotary switch to the MFD position.
6. Connect the test leads to the capacitor and measure the
capacitance.
Diode Check:
To ensure a proper functioning diode, the meter will develop a
voltage across the component from a test current. The diode
test function allows measurements of forward voltage drops
across diode and transistor junctions.
1. Turn off power to the device or circuit that is being tested
and discharge all capacitors.
2. Plug the Black test lead into the COM port and the Red test
lead into the + port.
3. Set the rotary switch to the position.
4. Connect the test leads to the diode. Normally the forward
voltage drop of a good silicone diode is shown between
400Vand90V.Ifthediodeundertestisdefective,“000”
(short circuit) or “OL” (non-conductive) is displayed.

11
CU
S
Warning
To avoid electrical shock, remove test lead before opening
the cover. Repairs or servicing not covered in this manual
should only be performed by qualified personnel.
IDEAL INDUSTRIES, INC.
Sycamore,IL60178,U.S.A.
800-304-3578CustomerAssistance
www.testersandmeters.com
ND 2356-3 Made in Taiwan
Continuity Check
To Verify Continuity:
A continuity test ensures that all circuit connections are intact.
1. Plug the Black test lead into the COM port and the Red test
lead into the + port.
2. Set the rotary switch to the position.
3. Connect the test leads to the circuit to be measured. The
beeperwillsoundwithin100mSiftheresistanceofthe
circuitmeasuredislowerthan300Ohms.
4. Inadditiontothebeeper,both61-702and61-704havean
LED to verify continuity.
General Specifications
Display: 3-1/2 digit LDC display
Polarity Indication: Automatic, negative indicated,
positive implied
Overrange Indication: “OL”
Low Battery Indication: when the battery voltage
drops below operating voltage
Auto Power Off: Approx.60min.
Temperature Coefficient: 0.1x(specifiedaccuracy)/
°F, <64°F or >82°F
Power Requirements: 9VNEDA1604
Battery Life: 150hourstypicalwithalkaline
75 hours typical with carbon zinc
Installation Category: IEC1010-1,IEC1010-2-032,
CatIII1000V
Maintenance
Battery Replacement:
When the multimeter displays the battery must be
replaced. Disconnect and unplug leads, turn meter off, and
remove the battery cover. Replace the battery with a NEDA type
10649Vbattery.
Warranty Statement
This tester is warranted to the original purchaser against defects
in material and workmanship for two years from the date of
purchase. During this warranty period, IDEAL INDUSTRIES, INC.
will, at its option, replace or repair the defective unit, subject to
verification of the defect or malfunction.
This warranty does not apply to defects resulting from abuse,
neglect, accident, unauthorized repair, alteration, or unreasonable
use of the instrument.
Any implied warranties arising out of the sale of an IDEAL
product, including but not limited to implied warranties of mer-
chantability and fitness for a particular purpose, are limited to
the above. The manufacturer shall not be liable for loss of use
of the instrument or other incidental or consequential damages,
expenses, or economic loss, or for any claim or claims for such
damage, expenses or economic loss.
State laws vary, so the above limitations or exclusions may not
apply to you. This warranty gives you specific legal rights, and
you may also have other rights which vary from state to state.
/