8
Tighten the mount holder using the screws .
Wall
Wall
Wall
9
Work with at least one person to lift the TV and mount it on to the bracket as shown in the
diagram.
Wall Wall Wall
10
Lift the bottom of the TV and then secure it in place as shown in the diagram. Connect the
cables.
11
Take hold of the bottom of the TV and slightly pull it up to leave
space between the TV and the wall, and then flip the safety
hooks at both ends to secure the mounting pieces.
✎
If the TV is not horizontally level, adjust the level by turning
the screws as shown in the diagram.
Product Specifications
✎
Tilt angle may vary depending on the model.
Width (mm) 1364
Height (mm) 1060
Depth (mm) 28
Weight (kg) 18.0
28.0
6
1364.0
484.0
1060.0
752.5
116.7
77.5
10.5
116.0
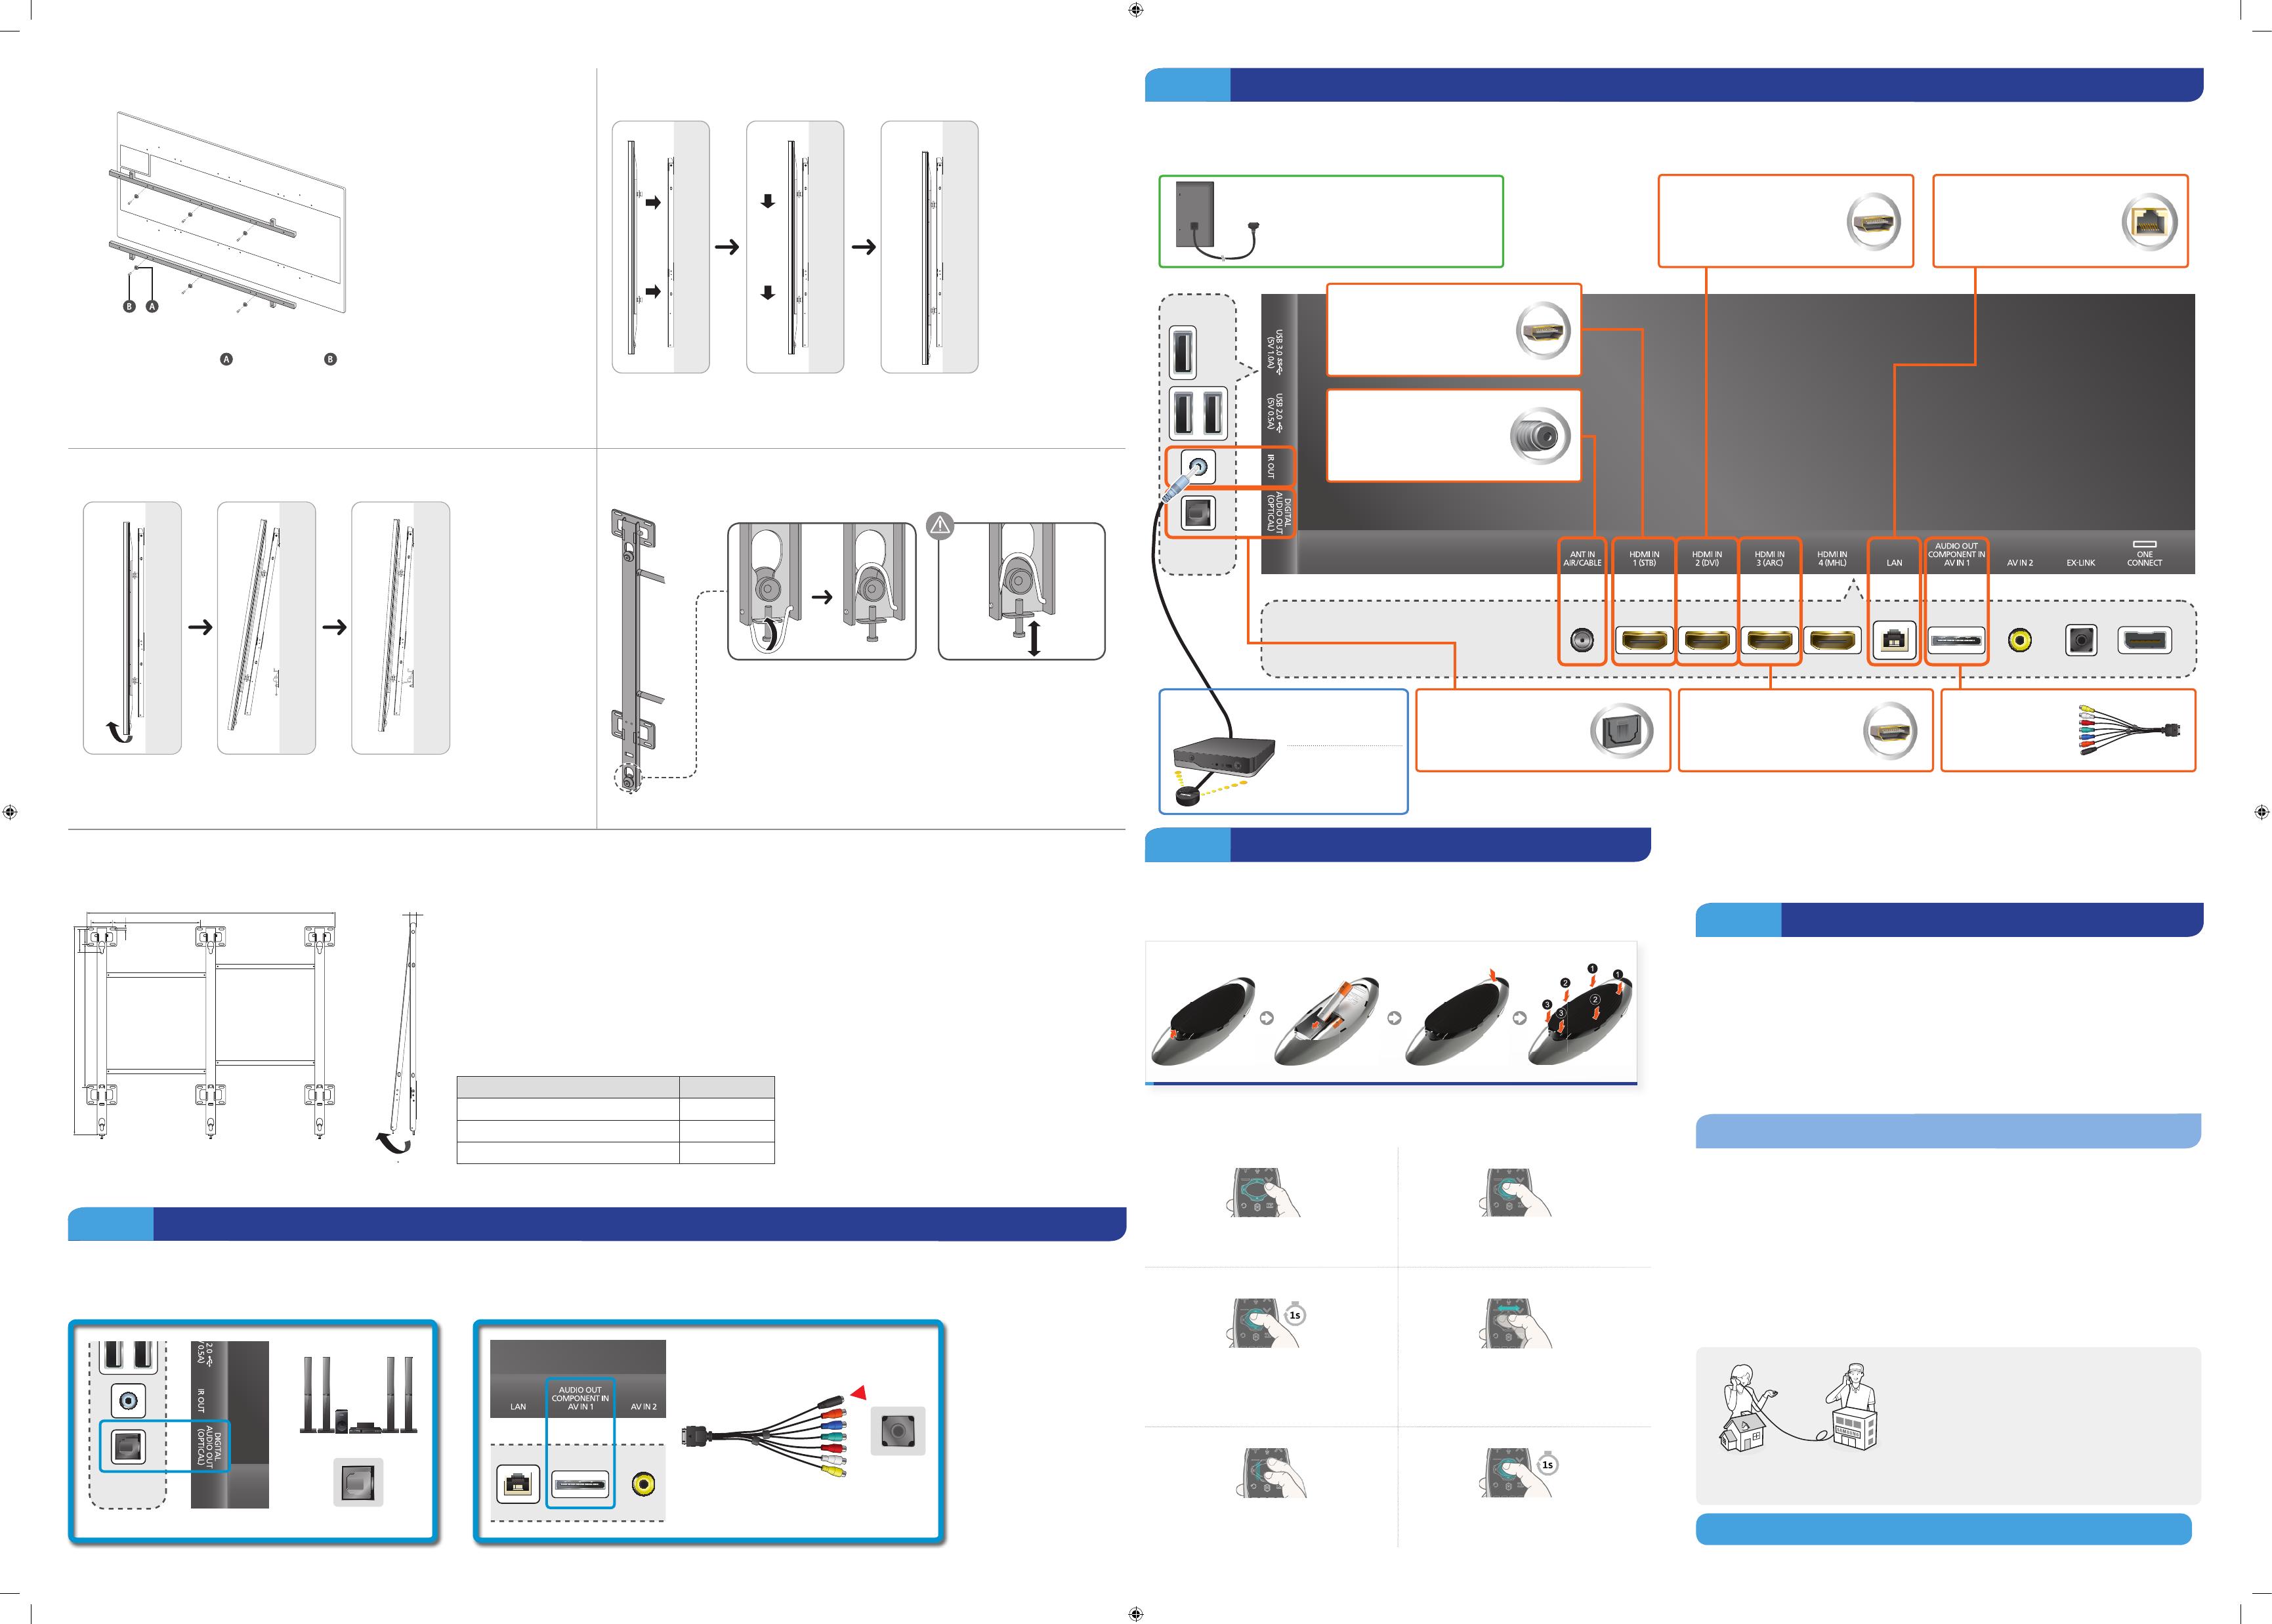
Step 2 Connect Audio Devices
✎
The UN110S9VF model requires you to connect a separate device in order to produce sound.
✎
To control the audio device using the TV’s remote control, use the Sound Share feature or connect the audio device to the TV’s HDMI (ARC) port.
You can connect home theater systems to the OPTICAL or AUDIO OUT ports.
Step 2 Connect video devices
We suggest using HDMI connections whenever possible for the best picture quality. Use the included AV adapter to connect older devices.
✎
Please check the shape of the plugs to avoid inserting them upside down.
✎
The appearance of your TV may differ from the images below, depending on the model.
After you have connected all your
external devices, plug the TV’s power
cord into the back of the TV. DO NOT
plug it into a wall outlet until you have
reached Section 7, Initial Setup.
Blu-ray/DVD/Home Theater
Connect your video player
using an HDMI cable.
Audio
Connect a receiver/home
theater using an optical
audio cable.
Internet
Connect here with an Ethernet
cable or wirelessly later during
the Initial Setup.
This adapter can be
connected to Audio,
Component, or AV
cables.
Game console
Connect your game console
or DVR using an HDMI cable.
Cable/Satellite/DVR
Connect your Cable box or
digital video recorder with an
HDMI cable.
TV signal
Connect your coaxial cable to
the Antenna In port.
Position the transmitter end 4
inches in front of the cable or
satellite box.
TV’s IR Out
Connect the IR extender
cable to the right side of the
One Connect.
Step 3 Using the Samsung Smart Control
Insert the batteries into the Samsung Smart Control
Insert the tip of a credit card or similar item into the notch on the side of the Samsung Smart
Control, and then twist the card to open and remove the remote's back cover.
✎
The notch’s location may vary depending on the type of Samsung Smart Control provided.
Using the touch pad
Moving the Focus or Pointer Entering the Menu / Selecting an Item
Press the directional buttons (up, down,
left, and right) to move the focus, pointer, or
cursor in the direction you want.
To enter a menu or select an item, highlight
the item or the menu title, or move the
pointer over it, and then press the touch pad.
Displaying Context-sensitive Menus in
Smart Hub
Changing the Smart Hub Panel
In Smart Hub, highlight an item, and then
press and hold the touch pad. The context-
sensitive menu for the item pops up.
✎
The context-sensitive menu may vary
depending on the item you selected.
On a Smart Hub panel, drag left or right on
the touch pad. The previous or next Smart
Hub panel appears.
Scrolling on the Web Browser Loading the CH List
When you are using the web browser, drag
up/down or left/right on the touch pad to
scroll the web screen.
Press and hold the touch pad while watching
TV. To launch the CH List.
Pairing the Samsung Smart Control
If you need to reestablish the connection between the TV and the Samsung Smart Control, press
the pairing button at the back of the Samsung Smart Control, pointing at the remote control
sensor of the TV.
Step 4 Power on and start the initial setup
Information required:
• Wi-Fi network password (if you use one)
• Zip code
• Cable or satellite provider info
Plug in the TV. Press the power button on the remote to turn on the TV and start the initial set-up.
✎
The TV must be connected to the Internet to use the Smart Features. If you have a wireless
network, confirm that your network router is working before you start the initial setup. If you
have a wired network, connect the TV to the network with a CAT 7 cable before you begin.
Troubleshooting
The stand is wobbly or crooked
Make sure the arrows on the stand are properly aligned.
The TV won’t turn on
Make sure all cables are fully inserted, and that the remote has batteries installed.
I don’t know where to plug in <device>
Devices without HDMI may require the included A/V adapter.
I have extra parts
The TV includes some optional parts to help with wall mounting and cable routing.
If you experience issues, please do not take the TV back
to the store.
In the United States of America, call us at
1-800-SAMSUNG (1-800-726-7864) or visit us at www.
samsung.com or www.samsung.com/spsn for support
and warranty service.
For other countries, refer to "Contact SAMSUNG
WORLDWIDE" in the user guide.
Congratulations on your new Smart TV!
[UN110S9VF-QSG]BN68-06329B-02ENG.indb 3 2014-09-22 1:10:08

