Page is loading ...

PowerFlex 70/700 Adjustable Frequency AC Drives
PowerFlex 70 Firmware Versions – Standard Control 2.001 and Below, Enhanced Control 2.xxx and Below
PowerFlex 700 Firmware Versions – Standard Control 3.001 and Below, Vector Control 3.002
Reference Manual

Important User Information
Read this document and the documents listed in the additional resources section about installation, configuration, and
operation of this equipment before you install, configure, operate, or maintain this product. Users are required to
familiarize themselves with installation and wiring instructions in addition to requirements of all applicable codes, laws,
and standards.
Activities including installation, adjustments, putting into service, use, assembly, disassembly, and maintenance are required
to be carried out by suitably trained personnel in accordance with applicable code of practice.
If this equipment is used in a manner not specified by the manufacturer, the protection provided by the equipment may be
impaired.
In no event will Rockwell Automation, Inc. be responsible or liable for indirect or consequential damages resulting from the
use or application of this equipment.
The examples and diagrams in this manual are included solely for illustrative purposes. Because of the many variables and
requirements associated with any particular installation, Rockwell Automation, Inc. cannot assume responsibility or
liability for actual use based on the examples and diagrams.
No patent liability is assumed by Rockwell Automation, Inc. with respect to use of information, circuits, equipment, or
software described in this manual.
Reproduction of the contents of this manual, in whole or in part, without written permission of Rockwell Automation,
Inc., is prohibited.
Throughout this manual, when necessary, we use notes to make you aware of safety considerations.
Labels may also be on or inside the equipment to provide specific precautions.
Allen-Bradley, Rockwell Software, Rockwell Automation, and TechConnect are trademarks of Rockwell Automation, Inc.
Trademarks not belonging to Rockwell Automation are property of their respective companies.
WARNING: Identifies information about practices or circumstances that can cause an explosion in a hazardous environment,
which may lead to personal injury or death, property damage, or economic loss.
ATTENTION: Identifies information about practices or circumstances that can lead to personal injury or death, property
damage, or economic loss. Attentions help you identify a hazard, avoid a hazard, and recognize the consequence.
IMPORTANT
Identifies information that is critical for successful application and understanding of the product.
SHOCK HAZARD: Labels may be on or inside the equipment, for example, a drive or motor, to alert people that dangerous
voltage may be present.
BURN HAZARD: Labels may be on or inside the equipment, for example, a drive or motor, to alert people that surfaces may
reach dangerous temperatures.
ARC FLASH HAZARD: Labels may be on or inside the equipment, for example, a motor control center, to alert people to
potential Arc Flash. Arc Flash will cause severe injury or death. Wear proper Personal Protective Equipment (PPE). Follow ALL
Regulatory requirements for safe work practices and for Personal Protective Equipment (PPE).

Rockwell Automation Publication PFLEX-RM001H-EN-P - June 2013 3
Summary of Changes
The information below summarizes the changes to the PowerFlex 70/700
Reference Manual, publication PFLEX-RM001 since the last release.
New and Updated
Information
Manual Updates
Description of Changes Refer to:
Removed the Specification and Dimension information (Chapter 1) 20A-TD001 or 20B-TD001
Removed Fuse information and tables 20A-TD001 or 20B-TD001
Removed Appendix A - Dynamic Brake Guide PFLEX-AT001
Added Motor Overload Protection section page 119

Summary of Changes
4 Rockwell Automation Publication PFLEX-RM001H-EN-P - June 2013
Notes:

Rockwell Automation Publication PFLEX-RM001H-EN-P - June 2013 5
Table of Contents
Important User Information . . . . . . . . . . . . . . . . . . . . . . . . . . . . . . . . . . . . . . . . 2
Summary of Changes New and Updated Information . . . . . . . . . . . . . . . . . . . . . . . . . . . . . . . . . . . . . 3
Chapter 1
Preface Manual Conventions . . . . . . . . . . . . . . . . . . . . . . . . . . . . . . . . . . . . . . . . . . . . . . . 9
Additional Resources . . . . . . . . . . . . . . . . . . . . . . . . . . . . . . . . . . . . . . . . . . . . . 10
General Precautions . . . . . . . . . . . . . . . . . . . . . . . . . . . . . . . . . . . . . . . . . . . . . . 10
Chapter 2
Detailed Drive Operation
Accel Time . . . . . . . . . . . . . . . . . . . . . . . . . . . . . . . . . . . . . . . . . . . . . . . . . . . . . . . . . . . . . . 11
Advanced Tuning. . . . . . . . . . . . . . . . . . . . . . . . . . . . . . . . . . . . . . . . . . . . . . . . . . . . . . . . 12
Alarms . . . . . . . . . . . . . . . . . . . . . . . . . . . . . . . . . . . . . . . . . . . . . . . . . . . . . . . . . . . . . . . . . . 15
Analog Inputs . . . . . . . . . . . . . . . . . . . . . . . . . . . . . . . . . . . . . . . . . . . . . . . . . . . . . . . . . . . 18
Analog Outputs . . . . . . . . . . . . . . . . . . . . . . . . . . . . . . . . . . . . . . . . . . . . . . . . . . . . . . . . . 31
Auto/Manual. . . . . . . . . . . . . . . . . . . . . . . . . . . . . . . . . . . . . . . . . . . . . . . . . . . . . . . . . . . . 36
Auto Restart (Reset/Run) . . . . . . . . . . . . . . . . . . . . . . . . . . . . . . . . . . . . . . . . . . . . . . . . 38
Autotune. . . . . . . . . . . . . . . . . . . . . . . . . . . . . . . . . . . . . . . . . . . . . . . . . . . . . . . . . . . . . . . . 40
Block Diagrams. . . . . . . . . . . . . . . . . . . . . . . . . . . . . . . . . . . . . . . . . . . . . . . . . . . . . . . . . . 44
Bus Regulation . . . . . . . . . . . . . . . . . . . . . . . . . . . . . . . . . . . . . . . . . . . . . . . . . . . . . . . . . . 56
Cable, Control . . . . . . . . . . . . . . . . . . . . . . . . . . . . . . . . . . . . . . . . . . . . . . . . . . . . . . . . . . 61
Cable, Motor Lengths . . . . . . . . . . . . . . . . . . . . . . . . . . . . . . . . . . . . . . . . . . . . . . . . . . . . 61
Cable, Power . . . . . . . . . . . . . . . . . . . . . . . . . . . . . . . . . . . . . . . . . . . . . . . . . . . . . . . . . . . . 61
Cable Trays and Conduit. . . . . . . . . . . . . . . . . . . . . . . . . . . . . . . . . . . . . . . . . . . . . . . . . 61
Carrier (PWM) Frequency . . . . . . . . . . . . . . . . . . . . . . . . . . . . . . . . . . . . . . . . . . . . . . . 62
CE Conformity. . . . . . . . . . . . . . . . . . . . . . . . . . . . . . . . . . . . . . . . . . . . . . . . . . . . . . . . . . 63
Copy Cat . . . . . . . . . . . . . . . . . . . . . . . . . . . . . . . . . . . . . . . . . . . . . . . . . . . . . . . . . . . . . . . 65
Current Limit . . . . . . . . . . . . . . . . . . . . . . . . . . . . . . . . . . . . . . . . . . . . . . . . . . . . . . . . . . . 66
Datalinks. . . . . . . . . . . . . . . . . . . . . . . . . . . . . . . . . . . . . . . . . . . . . . . . . . . . . . . . . . . . . . . . 67
DC Bus Voltage / Memory . . . . . . . . . . . . . . . . . . . . . . . . . . . . . . . . . . . . . . . . . . . . . . . 69
Decel Time. . . . . . . . . . . . . . . . . . . . . . . . . . . . . . . . . . . . . . . . . . . . . . . . . . . . . . . . . . . . . . 69
Digital Inputs. . . . . . . . . . . . . . . . . . . . . . . . . . . . . . . . . . . . . . . . . . . . . . . . . . . . . . . . . . . . 70
Digital Outputs. . . . . . . . . . . . . . . . . . . . . . . . . . . . . . . . . . . . . . . . . . . . . . . . . . . . . . . . . . 87
Direction Control . . . . . . . . . . . . . . . . . . . . . . . . . . . . . . . . . . . . . . . . . . . . . . . . . . . . . . . 91
DPI. . . . . . . . . . . . . . . . . . . . . . . . . . . . . . . . . . . . . . . . . . . . . . . . . . . . . . . . . . . . . . . . . . . . . 92
Drive Overload . . . . . . . . . . . . . . . . . . . . . . . . . . . . . . . . . . . . . . . . . . . . . . . . . . . . . . . . . . 94
Drive Ratings (kW, Amps, Volts) . . . . . . . . . . . . . . . . . . . . . . . . . . . . . . . . . . . . . . . . . 99
Droop . . . . . . . . . . . . . . . . . . . . . . . . . . . . . . . . . . . . . . . . . . . . . . . . . . . . . . . . . . . . . . . . . . 99
Economizer (Auto-Economizer) . . . . . . . . . . . . . . . . . . . . . . . . . . . . . . . . . . . . . . . . . . 99
Efficiency . . . . . . . . . . . . . . . . . . . . . . . . . . . . . . . . . . . . . . . . . . . . . . . . . . . . . . . . . . . . . . 100
Fan Curve. . . . . . . . . . . . . . . . . . . . . . . . . . . . . . . . . . . . . . . . . . . . . . . . . . . . . . . . . . . . . . 100
Fan . . . . . . . . . . . . . . . . . . . . . . . . . . . . . . . . . . . . . . . . . . . . . . . . . . . . . . . . . . . . . . . . . . . . 100
Faults . . . . . . . . . . . . . . . . . . . . . . . . . . . . . . . . . . . . . . . . . . . . . . . . . . . . . . . . . . . . . . . . . . 101
Flux Braking. . . . . . . . . . . . . . . . . . . . . . . . . . . . . . . . . . . . . . . . . . . . . . . . . . . . . . . . . . . . 103
Flux Up . . . . . . . . . . . . . . . . . . . . . . . . . . . . . . . . . . . . . . . . . . . . . . . . . . . . . . . . . . . . . . . . 104

6 Rockwell Automation Publication PFLEX-RM001H-EN-P - June 2013
Table of Contents
Flying Start . . . . . . . . . . . . . . . . . . . . . . . . . . . . . . . . . . . . . . . . . . . . . . . . . . . . . . . . . . . . . 105
Fuses and Circuit Breakers . . . . . . . . . . . . . . . . . . . . . . . . . . . . . . . . . . . . . . . . . . . . . . . 106
Grounding, General . . . . . . . . . . . . . . . . . . . . . . . . . . . . . . . . . . . . . . . . . . . . . . . . . . . . . 107
HIM Memory . . . . . . . . . . . . . . . . . . . . . . . . . . . . . . . . . . . . . . . . . . . . . . . . . . . . . . . . . . 107
HIM Operations. . . . . . . . . . . . . . . . . . . . . . . . . . . . . . . . . . . . . . . . . . . . . . . . . . . . . . . . 107
Input Devices . . . . . . . . . . . . . . . . . . . . . . . . . . . . . . . . . . . . . . . . . . . . . . . . . . . . . . . . . . . 108
Input Modes. . . . . . . . . . . . . . . . . . . . . . . . . . . . . . . . . . . . . . . . . . . . . . . . . . . . . . . . . . . . 109
Input Power Conditioning. . . . . . . . . . . . . . . . . . . . . . . . . . . . . . . . . . . . . . . . . . . . . . . 110
Jog . . . . . . . . . . . . . . . . . . . . . . . . . . . . . . . . . . . . . . . . . . . . . . . . . . . . . . . . . . . . . . . . . . . . . 110
Language . . . . . . . . . . . . . . . . . . . . . . . . . . . . . . . . . . . . . . . . . . . . . . . . . . . . . . . . . . . . . . . 111
Linking Parameters. . . . . . . . . . . . . . . . . . . . . . . . . . . . . . . . . . . . . . . . . . . . . . . . . . . . . . 111
Masks . . . . . . . . . . . . . . . . . . . . . . . . . . . . . . . . . . . . . . . . . . . . . . . . . . . . . . . . . . . . . . . . . . 113
MOP. . . . . . . . . . . . . . . . . . . . . . . . . . . . . . . . . . . . . . . . . . . . . . . . . . . . . . . . . . . . . . . . . . . 114
Motor Control. . . . . . . . . . . . . . . . . . . . . . . . . . . . . . . . . . . . . . . . . . . . . . . . . . . . . . . . . . 115
Motor Nameplate . . . . . . . . . . . . . . . . . . . . . . . . . . . . . . . . . . . . . . . . . . . . . . . . . . . . . . . 116
Motor Overload. . . . . . . . . . . . . . . . . . . . . . . . . . . . . . . . . . . . . . . . . . . . . . . . . . . . . . . . . 117
Motor Overload Protection . . . . . . . . . . . . . . . . . . . . . . . . . . . . . . . . . . . . . . . . . . . . . . 119
Motor Start/Stop Precautions. . . . . . . . . . . . . . . . . . . . . . . . . . . . . . . . . . . . . . . . . . . . 120
Notch Filter . . . . . . . . . . . . . . . . . . . . . . . . . . . . . . . . . . . . . . . . . . . . . . . . . . . . . . . . . . . . 121
Output Current. . . . . . . . . . . . . . . . . . . . . . . . . . . . . . . . . . . . . . . . . . . . . . . . . . . . . . . . . 123
Output Devices . . . . . . . . . . . . . . . . . . . . . . . . . . . . . . . . . . . . . . . . . . . . . . . . . . . . . . . . . 123
Output Frequency. . . . . . . . . . . . . . . . . . . . . . . . . . . . . . . . . . . . . . . . . . . . . . . . . . . . . . . 124
Output Power . . . . . . . . . . . . . . . . . . . . . . . . . . . . . . . . . . . . . . . . . . . . . . . . . . . . . . . . . . 124
Output Voltage . . . . . . . . . . . . . . . . . . . . . . . . . . . . . . . . . . . . . . . . . . . . . . . . . . . . . . . . . 124
Overspeed Limit . . . . . . . . . . . . . . . . . . . . . . . . . . . . . . . . . . . . . . . . . . . . . . . . . . . . . . . . 124
Owners. . . . . . . . . . . . . . . . . . . . . . . . . . . . . . . . . . . . . . . . . . . . . . . . . . . . . . . . . . . . . . . . . 125
Parameter Access Level . . . . . . . . . . . . . . . . . . . . . . . . . . . . . . . . . . . . . . . . . . . . . . . . . . 127
PET. . . . . . . . . . . . . . . . . . . . . . . . . . . . . . . . . . . . . . . . . . . . . . . . . . . . . . . . . . . . . . . . . . . . 128
Power Loss . . . . . . . . . . . . . . . . . . . . . . . . . . . . . . . . . . . . . . . . . . . . . . . . . . . . . . . . . . . . . 128
Preset Frequency . . . . . . . . . . . . . . . . . . . . . . . . . . . . . . . . . . . . . . . . . . . . . . . . . . . . . . . . 135
Process PI Loop . . . . . . . . . . . . . . . . . . . . . . . . . . . . . . . . . . . . . . . . . . . . . . . . . . . . . . . . . 135
Reflected Wave . . . . . . . . . . . . . . . . . . . . . . . . . . . . . . . . . . . . . . . . . . . . . . . . . . . . . . . . . 149
Regen Power Limit . . . . . . . . . . . . . . . . . . . . . . . . . . . . . . . . . . . . . . . . . . . . . . . . . . . . . . 151
Reset Meters . . . . . . . . . . . . . . . . . . . . . . . . . . . . . . . . . . . . . . . . . . . . . . . . . . . . . . . . . . . . 151
Reset Run . . . . . . . . . . . . . . . . . . . . . . . . . . . . . . . . . . . . . . . . . . . . . . . . . . . . . . . . . . . . . . 151
RFI Filter Grounding. . . . . . . . . . . . . . . . . . . . . . . . . . . . . . . . . . . . . . . . . . . . . . . . . . . . 151
S Curve. . . . . . . . . . . . . . . . . . . . . . . . . . . . . . . . . . . . . . . . . . . . . . . . . . . . . . . . . . . . . . . . . 151
Scale Blocks. . . . . . . . . . . . . . . . . . . . . . . . . . . . . . . . . . . . . . . . . . . . . . . . . . . . . . . . . . . . . 154
Shear Pin Fault. . . . . . . . . . . . . . . . . . . . . . . . . . . . . . . . . . . . . . . . . . . . . . . . . . . . . . . . . . 157
Skip Frequency. . . . . . . . . . . . . . . . . . . . . . . . . . . . . . . . . . . . . . . . . . . . . . . . . . . . . . . . . . 158
Sleep Mode . . . . . . . . . . . . . . . . . . . . . . . . . . . . . . . . . . . . . . . . . . . . . . . . . . . . . . . . . . . . . 160
Speed Control, Mode, Regulation & Vector Speed Feedback. . . . . . . . . . . . . . . . 162
Speed Feedback Filter. . . . . . . . . . . . . . . . . . . . . . . . . . . . . . . . . . . . . . . . . . . . . . . . . . . . 166
Speed Reference. . . . . . . . . . . . . . . . . . . . . . . . . . . . . . . . . . . . . . . . . . . . . . . . . . . . . . . . . 167
Speed Regulator. . . . . . . . . . . . . . . . . . . . . . . . . . . . . . . . . . . . . . . . . . . . . . . . . . . . . . . . . 171
Speed/Torque Select . . . . . . . . . . . . . . . . . . . . . . . . . . . . . . . . . . . . . . . . . . . . . . . . . . . . 172
Speed Units. . . . . . . . . . . . . . . . . . . . . . . . . . . . . . . . . . . . . . . . . . . . . . . . . . . . . . . . . . . . . 176

Rockwell Automation Publication PFLEX-RM001H-EN-P - June 2013 7
Table of Contents
Start Inhibits . . . . . . . . . . . . . . . . . . . . . . . . . . . . . . . . . . . . . . . . . . . . . . . . . . . . . . . . . . . 176
Start Permissives . . . . . . . . . . . . . . . . . . . . . . . . . . . . . . . . . . . . . . . . . . . . . . . . . . . . . . . . 176
Start-Up . . . . . . . . . . . . . . . . . . . . . . . . . . . . . . . . . . . . . . . . . . . . . . . . . . . . . . . . . . . . . . . 177
Stop Modes . . . . . . . . . . . . . . . . . . . . . . . . . . . . . . . . . . . . . . . . . . . . . . . . . . . . . . . . . . . . 197
Test Points . . . . . . . . . . . . . . . . . . . . . . . . . . . . . . . . . . . . . . . . . . . . . . . . . . . . . . . . . . . . . 200
Thermal Regulator. . . . . . . . . . . . . . . . . . . . . . . . . . . . . . . . . . . . . . . . . . . . . . . . . . . . . . 200
Torque Limits . . . . . . . . . . . . . . . . . . . . . . . . . . . . . . . . . . . . . . . . . . . . . . . . . . . . . . . . . . 200
Torque Performance Modes . . . . . . . . . . . . . . . . . . . . . . . . . . . . . . . . . . . . . . . . . . . . . 201
Torque Reference . . . . . . . . . . . . . . . . . . . . . . . . . . . . . . . . . . . . . . . . . . . . . . . . . . . . . . . 204
Troubleshooting. . . . . . . . . . . . . . . . . . . . . . . . . . . . . . . . . . . . . . . . . . . . . . . . . . . . . . . . 205
Unbalanced or Ungrounded Distribution Systems. . . . . . . . . . . . . . . . . . . . . . . . . 205
User Sets . . . . . . . . . . . . . . . . . . . . . . . . . . . . . . . . . . . . . . . . . . . . . . . . . . . . . . . . . . . . . . . 206
Voltage Class . . . . . . . . . . . . . . . . . . . . . . . . . . . . . . . . . . . . . . . . . . . . . . . . . . . . . . . . . . . 207
Voltage Tolerance. . . . . . . . . . . . . . . . . . . . . . . . . . . . . . . . . . . . . . . . . . . . . . . . . . . . . . . 207
Watts Loss . . . . . . . . . . . . . . . . . . . . . . . . . . . . . . . . . . . . . . . . . . . . . . . . . . . . . . . . . . . . . 207
Index

8 Rockwell Automation Publication PFLEX-RM001H-EN-P - June 2013
Table of Contents
Notes:

Rockwell Automation Publication PFLEX-RM001H-EN-P - June 2013 9
Chapter 1
Preface
The purpose of this manual is to provide detailed drive information including
operation, parameter descriptions and programming.
Manual Conventions
To help differentiate parameter names and LCD display text from other text, the
following conventions will be used:
• Parameter Names will appear in [brackets]. For example: [DC Bus Voltage].
• Display Text will appear in “quotes.” For example: “Enabled.”
• The following words are used throughout the manual to describe an action:
• The following symbols are used throughout the manual to indicate specific
drive imformation.
Word Meaning
Can Possible, able to do something
Cannot Not possible, not able to do something
May Permitted, allowed
Must Unavoidable, you must do this
Shall Required and necessary
Should Recommended
Should Not Not recommended
Symbol Description
Indicates that the information presented is specific to the Standard Control Option
This information only applies to PowerFlex 700 drives with the Vector Control option
Applies to PowerFlex 700 drives with [Motor Cntl Sel] set to “FVC Vector.”
Indicates that the information presented is specific to the PowerFlex 70 Enhanced Control
Option.
Standard
Vector
Vector
FV
E C

Preface
10 Rockwell Automation Publication PFLEX-RM001H-EN-P - June 2013
Additional Resources
These documents contain additional information concerning related products
from Rockwell Automation.
You can view or download publications at
http:/www.rockwellautomation.com/literature/
. To order paper copies of
technical documentation, contact your local Allen-Bradley distributor or
Rockwell Automation sales representative.
General Precautions
Resource Description
PowerFlex 700 Standard Control User Manual,
publication 20B-UM001
Provides detailed information on:
• Parameters and programming
• Faults, alarms, and troubleshooting
PowerFlex 70 AC Drive Technical Data, publication
20A-TD001
This publication provides detailed drive specifications,
option specifications and input protection device ratings.
PowerFlex 700 AC Drive Technical Data, publication
20B-TD001
PowerFlex Comm Adapter Manuals, publication
20COMM-UM…
These publications provide information on configuring,
using, and troubleshooting PowerFlex communication
adapters.
PowerFlex 70 Enhanced Control and PowerFlex 700
Vector Control Reference Manual, publication
PFLEX-RM004
These publications provide detailed application specific
information for programming and configuring the
PowerFlex 700 drive.
Wiring and Grounding Guidelines for Pulse Width
Modulated (PWM) AC Drives, publication DRIVES-IN001
Provides basic information needed to properly wire and
ground PWM AC drives.
Safety Guidelines for the Application, Installation and
Maintenance of Solid State Control, publication SGI-1.1
Provides general guidelines for the application,
installation, and maintenance of solid-state control.
Guarding Against Electrostatic Damage, publication
8000-4.5.2
Provides practices for guarding against Electrostatic
damage (ESD)
!
ATTENTION: This drive contains ESD (Electrostatic Discharge) sensitive parts
and assemblies. Static control precautions are required when installing, testing,
servicing or repairing this assembly. Component damage may result if ESD
control procedures are not followed. If you are not familiar with static control
procedures, reference A-B publication 8000-4.5.2, “Guarding Against
Electrostatic Damage” or any other applicable ESD protection handbook.
!
ATTENTION: An incorrectly applied or installed drive can result in component
damage or a reduction in product life. Wiring or application errors, such as,
undersizing the motor, incorrect or inadequate AC supply, or excessive ambient
temperatures may result in malfunction of the system.
!
ATTENTION: Only qualified personnel familiar with adjustable frequency AC
drives and associated machinery should plan or implement the installation,
start-up and subsequent maintenance of the system. Failure to comply may
result in personal injury and/or equipment damage.
!
ATTENTION: To avoid an electric shock hazard, verify that the voltage on the
bus capacitors has discharged before performing any work on the drive.
Measure the DC bus voltage at the +DC & –DC terminals of the Power Terminal
Block (refer to the Installation Instructions for location). The voltage must be
zero.

Rockwell Automation Publication PFLEX-RM001H-EN-P - June 2013 11
Chapter 2
Detailed Drive Operation
This chapter explains PowerFlex drive functions in detail. Explanations are
organized alphabetically by topic. Refer to the Table of Contents for a listing of
topics.
Accel Time [Accel Time 1, 2]
The Accel Time parameters set the rate at which the drive ramps up its output
frequency after a Start command or during an increase in command frequency
(speed change). The rate established is the result of the programmed Accel Time
and the Minimum and Maximum Frequency, as follows:
Two accel times exist to allow the user to change acceleration rates “on the fly” via
PLC command or digital input. The selection is made by programming [Accel
Time 1] & [Accel Time 2] and then using one of the digital inputs ([Digital Inx
Sel]) programmed as “Accel 2” (see Table 9
for further information). However, if
a PLC is used, manipulate the bits of the command word as shown below.
The effectiveness of these bits or digital inputs can be affected by [Accel Mask].
See Masks
on page 113 for more information.
Times are adjustable in 0.1 second increments from 0.0 seconds to 3600.0
seconds.
In its factory default condition, when no accel select inputs are closed and no
accel time bits are “1,” the default acceleration time is Accel Time 1 and the rate is
determined as above.
Maximum Speed
Accel Time
= Accel Rate (Hz./sec.)
011000010111
1
0
0
0
Accel 1
Accel 2
Decel 1
Decel 2
0
1
0
0
0
0
1
0
0
0
0
1
0000
10 01234567891112131415
1 = Condition True
0 = Condition False
x = Reserved
Bit #
Stop
Start
Jog
Clear Fault
Forward
Reverse
Local Contrl
Mop Inc
Accel 1
Accel 2
Decel 1
Decel 2
Spd Ref ID 0
(1)
Spd Ref ID 1
(1)
Spd Ref ID 2
(1)
MOP Dec

Advanced Tuning
12 Rockwell Automation Publication PFLEX-RM001H-EN-P - June 2013
Advanced Tuning Advanced Tuning Parameters – PF700 Vector Control Only
The following parameters can only be viewed when “2, Unused” is selected in
parameter 196, [Param Access Lvl].
!
ATTENTION: To guard against unstable or unpredictable operation,
the following parameters must only be changed by qualified service
personnel.
File
Group
No.
Parameter Name & Description Values
Related
UTILITY
Diag-Motor Cntl
500 [KI Current Limit]
Current Limit Integral gain. This gain is applied to the
current limit error signal to eliminate steady state current
limit error. A larger value increases overshoot during a
step of motor current/load.
Default:
Min/Max:
Units:
1500
0/10000
1
501 [KD Current Limit]
Current Limit Derivative gain. This gain is applied to the
sensed motor current to anticipate a current limit
condition. A larger value reduces overshoot of the current
relative to the current limit value.
Default:
Min/Max:
Units:
500
0/10000
1
502 [Bus Reg ACR Kp]
This proportional gain, in conjunction with P160, adjusts
the output frequency of the drive during a bus limit or
inertia ride through condition. The output frequency is
adjusted in response to an error in the active, or torque
producing, current to maintain the active bus limit, or
inertia ride through bus reference. A larger value of gain
reduces the dynamic error of the active current.
Default:
Min/Max:
Units:
450
0/10000
1
503 [Jerk]
This parameter allows you to adjust the amount of
S-Curve, or “Jerk” applied to the Acc/Dec rate. To enable
the Jerk feature, bit 1 of P56 must be set high.
Default:
Min/Max:
Units:
900
2/30000
1
504 [Kp Ln Ls Bus Reg]
This proportional gain adjusts the active current
command during an inertia-ride through condition, in
response to a bus error. A larger value of gain reduces the
dynamic error of the bus voltage as compared to the bus
voltage reference.
Default:
Min/Max:
Units:
500
0/10000
1
505 [Kd Ln Ls Bus Reg]
Line Loss Bus Reg Kd is a derivative gain, which is applied
to the sensed bus voltage to anticipate dynamic changes
and minimize them. A larger value reduces overshoot of
the bus voltage relative to the inertia-ride through bus
voltage reference.
Default:
Min/Max:
Units:
500
0/10000
1
506 [Angl Stblty Gain]
Angle Stability Gain adjusts the electrical angle to
maintain stable motor operation. An increase in the
value increases the angle adjustment.
Default:
Min/Max:
Units:
51
0/32767
1
507 [Volt Stblty Gain]
Adjusts the output voltage to maintain stable motor
operation. An increase in the value increases the output
voltage adjustment.
Default:
Min/Max:
Units:
93
0/32767
1
508 [Stability Filter]
The Stability Filter coefficient is used to adjust the
bandwidth of a low pass filter. The smaller the value of
this coefficient, the lower the bandwidth of the filter.
Default:
Min/Max:
Units:
3250
0/32767
1

Advanced Tuning
Rockwell Automation Publication PFLEX-RM001H-EN-P - June 2013 13
UTILITY
Diag-Motor Cntl
509 [Lo Freq Reg KpId]
This proportional gain adjusts the output voltage at very
low frequency in response to the reactive, or d-axis,
motor current. A larger value increases the output
voltage change.
Default:
Min/Max:
Units:
64
0/32767
1
510 [Lo Freq Reg KpIq]
The proportional gain adjusts the output voltage at very
low frequency in response to the active, or q-axis, motor
current. A larger value increases the output voltage
change.
Default:
Min/Max:
Units:
64
0/32767
1
511 [Ki Cur Reg]
This integral gain adjusts the output voltage in response
to the q and d axis motor currents. A larger value
increases the output voltage change.
Default:
Min/Max:
Units:
44
0/32767
1
512 [Kp Cur Reg]
This proportional gain adjusts the output voltage in
response to the q and d axis motor currents. A larger
value increases the output voltage change.
Default:
Min/Max:
Units:
1600
0/32767
1
523 [Bus Utilization]
This value sets the drive output voltage limit as a
percentage of the fundamental output voltage when
operating in 6 step mode. Values above 95% increase
harmonic content and jeopardize control stability. This
output voltage limit is strictly a function of input line and
resulting bus voltage.
Default:
Min/Max:
Units:
95.0%
85.0/100.0%
0.1%
524 [PWM Type Sel]
Allows selection of the active PWM type. A value of 0 is
default, and results in a change of PWM method at
approximately 2/3 of rated motor frequency. If this is
unacceptable for harmonic or audible reasons, a value of
1 disables the change.
Default:
Min/Max:
Units:
0
0/1
1
536 [Ki Flux Braking]
Proportional gain for the Flux Regulator
Default:
Min/Max:
Units:
100
0/32767
1
537 [Kp Flux Braking]
Integral gain for the Flux Regulator
Default:
Min/Max:
Units:
500
0/32767
1
538 [Rec Delay Time]
TBD
Default:
Min/Max:
Units:
1000
1/30000
1
Diag-DACs
513 [PWM DAC Enable]
Reserved. Do Not Adjust
Default:
Min/Max:
Units:
0
0/1
1
514
515
516
517
[DAC47-A]
[DAC47-B]
[DAC47-C]
[DAC47-D]
Reserved. Do Not Adjust
Default:
Min/Max:
Units:
0
0/7432
1
518 [Host DAC Enable]
Reserved. Do Not Adjust
Default:
Min/Max:
Units:
0
0/1
1
519
520
521
522
[DAC55-A]
[DAC55-B]
[DAC55-C]
[DAC55-D]
Reserved. Do Not Adjust
Default:
Min/Max:
Units:
0
0/7432
1
File
Group
No.
Parameter Name & Description Values
Related

Advanced Tuning
14 Rockwell Automation Publication PFLEX-RM001H-EN-P - June 2013
UTILITY
Diag-Vector Cnt
525 [Torq Adapt Speed]
Selects the operating frequency/speed at which the
adaptive torque control regulators become active as a
percent of motor nameplate frequency.
Default:
Min/Max:
Units:
10.0%
0.0/100.0%
0.1%
526 [Torq Reg Enable]
Enables or disables the torque regulator
Default:
Min/Max:
Units:
1
0/1
1
527 [Kp Torq Reg]
Proportional gain for the torque regulator
Default:
Min/Max:
Units:
32
0/32767
1
528 [Ki Torq Reg]
Integral gain for the torque regulator
Default:
Min/Max:
Units:
128
0/32767
1
529 [Torq Reg Trim]
Torque Regulator trim gain. A larger value increases the
developed torque. Typically used to compensate for
losses between developed and shaft torque.
Default:
Min/Max:
Units:
1.0
0.5/1.5
0.1
530 [Slip Reg Enable]
Enables or disables the slip frequency regulator.
Default:
Min/Max:
Units:
1
0/1
1
531 [Kp Slip Reg]
Proportional gain for the slip frequency regulator.
Default:
Min/Max:
Units:
256
0/32767
1
532 [Ki Slip Reg]
Integral gain for the slip frequency regulator.
Default:
Min/Max:
Units:
64
0/32767
1
533 [Flux Reg Enable]
Enables or disables the flux regulator.
Default:
Min/Max:
Units:
1
0/1
1
534 [Kp Flux Reg]
Proportional gain for the flux regulator.
Default:
Min/Max:
Units:
64
0/32767
1
535 [Ki Flux Reg]
Integral gain for the flux regulator.
Default:
Min/Max:
Units:
32
0/32767
1
539 [Freq Reg Ki]
Integral gain for the Frequency Regulator
Default:
Min/Max:
Units:
450
0/32767
1
540 [Freq Reg Kp]
Proportional gain for the Frequency Regulator.
Default:
Min/Max:
Units:
2000
0/32767
1
541 [Encdlss Ang Comp]
TBD
Default:
Min/Max:
Units:
0
–1023/1023
1
542 [Encdlss Vlt Comp]
TBD
Default:
Min/Max:
Units:
6.1
0/115
1
544 [Excitation Kp]
TBD
Default:
Min/Max:
Units:
1800
0/32767
1
File
Group
No.
Parameter Name & Description Values
Related

Alarms
Rockwell Automation Publication PFLEX-RM001H-EN-P - June 2013 15
Alarms Alarms are indications of situations that are occurring within the drive or
application that should be annunciated to the user. These situations may affect
the drive operation or application performance. Conditions such as Power Loss
or Analog input signal loss can be detected and displayed to the user for drive or
operator action.
There are two types of alarms:
• Type 1 Alarms
are conditions that occur in the drive or application that may
require alerting the operator. These conditions, by themselves, do not cause
the drive to “trip” or shut down, but they may be an indication that, if the
condition persists, it may lead to a drive fault.
• Type 2 Alarms
are conditions that are caused by improper programming and
they prevent the user from Starting the drive until the improper programming
is corrected. An example would be programming one digital input for a 2-wire
type control (Run Forward) and another digital input for a 3-wire type
control (Start). These are mutually exclusive operations, since the drive could
not determine how to properly issue a “Run” command. Because the
programming conflicts, the drive will issue a type 2 alarm and prevent Starting
until the conflict is resolved.
Alarm Status Indication
[Drive Alarm 1]
[Drive Alarm 2]
Two 16 bit Drive Alarm parameters are available to indicate the status of any
alarm conditions. Both Type 1 and Type 2 alarms are indicated.
A “1” in the bit indicates the presence of the alarm and a “0” indicates no alarm is
present
Configuration
In order for a drive alarm to be annunciated to the “outside” world, it must first
be “configured” or activated. Configuration parameters contain a configuration
bit for each Type 1 alarm. Type 2 alarms are permanently configured to
annunciate. The configuration word is a mirror image of the Drive Alarm word;
that is, the same bits in both the Drive Alarm Word and the Alarm Configuration
Word represent the same alarm.
Drive Alarm
111
Alarm Config
100
XX
Active
Alarm
Inactive
Alarm
Inactive
Alarm

Alarms
16 Rockwell Automation Publication PFLEX-RM001H-EN-P - June 2013
The configuration bits act as a mask to block or pass through the alarm condition
to the active condition. An active alarm will be indicated on the LCD HIM and
will cause the drive alarm status bit to go high (“1”) in the Drive Status word (Bit
6, parameter 209). This bit can then be linked to a digital output for external
annunciation. As default, all configuration bits are high (“1”). Note that setting a
configuration bit to “0” to “mask” an alarm does not affect the status bit in the
Drive Alarm parameter, only its ability to annunciate the condition.
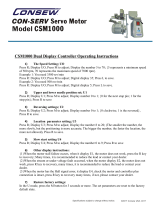
Application
A process is being controlled by a PowerFlex drive. The speed reference to the
drive is a 4-20 mA analog signal from a sensor wired to Analog Input 1.
The input is configured for mA by setting the corresponding bit in [Anlg In
Config] to “1”
The input is scaled for 4-20 mA by setting [Analog In 1 Lo] to “4” mA and
[Analog In 1 Hi] to “20” mA.
The signal is designated as the active speed reference by setting [Speed Ref A Sel]
to its factory default value of “1”
320 [Anlg In Config]
Selects the mode for the analog inputs.
322
325
323
326
Analog In Config
01
Speed References
090 [Speed Ref A Sel]
Selects the source of the speed reference to the drive
unless [Speed Ref B Sel] or [Preset Speed 1-7] is
selected.
(1)
See User Manual for DPI port locations.
Default:
Options:
2
1
2
3-6
7
8
9
10
11
12
13
14
15
16
17
18
19
20
21
22
“Analog In 2”
“Analog In 1”
“Analog In 2”
“Reserved”
“Pulse In”
“Encoder”
“MOP Level”
“Reserved”
“Preset Spd1”
“Preset Spd2”
“Preset Spd3”
“Preset Spd4”
“Preset Spd5”
“Preset Spd6”
“Preset Spd7”
“DPI Port 1”
(1)
“DPI Port 2”
(1)
“DPI Port 3”
(1)
“DPI Port 4”
(1)
“DPI Port 5”
(1)
002
091
thru
093
101
thru
107
117
thru
120
192
thru
194
213
272
273
320
361
thru
366
0
xx
0
xxxxxxxxxxxx
10 01234567891112131415
1
=Current
0
=Voltage
x=Reserved
Bit #
Factory Default Bit Values
An1 0=V 1=mA
An2 0=V 1=mA

Alarms
Rockwell Automation Publication PFLEX-RM001H-EN-P - June 2013 17
By setting Speed Ref A Hi to 60 Hz and Speed ref A Lo to 0 Hz, the speed
reference is scaled to the application needs. Because of the Input scaling and link
to the speed reference, 4 mA represents minimum frequency (0 Hz.) and 20 mA
represents Maximum Frequency (60 Hz.)
The input is configured to recognize a loss of signal and react accordingly to the
programming.
The loss action is chosen as Hold Input, meaning that the last received signal will
be maintained as the speed reference.
Finally, a Digital Output relay is configured to annunciate an alarm by turning on
a flashing yellow light mounted on the operator panel of the process control area.
Scale Block
P322
20mA
P091
60 Hz
P323
4mA
P092
0 HZ
324
327
[Analog In 1 Loss]
[Analog In 2 Loss]
Selects drive action when an analog signal loss is
detected. Signal loss is defined as an analog signal less
than 1V or 2mA. The signal loss event ends and normal
operation resumes when the input signal level is greater
than or equal to 1.5V or 3mA.
Default:
Options:
0
0
0
1
2
3
4
5
6
“Disabled”
“Disabled”
“Disabled”
“Fault”
“Hold Input”
“Set Input Lo”
“Set Input Hi”
“Goto Preset1”
“Hold OutFreq”
091
092
INPUTS & OUTPUTS
Digital Outputs
380
384
388
[Digital Out1 Sel]
[Digital Out2 Sel]
[Digital Out3 Sel]
Selects the drive status that will energize a (CRx) output
relay.
(1)
Contacts shown in User Manual are in drive powered
state with condition present. Refer to “Fault” and
“Alarm” information.
(2)
Vector Control Option Only.
Default:
Options:
1
4
4
1
2
3
4
5
6
7
8
9
10
11
12
13
14
15
16
17
18
19
20
21-
26
27
28
29
“Fault”
“Run”
“Run”
“Fault”
(1)
“A la rm ”
(1)
“Ready”
“Run”
“Forward Run”
“Reverse Run”
“Auto Restart”
“Powerup Run”
“At Speed”
“At Freq”
“At Current”
“At Torque”
“At Temp”
“At Bus Volts”
“At PI Error”
“DC Braking”
“Curr Limit”
“Economize”
“Motor Overld”
“Power Loss”
“Input 1-6 Link”
“PI Enable”
(2)
“PI Hold”
(2)
“PI Reset”
(2)
381
385
382
386
383
002
001
003
004
218
012
137
157
147
053
048
184
Vector

Analog Inputs
18 Rockwell Automation Publication PFLEX-RM001H-EN-P - June 2013
While the process is normal and running from the analog input, everything
proceeds normally. However, if the wire for the analog input should be severed or
the sensor malfunction so that the 4-20mA signal is lost, the following sequence
occurs:
1. The drive will sense the signal loss.
2. An active Type 1 Alarm is created and the last signal value is maintained as the
speed reference.
3. The alarm activates the digital output relay to light the alarm light for the
operator.
4. The operator uses the HIM to switch the drive to Manual Control (see Auto/
Manual).
5. The operator manually brings the process to a controlled stop until the signal
loss is repaired.
Alarm Queue (PowerFlex 700 Only)
A queue of 8 parameters exists that capture the drive alarms as they occur. A
sequential record of the alarm occurrences allows the user to view the history of
the eight most recent events.
Analog Inputs Possible Uses of Analog Inputs
The analog inputs provide data that can be used for the following purposes:
• Provide a value to [Speed Ref A] or [Speed Ref B].
• Provide a trim signal to [Speed Ref A] or [Speed Ref B].
• Provide a reference when the terminal block has assumed manual control of
the reference
• Provide the reference and feedback for the PI loop. See Process PI Loop
on
page 135.
• Provide an external and adjustable value for the current limit and DC braking
level
• Enter and exit sleep mode.
• Provide a value to [Torque Ref A] or [Torque Ref B].
UTILITY
Alarms
262
263
264
265
266
267
268
269
[Alarm 1 Code]
[Alarm 2 Code]
[Alarm 3 Code]
[Alarm 4 Code]
[Alarm 5 Code]
[Alarm 6 Code]
[Alarm 7 Code]
[Alarm 8 Code]
A code that represents a drive alarm. The codes will
appear in the order they occur (first 4 alarms in – first 4
out alarm queue). A time stamp is not available with
alarms.
Default:
Min/Max:
Display:
Read Only
0/256
1
261
Vector
FV

Analog Inputs
Rockwell Automation Publication PFLEX-RM001H-EN-P - June 2013 19
Analog Input Configuration
[Anlg In Config]
[Current Lmt Sel] allows an analog input to control the set point while [DC Brk
Levl Sel] allows an analog input to define the DC hold level used when
Ramp-to-Stop, Ramp-to-Hold, or Brake-to-Stop is active.
To provide local adjustment of a master command signal or to provide improved
resolution the input to analog channel 1 or 2 can be defined as a trim input.
Setting [Trim In Select] allows the selected channel to modify the commanded
frequency by ±10%. The speed command will be reduced by 10% when the input
level is at [Anlg In x Lo] with it linearly increasing to 10% above command at
[Anlg In xHi].
Feedback can be used to control an operation using the “Process PI”
(proportional-integral) feature of the control. In this case one signal, defined
using [PI Reference Sel], provides a reference command and a second, defined
using [PI Feedback Sel], provides a feedback signal for frequency compensation.
Please refer to the Process PI Loop
on page 135 for details on this mode of
operation.

Analog Inputs
20 Rockwell Automation Publication PFLEX-RM001H-EN-P - June 2013
Speed Ref A Sel Speed Ref B Sel TB Man Ref Sel PI Reference Sel PI Feedback Sel Current Lmt SelTrim In Select DC Brk Levl Sel Sleep-Wake Ref
Analog Input
1 Scale
Analog Input
2 Scale
Ref A
Scale/Limit
Ref B
Scale/Limit
Tr im
Scale/Limit
Cal Analog 1
Cal Analog 2
+
+
Hz Hz Hz %%
Hz
Volts or mA
Volts or mA
Sleep Level
Wake Level
Input/Output
Parameter
Processing
Selection/Control
Speed Ref A Lo
Trim Lo
Trim Hi
Speed Ref A Hi
Speed Ref B Lo
Speed Ref B Hi
Analog In 1 Lo
Analog In 1 Hi
Analog In 2 Lo
Analog In 2 Hi
PI
Reference
Scale/Limit
TB Manual
Scale/Limit
PI Feedback
Scale/Limit
Current Limit
Scale/Limit
Current LimitPI FeedbackPI ReferenceTB ManualReference BReference A DC Brake Sleep/Wake
% Rated
Current
% Rated
Current
Sleep/
Wake
Sleep Level
Compare
Torque Ref A Sel
Torque Ref A Lo
Torque Ref A Hi
Torque Ref A
%
Torque Ref A
Div
Torque Ref B Sel
Torque Ref B Lo
Torque Ref B Hi
Torque Ref B
%
Torque Ref B
Mult
Brake Level
Scale/Limit
Trim Out Sel
/