Interphone U-COM 7R is a Bluetooth® communication system designed for motorcyclists, allowing them to make and receive phone calls, listen to music, and communicate with other riders via intercom. It features advanced noise-canceling technology for clear audio, a long battery life, and a user-friendly interface. With its waterproof design, the U-COM 7R can withstand even the toughest weather conditions. It offers various connectivity options, including pairing with up to 8 Bluetooth devices, allowing riders to stay connected on their journeys.
Interphone U-COM 7R is a Bluetooth® communication system designed for motorcyclists, allowing them to make and receive phone calls, listen to music, and communicate with other riders via intercom. It features advanced noise-canceling technology for clear audio, a long battery life, and a user-friendly interface. With its waterproof design, the U-COM 7R can withstand even the toughest weather conditions. It offers various connectivity options, including pairing with up to 8 Bluetooth devices, allowing riders to stay connected on their journeys.


-
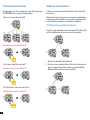
 1
1
-
 2
2
-
 3
3
-
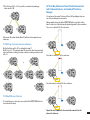
 4
4
-
 5
5
-
 6
6
-
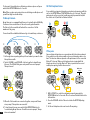
 7
7
-
 8
8
-
 9
9
-
 10
10
-
 11
11
-
 12
12
-
 13
13
-
 14
14
-
 15
15


Interphone U-COM 7R is a Bluetooth® communication system designed for motorcyclists, allowing them to make and receive phone calls, listen to music, and communicate with other riders via intercom. It features advanced noise-canceling technology for clear audio, a long battery life, and a user-friendly interface. With its waterproof design, the U-COM 7R can withstand even the toughest weather conditions. It offers various connectivity options, including pairing with up to 8 Bluetooth devices, allowing riders to stay connected on their journeys.
Ask a question and I''ll find the answer in the document
Finding information in a document is now easier with AI
Related papers
-
Interphone UCOM6R User manual
-
Interphone U-COM4 User manual
-
Interphone Sport User manual
-
-
Interphone F5MC User manual
-
Interphone Urban User manual
-
Interphone Link User manual
-
Interphone F4MC User manual
-
Cellular Line F3MC User manual
-
Other documents
-
Cellularline INTERPHOUCOM3 User manual
-
 Interphone-Cellularline F5MC Owner's manual
-
-
Sena S7A-SP16 User manual
-
Midland BTX1 PRO S Owner's manual
-
Sena 10C User guide
-
Midland BTX2 Pro S-LR Bluetooth Kommunikation, Doppelset Owner's manual
-
Midland BTX2 Pro 2020, Single, HiFi Super Bass Lautsprecher Owner's manual
-
Sena 10C PRO User guide
-
Sena 10C EVO User guide
