Page is loading ...

FireNET Vapor VPR-15
Product Guide
October 2012
Document: 21518
Part Number: HA-06-331


Intellectual Property and Copyright
This document includes registered and unregistered trademarks. All trademarks displayed are the trademarks of their
respective owners. Your use of this document does not constitute or create a licence or any other right to use the name
and/or trademark and/or label.
This document is subject to copyright owned by Hochiki America Corporation. You agree not to copy, communicate to the
public, adapt, distribute, transfer, sell, modify or publish any contents of this document without the express prior written
consent of Hochiki.
Disclaimer
The contents of this document is provided on an “as is” basis. No representation or warranty (either express or implied) is
made as to the completeness, accuracy or reliability of the contents of this document. The manufacturer reserves the right
to change designs or specifications without obligation and without further notice. Except as otherwise provided, all
warranties, express or implied, including without limitation any implied warranties of merchantability and fitness for a
particular purpose are expressly excluded.
General Warning
This product must only be installed, configured and used strictly in accordance with the General Terms and Conditions,
User Manual and product documents available from Hochiki. All proper health and safety precautions must be taken
during the installation, commissioning and maintenance of the product. The system should not be connected to a power
source until all the components have been installed. Proper safety precautions must be taken during tests and
maintenance of the products when these are still connected to the power source. Failure to do so or tampering with the
electronics inside the products can result in an electric shock causing injury or death and may cause equipment damage.
Hochiki is not responsible and cannot be held accountable for any liability that may arise due to improper use of the
equipment and/or failure to take proper precautions. Only persons trained through an Hochiki accredited training course
can install, test and maintain the system.
Liability
You agree to install, configure and use the products strictly in accordance with the User Manual and product documents
available from Hochiki.
Hochiki is not liable to you or any other person for incidental, indirect, or consequential loss, expense or damages of any
kind including without limitation, loss of business, loss of profits or loss of data arising out of your use of the products.
Without limiting this general disclaimer the following specific warnings and disclaimers also apply:
Fitness for Purpose
You agree that you have been provided with a reasonable opportunity to appraise the products and have made your own
independent assessment of the fitness or suitability of the products for your purpose. You acknowledge that you have not
relied on any oral or written information, representation or advice given by or on behalf of Hochiki or its representatives.
Total Liability
To the fullest extent permitted by law that any limitation or exclusion cannot apply, the total liability of Hochiki in relation to
the products is limited to:
i. in the case of services, the cost of having the services supplied again; or
ii. in the case of goods, the lowest cost of replacing the goods, acquiring equivalent goods or having the goods
repaired.
Indemnification
You agree to fully indemnify and hold Hochiki harmless for any claim, cost, demand or damage (including legal costs on a
full indemnity basis) incurred or which may be incurred arising from your use of the products.
Miscellaneous
If any provision outlined above is found to be invalid or unenforceable by a court of law, such invalidity or unenforceability
will not affect the remainder which will continue in full force and effect. All rights not expressly granted are reserved.
Hochiki America Corporation FireNET Vapor VPR-15 Product Guide
www.hochiki.com i

FireNET Vapor VPR-15 Product Guide Hochiki America Corporation
Document Conventions
The following typographic conventions are used in this document:
Convention Description
Bold Used to denote: emphasis.
Used for names of menus, menu options, toolbar buttons
Italics Used to denote: references to other parts of this document or other
documents. Used for the result of an action.
The following icons are used in this document:
Convention Description
Caution: This icon is used to indicate that there is a danger to
equipment. The danger could be loss of data, physical damage, or
permanent corruption of configuration details.
Warning: This icon is used to indicate that there is a danger of electric
shock. This may lead to death or permanent injury.
Warning: This icon is used to indicate that there is a danger of
hazardous laser radiation exposure.
Warning: This icon is used to indicate that there is a danger of inhaling
dangerous substances. This may lead to death or permanent injury.
Contact Us
Hochiki America Corporation
7051 Village Drive, Suite 100
Buena Park, CA 90621-2268
Ph: +1 800 845 6692
www.hochiki.com
technicalsupport@hochiki.com
ii www.hochiki.com

Codes and Standards Information for Air Sampling Smoke Detection
We strongly recommend that this document is read in conjunction with the appropriate local codes and standards for
smoke detection and electrical connections. This document contains generic product information and some sections may
not comply with all local codes and standards. In these cases, the local codes and standards must take precedence. The
information below was correct at time of printing but may now be out of date, check with your local codes, standards and
listings for the current restrictions.
FDA
This FireNET Vapor product incorporates a 658 nm laser device with an average power less than 10 mW, and is classified
as a Class 1 laser product that complies with FDA regulations 21 CFR 1040 with deviations pursuant to Laser Notice 50,
and with IEC / EN 60825-1. Access to the laser chamber is on the underside of equipment and is restricted by cover. The
cover may only be removed by qualified personnel. The laser emits visible light and can be hazardous if viewed with the
naked eye.
CAUTION - Use of controls or adjustments of performance or procedures other than those specified herein may result in
hazardous radiation exposure.
Regional Regulatory Requirements and Notices
UL
For open area applications at maximum dilution, when using obscuration/foot, the Fire 1 threshold must be set within 0.04
to 0.70 % obs /ft.
Approvals
lUL
Hochiki America Corporation FireNET Vapor VPR-15 Product Guide
www.hochiki.com iii

FireNET Vapor VPR-15 Product Guide Hochiki America Corporation
iv www.hochiki.com
This page is intentionally left blank.

Table of Contents
1 Introduction 3
2 Principle of Operation 5
2.1 Flow Monitoring 5
2.2 Alarms and Trace Mode 6
2.3 Detector Display Panel 8
3 Installation 11
3.1 Mounting the Detector 11
3.2 Cable Connections 12
3.3 Air Sampling Network 18
3.4 Remote Display Panel 20
4 Starting Up 21
4.1 Flow Normalization 21
5 Setup and Button Functionality 23
5.1 Access Codes 23
5.2 User Functions 24
5.3 Main Menu Modes 25
5.4 Input-Output Modules 37
6 Maintenance 41
6.1 Inspection 41
6.2 Servicing 42
7 Specifications 43
7.1 Power Supply 43
7.2 Case 43
7.3 Operating Conditions 43
7.4 Sampling Network 43
7.5 Area Covered 44
7.6 Interfaces 44
7.7 Alarm 44
7.8 Communication 44
7.9 Event Log 44
A Display Panel Navigation 45
B Communications Guide 47
B.1 Installation Guide for RS485 Equipment 47
C Laser Chamber Safety 49
Hochiki America Corporation FireNET Vapor VPR-15 Product Guide
www.hochiki.com 1

FireNET Vapor VPR-15 Product Guide Hochiki America Corporation
2www.hochiki.com
This page is intentionally left blank.

1 Introduction
Welcome to the FireNET Vapor VPR-15 Product Guide. This document is written to provide you with information on
technical specifications, cabling, and how to install, configure and operate these detectors.
The VPR-15 is an aspirating smoke detector that provides early warning of fire by analyzing air drawn through
microbore tubes. A highly sensitive detection chamber is able to detect smoke at very low concentrations.
Figure 1-1: FireNET Vapor VPR-15
Embedded and PC software enable the configuration of a wide range of user defined parameters and reporting
capabilities and extended input and output functionality is achieved through the addition of plug-in modules.
VPR-15 detectors incorporate a rotary valve as a method of sampling individual microbore tubes and providing
addressability. This unique feature is described in Chapter 2.
The aspiration systems use an internal vacuum pump (high pressure system) and air flow is monitored through the
microbore tubes by a differential pressure sensor. As high pressure systems are capable of drawing air samples
through microbore tubes, they are often preferred when installations need to be unobtrusive.
VPR-15 detectors are primarily designed for applications where pin point addressability of fire source is required. For
the purpose of calculating sampling point spacing, the equivalent maximum area coverage for the VPR-15 is 16,150ft²
(1,500m²) with 15 sampling tubes.
The basic system includes RS232, RS485 and TCP/IP interfaces for connecting to the FireNET Vapor Explorer
software.
Hochiki America Corporation FireNET Vapor VPR-15 Product Guide
www.hochiki.com 3

FireNET Vapor VPR-15 Product Guide Hochiki America Corporation
4www.hochiki.com
This page is intentionally left blank.

2 Principle of Operation
Air samples are drawn from the protected area through a microbore pipe network towards the detector. Microbore
systems normally sample air from the end of the microbore tube via a microbore sampling point.
The pump draws air from the microbore tubes into the detector inlets where the samples are combined, filtered, and
directed to the laser detection chamber. VPR-15 detectors have an Overall position which draws air equally from all
sectors.
The detection chamber consists of a laser beam directed across an optical chamber, through which the subsample
flows. A photodetector built into the optical chamber measures the amount of light scattering from smoke particles in
the air. A clean air sample will cause very little scattering but as the smoke density of the sample increases, the
amount of light directed onto the photodetector will also increase. The light signal is processed such that it becomes
a direct measurement of the amount of light scatter caused by smoke. Information about laser chamber safety can
be found in Appendix C.
If the detected smoke is higher than the preset alarm thresholds in the detector (Alert, Action, Fire 1 and Fire 2), an
alarm will be reported. One or more Alarm relays, preset to activate at an alarm threshold will signal the host panel
after a preset time delay. Alarm states are also shown on the display panel, and an audible warning is given. An
optional alarm beacon can also be fitted.
VPR-15 detectors have an additional preset trigger level, Trace, which must be set below the Alert level. When
Trace is activated, the rotary valve will sequentially scan the sectors, in order to determine the source of the event.
While in Trace mode, the default levels for Alert, Action, Fire 1 and Fire 2 are the same as used for Overall
monitoring. If required, different levels for Alert, Action, Fire 1 and Fire 2 may be set for each sector in the Sector
Alarms menu.
2.1 Flow Monitoring
VPR-15 detectors perform flow monitoring of individual sectors and of the combined airflow.
While scanning, the control system monitors for blockages or disconnections of the microbore tubes for each sector
by detecting when the air flow is above or below acceptable flow thresholds. Flow thresholds are dependant on air
flows measured during normalization.
The normalization process enables the detector to learn typical air flow characteristics of the system and sets these
expected flow readings to 100% for each sector. A normalization sequence must be performed at installation. The
detector has default high and low limits and associated delay times, which may be changed in the Configure menu.
The design of the pipe network should be considered carefully prior to installing the system.
Hochiki America Corporation FireNET Vapor VPR-15 Product Guide
www.hochiki.com 5

FireNET Vapor VPR-15 Product Guide Hochiki America Corporation
2.2 Alarms and Trace Mode
The default settings of the four alarm states (Alert, Action, Fire1 and Fire2) and Trace are shown in the following
table.
Level Latched / Unlatched Default Threshold Delay Beacon Pulse (On:Off) Sounder
Trace Latched 0.009% obs/ft
(0.03% obs/m)
3 secs - Continuous
Alert Latched 0.012% obs/ft
(0.04% obs/m)
n/a 0.5 secs : 2 secs Continuous
Action Latched 0.018% obs/ft
(0.06% obs/m)
n/a 0.5 secs : 1 sec Continuous
Fire1 Latched 0.024% obs/ft
(0.08% obs/m)
n/a 0.5 secs : 0.5 secs Continuous
Fire2 Latched 0.305% obs/ft
(1.0% obs/m)
n/a Continuous Continuous
Table 2-1: Default Behavior of Alarm States and Trace Mode
Trace parameters apply when the rotary valve is in the Overall position and all sectors are being monitored. If
latched, the Trace indicator will remain illuminated after the initiating event has ceased. It does NOT mean that the
unit will continue indefinitely in Trace (scan) mode. The system will only continue in Trace mode if the detected
smoke level is above the Trace threshold after scanning. The Alert relay may be programmed to be activated by the
Trace threshold. Its action will then follow that of the Trace indicator.
If any alarms are unlatched, all resultant actions (relay contacts, display panel indicators, sounder and beacon) will
clear if and when the triggering event ceases. If it is latched, all the warning mechanisms are maintained until action
is taken by the user (refer to Section 2.3). These alarm states are global and will be set depending on the smoke
density being measured, regardless of which sector is being sampled. Once in Trace mode, each sector has an
alarm indicator associated with it. These individual sector alarms pulse progressively, depending on the degree of
alarm status, in the same way as the Beacon (refer to Table 2-1).
2.2.1 Trace Relay
If Trace Relay is enabled, an all-sector Fire1 alarm will be generated if the all-sector smoke level is above the All-
Sector diluted Sector Fire1 threshold.
The All-Sector diluted Fire1 threshold is calculated by dividing the lowest of all the active Sector Fire1 thresholds by
the number of active sectors.
lIf the resultant threshold is less sensitive than Trace Threshold, then Trace Threshold will be used as all
sector Fire1 Threshold. This enables faster reporting of a Fire1 alarm without having to wait for scanning to
complete.
lIf the resultant threshold is more sensitive than Trace Threshold, then the diluted Sector 1 Fire1 threshold is
used.
If Trace Relay is disabled, the detector uses sector-based alarm reporting.
6www.hochiki.com

Example:
lTrace Relay = Enabled
lTrace Threshold = 0.03 %obs/ft (0.100 %obs/m)
lEnd Sector = 6
lActive Sectors = 1, 2, 3, 4, 5, 6
lFire1 Thresholds for Active Sectors %obs/ft = 0.458, 0.305, 0.610, 1.068, 0.458, 0.763
(%obs/m = 1.5, 1.0, 2.0, 3.5, 1.5, 2.5)
lAll-Sector diluted Fire 1 Threshold = 1.0/6 = 0.305/6 = 0.051% obs/ft (0.167 %obs/m)
lAll-Sector diluted Fire 1 Threshold Fire1 Alarm will be reported when All-Sector smoke level reaches
0.051%obs/ft (0.167%obs/m)
Hochiki America Corporation FireNET Vapor VPR-15 Product Guide
www.hochiki.com 7

FireNET Vapor VPR-15 Product Guide Hochiki America Corporation
2.3 Detector Display Panel
VPR-15 detectors have a full display panel fitted to the main system. The display panel is used for annunciating the
detector status and smoke levels, and can also be used to configure the detector.
The display consists of a range of configuration and control buttons (Item 1 in Figure 2-1) and LEDs to indicate
Alarms, Faults, Power, Reset and other operational status (Items 4 to 6 in Figure 2-1). When configuring the detector
via the display panel, some of these configuration and control buttons will have a dual function to allow the user to
enter parameter values, scroll through configuration items, or enter an Access Code. Alternate functions are
indicated by LEDs located above the buttons (Item 3 in Figure 2-1) and are activated when the associated button can
be used for the alternative function.
More information about button functionality, Access Codes and how to setup the detector with the Main Menu can
be found in Chapter 5. A flowchart illustrating how to navigate through the display panel can be found in Appendix A.
1. Control and Configuration Buttons
2. Status Display
3. Alternate Button Function Indicators
4. Sector, Alarm and Fault Indicators
5. Display LEDs
6. Alert, Action, Fire1 and Fire2 Indicators
7. Logarithmic smoke density bargraph
Figure 2-1: VPR-15 Display Panel
8www.hochiki.com

The following describes the display panel for the VPR-15 detector.
1. Control and Configuration Buttons
All local user-interface options are done using these buttons.
A. Not used for VPR-15 detectors
B. Menu key
C. Test key
D. Scan / parameter scroll down key
E. Isolate / parameter scroll up key
F. Sounder silence / enter key
G. Reset / value scroll down key
H. Accept / value scroll up key
Figure 2-2: Control and configuration buttons
2. Status display
This will normally show the smoke density value. Also used for all Setup and Configure procedures.
3. Alternate button function indicators
When the unit is in a mode accessed by the Main Menu, the five right-most buttons can change to Scroll and Enter
functions.
4. Sector, Alarm and Fault Indicators
Individual Sample, Alarm, and Fault indicators for each sector. The All alarm is the Trace indicator.
Hochiki America Corporation FireNET Vapor VPR-15 Product Guide
www.hochiki.com 9

FireNET Vapor VPR-15 Product Guide Hochiki America Corporation
5. Display LEDs
LED Description
Power Indicates that the power supply is ON.
If the system processor is faulty, the General Fault, Power and Comms LEDs will be
activated simultaneously.
General Fault The detector has one or more faults, which will also be shown by other specific fault
indicators. The Fault relay contacts always follow the state of this indicator.
Isolated will also show as General Fault.
If the system processor is faulty, the General Fault, Power and Comms LEDs will be
activated simultaneously.
Processor
Reset
This indicator activates briefly during the powerup initialization sequence.
Mains Fault This indicator may activate due to an incorrect device configuration.
To prevent this from occurring, ensure that Pin 2 and Pin 5 on CN2 are linked.
Refer to page 13 for further information.
Flow Fault The flow rate for any sector is outside the bounds set by the High and Low flow
limits.
Battery Fault This indicator may activate due to an incorrect device configuration.
To prevent this from occurring, ensure that the STANDBY parameter in the
Configuration menu is set to 0. For more information, refer to Table 5-4.
Aspiration
Fault
The rotary valve has a fault.
Detector Fault The laser smoke detector has developed a fault.
Isolated This has been put into Isolated mode when the unit functions normally, but alarm
reporting via the relays is disabled.
Note: General Fault will also be shown.
Comms Fault An element of the internal RS485 communication link or remote display is faulty.
If the system processor is faulty, the General Fault, Power and Comms LEDs will be
activated simultaneously.
Hold Flashes when a manual scan is being performed.
Unlock The Panel is unlocked - meaning that an access code has been entered. It will
clear when normal operation is resumed.
Table 2-2: LED Descriptions
6. Alert, Action, Fire1, and Fire2 Indicators
These operate in tandem with corresponding relays on the I/O board to indicate progressive levels of smoke and are
programmable for obscuration level.
7. Logarithmic smoke density bar graph
Displays 0 - 6.09 %obs/ft (0 to 20 % obs/m) with a resolution of 0.0003% obs/ft (0.001 % obs/m) at the lower end.
10 www.hochiki.com

3 Installation
The detector shall be installed in accordance with the following installation instructions and in a manner acceptable
to the local Authority Having Jurisdiction (AHJ). The detector is also intended to be installed in accordance with local
installation codes such as the NFPA 72 National Fire Code and FIA Code of Practice.
Warning: Use of controls or adjustments of performance or procedures other than those specified herein may
result in hazardous radiation exposure.
The following steps should be carried out in order to correctly install the system:
1. Securely mount the back box to a suitable wall or support using the three points shown in the fixing diagrams
in Section 3.1. M6 or M8 screws are suitable.
2. Connect the cables for the power supply and any I/O modules. Ferrite cores should be fitted to the power
cable.
3. Fit the microbore tubes to the system. For details on how to install microbore tube networks, refer to the
FireNET Vapor Pipe Installation Manual or refer to www.hochiki.com.
3.1 Mounting the Detector
Careful consideration should be given to the mounting location of the detector to ensure that it is:
lPositioned at an accessible height to facilitate commissioning, routine testing and maintenance.
lPositioned in an area where the exhaust air pipe will remain clear of obstacles at all times.
lNot installed above a heat source such as a radiator or in direct air flow source such as Air Conditioners.
lSecure and free from operation by unauthorized personnel.
12.6in (320.00mm) 1.6in (40.00mm)
19.3in (490.00mm)
12.13in (308.00mm)
11.1in (282.00mm)
14in (355.00mm)
19.3in (490.00mm)
14in (355.00mm)
8in (203.00mm)
14in (355.00mm)
1.5in
(37.20mm)
1.5in (37.60mm)
4.1in (104.20mm)
7.9in (200.00mm)
2.36in
(60.00mm )
3.9in
(100.00mm)
1.3in (32.50mm)
2.8in (70.00mm)
10.0
PROGRAM
0.01 0.1
1.0
4.0
SCAN ISOLA TE
F1 . . . Fn
SOUNDER
SILENCE
ACCEPT
CODE REQ UIRED
20.0
000 . . . 999
STOP
TESTMENU RESET
?000
FIRE 1
ALER T
ACTION
FIRE 2
FAULTALARMSECTOR
1
3
2
4
5
6
8
10
9
7
ALL
12
15
13
14
11
Figure 3-1: Mounting Diagram and Dimensions
Hochiki America Corporation FireNET Vapor VPR-15 Product Guide
www.hochiki.com 11

FireNET Vapor VPR-15 Product Guide Hochiki America Corporation
3.2 Cable Connections
Note: All work carried out on the VPR-15 detector should be performed by fully qualified personnel. The molded
chamber is serviceable.
Caution: Before carrying out any work that requires the removal of any board ensure that the power supply is
disconnected.
A fused junction box may be used as an external disconnect device.
3.2.1 Main Board Connections
This section describes the power, input / output and communications connections for the VPR-15 detectors and how
to access the interfaces for the connections. A summary of these interfaces is shown in the following table.
Category Name Description
Power 24 VDC Input 24 VDC power input from external power supply.
Refer to page 13 for further information.
Auxiliary 24 VDC Output 24 VDC power output rated to 1A for powering an external
sounder, addressable I/O devices etc.
Input / Output Fault Relay Output Activates when a Fault is detected.
Alarm Relay Outputs Alarm relays for each Alarm level (Alert, Action, Fire 1, Fire 2)
that are activated when the corresponding alarm level is
detected.
Remote Reset / Isolate
Input
Dual action input for remote reset and isolate.
Remote Reset: Activated by applying 24 VDC.
Remote Isolate: Activated by applying 24 VDC for 8 seconds
or more. Once 24 VDC is removed, the system reverts to
normal operation.
The function of this input is programmed in the Setup Menu.
More information can be found in Section 5.3.8.
Communications RS 485 Enables the following connections:
lConnection to a remote Display Panel
or;
lConnecting up to 30 detectors on an RS 485 multi-drop
network
lConnection to a PC with FireNET Vapor Explorer via a
RS232-RS485 converter.
Ethernet Enables TCP/IP connections to a PC with FireNET Vapor
Explorer via LAN/WAN.
RS 232 Enables a direct serial connection to a PC with FireNET
Vapor Explorer for configuration and monitoring.
Table 3-1: Standard Connections
More information on connecting and using the communications interfaces can be found in the FireNET Vapor
Communications Guide.
12 www.hochiki.com

Detector Access
To gain access to the interior of the detector, first disconnect the power supply then remove the front cover. It is
secured by two screws underneath and hinged at the top, allowing complete removal. If the beacon option is fitted, a
cable-loom is attached; this may be unplugged at either end, but it may be easier to detach/reattach the plug
connecting to the main unit.
To access the Fault Relay and other I/O Module connections, the front panel must be dropped down by loosening
the two knurled screw fixings at either side.
Knock-out cable entry points are provided at the top and left-hand side of the metal back box. Where the field wiring
to the unit is not via conduit tubing, strain-relief type cable glands of a suitable size to fit the 25 mm diameter holes
must be fitted to all used cable entry holes. These cable glands shall be fitted so as to provide strain relief and
ensure that the protective earth connection (where used) is the last conductor to take any strain.
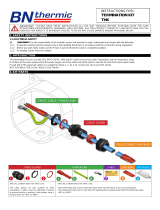
External Power Supply Connection
VPR-15 detectors are powered by an external 24 VDC power supply.
The power supply cable cores should be fitted individually with ferrite cores, close to the cable gland inside the
equipment case. To fit the cables with the ferrite cores, insert the 24V and 0V conductors through the ferrite cores
and wrap around once to provide maximum effectiveness.
B
A
C
Legend
A Power Supply Cables
B Two Turns
C Ferrite Core
Figure 3-2: Ferrite Core
Connect the 24 VDC power supply to the 5-way connector (CN2) on the I/O board under the control panel as shown
in Figure 3-3.
1. External Power Supply
2. No Connection
3. Link
Figure 3-3: 24 VDC connection for VPR-15 Detectors
The MAINS/BAT terminal must be linked to 0V. Failure to do so may result in a Mains Fault. The VBAT and BATT
TEST terminals should be left unconnected.
Ensure that in the Configuration menu, the STANDBY parameter is set to 0. For more information about
Configuration mode, refer to Section 5.3.4.
Grounding and Fuse Protection
An M5 chassis earthing stud is provided for the grounding of the unit using a suitable gauge of wire or earth braiding
(0.03 in² (0.75 mm²) minimum) to a primary earth point (i.e. copper water pipe or an earth-stake etc.). This chassis
earth should be connected on all DC powered installations.
Hochiki America Corporation FireNET Vapor VPR-15 Product Guide
www.hochiki.com 13

FireNET Vapor VPR-15 Product Guide Hochiki America Corporation
1. Knock-out cable entry holes
2. M5 Chassis grounding stud
3. RS232 connector
4. Ethernet connector
5. Fuse (1 A)
6. Main I/O board
7. Beacon connector
8. Display & valve connector
9. Programming connector
10. Optional I/O modules
11. Drop-down display panel
Figure 3-4: Input and Output Interfaces
Note: CN13 and CN14 are fitted (below CN6) but are not used.
14 www.hochiki.com
/