
Omix-Ada, Inc. - Installation
Instructions
1997- 2004 Jeep Wrangler TJ
3’’ Body Lift Kit
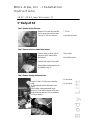
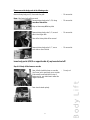
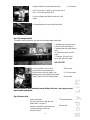
Step 1: Remove the fuel filler neck
Remove all 4 screws from fuel filler
neck to get access to the fuel hose
( see step 12 “fuel hose extension”)
- T-25 Torx
- screws will be reused
Step 2: Remove bolts from 4-wheel drive bracket
Remove carpet on drivers side to
get access to the 4-wheel drive
bracket bolts
Remove bolts using 10 mm socket
4-wheel drive bracket extension will
be installed in step 13
- 10mm socket
- Bolts will be re-used
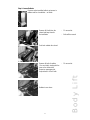
Step 3: Remove steering shaft mount bolts
Loosen 13 mm or ½ bolt on top of steering
shaft
ß Disassemble steering shaft mount from
frame
(Move rubber engine guard aside to get
access to 15 mm bolt that mounts in the side. )
Remove this bolt and save it for re-installation
of the new bracket.
- 13 mm socket
- 15 mm socket
Body Lift

2
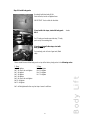
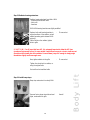
Step 4: Loosen Radiator
Remove coolant overflow bottle to get access to
radiator and fan shroud bolts – set aside.
Remove all 4 bolts from fan
shroud and keep them for
Re-installation.
- 11 mm socket
- Bolts will be re-used
Push back radiator fan shroud
Remove all bolts of radiator
(3 on each side), starting with the
ones on the drivers side.
Repeat on passenger side.
Keep at least 4 of the 6 bolts
- 10 mm socket
Radiator is now loose
Body Lift

3
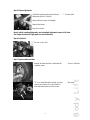
Step 5: Remove light bezels
Light bezels must be removed to install new
bump stops with the 3’’ body lift
Remove all three screws per headlight
Remove light bezels
Keep all six screws
- T-15 screw driver
Note: If vehicle is getting light guards, turn in headlight adjustment screws six full turns.
See Chapter Accessories/ Light guards for more information
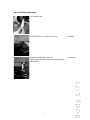
Step 6: Lift vehicle
Put Jeep on rack, lift it
Step 7: Remove wheels and tires
Remove all wheels and tires to make body lift
installation easier
- 19 mm or 3/4socket
TIP: If you install aftermarket wheels, you must
remove rotor retainers (2 on each wheel) to
allow aftermarket wheel to sit flat on rotor.
- Wire snips
Body Lift

4
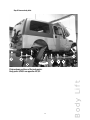
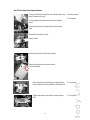
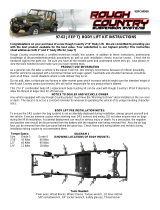
Step 8: Remove body bolts
Picture shows positions of the body pucks.
Body pucks 9/10/11 are opposite of 4/3/2.
7
5
6
4
2
1
3
8
9, 10,11
Body Lift

5
Please remove the body pucks in the following order:
Remove factory body puck (1) from under the grille
None of the factory bolts will be re-used
- 16 mm socket
Remove factory body pucks 2 /3 /4 along
one side of the vehicle.
Keep or throw away all factory bolts
- 16 mm socket
Remove factory body pucks 5 / 8, on each
side in front of gas tank
None of the factory bolts will be re-used
- 16 mm socket
Remove factory body pucks 6 / 7, one on
each side on rear of vehicle
- 16 mm socket
Leave body pucks 9/10/11 on opposite side of Jeep loose but not off!
Step 9: Lift body off the frame on one side
Now, all bolts should be loose on one side.
Use Screw Jack to push body up on one side
(high enough to put body block on top of
factory puck in, you might have to adjust the
height a few times)
- Screw Jack
Rear view of raised up body
Body Lift

6
Step 10: Install body pucks
Use body bolts from body lift kit.
Start the bolts, but do not tighten them.
IMPORTANT: Use Locktite for the bolts.
If you install side steps, start with body puck
No 4!
Put 1’’ body puck under rear side step, 2’’ body
puck on top of mounting hole
- hands
If you do not install side steps, start with
body puck No 5!
Put one body puck in front of gas tank (lifted
side)
Please install the rest of the body pucks on top of the factory body pucks in the following order:
1. Step:
No 4 à tighten
No 5 à start it, do not tighten
No 3 à tighten
No 2 à tighten
No 9 à tighten
No 8 à start it, do not tighten
No 10 à tighten
No 11 à tighten
2. Step:
No 5 à tighten
No 8 à tighten
No 6 à tighten
No 7 à tighten
No 1 will be tightened in the very last step. Leave it until then.
Body Lift

7
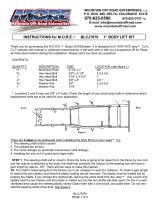
Step 11: Install fuel extension pipe
Fuel extension pipe
Cut fuel filler hose 1 ½’’ below factory clamp.
- razorblade
Insert fuel extension pipe in the hose.
Tighten hose and extension down with hose clamps from
the body lift kit.
- 8 mm socket
Body Lift

8
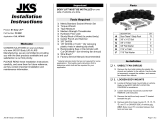
Step 12: Four wheel drive linkage extension
The Four-wheel-drive linkage has to be extended due to the
body lift impact on the part.
You’ve already loosened the bolts holding the linkage in
step 2
Remove linkage from its original position (below drivers
seat)
- 3/8 electric impact
- 10 mm socket
Remove the bolts of the bracket
Save the bolts
pivot bracket from the 4-wheel-drive linkage
Attach pivot bracket onto relocation bracket
For correct fitment.
Attach drop bracket to 4wd-linkage, using the factory
bolts and washers that are included in the body lift kit.
- 10 mm socket
Tighten down factory bolts with lock nuts from body
lift kit
- 11 mm socket
Body Lift

9
Install pivot bracket on drop bracket as shown.
Use 11 mm screws / 4 washers ( one on each side of
bolt) / 2 lock nuts from body lift kit
Do not over-tighten pivot bracket, make sure it still
rotates
- 11 mm socket
Put 4wd-linkage back in place using factory bolts.
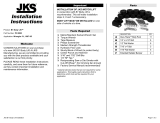
Step 13: Steering bracket lift
To install the steering bracket kit, you need to move rubber engine cover aside
1. steering raise cube, goes on top
of frame / under steering shaft
2. steering raise plate, goes aside of
cube
3 & 4 bolt and washer, use with 1
(cube)
5. 2 washers, lock nut, 1 bolt 1
factory bolt, use with 2 (plate)
USE LOCKTITE!
You’ve removed the bolts in step 3.
Combine items as described above.
Place the cube on top first, tighten, (see
detailed picture), then tighten the plate aside.
Tighten 13mm bolt on top of steering shaft.
- 13mm socket
- ½” or 15 mm socket
- 16 mm socket
TIP: After installation, paint the steering bracket kit black with semi – gloss spray paint and
replace rubber engine guard.
Step 14: Replace bolts
Lower vehicle down.
Put factory bolts back in fuel filler neck,
tighten down. ( see step 1)
- T-25 socket extension
Replace 4-wheel drive bracket bolts and
carpet under drivers set that you
removed in step 2.
- 10mm socket
Body Lift

10
Step 15: Radiator lowering extensions
Radiator lowering brackets from Body Lift Kit
- 4 lowering brackets with bolts
- 4 lock nuts
- 4 washers
OMIX-ADA lowering brackets are slightly modified.
Replace bolts and lowering brackets in
original positions of the radiator, using 4
radiator mounting points instead of the
original 6.
Start all bolts on the radiator, tighten
bolts to grille
- 10 mm socket
! C A U T I O N ! For all Jeeps that have A/C, it is extremely important to allow the A/C lines
(condenser line) enough space. On some models it might be necessary to cut out a small amount
of metal out of the lower part of the radiator. On most newer Jeeps it is enough to simply angle
the radiator slightly to allow enough room.
Now, tighten radiator to the grille.
Tighten fan shrout back to radiator, re-
using the original bolts.
Re-install coolant overflow bottle
- 11 mm socket
Step 16: Install bump-stops
Bump stop extensions from body lift kit
Remove factory bump stops below head
lights, underneath the grille
Hands!
Body Lift

11
Replace factory bump stops with bumps
stops from Body lift kit with the rounded side
pointing downwards.
Tighten bolts ( you might need to lift the
vehicle to get access to the bolts).
Repeat on other side of the vehicle.
- swivel 13mm socket
As the very last step, tighten the extended body puck No 1, underneath the grille.
Body Li
ft
-
 1
1
-
 2
2
-
 3
3
-
 4
4
-
 5
5
-
 6
6
-
 7
7
-
 8
8
-
 9
9
-
 10
10
-
 11
11


Ask a question and I''ll find the answer in the document
Finding information in a document is now easier with AI
Related papers


Other documents
-
 Rough Country RC610 Installation guide
-
 Rough Country RC608 Installation guide
-
M.O.R.E. BLCJ8086 MORE Installation guide
-
 Rough Country 3in Body Mount Lift Kit Installation guide
-
 Mountain Off-Road BLCJ7679S MORE Installation guide
-
-
 JKS Manufacturing 9901 Installation guide
-
 JKS Manufacturing 9903 Installation guide
-
 Fishbone Offroad FB21120 Installation guide
-
Cub Cadet RZT-S Zero Shop Manual


