Page is loading ...

Page 1 of 2
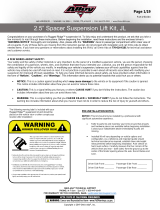
11217.02 Spare Tire Light/Licence Place Relocation
Contents:
1. Universal Bracket
2. Light Bracket
3. License Plate Bracket
4. Clevis Pin
5. Safety Catch
6. M12 Flange Bolt
7. M12 Washer (not shown)
8. M12 Nylon Lock Nut (not shown)
9. M6 Flange Bolt
10. M6 Washer (not shown)
11. M6 Nylon Lock Nut (not shown)
QTY
(1)
(1)
(1)
(1)
(1)
(1)
(1)
(1)
(2)
(2)
(2)
1
2
3
4
5
6
9
1. Remove spare tire from vehicle and install the Universal
Bracket.
2. Place the spare tire back on the vehicle and
tighten lugnuts.
NOTICE Please read and understand all instructions before proceeding

Page 2 of 2
11217.02 Spare Tire Light/Licence Place Relocation
3. Install Light Bracket into the Universal Plate and insert
the Clevis Pin. Be sure Safety Catch is looped over the pin
for retention.
Note: The light bracket can be rotated 180° depending on
your needs.
4. Install your choice of light. If license plate relocation is
desired, place License Plate Bracket between light and
the Light Bracket. Make sure to tighten securely.
Note: If not using a light, use supplied M12 bolt, washer,
and nylon lock nut to secure the License Plate Bracket to the
assembly.
5. If using the Licence Plate Bracket, use the supplied
M6 bolt, washer, and nylon lock nut to attach the license
plate to the License Plate Bracket
For assistance, please contact Omix-ADA Technical Support Department
(770) 614-6101
© Copyright 2012, Omix-Ada
REV: 6/8/12 CVB
/