Grandstream GAC2500 User guide

Category
IP phones
Type
User guide
Grandstream Networks, Inc.
GAC2500
User Guide
GAC2500 - User Guide
WELCOME
Thank you for purchasing Grandstream GAC2500 Audio Conference Phone for Android . This User Guide describes the basic
concept and tasks necessary to use and configure your GAC2500. This document covers the topics of conference environment
setups, start conference and the relevant operations like conference reservation. To learn the advanced features and
configurations, please visit http://www.grandstream.com to download the latest “GAC2500 Administration Guide”.
GAC2500 is a next generation enterprise-grade 6-line Android IP conference phone with a 4.3″ capacitive touch screen that
that runs the Android Operating System and therefore offers full access to the hundreds of thousands of Android apps in the
Google Play Store, including business productivity apps such as Skype™, Skype for Business™, and Google Hangouts™. The
phone features Gigabit ports, 7-way conference, 3x microphones, 1 Micro USB port, integrated WiFi and Bluetooth for
network flexibility. The GAC2500 delivers superior HD audio quality, rich and leading-edge telephony features, automated
provisioning for easy deployment, advanced security protection for privacy, and broad interoperability with most 3 party SIP
devices and leading SIP/NGN/IMS platforms. GAC2500 is a perfect choice for enterprise users looking for a high performance,
feature rich conference phone with superb audio quality at competitive price.
PRODUCT OVERVIEW
Feature Highlights
The following tables contain the major features of the GAC2500:
GAC2500 Features in a Glance
GAC2500 Technical Specifications
The following table resumes all the technical specifications including the protocols / standards supported, voice codecs,
telephony features, languages and upgrade/provisioning settings for the GAC2500.
TM
rd
GAC2500
Runs Android™ 4.4 and offers full access to all Android™ conference apps in the Google
Play Store (e.g., Skype™, Skype for Business™, Google Hangouts™, etc.)
World-class high-fidelity sound quality with audio bandwidth of up to 18Khz
4.3" capacitive touch screen LCD with support for flexible layout/content customization
3x microphones (12 ft. pickup range), 1x speaker (15 ft. coverage range)
Auto-sensing Gigabit Ethernet port, Wi-Fi, PoE+, Bluetooth, Micro-USB with 3.5mm audio
interface
Supports standalone IP mode or USB slave mode
Supports daisy chain (up to 2 units via RJ48 CAT5) mode in large conference room for
better audio quality
NAT-T enables the phone being the Plug and Play device
Automated provisioning using TR-069 or AES encrypted XML configuration file,
TLS/SRTP/HTTPS for advanced security and privacy protection
Protocols/Standards
SIP RFC3261, TCP/IP/UDP, RTP/RTCP, HTTP/HTTPS, ARP, ICMP, DNS (A record, SRV,
NAPTR), DHCP, PPPoE, SSH, TFTP, NTP, STUN, SIMPLE, LLDP, LDAP, TR-069, 802.1x,
TLSv1.1, TLSv1.2, SRTP, IPv6, OpenVPN (pending)
Voice Codec
Support for G.711µ/a, G.722, G.726, iLBC, Opus, G.722.1 and G.722.1c (pending), in-band
and out-of-band DTMF (In audio, RFC2833, SIP INFO), G.729A/B, VAD, CNG, AEC, PLC,
AJB, AGC
GAC2500 Technical Specifications
GETTING STARTED
This chapter provides basic installation instructions including the list of the packaging contents and also information for
obtaining the best performance with the GAC2500.
Platform Bridging Bridge SIP calls with any Android™ VoIP apps such as Skype™, Skype for Business (Lync),
Google Hangouts™ and more
Telephony Features
Hold, transfer, forward (unconditional/no-answer/busy/conditional), call park/pickup, 7-way
audio conference, auto answer, downloadable XML phone book (up to 2000 entries), LDAP,
call waiting, call history (up to 2000 entries), flexible dial plan, personalized music ringtones,
server redundancy & fail-over.
Sample Applications
Skype™, Google Hangouts™, Skype for Business (Lync), Web browser, Facebook™,
Twitter™, YouTube, Google calendar, mobile phone data import/export via Bluetooth, etc.
API/SDK available for advanced custom application development
Application Deployment Allows Android 4.4 compliant applications to be deployed in the device with provisioning
control
QoS Layer 2 QoS (802.1Q, 802.1p) and Layer 3 (ToS, DiffServ, MPLS) QoS
Security
User and administrator level passwords, MD5 and MD5-sess based authentication, 256-bit AES
encrypted configuration file, TLSv1.1, TLSv1.2, 128/256-bit SRTP/TLS, HTTPS, 802.1x
media access control
Multi-Language English, German, Italian, French, Spanish, Portuguese, Russian, Turkish, Polish, Chinese,
Korean, Japanese, and more
Upgrade/
Provisioning
Firmware upgrade via TFTP / HTTP / HTTPS or local HTTP upload, mass provisioning using
TR-069 or AES encrypted XML configuration file
Network Interface 1x auto-sensing Gigabit Ethernet port, integrated 2.4GHZ auto-band Wi-Fi (802.11a/b/g/n) and
4.0 Bluetooth.
HD Audio 3x microphones (12 ft. pickup range), 1x speaker (220-18,000 Hz, 15 ft. coverage range up to
86dB)
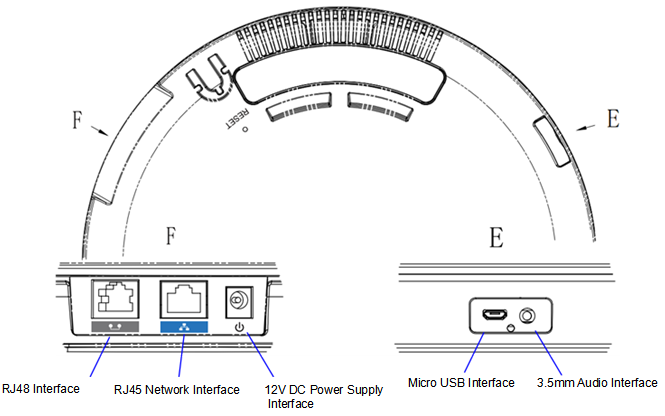
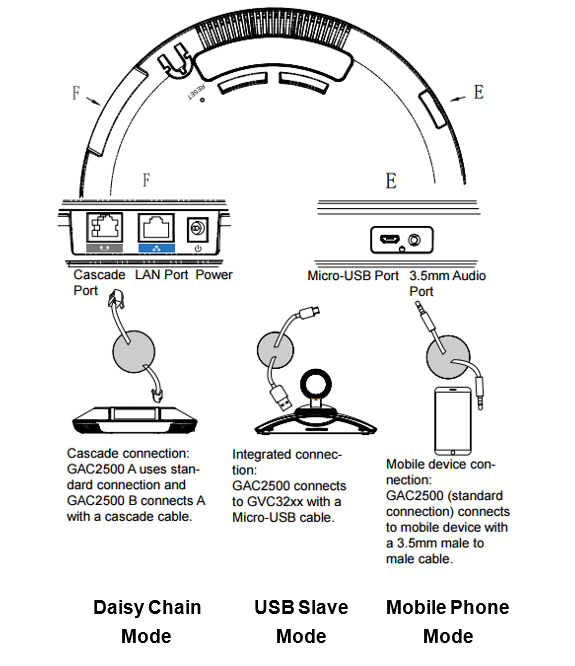
Auxiliary Ports 3.5mm audio interface, Micro-USB interface, RJ48 interface, reset pin
Graphic Display 4.3″ (800*480) capacitive touch screen LCD
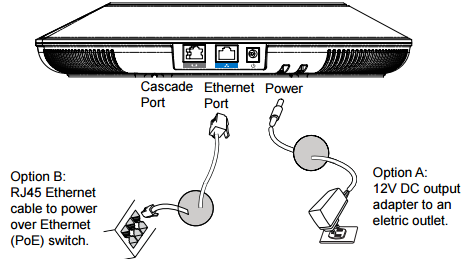
Power & Green Energy Efficiency Universal power adapter included:
Input: 100-240VAC 50-60Hz; Output: 12VDC, 2A (24W)
Temperature and Humidity
Operating: 32 – 104oF / 0 – 40oC
Storage: 14 – 140oF / -10 – 60oC
Humidity: 10% to 90% Non-condensing
Compliance
FCC: Part 15 (CFR 47) Class B; UL 60950 (power adapter)
CE EN55022 Class BEN55024EN61000-3-2
EN61000-3-3EN60950-1EN62479RoHS
RCMAS/ACIF S004AS/NZS CISPR22/24AS/NZS 60950AS/NZS 4268
Equipment Packaging
Equipment Packaging
Package Content
Product Appearance
GAC2500 Host Interface
GAC2500
1 x GAC2500 Main Case.
1 x 12V Power Adapter.
1 x Ethernet Cable
1 x Micro-USB Cable
1 x RJ48 CAT5
1 x Quick Installation Guide
1 x GPL License
Important
Check the package before installation. If you find anything missing, contact your system administrator.
Name Explanation
GAC2500 Interfaces Explanations
Powering the GAC2500
The GAC2500 can be powered either using POE or PSU, please refer to the following picture to have more visibility how to
connect your audio conferencing system.
Powering the GAC2500
Connection Configuration
GAC2500 provides the following connection configurations:
RJ48 Interface Daisy chain (up to 2 units via RJ48 CAT5) mode in large conference room for better audio
quality.
RJ45 Network Interface Connect to LAN port.
12V DC Power Supply Interface Connect to Power Adaptor.
Micro USB Interface
USB OTG devices can be connected to GAC2500 via the USB cable. For example, connect a
USB flash drive to read data, or PC USB Interface or GVC32XX SPKR Interface can be
connected to the GAC2500 USB Interface via USB cable for audio pickup and play
3.5mm Audio Interface Connect to 3.5mm devices like mobile phone or PC for mobile audio pickup and play
Reset Pin
When the GAC2500 is powered up, use a small pin to press the button one time to reboot.
When powering up GAC2500, long press the button for 4 to 9 seconds to detect whether
firmware file exists in USB OTG device to update system.
When powering up GAC2500, long press the button for more than 10 seconds to quick restore
factory settings.
Connecting the GAC2500
IP Mode
The GAC2500 is used as an independent phone in IP mode. Please follow the steps below to connect.
1. Connect the LAN port of the device to the external network port (the port in the office or at home) via Ethernet cable;
2. Plug in the power adapter into the power supply interface then power up the GAC2500.
USB Slave Mode
GAC2500 can be used as auxiliary device for GVC3200 or PC for audio acquisition and play. The conference feature will be
disabled in USB slave mode. Follow the steps below to connect route.
1. Connect one end of the USB cable to the Micro USB port of the device and the other end to the USB port of GVC3200/PC;
2. Plug in the power adapter into the power supply interface then power up the GAC2500.
The GAC2500 screen is as shown below in USB slave mode.
Note
It is recommended to use IP mode in room 3.6m* 7.2m or smaller.
GAC2500 Slave Mode Screen
Call
Tape on the Call icon to see the GVC3200 call screen, users can make Audio/Video calls, share contents, Hold/UnHold, Record,
Enable/Disable DND, and add more users to the conference.
Contacts
Tape on contact and a list of the GVC3200 will show up, users can search, make calls and sync with GVC3200 contacts if a new
entry is added from the GVC3200.
Schedule
Tape on Schedule to view all the scheduled meeting from GVC3200.
PTZ
Tape on PTZ to access the GVC3200 PTZ settings, users could control PTZ movement in camera mode, set presets, zoom
In/Out and adjust the focus.
If the GAC2500 is not connected to the SPKR USB interface it will prompt the following message in order to switch the port on
the GVC3200.
Connected to Wrong USB Port
Note
Cascade Mode
Connect two GAC2500 (s) via RJ48 CAT5 for larger space. Please follow the steps below to connect.
1. Connect the LAN port of the device to the external network port (the port in the office or at home) via Ethernet cable;
2. Connect the RJ48 ports of two devices with RJ48 CAT5;
3. Plug in two power adapters into the power supply interfaces then power up two devices;
4. The screen is as shown below. Tap on “Yes” on the first device and set it to be the master while the other the slave.
Figure 7: GAC2500 Cascade Mode Screen
Mobile Phone Mode
GAC2500 could be connected to mobile phone for expanded use. Please follow the steps to connect.
1. Connect the LAN port of the device to the external network port (the port in the office or at home) via Ethernet cable;
2. Plug in the power adapter into the power supply interface then power up the GAC2500;
3. Connect one end of the via 3.5mm audio aux cable to 3.5mm headset interface on the mobile phone first, then connect
the other end to 3.5mm audio interface on GAC2500, once connected, it will access 3.5mm AUX call screen;
If GAC2500 is connecting to PC via Micro-USB but there is no audio output from GAC2500, it is because the PC uses default
audio output in most cases. Please configure GAC2500 as default audio output.
Note
It is recommended to use cascade mode in room 7.2m*12.2m or smaller.
Please keep a distance of 5m between two devices.
Please make sure the master device is connected to the network or it may not work properly.
The slave device will synchronize with the master device and their dial screens will be shown synchronously.
Note
If the audio quality is not good, it may be the line sequence issue, you can hold the screen at the top of the status bar, drag and
drop down to open the status bar, tap on line sequence notifications and select the line sequence the same as the one of 3.5mm
headset interface on the mobile phone.
4. When the mobile phone is answering an incoming call or dialing out, GAC2500 will collect and play the sound.
GAC2500 Select Line Sequence Screen
GETTING TO KNOW GAC2500
Desktop
When the GAC2500 is on idle screen, hold the screen at the bottom of the screen, drag upward to bring up 5 soft keys; hold
the screen at the top of the status bar, drag and drop down to open the status bar,
Note
The GAC2500 package contains no 3.5mm audio aux cable, you can buy one at electronic gadgets store.
The line sequence of GAC2500 must be the same as the one of your mobile phone, or the microphone may work
improperly.
It is recommended to connect mobile phone first, then GAC2500.
You cannot dial or call a number via GAC2500 keypad directly.
Once mobile phone mode is enabled, the 3.5mm audio aux line is regarded as one call line.
Once a conference is established, the 3.5mm audio aux line is regarded as one party of the conference.
Please do not unplug the 3.5mm audio aux cable or it may cause call exception.
The audio quality may vary according to different types of 3.5mm audio aux cable and mobile phones.
Once the 3.5mm male to male cable is inserted, some types of mobile phones may be detected by GAC2500 only after the
call is established.
GAC2500 Multi-screens
Home Screen. GAC2500 Home screen is a dial screen by default. You can dial up or start a conference on this screen. To
change the home screen, please long press the blank area and select “Edit desktop”. Press the button in the
preview desktop to set it as home screen.
Widget. GAC2500 supports tools and Apps like Clock, MPK, and etc.
Status Bar. The GAC2500 status bar is located on the top of the screen to indicate the current status of the device. Please
refer to chapter Status Icons for more details.
Soft Keys. 5 softkeys Including Volume+, Volume-, Back, Home, and Process Manager. Drag and slide upward at the
bottom of the screen o bring out soft keys, the keys will be hidden automatically if no operation timeout.
Status Icons
Touch the status bar of GAC2500 and slowly drag it down to display the full status list. Users could view status icons that
indicate the current status of the device. The following table lists the main status icons used on GAC2500.
Icon Descriptions Icon Descriptions Icon Descriptions
Ethernet is
connected
Trying to connect
to Ethernet
Ethernet is
disconnected
Missed call One line is in
active Unread voicemail
Calls from
blacklist
Call forward is set
up
Auto answer is set
up
DND mode is
enabled Wi-Fi is connected Wi-Fi is enabled
but not connected
Bluetooth is
connected
Sending files via
Bluetooth
Bluetooth has
been plugged in
Using Bluetooth
headset for calls
Volume is turned
to silent Mute is enabled.
Downloading Download failed Updating
Application
3.5mm headset is
inserted
Switch 3.5mm
headset line
sequence
Powering the
device with PoE
PPPoE is
connected
PPPoE connection
failed Missed conference
GAC2500 Status Icons Descriptions
Using the Onscreen Keyboard
Keyboard
The default keyboard on the GAC2500 is English keyboard. The GAC2500 English keyboard supports multiple languages input
methods. Users could tap on to switch among different languages configured under LCD Menu
Settings 🡪 Language & Keyboard 🡪 Keyboard & Input methods. See figure below.
GAC2500 Soft Keyboard – English Input Method
Tap on to switch Caps Lock.
GAC2500 English Keyboard – Uppercase
Numbers and Symbols
To input numbers and symbols, tap on the default keyboard to switch to numbers/symbols. Tap on for more
numbers/symbols.
Using the LED Indicator
The GAC2500 LED indicator is located on the top part of the device. It can be used to notify the users with current status of
the device. The priority of the indicator from high to low is shown below.
Warnings New message Full messages
storage
VPN is connected VPN connection
failed More notifications
The USB mouse is
connected
The USB
keyboard is
connected
VPN is connected
RJ48 CAT5 is
connected
Set GAC2500 as
master device
Set GAC2500 as
slave device
Hotspot is enabled USB device is
inserted
Full USB device
storage
GAC2500 LED Indicator Descriptions
Note: The colors and statuses of LED indicators are by default. You can go to Web page🡪Maintenance🡪Device Manager to
custom indicators.
ASSISTIVE TOUCH
Use the Touchscreen
To fully manipulate the GAC2500 capacitive touch screen, use your fingers to operate the following on the GAC2500 icons,
buttons, menu items, onscreen keyboard and etc.
GAC2500 Finger Gestures on the Touch Screen
Tap
Color LED Indicator Status Descriptions
Blue
Fast Flashing Incoming call (including calls when conferencing and when phone is busy).
Solid Calling, Talking, Conferencing, Screensaver status.
Slow Flashing Call on hold.
Orange
Slow Flashing Unhandled events. Including missed call (s), new voicemail (s), new SIP
message (s).
Solid High memory usage, full message box, full contacts storage, network
disconnection.
Rapid Flashing Upgrading.
None OFF Normal.
Slightly touch the screen with fingertip to initiate menu, options or applications. For example, to select items on the screen
(e.g., setting options, apps and etc.); to press onscreen buttons (e.g., “End” or “Options” soft key during the call); to type letters
and symbols using the onscreen keyboard.
Long Press
Touch the screen with fingertip and press for about 2 seconds without lifting your finger from the screen till an action occurs.
For example, long press on a picture to bring up selection option.
Flick and Slide
Touch the screen with fingertip and slide over the screen. For example, user could slide up to scroll up the page, slide down to
open dropdown menu, slide left or slide right to delete an item from the list. If your finger stays on the screen for too long,
the item may be selected and sliding won’t occur.
Press and Drag
Touch and press the item, then move it by dragging it up, down, left or right, without lifting your finger from the screen.
Zoom in/Zoom Out
Place two fingers on the screen, then pinch them together (zoom out) or spread them apart (zoom in).
Double Tap
Quickly touch the screen twice with fingertip to switch between default display and zoomed-in display. This is usually used
when viewing photos or web pages.
Shortcut Keys
GAC2500 supports shortcuts for some special operation like Screenshots, Factory Reset, Upgrade and Security.
Screenshot. Long press the Process Manager icon on GAC2500 screen, the screenshot file will be saved
automatically in the screenshot folder under SD card. Go to File Manager🡪Storage🡪Pictures🡪Screenshots to view files.
Factory Reset. When powering up GAC2500, long press the reset button on the back of the device for more than 10
seconds to restore to factory settings.
Upgrade. When powering up GAC2500, long press the button for 4 to 9 seconds to update system.
Managing Status Bar
The GAC2500 status bar is located on the top of the screen. Touch the bar and slowly drag it down to display the full status
list. Once the status bar is opened, users could view Notifications.
The Notifications in the Status Bar is as shown in figure below.
GAC2500 Status Bar – Notifications
Click on button on the upper right corner to clear all notification messages.
Slide a notification message to left or right to delete it.
Click a notification message to view the details.
Tap on the corresponding icon on the top of the screen to quick turn on/off the applications.
Long press the corresponding icon on the top of the screen to quick access the applications.
Drag the seek bar behind the icon to adjust LCD brightness.
Desktop Menu
When the GAC2500 is on idle screen, long press the blank area, then you can tap on “Edit desktop” or “Set wallpaper”. See
figure below.
GAC2500 Idle Screen Menu
Edit Wallpaper: Edit the idle screen wallpaper.
Edit Desktop: Add, delete, edit desktop or add widgets on the desktop.
Edit Wallpaper
You can set wallpapers, live wallpapers or choose photo from gallery. See figure below.
GAC2500 Choose Wallpaper
1. Long press the blank area on home screen then tap on “Set Wallpaper”;
2. Slide wallpapers to left or right to view a list of sample wallpapers embedded in the GAC2500, tap on wallpaper to
preview, tap on “Set Wallpaper” to confirm the selection. You can also select photo from gallery or file manager, or set live
wallpapers.
Note: The user has the ability to block image gallery options using GUI Customization Tool 3.9.0. The GUI Customization Tool
can be found under the link: http://www.grandstream.com/support/tools .
Edit Desktop
The desktop screen is as shown below.
GAC2500 Edit Desktop
Add Desktop: Press finger slightly in free space of the screen and fast slide to the last screen and click on the middle
screen to add a new desktop. Users could add up to 15 desktops.
Delete Desktop: Click on the upper right corner of the blank desktop to delete it. The desktop with widgets and
shortcuts on it is undeletable.
Tap on the icon of a preview desktop to set it as home screen.
Adding an Item to Desktop
Users could add commonly used items (Weather Forecast, RSS News, etc.) to the desktop. Follow the steps below:
1. When the GAC2500 is running on idle screen, long press the blank area, then tap on “Edit Desktop”;
2. Slide left or right to view a list of options;
3. Press and drag the shortcut or widget you would like to add and drag it to the desktop you want to put on.
Managing Desktop Apps and Items
All the GAC2500 apps/items can be accessed /removed. Take Weather Forecast as an example in the following chapter.
Opening an app
Tap on Weather Forecast icon to access screen as shown on the following figure. Users could edit Weather Forecast after
accessing it.
GAC2500 Weather Forecast Screen
Moving an app
Touch and hold the Weather Forecast icon, when the icon begins to float, drag it to any desktop with free space.
Notes
Please ensure that there is enough space on the desktop when adding widget.
Users may need to select the specific items before adding them to the desktop. i.e., browser, bookmark, star-labeled
contact, photos, etc.
GAC2500 Move Weather Forecast to Desktop
Removing an App
Touch and hold the Weather Forecast icon until the Recycle Bin icon displayed on the top as shown in figure 18, drag the
widget to the Recycle Bin, when the item gets close to the Recycle Bin, it will turn red. Now release your finger to delete.
GAC2500 Remove Weather Forecast from Desktop
Managing Applications
Tap on the Process Manager icon on screen to view the running applications on the GAC2500 as shown below.
Note
The system applications cannot be deleted.
GAC2500 Managing Applications
Slide up/down to view the applications, tap on one and slide left/right to turn it off, or tap on it to access the corresponding
interface. Tap on to turn off all running applications.
GAC2500 Home Screen
Mode. Set the call mode.
Account. Display all registered accounts. Tap to select account.
Input box. Tap on digits below to input phone number, or tap on the input box to bring out the soft keyboard. You will
see all the matching numbers on the left when you are inputting digits, tap on the number to add it to input box directly,
you can add up to 6 numbers.
Dial-up. Tap to dial out.
Conference. Display the conference line. Tap to access conference interface.
Contacts. Tap to access Contacts interface to add more contacts to the input box.
Hotkeys. This is a quick access to MPK app.
You can slide left or right to the Conference app on other desktops, or dial out multiple numbers to start a conference on
home screen.
CONNECTING TO NETWORK AND DEVICES
The GAC2500 supports a variety of network connections (Ethernet, Wi-Fi) and device connections, you can configure on
GAC2500 or log in the GAC2500 web UI to configure. For more information about using web UI, please refer to the GAC2500
Administration Guide in www.grandstream.com.
Network
Network connection has a variety of ways, one is wired connection via the cables, and the other way is to connect via Wi-Fi.
Ethernet
If the user would like to use Ethernet connection for network access, please connect the Ethernet cable to the LAN port of the
GAC2500. Ethernet connection is turned on as DHCP by default.
To configure Ethernet settings on GAC2500:
1. Plug the Ethernet cable into the LAN port on the back of the GAC2500.
2. Go to LCD menu🡪Settings🡪Advanced settings 🡪 Wireless & network 🡪 Ethernet 🡪 IPv4 Settings.
3. Tap on “Address Type” to select DHCP, Static IP or PPPoE as the address type.
For DHCP, save the setting and the GAC2500 should be able to get IP address from the DHCP server in the network.
For static IP, enter IP Address, Subnet Mask, Default Gateway, DNS Server and Alternative DNS server for the GAC2500 to
correctly connect to the network.
For PPPoE, enter PPPoE account ID and password so the GAC2500 can get IP address from the PPPoE server.
WI-FI
Turning Wi-Fi On or Off
Wi-Fi is supported and built-in on the GAC2500. On the LCD display, go to Settings🡪Advanced settings🡪Wireless & network
🡪 Wi-Fi to turn on and configure Wi-Fi.
GAC2500 Add Wi-Fi Screen
Search and Add Wi-Fi
Once Wi-Fi is turned on, GAC2500 will automatically start the scanning within the range. A list of Wi-Fi networks will be
displayed as scanning result. Tap on the SSID and enter the correct password information to connect to the selected Wi-Fi
network.
Follow the steps below for static IP usage in Wi-Fi environment:
1. Tap on one Wi-Fi network in the scanned Wi-Fi list to bring up the dialog that shows signal strength, security, password
and option “Show advanced options”.
2. Select “Show advanced options”. The dialog will show additional option “IP settings”.
3. In “IP settings”, select Static IP, enter IP Address, Subnet Mask, and Default Gateway for the GAC2500 to correctly connect
to the network.
Bluetooth
Users could use the Bluetooth to send or receive files to cellphone, or use Bluetooth speaker and etc.
Turning Bluetooth On or Off
There are two ways to enable Bluetooth:
On the LCD display device, go to Settings🡪Network🡪Bluetooth.
Click to enable the Bluetooth in the drop-down status bar.
Pairing GAC2500 with a Bluetooth Device
Before connecting GAC2500 with other Bluetooth device, users must pair them first. They will stay paired afterwards unless
they are manually unpaired. To pair Bluetooth device:
1. On the LCD display device, go to Settings🡪Bluetooth. Switch the “Bluetooth” option.
2. Select “Bluetooth settings”, drag up from LCD bottom and press button on the remote control and select
“Search for devices”.
3. The GAC2500 scans and displays the IDs of all available Bluetooth devices in range. Once the Bluetooth device shows up
in the result, tap on it to start pairing.
4. Confirm the passkey in the prompted message (if any). Or if passcode is required, please refer to the device’s
documentation or other procedures to obtain the passcode.
Connecting to a Bluetooth Device
After successfully paired, the device will be connected to the GAC2500 immediately. Users will see this device listed under
“Paired Devices”. Tap on next to the connected device. Users will see options “Rename”, “Unpair” and etc.
  • Page 1 1
  • Page 2 2
  • Page 3 3
  • Page 4 4
  • Page 5 5
  • Page 6 6
  • Page 7 7
  • Page 8 8
  • Page 9 9
  • Page 10 10
  • Page 11 11
  • Page 12 12
  • Page 13 13
  • Page 14 14
  • Page 15 15
  • Page 16 16
  • Page 17 17
  • Page 18 18
  • Page 19 19
  • Page 20 20
  • Page 21 21
  • Page 22 22
  • Page 23 23
  • Page 24 24
  • Page 25 25
  • Page 26 26
  • Page 27 27
  • Page 28 28
  • Page 29 29
  • Page 30 30
  • Page 31 31
  • Page 32 32
  • Page 33 33
  • Page 34 34
  • Page 35 35
  • Page 36 36
  • Page 37 37
  • Page 38 38
  • Page 39 39
  • Page 40 40
  • Page 41 41
  • Page 42 42
  • Page 43 43
  • Page 44 44
  • Page 45 45
  • Page 46 46
  • Page 47 47
  • Page 48 48
  • Page 49 49
  • Page 50 50
  • Page 51 51
  • Page 52 52
  • Page 53 53
  • Page 54 54
  • Page 55 55
  • Page 56 56
  • Page 57 57
  • Page 58 58
  • Page 59 59
  • Page 60 60
  • Page 61 61
  • Page 62 62
  • Page 63 63
  • Page 64 64
  • Page 65 65
  • Page 66 66
  • Page 67 67
  • Page 68 68
  • Page 69 69
  • Page 70 70
  • Page 71 71
  • Page 72 72
  • Page 73 73
  • Page 74 74
  • Page 75 75
  • Page 76 76
  • Page 77 77
  • Page 78 78
  • Page 79 79
  • Page 80 80
  • Page 81 81
  • Page 82 82
  • Page 83 83
  • Page 84 84
  • Page 85 85
  • Page 86 86
  • Page 87 87
  • Page 88 88
  • Page 89 89
  • Page 90 90

Grandstream GAC2500 User guide

Category
IP phones
Type
User guide

Ask a question and I''ll find the answer in the document

Finding information in a document is now easier with AI