Page is loading ...

Model #
Purchase Date
Serial #
Distributor
Save this guide for future reference.
Read all instructions carefully before proceeding.
F² Drain video
View F² Drain Video - Scan QR
code with a mobile device
INSTALLATION GUIDE
Freestanding Bathtubs
INSTALLER: This booklet must be given to the product owner.
Read all instructions before proceeding. All specifications are ±
3
⁄8’’ and are subject to change without notice. Dimensions listed in inches.

TABLE OF CONTENTS
BEFORE YOU BEGIN 3
TOOLS REQUIRED FOR PROPER INSTALLATION 3
STEP 1: UNPACKING THE UNIT 4
STEP 2: LEVELING LEGS ADJUSTMENT 5
STEP 3: BATHTUB SKIRT AND DRAIN POSITIONING 6
STEP 4: FAUCETS INSTALLATION (NOT INCLUDED) 7
STEP 5: BATHTUB PREPARATION AND INSTALLATION 8
TROUBLESHOOTING AND MAINTENANCE 11
WARRANTY 12

— 3 —
Customer Service (800) 945-2726 • www.aquaticbath.com
Installation Instructions
FREESTANDING BATHTUB
MODELS: W1AX6032FTO, W1AX6636FTO, W2AX6032FTO, W3AX6636FTO, W3AX6042FTO, W4AX6032FTO, W4AX6636FTO,
BEFORE YOU BEGIN
• Carefully read the all the instructions in the manual before beginning the installation.
• Consult local building codes to make sure the installation complies with standards.
• Remove the unit from its packaging. Before disposing of it, inspect the unit to make sure it is in good shape. Should
inspection reveal any damage or defect in the finish, contact your distributor. The warranty does not cover damages or
defects in the finish once the unit has been installed. Aquatic’s responsibility for shipping damages ceases upon delivery
of the product in good order to the carrier. All complaints regarding damage due to transport must be made directly
to the carrier.
• Place the unit in the bathroom before you start working. Sectional units should be disassembled if necessary.
Conserve all nuts and bolts.
• To protect the unit during installation, we recommend that you lay a piece of cardboard on the bottom.
• If the unit is covered with polyethylene protective film, do not remove until installation is complete to grant maximum
protection. However, remove film where two surfaces will be in permanent contact.
• Install all plumbing and drainage before securing the unit. It is always recommended to have a professional plumber
do the plumbing installations. See rough-in information for your model on our website.
If the optional F² Drain kit was purchased, please refer
to the F2 Drain installation guide before installing the bathtub
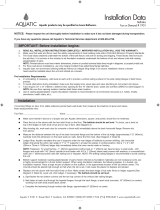
TOOLS REQUIRED FOR PROPER INSTALLATION
A two person installation is recommended.
Electric drill
Level Pencil
Clear silicone sealant
Measuring tape
30" 2 x 4 studs
Utility knife
Safety equipment
Screwdriver
⅛" - drill bit
Box of #8 x 1¾" flathead screws
Wooden shims
Hole saw
Materials (sold separately)

— 4 —
Customer Service (800) 945-2726 • www.aquaticbath.com
Installation Instructions
FREESTANDING BATHTUB
MODELS: W1AX6032FTO, W1AX6636FTO, W2AX6032FTO, W3AX6636FTO, W3AX6042FTO, W4AX6032FTO, W4AX6636FTO,
STEP 1: UNPACKING THE UNIT
Cut the cardboard box so as to keep one side to protect the
bathtub while is upside down. Turn the bathtub upside down.
Unscrew the skirt from the wooden blocks.
Not all bathtubs have screws and wooden blocks
holding the skirt and the bathtub together.
Remove the skirt. Insert a flathead screwdriver
between the wooden blocks and the wood plank
to remove the blocks.
Do NOT remove the wood block
supporting a leg like this (only applicable
to certain models).
Follow all instructions.

— 5 —
Customer Service (800) 945-2726 • www.aquaticbath.com
Installation Instructions
FREESTANDING BATHTUB
MODELS: W1AX6032FTO, W1AX6636FTO, W2AX6032FTO, W3AX6636FTO, W3AX6042FTO, W4AX6032FTO, W4AX6636FTO,
STEP 2: LEVELING LEGS ADJUSTMENT
Place back the skirt in the inverted bathtub. Adjust the legs so that
they exceed the top of the edge of the skirt by
1
⁄8". You can use a
2x4 to take the measure as shown.
Bolt leg installation only applicable to certain models.
2x4
Leg
Skirt
Legs
Skirt
Legs
2x4
Cut View
Skirt
Legs
2x4
Cut View
Skirt
Legs
2x4
Cut View
1
⁄8”
1
⁄8”
1
⁄8”
1
⁄8”

— 6 —
Customer Service (800) 945-2726 • www.aquaticbath.com
Installation Instructions
FREESTANDING BATHTUB
MODELS: W1AX6032FTO, W1AX6636FTO, W2AX6032FTO, W3AX6636FTO, W3AX6042FTO, W4AX6032FTO, W4AX6636FTO,
Floor
Drain position
Desired bathtub position
.
STEP 3: BATHTUB SKIRT AND DRAIN POSITIONING
With the help of the bathtub apron or the optional template, mark
the center of the drainage line in relation with the desired position
of the bathtub. See also the rough-in information for your model on
our website.
Make sure the floor is level.
Before drilling a hole in the floor for the drainpipe,
make sure there are no hidden elements underneath
(pipes, floor joists, heating ducts, electrical wires).
Place the bathtub in the previously marked position. Verify that
the bathtub is completely leveled. Use the leveling legs if needed.
Remove the bathtub.
Drill the cutout on the floor for the drain and overflow in the
previously marked position.
If the user needs faucet on the same side than the
overflow, he must validate that there is no
interference between them.

— 7 —
Customer Service (800) 945-2726 • www.aquaticbath.com
Installation Instructions
FREESTANDING BATHTUB
MODELS: W1AX6032FTO, W1AX6636FTO, W2AX6032FTO, W3AX6636FTO, W3AX6042FTO, W4AX6032FTO, W4AX6636FTO,
STEP 4: INSTALLING FAUCETS (NOT INCLUDED)
Faucet elements must be installed in the intended area. See
also the rough-in information for your model on our website.
Before drilling, position the faucet base to make sure they
line up with the predrilled holes.
Mark the location of the faucets on the unit and drill 3/16"
pilot holes. Make sure the holes line up with the plumbing.
If the user needs faucet on the same side than
the overflow, he must validate that there is no
interference between them.
Drill directly on the finished side, following the faucet
installation instructions.

— 8 —
Customer Service (800) 945-2726 • www.aquaticbath.com
Installation Instructions
FREESTANDING BATHTUB
MODELS: W1AX6032FTO, W1AX6636FTO, W2AX6032FTO, W3AX6636FTO, W3AX6042FTO, W4AX6032FTO, W4AX6636FTO,
Standard drainpipe and overflow compatible
with end-drain freestanding bathtub models:
W2AX6032FTO.
Standard drainpipe and overflow compatible
with center drain freestanding bathtub
model: W1AX6032FTO, W1AX6636FTO,
W4AX6032FTO, W4AX6636FTO.
STEP 5: BATHTUB PREPARATION AND INSTALLATION
Install the waste and overflow and faucets according to the
manufacturer's instruction manuals.
Install the valves and faucets at this stage.
For models W2AX6032FTO, W1AX6032FTO, W1AX6636FTO,
W4AX6032FTO and W4AX6636FTO ONLY:

— 9 —
Customer Service (800) 945-2726 • www.aquaticbath.com
Installation Instructions
FREESTANDING BATHTUB
MODELS: W1AX6032FTO, W1AX6636FTO, W2AX6032FTO, W3AX6636FTO, W3AX6042FTO, W4AX6032FTO, W4AX6636FTO,
Top view
Skirt
Silicone
Apply a bead of silicone under the apron, at about 1” from the exterior edge. (Optional)
Position apron on floor according to marks drawn on the floor.
According to bathroom flooring, use proper screws (not included) to secure the skirt to the floor.
Make sure the skirt is level.
Add two spacers (example 2x4) on the skirt ends and position the bathtub
inside the skirt. Attach the hot and cold water riser to the plumbing hoses.
Faucet must be connected to 1/2" flexible hoses of sufficient length
to allow the bathtub to be lifted if needed (25").

— 10 —
Customer Service (800) 945-2726 • www.aquaticbath.com
Installation Instructions
FREESTANDING BATHTUB
MODELS: W1AX6032FTO, W1AX6636FTO, W2AX6032FTO, W3AX6636FTO, W3AX6042FTO, W4AX6032FTO, W4AX6636FTO,
Remove the spacers. Make sure all the legs are in contact
with the ground, so that the bathtub is not supported by the
skirt (see cut view below).
The bathtub must be tested before installation is complete.
Fill the bathtub to the overflow and inspect for leaks. Tighten
and loose connections between the hoses and motor by
hand.
The bathtub should not be supported by the skirt.
For models W2AX6032FTO, W1AX6032FTO,
W1AX6636FTO, W4AX6032FTO and
W4AX6636FTO ONLY:
To complete the installation and solidify the bathtub, apply
a bead of silicone along the seam where the bathtub rests
against the skirt.
Skirt
Bathtub
Silicone
Cut view
Skirt
Bathtub
Cut View
1
⁄8”

— 11 —
Customer Service (800) 945-2726 • www.aquaticbath.com
Installation Instructions
FREESTANDING BATHTUB
MODELS: W1AX6032FTO, W1AX6636FTO, W2AX6032FTO, W3AX6636FTO, W3AX6042FTO, W4AX6032FTO, W4AX6636FTO,
TROUBLESHOOTING
Water accumulates around the drain and the bathtub does not completely empty.
• Check that the installation is leveled and that the bathtub is well supported by the legs. With the help of level, place at the
bottom of the bathtub, make sure to have a slight slope towards the drain. If necessary, adjust the legs under the bathtub.
Bottom of bathtub moves during use.
• Bathtub is not sitting firmly on its base; adjust leveling legs.
Polyethylene film will not come off.
• Use hair dryer to blow hot air on the surface.
MAINTENANCE
Regular disinfections provide an effective defense against various types of bacteria susceptible of developing in the deposits
that build up over time in all bathtubs and showers.
For daily maintenance cleaning, use a moist cloth and gentle liquid detergent.
Do not use abrasive cleaners, scrapers, metal brushes, or any items or products that could scratch or dull the surface.
Paint stains: Use either turpentine or a paint thinner.
Joint compound: Use a plastic or wood spatula covered with a damp cloth. Do not use a metal blade or a metal brush.
If a rubber mat is used, it must be removed immediately after each use. Ignoring this recommendation will cause damage
not covered by the warranty.
Certain types of therapeutic products when added to bath water, or if applied non-diluted directly in the bath, may damage
the unit finish. Test the product on a small inconspicuous surface prior to use.

AMERCIAN BATH GROUP
ACRYLX™ LIFETIME WARRANTY
1521 No. Cooper, Ste. 500
Arlington, TX 76011
PH: 800-945-2726, 817-801-8300
FAX: 866-544-5353
Customer Service | Technical Services | Warranty Services
LIT-ID-2PBCFS
12.18.18
[American Bath Group] warrants to the original purchaser and consumer that its products will be free from defects in material
or workmanship when properly installed pursuant to [American Bath Group] installation instructions for the following warranty periods:
AcrylX™, Residential* Use: Lifetime Warranty
AcrylX™, Commercial* Use: Thirty (30) Year Warranty
The F2 warranty is only valid if the F2 drain is used with an [American Bath Group] bath. [American Bath Group] warrants F2 drain
bracket to be free from defects in workmanship and materials under normal inside use and service for a period of three (3) years from
the initial date of purchase by the owner/end-user, contractor or builder from an authorized dealer.
Upon inspection by an authorized representative, [American Bath Group] will repair or exchange at its sole discretion, any unit found to
be defective in material or workmanship. The exchange of a unit will only be considered when [American Bath Group] has eliminated all
options to restore the unit to acceptable factory condition. Exchange of a unit is limited to supplying replacement product of comparable
size and style, and does not include any cost of removal or installation.
EXCEPTIONS
This warranty shall be voided if the unit is moved from its place of initial installation or is not installed in accordance with the instructions
supplied by the manufacturer of the unit. [American Bath Group] will not be held responsible for any damages resulting from improper
installation.
Further, this warranty does not apply if the unit has been subjected to accident, abuse, misuse, damage caused by flood, fire, or other
force of nature.
Any unauthorized repair or modification to the product would render the warranty null and void.
This warranty does not apply to any equipment or accessories not installed by [American Bath Group] and [American Bath Group] will
not be held liable for any results of such acts.
[American Bath Group] is not responsible for any consequential or incidental mishaps, inconvenience, time loss, incidental expense,
materials or labor related to the installation of hardware or the actual tub.
The owner agrees by use of the unit that the obligations of [American Bath Group] shall not extend to contingent or indirect damage
or injury to the structure of its contents, that the obligations of [American Bath Group] are limited to those set forth herein, and that no
other obligations, expressed or implied, are assumed by [American Bath Group].
The product is not recommended for outside storage.
To obtain warranty service, the Customer must give prompt notice to [American Bath Group] of any claim.
Within this document [American Bath Group] refers to all divisions/brands and/or entities which are solely owned by American Bath
Group Inc.
*Residential Use is considered any unit installed in a permanent residence dwelling of individual ownership, such as but not limited
to single family home, multi-family home, or condominium. Commercial Use is considered transient lodging, such as but not limited to
healthcare facility, dormitory, hotel, or apartment complex.
/