Page is loading ...

SAVE THIS GUIDE FOR FUTURE REFERENCE.Read all instructions carefully before proceeding.
Serial number
IMPORTANT
• Record the serial number
A two person installation is recommended.
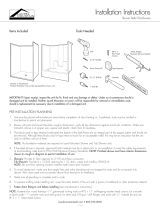
INSTALLATION INSTRUCTIONS
1PIECE FREESTANDING BATHTUB

Table of contents: Page
Before you begin................................................................................................................. 3
Tools and supplies...............................................................................................................4
1. Unpacking the unit...........................................................................................................5
2. Leveling legs adjustment.................................................................................................6
3. Bathtub skirt and drain positioning.................................................................................. 7
4. Faucets installation (not included)...................................................................................8
5. Bathtub preparation and installation............................................................................9-11
Troubleshooting and maintenance......................................................................................12
Warranty.............................................................................................................................. 12

3
BEFORE YOU BEGIN
• Carefully read the all the instructions in the manual before beginning the installation.
• Consult local building codes to make sure the installation complies with standards.
• Remove the unit from its packaging. Before disposing of it, inspect the unit to make sure it is in good
shape. Should inspection reveal any damage or defect in the finish, contact your distributor. The
warranty does not cover damages or defects in the finish once the unit has been installed. Laurel
Mountain’s responsibility for shipping damages ceases upon delivery of the product in good order to
the carrier. All complaints regarding damage due to transport must be made directly to the carrier.
• Place the unit in the bathroom before you start working. Sectional units should be disassembled if
necessary. Conserve all nuts and bolts.
• To protect the unit during installation, we recommend that you lay a piece of cardboard on the bottom.
• If the unit is covered with polyethylene protective film, do not remove until installation is complete to
grant maximum protection. However,
remove film where two surfaces will be in permanent contact.
• Install all plumbing and drainage before securing the unit. It is always recommended to have a
professional plumber do the plumbing installations. See rough-in information for your model on
our website.

4
TOOLS
REQUIRED
Electric drill
Level
Pencil
Clear silicone sealant
Measuring tape
30" 2 x 4 studs
Utility knife
Safety equipment
Screwdriver
⅛
" -drill bit
SUPPLIES
SOLD SEPARATELY
Box of #8x1¾" flathead screws
Wooden shims
50
Hole saw

5
Follow all instructions and check
them off as you go.
1.1
Check me!
1.2
Check me!
1
Cut the cardboard box so as to keep one side to pro
-
tect the bathtub while is upside down. Turn the bathtub
upside down. Unscrew the the skirt from the wooden
blocks.
STEP
Unpacking the unit
Not all bathtubs have screws
and wooden blocks holding the
skirt and the bathtub together.
Remove the skirt.
blocks and the wood plank to remove the blocks.
Insert a flat-head screwdriver between the wooden
Do NOT remove the wood block
supporting a leg like this
(only applicable to certain models).

6
2
STEP
Leveling legs adjustment
2.1
Check me!
Place back the skirt in the inverted bathtub. Adjust the
legs so that they exceed the top of the edge of the
skirt by 1/8". You can use a 2x4 to take the measure
as shown.
2x4
Leg
Patte
Skirt
⅛"
Legs
Skirt
⅛"
Legs
2x4
Cut view
Skirt
⅛"
Legs
2x4
Cut view
Skirt
⅛"
Legs
2x4
Cut view
to certain models.
Bolt leg installation only applicable

7
3
the previously marked position.
Drill the cutout on the floor for the drain and oveflow in
With the help of the bathtub apron or the optional
template, mark the center of the drainage line in relation
with the desired position of the bathtub
.
See also the
rough-in information for your model on our website.
STEP
Bathtub skirt and drain positioning
3.1
Check me!
3.3
Check me!
Floor
Drain position
Desired bathtub position
Before drilling a hole in the floor for
the drainpipe, make sure there are no
hidden elements underneath (pipes, floor
joists, heating ducts, electrical wires).
validate that there is no interference between them.
If the user needs faucet on the same side than the overflow, he must
3.2
Check me!
Place the bathtub in the previously marked position.
Verify that the bathtub is completely leveled. Use the
leveling legs if needed. Remove the bathtub.
Make sure the floor is level.

8
Faucet elements must be installed in the intended area.
See also the rough-in information for your model
on our website.
Before drilling, position the faucet base to make sure
they line up with the predrilled holes.
Mark the location of the faucets on the unit and drill
3/16" (5 mm) pilot holes. Make sure the holes line up
with the plumbing.
4
STEP
Installing faucets (NOT INCLUDED)
4.1
Check me!
Drill directly on the finished side, following the faucet
installation instructions.
4.2
Check me!
validate that there is no interference between them.
If the user needs the faucet on the same side as the overflow,

9
5
STEP
Bathtub preparation and installation
the manufacturer's instruction manuals.
Install the waste, overflow, and faucet according to
5.1
Check me!
Install the valves and faucets at
this stage.
Standard drainpipe and overflow compatible with end-drain freestanding bathtub. Standard drainpipe and overflow compatible with center
drain freestanding bathtub

Top view
10
5
STEP
Bathtub preparation and installation (cont'd)
Add two spacers (example 2x4) on the skirt ends and
position the bathtub inside the skirt. Attach the hot and
cold water riser to the plumbing hoses.
5.3
Check me!
Faucet must be connected to 1/2" flexible
hoses of sufficient length to allow the bathtub
to be lifted if needed (25" or 635mm).
Apply a silicone seal under the apron (optional).
According to bathroom flooring, use proper screws
(not included) to secure the skirt to the floor.
5.2
Check me!
Skirt
Silicone
Make sure the skirt is level.
.

11
5
STEP Bathtub preparation and installation (cont'd)
Remove the spacers. Make sure all the legs are in
contact with the ground, so that the bathtub is not
supported by the skirt (see cut view below).
The bathtub must be tested before installation
inspect for leaks. Tighten and loose connections
between the hoses and motor by hand.
5.4
Check me!
For models Ovilla I and Ovilla II ONLY.
To complete the installation and solidify the bathtub, apply
a bead of silicone along the seam where the bathtub
rests against the skirt.
5.5
Check me!
Skirt
Bathtub
Silicone
Cut view
Skirt
Bathtub
Cut view
⅛"
The bathtub should not be
supported by the skirt.

12
TOUBLESHOOTING
Water accumulates around the drain and the bathtub does not completely empty.
• Check that the installation is leveled and that the bathtub is well supported by the legs. With the help
of level, place at the bottom of the bathtub, make sure to have a slight slope towards the drain. If
necessary, adjust the legs under the bathtub.
Bottom of bathtub moves during use.
• Bathtub is not sitting firmly on its base; adjust leveling legs.
Polyethylene film will not come off.
• Use hair dryer to blow hot air on the surface.
MAINTENANCE
Regular disinfections provide an effective defense against various types of bacteria susceptible of
developing in the deposits that build up over time in all bathtubs and showers.
For daily maintenance cleaning, use a moist cloth and gentle liquid detergent.
Do not use abrasive cleaners, scrapers, metal brushes, or any items or products that could scratch or
dull the surface.
Paint stains: Use either turpentine or a paint thinner.
Joint compound: Use a plastic or wood spatula cov
ered with a damp cloth. Do not use a metal
blade or a metal brush.
If a rubber mat is used, it must be removed immediately after each use. Ignoring this
recommendation will cause damage not covered by the warranty.
Certain types of therapeutic products when added to bath water, or if applied non-diluted directly in the
bath, may damage the unit finish. Test the product on a small inconspicuous surface prior to use.
-
REV:2018-12-04
10025754-LM
www.laurelmountainwhirlpools.com
Laurel Mountain
Customer service: 1-800-930-0050
Laurel Mountain Warranty
This Laurel Mountain bath is warranted to the original purchaser to be free of defects in
material and workmanship and the bathtub shell carries a lifetime limited warranty.
Proof of purchase is required. This warranty is issued to the original purchaser and shall be
effective from the date of purchase as shown on the purchaser’s receipt. Laurel Mountain will
repair or replace (at their choice) any unit which proves to be defective in material or
workmanship under normal use and service, having been properly installed. This warranty is
the only express warranty made by Laurel Mountain and is limited to the duration of this
warranty. Any labor charges and/or damage incurred in installation, repair or replacement as
well as incidental and consequential damages connected therewith are excluded and will not
be paid by Laurel Mountain. Some states do not allow the exclusion or limitation of incidental
or consequential damages, so the above limitation or exclusion may not apply to you.
This warranty is void for any damage to the bath due to abuse, misuse, neglect, accident,
improper installation, any use violating instructions furnished by us, or repair not authorized in
writing by Laurel Mouintain.
/