Page is loading ...

AQT-LK12
ICE & WATER FILTER SYSTEM
MODEL
Please read carefully before proceeding with installation. Failure to follow any attached
instructions or operating parameters may lead to the product’s failure.
INSTALLATION, OPERATION
AND MAINTENANCE MANUAL
www.aquathrift.com
Customer Service
M-F 8AM-5PM PST • 866-218-8473P.O. Box 3303 • Nashua, NH 03061

Service Record . . . . . . . . . . . . . . . . . . . . . . . . . . . . . . . . . . . . . . . . . . . . . . . . . . . . . . . . . . . . . . . . 2
System Overview. . . . . . . . . . . . . . . . . . . . . . . . . . . . . . . . . . . . . . . . . . . . . . . . . . . . . . . . . . . . . . . 3
System Diagram . . . . . . . . . . . . . . . . . . . . . . . . . . . . . . . . . . . . . . . . . . . . . . . . . . . . . . . . . . . . . . . 4
Operating Parameters & System Components. . . . . . . . . . . . . . . . . . . . . . . . . . . . . . . . . . . . . . . . . . . . 5
System Installation . . . . . . . . . . . . . . . . . . . . . . . . . . . . . . . . . . . . . . . . . . . . . . . . . . . . . . . . . . . 6-7
System Maintenance . . . . . . . . . . . . . . . . . . . . . . . . . . . . . . . . . . . . . . . . . . . . . . . . . . . . . . . . . . . . 8
Performance Data Sheet . . . . . . . . . . . . . . . . . . . . . . . . . . . . . . . . . . . . . . . . . . . . . . . . . . . . . . . . . . 9
TABLE OF CONTENTS
SERVICE RECORD
2
AQT-LK12
INSTALLATION, OPERATION
AND MAINTENANCE MANUAL
DATE OF PURCHASE FILTER MODEL AQT-L2 DATE OF INSTALLATION INSTALLED BY
www.aquathrift.com
Customer Service
M-F 8AM-5PM PST • 866-218-8473

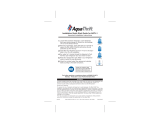
The AquaThrift
®
AQT-LK12
Ice & Water Filter System
Thank you for your purchase of
The AquaThrift AQT-LK12 Ice & Water Filter System.
ADVANCED MULTI-STAGE FILTRATION TECHNOLOGY
This AQT-LK12 Ice & Water Filter System contains a compressed carbon block which provides tremendous capacity to reduce
impurities and sediment that may be present in your drinking water. The carbon block has millions of active sites on its surface
and within the structure which can absorb impurities like a sponge. It adsorbs and holds other types of impurities on its surface
like a magnet. This filter also breaks down other impurities very similar to the way a catalytic converter works in your
automobile. These processes ensure that you are getting the cleanest and best tasting water possible.
This economical filter will provide you with fresh and clean tasting water and ice.
AquaThrift® water filters are proudly manufactured in the USA.
FILTER FEATURES:
• Reduces Chlorine taste and odor, sand, rust, silt, sediment and impurities that may be present in your drinking water.
• Provides your family with great tasting, premium quality drinking water for pennies per gallon.
• Enjoy better-tasting coffee, juices, vegetables, ice cubes, etc.
• Provides 1-Micron Filtration.
• Leaves in Minerals and Fluoride that may be present in your drinking water.
• Includes a permanently mounted head which can be installed vertically or horizontally.
• Built-in bypass valve in the head allows for filter change without shutting off water supply to system.
• Easy DIY quarter turn replacement filter.
• Includes flush valve to activate system, saving significant installation time and money.
• Designed to provide up to 6 months of life or 300 gallons.
• AquaThrift® filters are easy to replace and provide clean, clear, great tasting water for you, your family and your pets.
THE IMPORTANCE OF SYSTEM MAINTENANCE
Keep your ice & water tasting great by replacing your AquaThrift® filter at the recommended intervals stated in this manual.
3
AQT-LK12
INSTALLATION, OPERATION
AND MAINTENANCE MANUAL
www.aquathrift.com
Customer Service
M-F 8AM-5PM PST • 866-218-8473

4
AQT-LK12
INSTALLATION, OPERATION
AND MAINTENANCE MANUAL
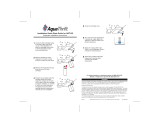
SYSTEM DIAGRAM
INLET
OUTLET
TEE
FLUSH VALVE
(CLOSED POSITION)
HORSE-SHOE CLIP
HEAD
FILTER
COLLET
www.aquathrift.com
Customer Service
M-F 8AM-5PM PST • 866-218-8473

IMPORTANT OPERATING PARAMETERS AND INSTALLATION
Installation must comply with state and local plumbing codes. Do not use with water that is microbiologically unsafe or of
unknown quality without adequate disinfection before or after the system.
• FOR COLD WATER APPLICATIONS ONLY.
• THE TWO HORSESHOE CLIPS MUST BE USED ON TUBING CONNECTIONS OF FLUSH VALVE ONLY – FAILURE TO USE THE TWO
HORSESHOE CLIPS ON TUBING CONNECTIONS OF FLUSH VALVE WILL VOID WARRANTY.
• FITTINGS PROVIDED WITH SYSTEM MUST BE USED.
• IF INSTALLING THE SYSTEM ON AN ICE MAKER ONLY, FLUSH VALVE SUPPLIED MUST BE USED - FAILURE TO USE THE FLUSH
VALVE WILL VOID WARRANTY.
Approximate dimensions of system: 13” H X ” W X 3.5” D. Allow for space around the system for installation of tubing, tee, flush
valve and at least 3” beyond end of replacement filter for ease of change.
SYSTEM COMPONENTS
1 AQT-L2 Filter 1 Tubing 1 Filter Change Calendar
1 AQT-LK12 Head with Bracket 1 Installation Manual
2 Elbow Fittings for Head 1 Tee 1/4”
2 Mounting Screws 1 Flush Valve 1/4” + 2 Horseshoe Clips (For Flush Valve Only)
USING QUICKCONNECT FITTINGS
Fittings provided can be used with copper or plastic tubing.
To Connect
Cut tubing square. If using soft copper tubing, remove burrs and sharp edges.
Ensure outside diameter of tubing is free of score marks. Be careful not to kink tubing.
Insert tubing into QuickConnect fitting. There will be some resistance when tube is initially inserted.
Make sure tubing is inserted all the way into fitting until it meets the tube stop, at least 5/8” (See
diagram). Tube may be gripped but not sealed if not fully inserted.
FOR FLUSH VALVE ONLY:
After insertion gently pull on the tubing so that the collet around the tubing comes just far enough
away from the body of the Flush Valve to be able to slide the horseshoe locking clip between the collet and the
Flush Valve body.
To Disconnect
Remove horseshoe clip if present. Push in the collet against the body of the quick connect
fitting. With the collet held in this position, the tube can be removed. Before re-connecting,
make sure the tube is free of burrs and sharp edges. Ensure outside diameter of tubing is free of
score marks. Trim if needed.
5
AQT-LK12
INSTALLATION, OPERATION
AND MAINTENANCE MANUAL
Operating Temperature Range: 40°-100° F (4.4°-38° C)
Operating Pressure Range: 30-100 psi (207 kPa-690 kPa)
www.aquathrift.com
Customer Service
M-F 8AM-5PM PST • 866-218-8473
Collet
Push in collet
Remove pipe

SYSTEM INSTALLATION
System can be mounted vertically (preferred) or horizontally.
REFER OFTEN TO SYSTEM DIAGRAMS/PICTURES. BE CAREFUL NOT TO KINK TUBING.
Tools required (Not included): Phillips Screwdriver; Utility Knife; Permanent Marker; Tape Measure; Safety Glasses.
CONNECTING ELBOW FITTINGS TO HEAD
1. Turn OFF ice maker by following instructions of your refrigerator.
2. Shut OFF cold water supply pipe.
3. Remove the AQT-L2 filter from the head by turning it to the left (counter-clockwise), 1/4 turn.
4. Push an elbow fitting onto the Inlet (lower) tube sticking out from the head. There will be some resistance when fitting
is initially pushed on. Make sure Inlet tube inserts all the way into fitting until it meets the tube stop, at least 5/8”
(See Connecting Elbow Fittings to Head diagrams). Tube may be gripped but not sealed if not fully inserted.
5. Repeat step 4 with the Outlet (upper) tube sticking out from the head. Once the elbow fittings are installed onto head,
rotate fittings only as needed, keeping rotation of fittings to a bare minimum.
NOTE: To determine the mounting location of the system and tubing connections to the Tee, note the direction of the
tubing from the cold water supply, the tubing from the ice maker and the drain or bucket the system will flush to.
Approximate total area needed is 17.5” H x 8” W x 3.5” D.
6. Using the bracket as template, mark and then mount system head in desired location using two self-tapping screws.
Leave enough area around head to attach tubing, Tee and Flush Valve and at least 13” of space under the head for easy
filter replacement.
6
AQT-LK12
INSTALLATION, OPERATION
AND MAINTENANCE MANUAL
CONNECTION SIZE LOCATION ON HEAD DESCRIPTION
Inlet 1/4” QC Lower Cold Water source (30PSI minimum)
Outlet 1/4” QC Upper Filtered water
IMPORTANT. DO NOT insert filter until instructed to do so.
7. Firmly hold the Inlet (lower) elbow fitting of the head and connect tubing from the cold water supply pipe to the
fitting (See QuickConnect Fittings instructions on page 5).
8. Cut a 4” piece from the tubing supplied and, while firmly holding the Outlet (upper) elbow fitting of the head, connect
one end of the tubing to the fitting (See QuickConnect Fittings instructions on page 5).
9. Connect the other end of the 4” piece of tubing coming from the Outlet fitting to the Tee (See QuickConnect Fittings
instructions on page 5).
10. Firmly hold the Tee and connect tubing from the ice maker or other water dispenser to the Tee (See QuickConnect
Fittings instructions on page 5).
11. Cut a another 4” piece from the tubing supplied and, while firmly holding the Tee, connect the tubing to the Tee (See
QuickConnect Fittings instructions on page 5).
12. Connect Flush Valve to the 4” piece of tubing coming from the Tee (See QuickConnect Fittings instructions AND instruc-
tion concerning horseshoe clips for Flush Valve.)
13. Firmly hold the Flush Valve and connect the remainder of the tubing supplied to the other end of the Flush Valve (See
QuickConnect Fittings instructions AND instruction concerning horseshoe clips for Flush Valve.)
14. Close Flush Valve by turning the lever clockwise. (Diagram shows Flush Valve in Closed position.)
IMPORTANT. DO NOT insert filter yet. Water must be supplied to the head and the entire installation checked before
inserting filter. Built in bypass valve in the head shuts off water to the filter when filter is removed.
IMPORTANT: Tubing Brackets (Not Included) must support all the weight of the tubing, with additional brackets/support
for the tee and flush valve.
15. Turn ON cold water supply pipe. Leave ice maker turned OFF. Inspect entire system head and tubing connections for
leaks.
16. Insert filter into head and turn it to the right (clockwise), 1/4 turn until it is fully seated.
17. Slowly open the Flush Valve on the Outlet of system by slowly turning the lever counter-clockwise and slowly run water
into a bucket or drain for 5 minutes at .5 gpm (about 2.5 gallons) to clear the system. Close Flush Valve by turning the
lever clockwise. Check for leaks at all fittings and connections.
18. Turn ice maker ON. System is ready to use. Check for leaks within the next 24 hrs.
Note: The first few batches of ice may contain some carbon fines. If the system was properly flushed, this should be minimal.
Please discard the ice. If you are also filtering water to a water dispenser or filtered-water faucet, the water may appear cloudy
for 1-3 days as the filter is purged of air. You can check to make sure it is only air bubbles causing the cloudiness by filling a
large glass with water and letting it stand. The bubbles will rise and the water will become clear. The water is fine to drink. If
the cloudiness persists, please contact Customer Service at: 1-866-218-8473.
TOO MUCH SPACE
TOO MUCH SPACE
INCORRECT CORRECT
FULLY ON
ELBOW
FITTINGS
www.aquathrift.com
Customer Service
M-F 8AM-5PM PST • 866-218-8473

SYSTEM INSTALLATION
System can be mounted vertically (preferred) or horizontally.
REFER OFTEN TO SYSTEM DIAGRAMS/PICTURES. BE CAREFUL NOT TO KINK TUBING.
Tools required (Not included): Phillips Screwdriver; Utility Knife; Permanent Marker; Tape Measure; Safety Glasses.
CONNECTING ELBOW FITTINGS TO HEAD
1. Turn OFF ice maker by following instructions of your refrigerator.
2. Shut OFF cold water supply pipe.
3. Remove the AQT-L2 filter from the head by turning it to the left (counter-clockwise), 1/4 turn.
4. Push an elbow fitting onto the Inlet (lower) tube sticking out from the head. There will be some resistance when fitting
is initially pushed on. Make sure Inlet tube inserts all the way into fitting until it meets the tube stop, at least 5/8”
(See Connecting Elbow Fittings to Head diagrams). Tube may be gripped but not sealed if not fully inserted.
5. Repeat step 4 with the Outlet (upper) tube sticking out from the head. Once the elbow fittings are installed onto head,
rotate fittings only as needed, keeping rotation of fittings to a bare minimum.
NOTE: To determine the mounting location of the system and tubing connections to the Tee, note the direction of the
tubing from the cold water supply, the tubing from the ice maker and the drain or bucket the system will flush to.
Approximate total area needed is 17.5” H x 8” W x 3.5” D.
6. Using the bracket as template, mark and then mount system head in desired location using two self-tapping screws.
Leave enough area around head to attach tubing, Tee and Flush Valve and at least 13” of space under the head for easy
filter replacement.
IMPORTANT. DO NOT insert filter until instructed to do so.
7. Firmly hold the Inlet (lower) elbow fitting of the head and connect tubing from the cold water supply pipe to the
fitting (See QuickConnect Fittings instructions on page 5).
8. Cut a 4” piece from the tubing supplied and, while firmly holding the Outlet (upper) elbow fitting of the head, connect
one end of the tubing to the fitting (See QuickConnect Fittings instructions on page 5).
9. Connect the other end of the 4” piece of tubing coming from the Outlet fitting to the Tee (See QuickConnect Fittings
instructions on page 5).
10. Firmly hold the Tee and connect tubing from the ice maker or other water dispenser to the Tee (See QuickConnect
Fittings instructions on page 5).
11. Cut a another 4” piece from the tubing supplied and, while firmly holding the Tee, connect the tubing to the Tee (See
QuickConnect Fittings instructions on page 5).
12. Connect Flush Valve to the 4” piece of tubing coming from the Tee (See QuickConnect Fittings instructions AND instruc-
tion concerning horseshoe clips for Flush Valve.)
13. Firmly hold the Flush Valve and connect the remainder of the tubing supplied to the other end of the Flush Valve (See
QuickConnect Fittings instructions AND instruction concerning horseshoe clips for Flush Valve.)
14. Close Flush Valve by turning the lever clockwise. (Diagram shows Flush Valve in Closed position.)
IMPORTANT. DO NOT insert filter yet. Water must be supplied to the head and the entire installation checked before
inserting filter. Built in bypass valve in the head shuts off water to the filter when filter is removed.
IMPORTANT: Tubing Brackets (Not Included) must support all the weight of the tubing, with additional brackets/support
for the tee and flush valve.
15. Turn ON cold water supply pipe. Leave ice maker turned OFF. Inspect entire system head and tubing connections for
leaks.
16. Insert filter into head and turn it to the right (clockwise), 1/4 turn until it is fully seated.
17. Slowly open the Flush Valve on the Outlet of system by slowly turning the lever counter-clockwise and slowly run water
into a bucket or drain for 5 minutes at .5 gpm (about 2.5 gallons) to clear the system. Close Flush Valve by turning the
lever clockwise. Check for leaks at all fittings and connections.
18. Turn ice maker ON. System is ready to use. Check for leaks within the next 24 hrs.
Note: The first few batches of ice may contain some carbon fines. If the system was properly flushed, this should be minimal.
Please discard the ice. If you are also filtering water to a water dispenser or filtered-water faucet, the water may appear cloudy
for 1-3 days as the filter is purged of air. You can check to make sure it is only air bubbles causing the cloudiness by filling a
large glass with water and letting it stand. The bubbles will rise and the water will become clear. The water is fine to drink. If
the cloudiness persists, please contact Customer Service at: 1-866-218-8473.
7
AQT-LK12
INSTALLATION, OPERATION
AND MAINTENANCE MANUAL
www.aquathrift.com
Customer Service
M-F 8AM-5PM PST • 866-218-8473

SYSTEM MAINTENANCE
AQT-LK12
For best performance, The AquaThrift Filter must be replaced every 6 months or 300 gallons.
Built-in bypass valve in the head allows for filter change without shutting off water supply to system.
1. Turn OFF ice maker by following instructions of your refrigerator.
2. Remove the filter cartridge by turning it to the left (counter-clockwise), 1/4 turn.
3. Insert new filter into head and turn it to the right (clockwise), 1/4 turn until it is fully seated.
4. Slowly open the Flush Valve on the Outlet of the system by slowly turning the lever counter-clockwise and slowly run
water into a bucket or drain for 5 minutes at .5 gpm (about 2.5 gallons) to clear the system. Close Flush Valve by
turning the lever clockwise.
5. Turn ON ice maker by following instructions of your refrigerator. System is ready to use.
Note: The first few batches of ice may contain some carbon fines. If the system was properly flushed, this should be
minimal. Please discard the ice. If you are also filtering water to a water dispenser or filtered-water faucet, the water
may appear cloudy for 1 – 3 days as the filter is purged of air. You can check to make sure it is only air bubbles causing
the cloudiness by filling a large glass with water and letting it stand. The bubbles will rise and the water will become
clear. The water is fine to drink. If the cloudiness persists, please contact Customer Service at: 1-866-218-8473.
8
AQT-LK12
INSTALLATION, OPERATION
AND MAINTENANCE MANUAL
www.aquathrift.com
Customer Service
M-F 8AM-5PM PST • 866-218-8473

PERFORMANCE DATA SHEET
AQT-LK12
NOTE: System to be used with municipal or well water sources treated and tested on a regular basis to ensure bacteriological safe
quality. DO NOT use with water that is microbiologically unsafe or of unknown quality without adequate disinfection before or
after the system. It is essential that the manufacturer's recommended installation, maintenance and filter replacement require-
ments be carried out for the product to perform as advertised. 90 day warranty on AQT-LK12 system.
9
AQT-LK12
INSTALLATION, OPERATION
AND MAINTENANCE MANUAL
Maximum Flow Rate: 0.5 GPM (1.89 lpm)
Operating Temperature Range: 40°-100° F (4.4°-38° C)
Operating Pressure Range: 30-100 psi (207 kPa-690 kPa)
Rated Capacity: 6 Months or 300 Gallons
Micron Rating: 1-Micron
RECOMMENDED REPLACEMENT PARTS AND CHANGE INTERVAL:
NOTE: Depending on incoming feed water conditions replacement time may vary.
v3 © 2017 RAM ASSOCIATES LLC. RMAJR. All Rights Reserved.
AquaThrift
®
RAM Associates, LLC
PO BOX 3303
Nashua, NH 03061
DESCRIPTION PART NUMBER CHANGE TIME FRAME
Filter Cartridge AQT-L2 6 Months or 300 Gallons
www.aquathrift.com
Customer Service
M-F 8AM-5PM PST • 866-218-8473
/